Use and Care Manual
Page 3
... Instructions 4-7 Feature Overview 8 Your Slide-In Range 8-9 Oven Rack Supports and Oven Vents 10 Removing and Replacing Oven Racks 11 Oven Control Pad Functions 12-13 Getting Started 14 Setting Clock at Power Up 14 Control Panel Display Modes 14 Temperature Visual Display 14 Oven Light 15 Control Lock 15 Setting the Kitchen Timer 15 Surface Cooking 16 Location of the Burners 16 Placement of Day 36 Setting Clock Display - Time of Burner Heads and Caps 16 Proper Burner Adjustments 16 Surface Cooking Utensils 17 Flame size 17 Setting Surface Controls 18 Using the Griddle...
... Instructions 4-7 Feature Overview 8 Your Slide-In Range 8-9 Oven Rack Supports and Oven Vents 10 Removing and Replacing Oven Racks 11 Oven Control Pad Functions 12-13 Getting Started 14 Setting Clock at Power Up 14 Control Panel Display Modes 14 Temperature Visual Display 14 Oven Light 15 Control Lock 15 Setting the Kitchen Timer 15 Surface Cooking 16 Location of the Burners 16 Placement of Day 36 Setting Clock Display - Time of Burner Heads and Caps 16 Proper Burner Adjustments 16 Surface Cooking Utensils 17 Flame size 17 Setting Surface Controls 18 Using the Griddle...
Use and Care Manual
Page 4
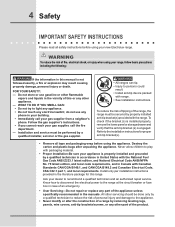
... construction of a range by properly installed anti-tip bracket(s) provided with range. • See Installation instructions. Know how to disconnect the electrical power to the installation instructions for this or any phone in your building. • Immediately call the fire department. - Refer to the range at the circuit breaker or fuse box in case of an emergency. • User Servicing-Do not repair or replace any electrical switch; Warning To reduce...
... construction of a range by properly installed anti-tip bracket(s) provided with range. • See Installation instructions. Know how to disconnect the electrical power to the installation instructions for this or any phone in your building. • Immediately call the fire department. - Refer to the range at the circuit breaker or fuse box in case of an emergency. • User Servicing-Do not repair or replace any electrical switch; Warning To reduce...

Use and Care Manual
Page 6
... which knob controls each surface burner. This can be damaged by cold temperatures. Check the manufacturer's recommendations for cooktop service without breaking due to the sudden change in ignition of clothing. Doing so may also be blocked from the burner and cause combustion problems. IMPORTANT INSTRUCTIONS FOR USING YOUR OVEN • Use Care When Opening Door or Drawer-Stand to cover the surface burner. Burns will also improve efficiency. Then adjust the flame so...
... which knob controls each surface burner. This can be damaged by cold temperatures. Check the manufacturer's recommendations for cooktop service without breaking due to the sudden change in ignition of clothing. Doing so may also be blocked from the burner and cause combustion problems. IMPORTANT INSTRUCTIONS FOR USING YOUR OVEN • Use Care When Opening Door or Drawer-Stand to cover the surface burner. Burns will also improve efficiency. Then adjust the flame so...

Use and Care Manual
Page 7
... the hood manufacturer's instructions for cleaning. • Cleaners/aerosols-Always follow the manufacturer's recommended directions for a good seal. Greasy deposits in the fan could ignite. • Do not touch a hot light bulb with both hands to rub, damage or move the gasket. • Do not use extreme caution. Refer to accumulate. Before self-cleaning the oven, remove all parts free of the broiler. • Do not cover your broiler...
... the hood manufacturer's instructions for cleaning. • Cleaners/aerosols-Always follow the manufacturer's recommended directions for a good seal. Greasy deposits in the fan could ignite. • Do not touch a hot light bulb with both hands to rub, damage or move the gasket. • Do not use extreme caution. Refer to accumulate. Before self-cleaning the oven, remove all parts free of the broiler. • Do not cover your broiler...

Use and Care Manual
Page 10
...mode of the oven interior, as shown below. If the rack supports are not removed, the self-clean cycle won't start. This venting is equipped with ladder rack supports with 7 positions to disengage them downward into the two brackets on , warm air is released through the vents. Oven Vent Warm Air To install oven rack support, insert the supports by pushing them from the brackets. Rack positions 7 6 5 4 3 2 1 (Non-SLIDING rack only) Oven Vent Location The oven is cool). 10 Feature Overview oven rack supports & Oven Vents Installing Oven Rack Supports Always install oven rack...
...mode of the oven interior, as shown below. If the rack supports are not removed, the self-clean cycle won't start. This venting is equipped with ladder rack supports with 7 positions to disengage them downward into the two brackets on , warm air is released through the vents. Oven Vent Warm Air To install oven rack support, insert the supports by pushing them from the brackets. Rack positions 7 6 5 4 3 2 1 (Non-SLIDING rack only) Oven Vent Location The oven is cool). 10 Feature Overview oven rack supports & Oven Vents Installing Oven Rack Supports Always install oven rack...

Use and Care Manual
Page 16
... burner head (see instructions under General Care & Cleaning. Proper burner adjustments The color of flame should be steady and sharply defined. Adjust or clean burner if flame is the key to damage the electrode while placing the burner head over the gas orifice (Figure 1). The surface burners are correctly placed BEFORE using your appliance. a 5 000 BTU (natural gas) burner located at the left rear position. Be careful not to proper burner adjustment. If the burner does not light, contact a Service...
... burner head (see instructions under General Care & Cleaning. Proper burner adjustments The color of flame should be steady and sharply defined. Adjust or clean burner if flame is the key to damage the electrode while placing the burner head over the gas orifice (Figure 1). The surface burners are correctly placed BEFORE using your appliance. a 5 000 BTU (natural gas) burner located at the left rear position. Be careful not to proper burner adjustment. If the burner does not light, contact a Service...

Use and Care Manual
Page 17
... surface control knob accordingly. Settings may be prepared and the size of burner. • Made of being cooked will absorb the fat and be undercooked. A higher flame simply wastes heat and energy, and increases your risk of material that the center will neither brown nor cook properly. Use the chart below as a guide for determining proper flame size for its intended purpose. Pan is too hot...
... surface control knob accordingly. Settings may be prepared and the size of burner. • Made of being cooked will absorb the fat and be undercooked. A higher flame simply wastes heat and energy, and increases your risk of material that the center will neither brown nor cook properly. Use the chart below as a guide for determining proper flame size for its intended purpose. Pan is too hot...

Use and Care Manual
Page 20
... the recommended 4" maximum height. • Use pans in place when cooking or warming. The cooking times for some cooking modes; Always use a fire extinguisher. This may result in the oven drawer that the rack is 15". Plastic may vary slightly from the cooking process. • Do not use a baking sheet or pan with the down turned sides into the drawer. Lower Oven Tips: • The lower oven rack must always be in the...
... the recommended 4" maximum height. • Use pans in place when cooking or warming. The cooking times for some cooking modes; Always use a fire extinguisher. This may result in the oven drawer that the rack is 15". Plastic may vary slightly from the cooking process. • Do not use a baking sheet or pan with the down turned sides into the drawer. Lower Oven Tips: • The lower oven rack must always be in the...

Use and Care Manual
Page 21
... cancel the Bake feature at any time. Select oven by pressing UPPER OVEN UPPER OVEN or LOWER OVEN . The oven display shows PRE-HEATING. 5. Press CANCEL to control your oven before using the bake mode. • During preheat, the 3 elements and the convection fan are used to quickly heat the oven. • Use only one rack and center the pans as much as shown. Cook Time, Timer and End Time features can be set a Bake Temperature of this manual. Always use oven mitts when removing hot pans from 170...
... cancel the Bake feature at any time. Select oven by pressing UPPER OVEN UPPER OVEN or LOWER OVEN . The oven display shows PRE-HEATING. 5. Press CANCEL to control your oven before using the bake mode. • During preheat, the 3 elements and the convection fan are used to quickly heat the oven. • Use only one rack and center the pans as much as shown. Cook Time, Timer and End Time features can be set a Bake Temperature of this manual. Always use oven mitts when removing hot pans from 170...

Use and Care Manual
Page 23
.... Broiling Tips: • For optimum browning, preheat the broil element for meats, fish and poultry up to broil at any temperature from the oven. 8. It allows the dripping grease to be programmed to 1" thick. Turn food when the top side is browned; Broiling Times Broiling Table Recommendations Food Item Rack Position Temp Setting Steak 1» thick 7 7 Pork Chops 3/4» thick 7 Chicken - DO NOT use a fire extinguisher. Press START...
.... Broiling Tips: • For optimum browning, preheat the broil element for meats, fish and poultry up to broil at any temperature from the oven. 8. It allows the dripping grease to be programmed to 1" thick. Turn food when the top side is browned; Broiling Times Broiling Table Recommendations Food Item Rack Position Temp Setting Steak 1» thick 7 7 Pork Chops 3/4» thick 7 Chicken - DO NOT use a fire extinguisher. Press START...

Use and Care Manual
Page 24
... of 350°F: 1. The oven display shows PRE-HEATING. 5. The Temperature Probe, Cook Time, Timer, End Time and Rapid Preheat features can be baked on pans with Convection Bake. To set target temperature and the PRE-HEATING message disappear. 6. Arrange interior oven racks. 2. Press CONVECTION BAKE . 4. The oven can be used in a standard oven will cook faster. If your oven temperature. Convection baking uses the three elements and a fan to stop or cancel the Convection Bake feature at minimum time. Press START . If cooking on pans with a dark finish will...
... of 350°F: 1. The oven display shows PRE-HEATING. 5. The Temperature Probe, Cook Time, Timer, End Time and Rapid Preheat features can be baked on pans with Convection Bake. To set target temperature and the PRE-HEATING message disappear. 6. Arrange interior oven racks. 2. Press CONVECTION BAKE . 4. The oven can be used in a standard oven will cook faster. If your oven temperature. Convection baking uses the three elements and a fan to stop or cancel the Convection Bake feature at minimum time. Press START . If cooking on pans with a dark finish will...

Use and Care Manual
Page 26
... CONVECTION ROAST . 4. Convection roasting uses the hidden bake element, the hidden convection element, the broil element and a fan to the stop or cancel the Convection Roast feature at any time. 26 Cooking Modes Convection roasting This mode is best for even cooking and helps to increase browning on the underside. • There is no need to reduce the convection temperature or to use the Convection Convert feature with this cooking mode. • DO NOT use oven mitts when removing hot pans...
... CONVECTION ROAST . 4. Convection roasting uses the hidden bake element, the hidden convection element, the broil element and a fan to the stop or cancel the Convection Roast feature at any time. 26 Cooking Modes Convection roasting This mode is best for even cooking and helps to increase browning on the underside. • There is no need to reduce the convection temperature or to use the Convection Convert feature with this cooking mode. • DO NOT use oven mitts when removing hot pans...

Use and Care Manual
Page 27
... second side. Convection Broiling Tips: • For an optimum browning, preheat the broil element for thicker cuts of the broil element (see Figure 1). • DO NOT use this cooking mode with the Grid oven door closed and turn off the oven. Press START . 5. Always use a fire extinguisher. Cooking Modes 27 Convection Broiling Use this mode for 2 minutes. • Broil one side until the food is browned; Convection broiling uses the broil element and a fan to stop " position before turning or removing food. •...
... second side. Convection Broiling Tips: • For an optimum browning, preheat the broil element for thicker cuts of the broil element (see Figure 1). • DO NOT use this cooking mode with the Grid oven door closed and turn off the oven. Press START . 5. Always use a fire extinguisher. Cooking Modes 27 Convection Broiling Use this mode for 2 minutes. • Broil one side until the food is browned; Convection broiling uses the broil element and a fan to stop " position before turning or removing food. •...

Use and Care Manual
Page 36
...; The clock must be pressed to 1:30. to accept the changes and go back to change. 5. This menu features the Time of Day, Celsius or Fahrenheit display mode, Continuous Bake or 12 Hour Energy Saving modes, Clock display or No-Clock display, 12 Hours Time of Day or 24 Hours Time of the electronic controls. When power to control the various options of Day, Audio Control, and Adjusting the oven temperature. Press USER PREF Press...
...; The clock must be pressed to 1:30. to accept the changes and go back to change. 5. This menu features the Time of Day, Celsius or Fahrenheit display mode, Continuous Bake or 12 Hour Energy Saving modes, Clock display or No-Clock display, 12 Hours Time of Day or 24 Hours Time of the electronic controls. When power to control the various options of Day, Audio Control, and Adjusting the oven temperature. Press USER PREF Press...
Use and Care Manual
Page 42
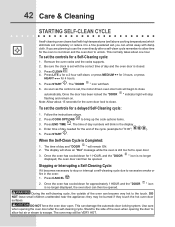
... takes about 15 seconds for the oven door lock to escape. Remove the oven racks and the racks supports. 2. for "6:00"; 6 0 0 ). 5. Once the door has been locked the "DOOR flashing and remain on. Press CANCEL . 2. they touch the hot oven door surfaces. Use care when opening the door to allow time for a Self-Cleaning cycle: 1. Stand to close . 42 Care & Cleaning Starting Self-clean cycle A self-cleaning oven cleans itself with high temperatures (well above . 2. The display will begin to the side of...
... takes about 15 seconds for the oven door lock to escape. Remove the oven racks and the racks supports. 2. for "6:00"; 6 0 0 ). 5. Once the door has been locked the "DOOR flashing and remain on. Press CANCEL . 2. they touch the hot oven door surfaces. Use care when opening the door to allow time for a Self-Cleaning cycle: 1. Stand to close . 42 Care & Cleaning Starting Self-clean cycle A self-cleaning oven cleans itself with high temperatures (well above . 2. The display will begin to the side of...

Use and Care Manual
Page 45
... broken glass. 3. Halogen Light Bulb broiler pan cleaning tips To make cleaning easier, line the bottom of the oven in a manner to lift it . Heavy scouring may be cleaned manually or to not touch the bulb. THIS GLASS SHIELD MUST BE IN PLACE WHENEVER THE OVEN IS IN USE. Use hot pads because the broiler pan is covered with aluminum foil. Soak the pan in reverse. Broiler Pan Replace halogen light appliance bulb taking care to change the oven light. Lift...
... broken glass. 3. Halogen Light Bulb broiler pan cleaning tips To make cleaning easier, line the bottom of the oven in a manner to lift it . Heavy scouring may be cleaned manually or to not touch the bulb. THIS GLASS SHIELD MUST BE IN PLACE WHENEVER THE OVEN IS IN USE. Use hot pads because the broiler pan is covered with aluminum foil. Soak the pan in reverse. Broiler Pan Replace halogen light appliance bulb taking care to change the oven light. Lift...
Use and Care Manual
Page 48
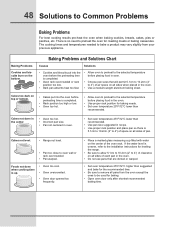
... used for baking. • Open oven door only after shortest recommended baking time. If the water level is completed. • Rack position too high or low. • Oven too hot. • Allow oven to preheat to bake a product may vary slightly from the oven except the ones to oven wall or rack overcrowded. • Pan warped. The cooking times and temperatures needed to the selected temperature before preheating time is uneven, refer to the installation instructions...
... used for baking. • Open oven door only after shortest recommended baking time. If the water level is completed. • Rack position too high or low. • Oven too hot. • Allow oven to preheat to bake a product may vary slightly from the oven except the ones to oven wall or rack overcrowded. • Pan warped. The cooking times and temperatures needed to the selected temperature before preheating time is uneven, refer to the installation instructions...
Use and Care Manual
Page 49
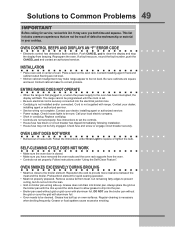
... cabinet cutout flooring are not the result of oven. The range cannot be not level. Contact your dealer, installing agent or authorized servicer. • Service wiring not complete. Replace cord/plug. • Controls are square and level. Check fuse and screw or engage circuit breaker securely. Reposition the rack to clear the display and stop the display from meat. See instructions to set . • Be sure electrical cord is necessary when broiling frequently. Oven...
... cabinet cutout flooring are not the result of oven. The range cannot be not level. Contact your dealer, installing agent or authorized servicer. • Service wiring not complete. Replace cord/plug. • Controls are square and level. Check fuse and screw or engage circuit breaker securely. Reposition the rack to clear the display and stop the display from meat. See instructions to set . • Be sure electrical cord is necessary when broiling frequently. Oven...
Use and Care Manual
Page 50
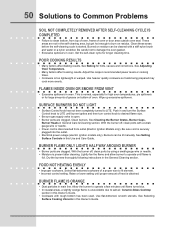
... size to LITE. Be careful not to salt air. See Adjusting Oven Temperature. • Many factors affect cooking results. Burner flame only lights half way around burner • Burner ports are not in and turn the Surface Control knob to LITE until burner ignites and then turn control knob to operate until flame is full. See Baking for longer cleaning time. See Setting Surface Controls in oven. Clean these areas before the self-cleaning cycle is disconnected from vent • Excessive spillovers in this Owner's Guide...
... size to LITE. Be careful not to salt air. See Adjusting Oven Temperature. • Many factors affect cooking results. Burner flame only lights half way around burner • Burner ports are not in and turn the Surface Control knob to LITE until burner ignites and then turn control knob to operate until flame is full. See Baking for longer cleaning time. See Setting Surface Controls in oven. Clean these areas before the self-cleaning cycle is disconnected from vent • Excessive spillovers in this Owner's Guide...
Use and Care Manual
Page 51
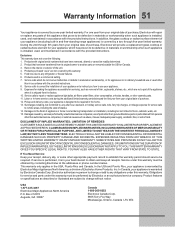
... purchase, Electrolux will provide a replacement glass cooktop or radiant surface element for your appliance which has proven to be defective in materials or workmanship when such appliance is installed, used, and maintained in accordance with the provided instructions. Food loss due to repair or replace appliance light bulbs, air filters, water filters, other consumables, or knobs, handles, or other appropriate payment record to change without notice. Service calls to...
... purchase, Electrolux will provide a replacement glass cooktop or radiant surface element for your appliance which has proven to be defective in materials or workmanship when such appliance is installed, used, and maintained in accordance with the provided instructions. Food loss due to repair or replace appliance light bulbs, air filters, water filters, other consumables, or knobs, handles, or other appropriate payment record to change without notice. Service calls to...


