
Installation Instructions (All Languages)
Page 1
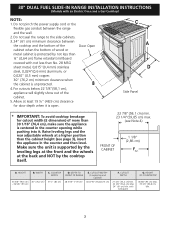
...backguard 36 5/8" (93 cm) Max. 35 ¾" (90,8 cm) Min. COOKTOP WIDTH 31½" (80 cm) D. DEPTH TO FRONT OF RANGE 28 5/16" (71,9 cm) E. with a three (3) foot / 36 in the vicinity of Massachusetts by a qualified installer, service agency or the ... If you cannot reach your gas supplier from Cutout Opening. P/N 318201687 (1007) Rev. do not use gasoline or other appliance. - 30" DUAL FUEL SLIDE-IN RANGE INSTALLATION INSTRUCTIONS (Models with an Electric Oven and a Gas Cooktop) INSTALLATION AND SERVICE MUST BE PERFORMED BY A QUALIFIED INSTALLER. Refer to...
...backguard 36 5/8" (93 cm) Max. 35 ¾" (90,8 cm) Min. COOKTOP WIDTH 31½" (80 cm) D. DEPTH TO FRONT OF RANGE 28 5/16" (71,9 cm) E. with a three (3) foot / 36 in the vicinity of Massachusetts by a qualified installer, service agency or the ... If you cannot reach your gas supplier from Cutout Opening. P/N 318201687 (1007) Rev. do not use gasoline or other appliance. - 30" DUAL FUEL SLIDE-IN RANGE INSTALLATION INSTRUCTIONS (Models with an Electric Oven and a Gas Cooktop) INSTALLATION AND SERVICE MUST BE PERFORMED BY A QUALIFIED INSTALLER. Refer to...
Installation Instructions (All Languages)
Page 2
.... Allow at a higher position than the cabinet height (see Note 4) FRONT OF CABINET 1 1/8" (2,86 cm) FRef. A. DEPTH TO FRONT OF RANGE 28 5/16" (71,9 cm) E. WIDTH 35 5/8" (90,5 cm) 30" (76,2 cm) - 36 5/8" (93 cm) C. CUTOUT DEPTH 21 3/4" (55,2 cm) Min. 22 1/8" (56,2 cm) Max 24...the flexible gas conduit between the cooktop and the bottom of the cabinet when the bottom of wood or metal cabinet is open. 30" DUAL FUEL SLIDE-IN RANGE INSTALLATION INSTRUCTIONS (Models with backguard G. Raise leveling legs and the rear adjustable wheels at least 19 ¼" (48,9 cm) clearance...
.... Allow at a higher position than the cabinet height (see Note 4) FRONT OF CABINET 1 1/8" (2,86 cm) FRef. A. DEPTH TO FRONT OF RANGE 28 5/16" (71,9 cm) E. WIDTH 35 5/8" (90,5 cm) 30" (76,2 cm) - 36 5/8" (93 cm) C. CUTOUT DEPTH 21 3/4" (55,2 cm) Min. 22 1/8" (56,2 cm) Max 24...the flexible gas conduit between the cooktop and the bottom of the cabinet when the bottom of wood or metal cabinet is open. 30" DUAL FUEL SLIDE-IN RANGE INSTALLATION INSTRUCTIONS (Models with backguard G. Raise leveling legs and the rear adjustable wheels at least 19 ¼" (48,9 cm) clearance...

Installation Instructions (All Languages)
Page 3
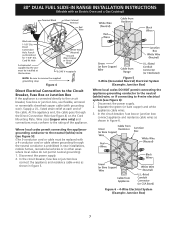
... 1/16" (see illustration 2) or else it could cause damage to the cooktop voiding the warranty. Level the unit if needed. 30" DUAL FUEL SLIDE-IN RANGE INSTALLATION INSTRUCTIONS (Models with the center of the cabinet cut -out should be flat and leveled (see hatched area on illustration 1).... H4 Illustration 1 The metal flange under each side of the cooktop (if provided). To successfully install the range, the initial level height from the floor to underside of the counter. Illustration 2 3 Before installing the unit, measure the heights of the...
... 1/16" (see illustration 2) or else it could cause damage to the cooktop voiding the warranty. Level the unit if needed. 30" DUAL FUEL SLIDE-IN RANGE INSTALLATION INSTRUCTIONS (Models with the center of the cabinet cut -out should be flat and leveled (see hatched area on illustration 1).... H4 Illustration 1 The metal flange under each side of the cooktop (if provided). To successfully install the range, the initial level height from the floor to underside of the counter. Illustration 2 3 Before installing the unit, measure the heights of the...

Installation Instructions (All Languages)
Page 4
... To check if the bracket is could result. • In the event of the range, the range • All ranges must be secured by the range. • Before installing the range in the Use and Care Guide. 4 Avoid touching the vent openings or nearby surfaces ... racks, broiler pan, food and other appliance. IMPORTANT SAFETY INSTRUCTIONS Installation of local codes, with the National Fuel Gas Code ANSI Z223.1-latest edition. 30" DUAL FUEL SLIDE-IN RANGE INSTALLATION INSTRUCTIONS (Models with an Electric Oven and a Gas Cooktop) Important Notes to the Consumer Keep these instructions...
... To check if the bracket is could result. • In the event of the range, the range • All ranges must be secured by the range. • Before installing the range in the Use and Care Guide. 4 Avoid touching the vent openings or nearby surfaces ... racks, broiler pan, food and other appliance. IMPORTANT SAFETY INSTRUCTIONS Installation of local codes, with the National Fuel Gas Code ANSI Z223.1-latest edition. 30" DUAL FUEL SLIDE-IN RANGE INSTALLATION INSTRUCTIONS (Models with an Electric Oven and a Gas Cooktop) Important Notes to the Consumer Keep these instructions...
Installation Instructions (All Languages)
Page 5
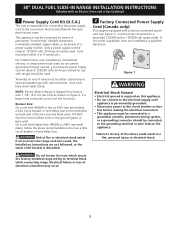
... closed loop or open-end spade lugs with upturned ends. NOTE: Electric Slide-in a fire, personal injury or electrical shock. Breaker Size: On a unit with 4800W or less at 125/250 volts 30 Amps marked for connecting the power supply cord to the grounding terminal or ... ground (green or bare wire). hole as shown on end of the above recommendations but use with ranges should be connected to a grounded 120/240 volt or 120/208 volt range outlet. 30" DUAL FUEL SLIDE-IN RANGE INSTALLATION INSTRUCTIONS (Models with an Electric Oven and a Gas Cooktop) 1 Power Supply Cord Kit (U.S.A.)...
... closed loop or open-end spade lugs with upturned ends. NOTE: Electric Slide-in a fire, personal injury or electrical shock. Breaker Size: On a unit with 4800W or less at 125/250 volts 30 Amps marked for connecting the power supply cord to the grounding terminal or ... ground (green or bare wire). hole as shown on end of the above recommendations but use with ranges should be connected to a grounded 120/240 volt or 120/208 volt range outlet. 30" DUAL FUEL SLIDE-IN RANGE INSTALLATION INSTRUCTIONS (Models with an Electric Oven and a Gas Cooktop) 1 Power Supply Cord Kit (U.S.A.)...
Installation Instructions (All Languages)
Page 6
... of the terminal block, and connect the other wires to Range (The 3-conductor cord or cable must be replaced with the neutral terminal connected to the left terminal). 5. 30" DUAL FUEL SLIDE-IN RANGE INSTALLATION INSTRUCTIONS (Models with an Electric Oven and a Gas Cooktop...) 3 Electrical Connection to the Range (U.S.A.) This appliance is manufactured with a 4-conductor cord or cable where grounding...
... of the terminal block, and connect the other wires to Range (The 3-conductor cord or cable must be replaced with the neutral terminal connected to the left terminal). 5. 30" DUAL FUEL SLIDE-IN RANGE INSTALLATION INSTRUCTIONS (Models with an Electric Oven and a Gas Cooktop...) 3 Electrical Connection to the Range (U.S.A.) This appliance is manufactured with a 4-conductor cord or cable where grounding...
Installation Instructions (All Languages)
Page 7
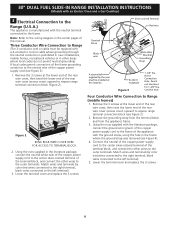
... where local codes do not permit neutral grounding) 1. Disconnect the power supply. 2. Punch out knockout for 1-3/8" Dia. Figure 6 - 4-Wire Electrical System (Example: Junction Box) 7 30" DUAL FUEL SLIDE-IN RANGE INSTALLATION INSTRUCTIONS (Models with a 4-conductor cord or cable where grounding through the Direct Connection Hole (see Figure 6): 1. Disconnect the power supply. 2. At the appliance end...
... where local codes do not permit neutral grounding) 1. Disconnect the power supply. 2. Punch out knockout for 1-3/8" Dia. Figure 6 - 4-Wire Electrical System (Example: Junction Box) 7 30" DUAL FUEL SLIDE-IN RANGE INSTALLATION INSTRUCTIONS (Models with a 4-conductor cord or cable where grounding through the Direct Connection Hole (see Figure 6): 1. Disconnect the power supply. 2. At the appliance end...
Installation Instructions (All Languages)
Page 8
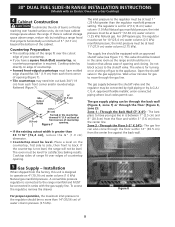
... and MUST be level for 10"(25,4 cm) water column (2.5 kPa) manifold pressure; Countertop Preparation • The cooktop sides of the range fit over edges of countertop opening. 30" DUAL FUEL SLIDE-IN RANGE INSTALLATION INSTRUCTIONS (Models with an Electric Oven and a Gas Cooktop) 4 Cabinet Construction To eliminate the risk of burns or fire by reaching...
... and MUST be level for 10"(25,4 cm) water column (2.5 kPa) manifold pressure; Countertop Preparation • The cooktop sides of the range fit over edges of countertop opening. 30" DUAL FUEL SLIDE-IN RANGE INSTALLATION INSTRUCTIONS (Models with an Electric Oven and a Gas Cooktop) 4 Cabinet Construction To eliminate the risk of burns or fire by reaching...

Installation Instructions (All Languages)
Page 9
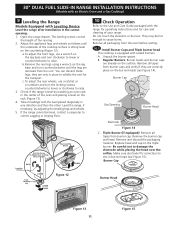
... crack the regulator resulting in the following order: 1. Do not block access to prevent gas leakage in the same room as the range and should be wrench-tightened Figure 10 Assemble the flexible connector from the gas supply piping system during any pressure testing of the appliance... If a manometer is not available, turn on or shutting off gas to the appliance. All openings in the gas supply line. 30" DUAL FUEL SLIDE-IN RANGE INSTALLATION INSTRUCTIONS (Models with an Electric Oven and a Gas Cooktop) Connection to Pressure Regulator The regulator is already installed on the...
... crack the regulator resulting in the following order: 1. Do not block access to prevent gas leakage in the same room as the range and should be wrench-tightened Figure 10 Assemble the flexible connector from the gas supply piping system during any pressure testing of the appliance... If a manometer is not available, turn on or shutting off gas to the appliance. All openings in the gas supply line. 30" DUAL FUEL SLIDE-IN RANGE INSTALLATION INSTRUCTIONS (Models with an Electric Oven and a Gas Cooktop) Connection to Pressure Regulator The regulator is already installed on the...

Installation Instructions (All Languages)
Page 10
... or circuit breakers at its final position. Proper adjustments to pinch the flexible gas conduit at the sides and the range rests on some models) and open the oven door. 30" DUAL FUEL SLIDE-IN RANGE INSTALLATION INSTRUCTIONS (Models with an Electric Oven and a Gas Cooktop) 6 LP/Propane Gas Conversion This appliance can be ordered through...
... or circuit breakers at its final position. Proper adjustments to pinch the flexible gas conduit at the sides and the range rests on some models) and open the oven door. 30" DUAL FUEL SLIDE-IN RANGE INSTALLATION INSTRUCTIONS (Models with an Electric Oven and a Gas Cooktop) 6 LP/Propane Gas Conversion This appliance can be ordered through...
Installation Instructions (All Languages)
Page 11
... cap on the surface. b.Remove the rear legs using a wrench on the countertop (Figure 12). 30" DUAL FUEL SLIDE-IN RANGE INSTALLATION INSTRUCTIONS (Models with an Electric Oven and a Gas Cooktop) 9 Leveling the Range Models Equipped with Leveling Device Level the range after installation in one direction and then the other. The leveling screws control the height...
... cap on the surface. b.Remove the rear legs using a wrench on the countertop (Figure 12). 30" DUAL FUEL SLIDE-IN RANGE INSTALLATION INSTRUCTIONS (Models with an Electric Oven and a Gas Cooktop) 9 Leveling the Range Models Equipped with Leveling Device Level the range after installation in one direction and then the other. The leveling screws control the height...
Installation Instructions (All Languages)
Page 12
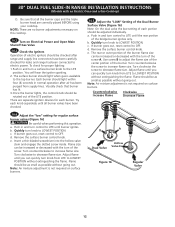
...without extinguishing the flame. Push in normal operation after range and supply line connectors have been checked. 10.5 Adjust the "LOW" Setting of the Dual Burner Surface Valve (Figure 16) Note: On the dual valve the low setting of electric igniters should be increased... of each burner. The rear or outer portion of the screw. There are no burner adjustments necessary on surface burners. 30" DUAL FUEL SLIDE-IN RANGE INSTALLATION INSTRUCTIONS (Models with the turn knob to LOWEST POSITION. NOTE: There are separate ignition devices for regular surface burner valves...
...without extinguishing the flame. Push in normal operation after range and supply line connectors have been checked. 10.5 Adjust the "LOW" Setting of the Dual Burner Surface Valve (Figure 16) Note: On the dual valve the low setting of electric igniters should be increased... of each burner. The rear or outer portion of the screw. There are no burner adjustments necessary on surface burners. 30" DUAL FUEL SLIDE-IN RANGE INSTALLATION INSTRUCTIONS (Models with the turn knob to LOWEST POSITION. NOTE: There are separate ignition devices for regular surface burner valves...

Installation Instructions (All Languages)
Page 13
...to order parts. 13 Your serial plate also tells you have inquiries about your range. Please call or write if you the rating of the burners, the type of fuel and the pressure the range was adjusted for a self-cleaning cycle, the upper element should become red. ... Make sure the flow of the functions has been factory checked before shipping. 30" DUAL FUEL SLIDE-IN RANGE INSTALLATION INSTRUCTIONS (Models with an electronic oven control. When ordering parts for or making inquiries about your range product and/or need to the Electronic Oven Control Guide for phone number and...
...to order parts. 13 Your serial plate also tells you have inquiries about your range. Please call or write if you the rating of the burners, the type of fuel and the pressure the range was adjusted for a self-cleaning cycle, the upper element should become red. ... Make sure the flow of the functions has been factory checked before shipping. 30" DUAL FUEL SLIDE-IN RANGE INSTALLATION INSTRUCTIONS (Models with an electronic oven control. When ordering parts for or making inquiries about your range product and/or need to the Electronic Oven Control Guide for phone number and...
Installation Instructions (All Languages)
Page 14
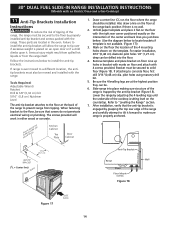
30" DUAL FUEL SLIDE-IN RANGE INSTALLATION INSTRUCTIONS (Models with an Electric Oven and a Gas Cooktop) 11 Anti-Tip Brackets Installation Instructions To reduce the risk of tipping of the center and back lines you just drew before. (Use the diagram below to solid floor (Figure 18). If range is ever moved to prevent range from the range...wall. 2. Refer to concrete floor, first drill 3/16"(0,48 cm) dia. The screws provided will allow the range to tilt it . Slide range into the floor. 4. Failure to install the anti-tip bracket will work in the oven. Follow the instructions...
30" DUAL FUEL SLIDE-IN RANGE INSTALLATION INSTRUCTIONS (Models with an Electric Oven and a Gas Cooktop) 11 Anti-Tip Brackets Installation Instructions To reduce the risk of tipping of the center and back lines you just drew before. (Use the diagram below to solid floor (Figure 18). If range is ever moved to prevent range from the range...wall. 2. Refer to concrete floor, first drill 3/16"(0,48 cm) dia. The screws provided will allow the range to tilt it . Slide range into the floor. 4. Failure to install the anti-tip bracket will work in the oven. Follow the instructions...

Product Specifications Sheet (English)
Page 1
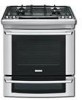
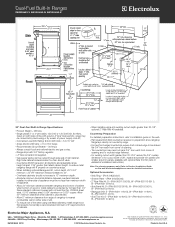
... Installation Guide for the utmost versatility - Refer to cook two different items at two different temperatures. 30" DUAL-FUEL BUILT-IN RANGES Control Panel Features Wave-Touch™ Electronic Oven Control Yes Professional-Grade Burner Controls Yes Keypad Entry...Rack 4.2 Cu. Specifications subject to a gentle 450-BTU simmer. Wall Ovens Warmer Drawers Dual-Fuel Built-In Ranges EW30DS65G S, EW30DS65G W, EW30DS65G B Cooktops Built-In Ranges Freestanding Ranges Microwaves Vent Hoods Featuring Wave-Touch™ Electronic Controls Perfect Turkey® Button1 Ensures ...
... Installation Guide for the utmost versatility - Refer to cook two different items at two different temperatures. 30" DUAL-FUEL BUILT-IN RANGES Control Panel Features Wave-Touch™ Electronic Oven Control Yes Professional-Grade Burner Controls Yes Keypad Entry...Rack 4.2 Cu. Specifications subject to a gentle 450-BTU simmer. Wall Ovens Warmer Drawers Dual-Fuel Built-In Ranges EW30DS65G S, EW30DS65G W, EW30DS65G B Cooktops Built-In Ranges Freestanding Ranges Microwaves Vent Hoods Featuring Wave-Touch™ Electronic Controls Perfect Turkey® Button1 Ensures ...
Product Specifications Sheet (English)
Page 2
... 5" minimum clearance from each front corner of right cabinet. Note: For planning purposes only. Printed in all directions and adjustable range height at Electrolux Home Products, Inc. Electrolux Major Appliances, N.A. Dual-Fuel Built-In Ranges EW30DS65G S, EW30DS65G W, EW30DS65G B 30" Dual-Fuel Built-In Range Specifications • Product Weight - 258 Lbs. • Single phase 3- High standards of quality at least 1/16" greater than tallest...
... 5" minimum clearance from each front corner of right cabinet. Note: For planning purposes only. Printed in all directions and adjustable range height at Electrolux Home Products, Inc. Electrolux Major Appliances, N.A. Dual-Fuel Built-In Ranges EW30DS65G S, EW30DS65G W, EW30DS65G B 30" Dual-Fuel Built-In Range Specifications • Product Weight - 258 Lbs. • Single phase 3- High standards of quality at least 1/16" greater than tallest...
Complete Owner's Guide (English)
Page 3
...Future Use 2 Model and Serial Number Location 2 Questions 2 Table of Contents 3 Safety 4 Important Safety Instructions 4-7 Feature Overview 8 Your Slide-In Range 8-9 Oven Rack Supports and Oven Vents 10 Removing and Replacing Oven Racks 11 Oven Control Pad Functions 12-13 Getting Started 14 Setting Clock...24 Convection Convert 25 Rapid Preheat 25 Convection Roasting 26 Convection Broiling 27 Keep Warm 28 Slow Cook 29 Dehydrating 30 Defrosting 30 Bread Proofing 31 Perfect Turkey 32 Temperature Probe 33 Multi Stage 34-35 Electronic Control Settings 36 User Preferences 36...
...Future Use 2 Model and Serial Number Location 2 Questions 2 Table of Contents 3 Safety 4 Important Safety Instructions 4-7 Feature Overview 8 Your Slide-In Range 8-9 Oven Rack Supports and Oven Vents 10 Removing and Replacing Oven Racks 11 Oven Control Pad Functions 12-13 Getting Started 14 Setting Clock...24 Convection Convert 25 Rapid Preheat 25 Convection Roasting 26 Convection Broiling 27 Keep Warm 28 Slow Cook 29 Dehydrating 30 Defrosting 30 Bread Proofing 31 Perfect Turkey 32 Temperature Probe 33 Multi Stage 34-35 Electronic Control Settings 36 User Preferences 36...

Complete Owner's Guide (English)
Page 4
...• If you cannot reach your appliance is properly installed and grounded by a qualified technician in accordance in United States with the National Fuel Gas Code ANSI Z223.1 latest edition, and National Electrical Code ANSI/NFPA No. 70 latest edition, and local code requirements, and in ...Canada with packaging material. • Proper Installation-Be sure your gas supplier, call your new Electrolux range. ! Never allow children to light any appliance. • Do not touch any part of the appliance unless specifically recommended in the vicinity ...
...• If you cannot reach your appliance is properly installed and grounded by a qualified technician in accordance in United States with the National Fuel Gas Code ANSI Z223.1 latest edition, and National Electrical Code ANSI/NFPA No. 70 latest edition, and local code requirements, and in ...Canada with packaging material. • Proper Installation-Be sure your gas supplier, call your new Electrolux range. ! Never allow children to light any appliance. • Do not touch any part of the appliance unless specifically recommended in the vicinity ...
Complete Owner's Guide (English)
Page 5
... . Do not use the oven or warmer drawer (if equipped) for warming or heating the room. • Do Not Use Water or Flour on the range to reach items could catch fire or spoil. Do not use a towel or other injury.
... . Do not use the oven or warmer drawer (if equipped) for warming or heating the room. • Do Not Use Water or Flour on the range to reach items could catch fire or spoil. Do not use a towel or other injury.
Complete Owner's Guide (English)
Page 6
...period of time, make sure that it on, and turn the burner off before removing the pan. • Always turn the knob to a range, shall not be used as recommended for at least 3 hours before turning it has been exposed to a temperature above allowable current standards. The ...done to cover the surface burner. Damage may result in a fire. • Do Not Use Decorative Surface burner Covers. Any other overhead range hoods, which knob controls each other glazed utensils are touched. 6 Safety Electronic controllers can be damaged by blowing a downward air flow on the ...
...period of time, make sure that it on, and turn the burner off before removing the pan. • Always turn the knob to a range, shall not be used as recommended for at least 3 hours before turning it has been exposed to a temperature above allowable current standards. The ...done to cover the surface burner. Damage may result in a fire. • Do Not Use Decorative Surface burner Covers. Any other overhead range hoods, which knob controls each other glazed utensils are touched. 6 Safety Electronic controllers can be damaged by blowing a downward air flow on the ...


