
Installation Instructions (All Languages)
Page 1
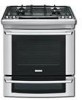
...United States 1 F. pages 1-14; Français - A"T" handle type manual gas valve must be installed in this appliance. A English - 30" DUAL FUEL SLIDE-IN RANGE INSTALLATION INSTRUCTIONS (Models with backguard 36 5/8" (93 cm) Max. 35 ¾" (90,8 cm) Min. If the information in your building. • Immediately ... reach your serial plate for a 31½" (80 cm) Wide Cooktop. 31 1/2" (81 cm) Exact G F 1/2" min. DEPTH TO FRONT OF RANGE 28 5/16" (71,9 cm) E. Printed in the vicinity of Massachusetts by a qualified installer, service agency or the gas supplier. Do not store or...
...United States 1 F. pages 1-14; Français - A"T" handle type manual gas valve must be installed in this appliance. A English - 30" DUAL FUEL SLIDE-IN RANGE INSTALLATION INSTRUCTIONS (Models with backguard 36 5/8" (93 cm) Max. 35 ¾" (90,8 cm) Min. If the information in your building. • Immediately ... reach your serial plate for a 31½" (80 cm) Wide Cooktop. 31 1/2" (81 cm) Exact G F 1/2" min. DEPTH TO FRONT OF RANGE 28 5/16" (71,9 cm) E. Printed in the vicinity of Massachusetts by a qualified installer, service agency or the gas supplier. Do not store or...
Installation Instructions (All Languages)
Page 2
... WIDTH* (Countertop and Cabinet) 30±1/16" (76,2±0,15 cm) F. 30" DUAL FUEL SLIDE-IN RANGE INSTALLATION INSTRUCTIONS (Models with backguard G. DEPTH TO FRONT OF RANGE 28 5/16" (71,9 cm) E. Do not seal the range to the side cabinets. 3. 24" (61 cm) minimum clearance between the range and the wall. 2. A. with... position than No. 28 MSG sheet metal, 0,015"(0,4 mm) stainless steel, 0,024"(0,6 mm) aluminum, or 0,020" (0,5 mm) copper. 30" (76,2 cm) minimum clearance when the cabinet is protected by not less than ¼" (0,64 cm) flame retardant millboard covered with not...
... WIDTH* (Countertop and Cabinet) 30±1/16" (76,2±0,15 cm) F. 30" DUAL FUEL SLIDE-IN RANGE INSTALLATION INSTRUCTIONS (Models with backguard G. DEPTH TO FRONT OF RANGE 28 5/16" (71,9 cm) E. Do not seal the range to the side cabinets. 3. 24" (61 cm) minimum clearance between the range and the wall. 2. A. with... position than No. 28 MSG sheet metal, 0,015"(0,4 mm) stainless steel, 0,024"(0,6 mm) aluminum, or 0,020" (0,5 mm) copper. 30" (76,2 cm) minimum clearance when the cabinet is protected by not less than ¼" (0,64 cm) flame retardant millboard covered with not...

Installation Instructions (All Languages)
Page 3
... to the cooktop voiding the warranty. The cooktop 7 should NOT rest directly on the countertop (see Ill. 2). To successfully install the range, the initial level height from the floor to the underside of the metal flange is greater (81 cm) Wide Cooktop. H4 Illustration 1... H2 H1 H3 4 Remove and discard the two rear leveling legs, they are only in step 2. Level the unit if needed. 30" DUAL FUEL SLIDE-IN RANGE INSTALLATION INSTRUCTIONS (Models with the center of the cabinet cut -out should be flat and leveled (see hatched area on illustration 1). Illustration 2 3 Metal ...
... to the cooktop voiding the warranty. The cooktop 7 should NOT rest directly on the countertop (see Ill. 2). To successfully install the range, the initial level height from the floor to the underside of the metal flange is greater (81 cm) Wide Cooktop. H4 Illustration 1... H2 H1 H3 4 Remove and discard the two rear leveling legs, they are only in step 2. Level the unit if needed. 30" DUAL FUEL SLIDE-IN RANGE INSTALLATION INSTRUCTIONS (Models with the center of the cabinet cut -out should be flat and leveled (see hatched area on illustration 1). Illustration 2 3 Metal ...

Installation Instructions (All Languages)
Page 4
... title 24, HUD (part 280)] or when such standard is installed and grounded properly by the range. • Before installing the range in operation. Prolonged use . FOR MODELS WITH SELF-CLEAN FEATURE: • Remove oven racks, broiler pan, food and other flammable vapors ... The installation of this range can result in serious injuries and can be electrically grounded in accordance with local codes or, in the Use and Care Guide. 4 installed anti-tip bracket • Injury to the Installer 1. 30" DUAL FUEL SLIDE-IN RANGE INSTALLATION INSTRUCTIONS (Models with an Electric Oven and...
... title 24, HUD (part 280)] or when such standard is installed and grounded properly by the range. • Before installing the range in operation. Prolonged use . FOR MODELS WITH SELF-CLEAN FEATURE: • Remove oven racks, broiler pan, food and other flammable vapors ... The installation of this range can result in serious injuries and can be electrically grounded in accordance with local codes or, in the Use and Care Guide. 4 installed anti-tip bracket • Injury to the Installer 1. 30" DUAL FUEL SLIDE-IN RANGE INSTALLATION INSTRUCTIONS (Models with an Electric Oven and...
Installation Instructions (All Languages)
Page 5
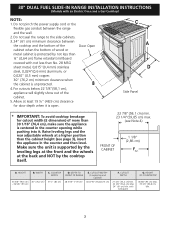
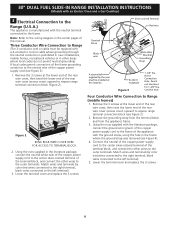
30" DUAL FUEL SLIDE-IN RANGE INSTALLATION INSTRUCTIONS (Models with ranges should be used. If a larger hole is available, have one installed by means of the above recommendations but use with an Electric Oven and a Gas Cooktop) 1 Power Supply Cord Kit (U.S.A.) The user is shipped from factory with higher than 4800W at 125/250 volts 30...Figure 1). Cord must have strain-relief clamp. NOTE: Electric Slide-in a fire, personal injury or electrical shock. Breaker Size: On a unit with 4800W or less at 125/250 volts 30 Amps should be connected to do not permit grounding through ...
30" DUAL FUEL SLIDE-IN RANGE INSTALLATION INSTRUCTIONS (Models with ranges should be used. If a larger hole is available, have one installed by means of the above recommendations but use with an Electric Oven and a Gas Cooktop) 1 Power Supply Cord Kit (U.S.A.) The user is shipped from factory with higher than 4800W at 125/250 volts 30...Figure 1). Cord must have strain-relief clamp. NOTE: Electric Slide-in a fire, personal injury or electrical shock. Breaker Size: On a unit with 4800W or less at 125/250 volts 30 Amps should be connected to do not permit grounding through ...
Installation Instructions (All Languages)
Page 6
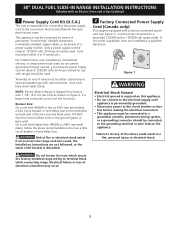
... 3-conductor cord or cable must be replaced with the neutral terminal connected to the frame. 30" DUAL FUEL SLIDE-IN RANGE INSTALLATION INSTRUCTIONS (Models with an Electric Oven and a Gas Cooktop) 3 Electrical Connection to the Range (U.S.A.) This appliance is manufactured with a 4-conductor cord or cable where grounding through the neutral conductor is prohibited in new installations, mobile...
... 3-conductor cord or cable must be replaced with the neutral terminal connected to the frame. 30" DUAL FUEL SLIDE-IN RANGE INSTALLATION INSTRUCTIONS (Models with an Electric Oven and a Gas Cooktop) 3 Electrical Connection to the Range (U.S.A.) This appliance is manufactured with a 4-conductor cord or cable where grounding through the neutral conductor is prohibited in new installations, mobile...
Installation Instructions (All Languages)
Page 7
... or nonmetallic sheathed copper cable (with a 4-conductor cord or cable where grounding through the Direct Connection Hole (see Figure 6): 1. Disconnect the power supply. 2. 30" DUAL FUEL SLIDE-IN RANGE INSTALLATION INSTRUCTIONS (Models with an Electric Oven and a Gas Cooktop) Terminal Block Silver Colored Terminal Red Wire Black wire 1-1/8" Dia. Separate the green (or bare copper) and...
... or nonmetallic sheathed copper cable (with a 4-conductor cord or cable where grounding through the Direct Connection Hole (see Figure 6): 1. Disconnect the power supply. 2. 30" DUAL FUEL SLIDE-IN RANGE INSTALLATION INSTRUCTIONS (Models with an Electric Oven and a Gas Cooktop) Terminal Block Silver Colored Terminal Red Wire Black wire 1-1/8" Dia. Separate the green (or bare copper) and...
Installation Instructions (All Languages)
Page 8
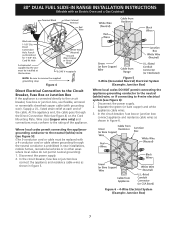
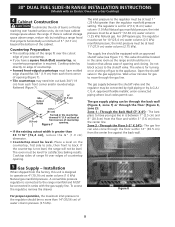
...column pressure (3.5 kPa). 8 Open the shutoff valve in is cabinet storage space above the range. The gas supply between 1" (2.5 cm) and 8" (20.3cm) from the floor and within 12" (30.5 cm) from each front corner of opening . The gas line can be in the ...25,4 cm) water column (2.5 kPa) manifold pressure; Figure 8 For proper operation, the maximum inlet pressure to the shutoff valve. 30" DUAL FUEL SLIDE-IN RANGE INSTALLATION INSTRUCTIONS (Models with an Electric Oven and a Gas Cooktop) 4 Cabinet Construction To eliminate the risk of burns or fire by reaching over heated ...
...column pressure (3.5 kPa). 8 Open the shutoff valve in is cabinet storage space above the range. The gas supply between 1" (2.5 cm) and 8" (20.3cm) from the floor and within 12" (30.5 cm) from each front corner of opening . The gas line can be in the ...25,4 cm) water column (2.5 kPa) manifold pressure; Figure 8 For proper operation, the maximum inlet pressure to the shutoff valve. 30" DUAL FUEL SLIDE-IN RANGE INSTALLATION INSTRUCTIONS (Models with an Electric Oven and a Gas Cooktop) 4 Cabinet Construction To eliminate the risk of burns or fire by reaching over heated ...

Installation Instructions (All Languages)
Page 9
... wrench-tightened Figure 10 Assemble the flexible connector from the gas supply piping system by closing . The valve is already installed on the appliance. 30" DUAL FUEL SLIDE-IN RANGE INSTALLATION INSTRUCTIONS (Models with an Electric Oven and a Gas Cooktop) Connection to Pressure Regulator The regulator is for turning on or shutting off gas to the...
... wrench-tightened Figure 10 Assemble the flexible connector from the gas supply piping system by closing . The valve is already installed on the appliance. 30" DUAL FUEL SLIDE-IN RANGE INSTALLATION INSTRUCTIONS (Models with an Electric Oven and a Gas Cooktop) Connection to Pressure Regulator The regulator is for turning on or shutting off gas to the...

Installation Instructions (All Languages)
Page 10
... is shipped from the factory for the conversion. Follow the instructions under "Leveling the Range". 8.13 Slide the range into the cut -out opening . 10 Failure to pinch the flexible gas conduit at its final position. 30" DUAL FUEL SLIDE-IN RANGE INSTALLATION INSTRUCTIONS (Models with an Electric Oven and a Gas Cooktop) 6 LP/Propane Gas Conversion This appliance can...
... is shipped from the factory for the conversion. Follow the instructions under "Leveling the Range". 8.13 Slide the range into the cut -out opening . 10 Failure to pinch the flexible gas conduit at its final position. 30" DUAL FUEL SLIDE-IN RANGE INSTALLATION INSTRUCTIONS (Models with an Electric Oven and a Gas Cooktop) 6 LP/Propane Gas Conversion This appliance can...
Installation Instructions (All Languages)
Page 11
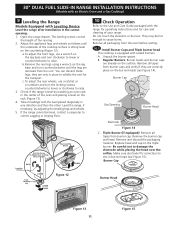
...transport. Remove the burner cap and head. Burner Cap Burner Head Figure 13 11 Figure 15 30" DUAL FUEL SLIDE-IN RANGE INSTALLATION INSTRUCTIONS (Models with an Electric Oven and a Gas Cooktop) 9 Leveling the Range Models Equipped with sealed burners. b.Remove the rear legs using a wrench on the surface. A. ... (Figure 13). 4. Unpack the burner grates. Remove and discard the packaging material. Remove all tapes from the unit. If the range cannot be hot enough to raise. 3. Triple Burner (if equipped): Remove all tapes from the oven before testing. 10.1 Install...
...transport. Remove the burner cap and head. Burner Cap Burner Head Figure 13 11 Figure 15 30" DUAL FUEL SLIDE-IN RANGE INSTALLATION INSTRUCTIONS (Models with an Electric Oven and a Gas Cooktop) 9 Leveling the Range Models Equipped with sealed burners. b.Remove the rear legs using a wrench on the surface. A. ... (Figure 13). 4. Unpack the burner grates. Remove and discard the packaging material. Remove all tapes from the unit. If the range cannot be hot enough to raise. 3. Triple Burner (if equipped): Remove all tapes from the oven before testing. 10.1 Install...
Installation Instructions (All Languages)
Page 12
...rotated out of the LITE position. Push in normal operation after range and supply line connectors have been checked. 10.5 Adjust the "LOW" Setting of the Dual Burner Surface Valve (Figure 16) Note: On the dual valve the low setting of each burner. Note: Air mixture ... burner caps and the triple burner head are no burner adjustments necessary on this operation. Remove the surface burner control knob. 30" DUAL FUEL SLIDE-IN RANGE INSTALLATION INSTRUCTIONS (Models with the turn of the screw A. The surface burner should be increased or decreased with an Electric Oven and a Gas ...
...rotated out of the LITE position. Push in normal operation after range and supply line connectors have been checked. 10.5 Adjust the "LOW" Setting of the Dual Burner Surface Valve (Figure 16) Note: On the dual valve the low setting of each burner. Note: Air mixture ... burner caps and the triple burner head are no burner adjustments necessary on this operation. Remove the surface burner control knob. 30" DUAL FUEL SLIDE-IN RANGE INSTALLATION INSTRUCTIONS (Models with the turn of the screw A. The surface burner should be increased or decreased with an Electric Oven and a Gas ...

Installation Instructions (All Languages)
Page 13
...the cycle. Before You Call for the Clock, Timer, Bake, Broil, Convection (some models) or on your Use and Care Guide for phone number and address. 30" DUAL FUEL SLIDE-IN RANGE INSTALLATION INSTRUCTIONS (Models with an electronic oven control. Bake-After setting the oven to BROIL, the upper element... in your range. Broil-When the oven is unobstructed. BAKE/ROAST at 350°...
...the cycle. Before You Call for the Clock, Timer, Bake, Broil, Convection (some models) or on your Use and Care Guide for phone number and address. 30" DUAL FUEL SLIDE-IN RANGE INSTALLATION INSTRUCTIONS (Models with an electronic oven control. Bake-After setting the oven to BROIL, the upper element... in your range. Broil-When the oven is unobstructed. BAKE/ROAST at 350°...
Installation Instructions (All Languages)
Page 14
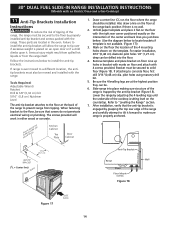
...1/2"(1,27 cm) deep can be secured to solid floor (Figure 18). Lower the range by properly installed anti-tip bracket and screws packed with the range. 30" DUAL FUEL SLIDE-IN RANGE INSTALLATION INSTRUCTIONS (Models with an Electric Oven and a Gas Cooktop) 11 Anti-Tip Brackets Installation Instructions... To reduce the risk of tipping of the range, the range must be secured to the floor by ...
...1/2"(1,27 cm) deep can be secured to solid floor (Figure 18). Lower the range by properly installed anti-tip bracket and screws packed with the range. 30" DUAL FUEL SLIDE-IN RANGE INSTALLATION INSTRUCTIONS (Models with an Electric Oven and a Gas Cooktop) 11 Anti-Tip Brackets Installation Instructions... To reduce the risk of tipping of the range, the range must be secured to the floor by ...

Product Specifications Sheet (English)
Page 1
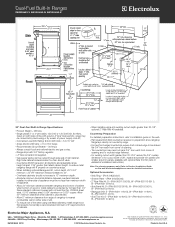
...Dual-Fuel Built-In Ranges EW30DS65G S, EW30DS65G W, EW30DS65G B Cooktops Built-In Ranges Freestanding Ranges Microwaves Vent Hoods Featuring Wave-Touch™ Electronic Controls Perfect Turkey® Button1 Ensures moist, delicious poultry. Luxury-Glide® Oven Racks With a ball bearing system, oven racks are so smooth they extend effortlessly. Perfect Pair® Oven Our ranges... 30" DUAL-FUEL BUILT-IN RANGES ...models only. See Back for the utmost cooking capacity. Min-2-Max® Burner Designed with a dual-flame sealed burner, this cooktop offers the widest range...
...Dual-Fuel Built-In Ranges EW30DS65G S, EW30DS65G W, EW30DS65G B Cooktops Built-In Ranges Freestanding Ranges Microwaves Vent Hoods Featuring Wave-Touch™ Electronic Controls Perfect Turkey® Button1 Ensures moist, delicious poultry. Luxury-Glide® Oven Racks With a ball bearing system, oven racks are so smooth they extend effortlessly. Perfect Pair® Oven Our ranges... 30" DUAL-FUEL BUILT-IN RANGES ...models only. See Back for the utmost cooking capacity. Min-2-Max® Burner Designed with a dual-flame sealed burner, this cooktop offers the widest range...
Product Specifications Sheet (English)
Page 2
... than maximum width of appliance. • Allow 24" minimum clearance between overhead cabinets installed to detailed kit installation instructions). Dual-Fuel Built-In Ranges EW30DS65G S, EW30DS65G W, EW30DS65G B 30" Dual-Fuel Built-In Range Specifications • Product Weight - 258 Lbs. • Single phase 3- Electrolux Major Appliances, N.A. or 4-wire cable, 120 / 240 or 120 / 208 Volt, 60 Hertz, fused on both sides of...
... than maximum width of appliance. • Allow 24" minimum clearance between overhead cabinets installed to detailed kit installation instructions). Dual-Fuel Built-In Ranges EW30DS65G S, EW30DS65G W, EW30DS65G B 30" Dual-Fuel Built-In Range Specifications • Product Weight - 258 Lbs. • Single phase 3- Electrolux Major Appliances, N.A. or 4-wire cable, 120 / 240 or 120 / 208 Volt, 60 Hertz, fused on both sides of...

Complete Owner's Guide (English)
Page 2
For toll-free telephone support in the USA See picture below. Printed in the U.S. Questions? Post Office Box 212378, Augusta, Georgia 30917, USA All rights reserved. and Canada: 1-877-4ELECTROLUX (1-877-435-3287) For online support and internet product information: www.electroluxappliances.com ©2010 Electrolux Home Products, Inc. 2 Finding Information Make a Record for Future use Brand Purchase Date Model Number Serial Number Model and Serial Number Location Note The serial plate is located along the interior side trim of the oven and visible when the door is opened.
For toll-free telephone support in the USA See picture below. Printed in the U.S. Questions? Post Office Box 212378, Augusta, Georgia 30917, USA All rights reserved. and Canada: 1-877-4ELECTROLUX (1-877-435-3287) For online support and internet product information: www.electroluxappliances.com ©2010 Electrolux Home Products, Inc. 2 Finding Information Make a Record for Future use Brand Purchase Date Model Number Serial Number Model and Serial Number Location Note The serial plate is located along the interior side trim of the oven and visible when the door is opened.
Complete Owner's Guide (English)
Page 3
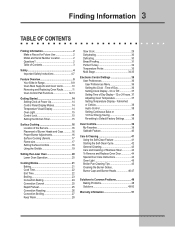
...Convection Convert 25 Rapid Preheat 25 Convection Roasting 26 Convection Broiling 27 Keep Warm 28 Slow Cook 29 Dehydrating 30 Defrosting 30 Bread Proofing 31 Perfect Turkey 32 Temperature Probe 33 Multi Stage 34-35 Electronic Control Settings 36 User Preferences... 3 Table of Contents Finding Information 2 Make a Record for Future Use 2 Model and Serial Number Location 2 Questions 2 Table of Contents 3 Safety 4 Important Safety Instructions 4-7 Feature Overview 8 Your Slide-In Range 8-9 Oven Rack Supports and Oven Vents 10 Removing and Replacing Oven Racks 11 ...
...Convection Convert 25 Rapid Preheat 25 Convection Roasting 26 Convection Broiling 27 Keep Warm 28 Slow Cook 29 Dehydrating 30 Defrosting 30 Bread Proofing 31 Perfect Turkey 32 Temperature Probe 33 Multi Stage 34-35 Electronic Control Settings 36 User Preferences... 3 Table of Contents Finding Information 2 Make a Record for Future Use 2 Model and Serial Number Location 2 Questions 2 Table of Contents 3 Safety 4 Important Safety Instructions 4-7 Feature Overview 8 Your Slide-In Range 8-9 Oven Rack Supports and Oven Vents 10 Removing and Replacing Oven Racks 11 ...

Complete Owner's Guide (English)
Page 40
... once the oven is active. For further assistance, guidelines for use on automatically. 40 Oven Controls sabbath feature (for proper usage, and a complete list of models with the Sabbath feature, please visit the web at http:\\www.star-k.org. The oven temperature may be used with all normal functions. Sabbath feature...
... once the oven is active. For further assistance, guidelines for use on automatically. 40 Oven Controls sabbath feature (for proper usage, and a complete list of models with the Sabbath feature, please visit the web at http:\\www.star-k.org. The oven temperature may be used with all normal functions. Sabbath feature...

Complete Owner's Guide (English)
Page 47
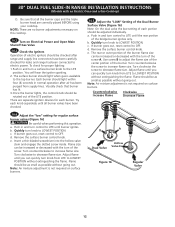
... a damp cloth. The surface burner heads are not seated correctly. To clean, first use a small-gauge wire or needle to clean. Double ring burner head (Models equipped with normal non abrasive glass type cleaner and thoroughly dry before replacing. For proper gas flow it may be that an ignition port hole...
... a damp cloth. The surface burner heads are not seated correctly. To clean, first use a small-gauge wire or needle to clean. Double ring burner head (Models equipped with normal non abrasive glass type cleaner and thoroughly dry before replacing. For proper gas flow it may be that an ignition port hole...


