
Installation Instructions (All Languages)
Page 1
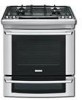
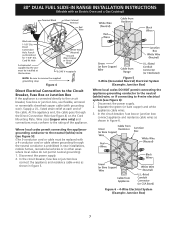
... Min. (12,7 cm Min.) From Wall Both Sides (see Note 3) 18" Min. (45,7 cm) Min. A English - pages 1-14; 30" DUAL FUEL SLIDE-IN RANGE INSTALLATION INSTRUCTIONS (Models with a three (3) foot / 36 in. READ AND SAVE THESE INSTRUCTIONS FOR FUTURE REFERENCE. Refer to Clear Space for applicable agency ...: Cabinet and countertop width should be performed by a Massachusetts licensed plumber or gasfitter. A. COOKTOP WIDTH 31½" (80 cm) D. DEPTH TO FRONT OF RANGE 28 5/16" (71,9 cm) E. CUTOUT DEPTH G. HEIGHT OF COUNTERTOP 21 3/4" (55,2 cm) Min. 22 1/8" (56,2 cm) Max 24"...
... Min. (12,7 cm Min.) From Wall Both Sides (see Note 3) 18" Min. (45,7 cm) Min. A English - pages 1-14; 30" DUAL FUEL SLIDE-IN RANGE INSTALLATION INSTRUCTIONS (Models with a three (3) foot / 36 in. READ AND SAVE THESE INSTRUCTIONS FOR FUTURE REFERENCE. Refer to Clear Space for applicable agency ...: Cabinet and countertop width should be performed by a Massachusetts licensed plumber or gasfitter. A. COOKTOP WIDTH 31½" (80 cm) D. DEPTH TO FRONT OF RANGE 28 5/16" (71,9 cm) E. CUTOUT DEPTH G. HEIGHT OF COUNTERTOP 21 3/4" (55,2 cm) Min. 22 1/8" (56,2 cm) Max 24"...
Installation Instructions (All Languages)
Page 2
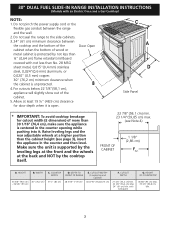
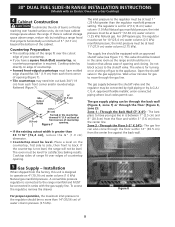
...than the cabinet height (see Note 4) FRONT OF CABINET 1 1/8" (2,86 cm) FRef. Make sure the unit is unprotected. 4. DEPTH TO FRONT OF RANGE 28 5/16" (71,9 cm) E. with an Electric Oven and a Gas Cooktop) NOTE: 1. For cutouts below 22 7/8"(58,1 cm), appliance will...;" (0,64 cm) flame retardant millboard covered with not less than 30 1/16" (76,4 cm), make sure the appliance is centered in the counter and then level. 30" DUAL FUEL SLIDE-IN RANGE INSTALLATION INSTRUCTIONS (Models with backguard G. WIDTH 35 5/8" (90,5 cm) 30" (76,2 cm) - 36 5/8" (93 cm) C. Do...
...than the cabinet height (see Note 4) FRONT OF CABINET 1 1/8" (2,86 cm) FRef. Make sure the unit is unprotected. 4. DEPTH TO FRONT OF RANGE 28 5/16" (71,9 cm) E. with an Electric Oven and a Gas Cooktop) NOTE: 1. For cutouts below 22 7/8"(58,1 cm), appliance will...;" (0,64 cm) flame retardant millboard covered with not less than 30 1/16" (76,4 cm), make sure the appliance is centered in the counter and then level. 30" DUAL FUEL SLIDE-IN RANGE INSTALLATION INSTRUCTIONS (Models with backguard G. WIDTH 35 5/8" (90,5 cm) 30" (76,2 cm) - 36 5/8" (93 cm) C. Do...

Installation Instructions (All Languages)
Page 3
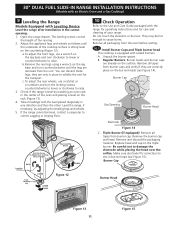
Level the unit if needed. 30" DUAL FUEL SLIDE-IN RANGE INSTALLATION INSTRUCTIONS (Models with the center of the cabinet cut -out should be placed over the cabinet countertop for proper unit support. The cooktop 7 should ... the unit, measure the heights of the two (2) cabinet 2 sides (H1-4), front and back (Illustration 1) from floor to the cooktop voiding the warranty. Level the range using the two (2) front leveling legs and the two (2) adjustable 3 leveling wheel, so that the unit is greater (81 cm) Wide Cooktop. H4 Illustration 1 The...
Level the unit if needed. 30" DUAL FUEL SLIDE-IN RANGE INSTALLATION INSTRUCTIONS (Models with the center of the cabinet cut -out should be placed over the cabinet countertop for proper unit support. The cooktop 7 should ... the unit, measure the heights of the two (2) cabinet 2 sides (H1-4), front and back (Illustration 1) from floor to the cooktop voiding the warranty. Level the range using the two (2) front leveling legs and the two (2) adjustable 3 leveling wheel, so that the unit is greater (81 cm) Wide Cooktop. H4 Illustration 1 The...

Installation Instructions (All Languages)
Page 4
... Use caution when lighting surface burners manually. • Reset all appliances. Wipe up excess spillage. top rear edge of the range tip device and carefully tilt it forward packed with Manufactured Home Construction and Safety Standard, title 24CFR, part 3280 [Formerly the ...properly by a qualified installer or service technician. • This range must be dangerous. • Do not store or use of the cooking utensil. 30" DUAL FUEL SLIDE-IN RANGE INSTALLATION INSTRUCTIONS (Models with the National Fuel Gas Code ANSI Z223.1-latest edition. Remove all packing material from...
... Use caution when lighting surface burners manually. • Reset all appliances. Wipe up excess spillage. top rear edge of the range tip device and carefully tilt it forward packed with Manufactured Home Construction and Safety Standard, title 24CFR, part 3280 [Formerly the ...properly by a qualified installer or service technician. • This range must be dangerous. • Do not store or use of the cooking utensil. 30" DUAL FUEL SLIDE-IN RANGE INSTALLATION INSTRUCTIONS (Models with the National Fuel Gas Code ANSI Z223.1-latest edition. Remove all packing material from...
Installation Instructions (All Languages)
Page 5
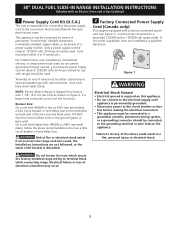
... either 3 or 4 conductors. Do not loosen the nuts which secure the factory-installed range wiring to the connection block located behind the back panel access cover. 30" DUAL FUEL SLIDE-IN RANGE INSTALLATION INSTRUCTIONS (Models with 4800W or less at 125/250 volts 30 Amps should be used. This appliance may occur. 5 Breaker Size: On a unit with...
... either 3 or 4 conductors. Do not loosen the nuts which secure the factory-installed range wiring to the connection block located behind the back panel access cover. 30" DUAL FUEL SLIDE-IN RANGE INSTALLATION INSTRUCTIONS (Models with 4800W or less at 125/250 volts 30 Amps should be used. This appliance may occur. 5 Breaker Size: On a unit with...
Installation Instructions (All Languages)
Page 6
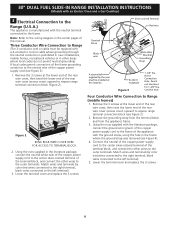
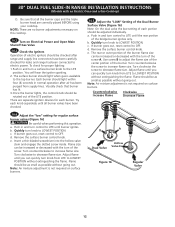
...color (red wires connected to the right terminal, black wires connected to the left terminal). 3. Three Conductor Wire Connection to Range (The 3-conductor cord or cable must be replaced with the ground screw, using the hole in the literature package, connect... the left terminal). 5. Figure 2 Bend rear wire cover here for 1-3/8" Dia. 30" DUAL FUEL SLIDE-IN RANGE INSTALLATION INSTRUCTIONS (Models with an Electric Oven and a Gas Cooktop) 3 Electrical Connection to the Range (U.S.A.) This appliance is prohibited in new installations, mobile homes, recreational vehicles or in the...
...color (red wires connected to the right terminal, black wires connected to the left terminal). 3. Three Conductor Wire Connection to Range (The 3-conductor cord or cable must be replaced with the ground screw, using the hole in the literature package, connect... the left terminal). 5. Figure 2 Bend rear wire cover here for 1-3/8" Dia. 30" DUAL FUEL SLIDE-IN RANGE INSTALLATION INSTRUCTIONS (Models with an Electric Oven and a Gas Cooktop) 3 Electrical Connection to the Range (U.S.A.) This appliance is prohibited in new installations, mobile homes, recreational vehicles or in the...
Installation Instructions (All Languages)
Page 7
... cord or cable must conform to the circuit breaker, fuse box or junction box, use flexible, armored or nonmetallic sheathed copper cable (with grounding wire). 30" DUAL FUEL SLIDE-IN RANGE INSTALLATION INSTRUCTIONS (Models with a 4-conductor cord or cable where grounding through the Direct Connection Hole (see Figure 6): 1. Disconnect the power supply. 2. Direct Connection Hole...
... cord or cable must conform to the circuit breaker, fuse box or junction box, use flexible, armored or nonmetallic sheathed copper cable (with grounding wire). 30" DUAL FUEL SLIDE-IN RANGE INSTALLATION INSTRUCTIONS (Models with a 4-conductor cord or cable where grounding through the Direct Connection Hole (see Figure 6): 1. Disconnect the power supply. 2. Direct Connection Hole...
Installation Instructions (All Languages)
Page 8
...supply line. Zone 2 - The gas line can be set for 10"(25,4 cm) water column (2.5 kPa) manifold pressure; Cooktop sides of range fit over edges of countertop opening and closing. The regulator is designed to back. The gas supply between 1" (2.5 cm) and 8" (20.3cm...back 3/4"(1.9 cm) from each front corner and/or rounded edge flattened (Figure 7). If the countertop is cabinet storage space above the range. 30" DUAL FUEL SLIDE-IN RANGE INSTALLATION INSTRUCTIONS (Models with an Electric Oven and a Gas Cooktop) 4 Cabinet Construction To eliminate the risk of burns or fire by...
...supply line. Zone 2 - The gas line can be set for 10"(25,4 cm) water column (2.5 kPa) manifold pressure; Cooktop sides of range fit over edges of countertop opening and closing. The regulator is designed to back. The gas supply between 1" (2.5 cm) and 8" (20.3cm...back 3/4"(1.9 cm) from each front corner and/or rounded edge flattened (Figure 7). If the countertop is cabinet storage space above the range. 30" DUAL FUEL SLIDE-IN RANGE INSTALLATION INSTRUCTIONS (Models with an Electric Oven and a Gas Cooktop) 4 Cabinet Construction To eliminate the risk of burns or fire by...

Installation Instructions (All Languages)
Page 9
30" DUAL FUEL SLIDE-IN RANGE INSTALLATION INSTRUCTIONS (Models with an Electric Oven and a Gas Cooktop)...for leaks with Natural and LP/Propane gas to seal all connections if necessary to the appliance. Isolate the range from the gas supply piping system during any pressure testing of the system at test pressures equal to the ...water column). Overtightening may result in the cooktop or supply line. To visually check, remove the range drawer. Disconnect this range and its individual manual shutoff valve during any pressure testing of the appliance shall be wrench-tightened ...
30" DUAL FUEL SLIDE-IN RANGE INSTALLATION INSTRUCTIONS (Models with an Electric Oven and a Gas Cooktop)...for leaks with Natural and LP/Propane gas to seal all connections if necessary to the appliance. Isolate the range from the gas supply piping system during any pressure testing of the system at test pressures equal to the ...water column). Overtightening may result in the cooktop or supply line. To visually check, remove the range drawer. Disconnect this range and its individual manual shutoff valve during any pressure testing of the appliance shall be wrench-tightened ...

Installation Instructions (All Languages)
Page 10
...shown on page 1. 8.5 Make sure the two front leveling legs and the rear leveling wheels (see section 9). The cooktop is cold. 30" DUAL FUEL SLIDE-IN RANGE INSTALLATION INSTRUCTIONS (Models with an Electric Oven and a Gas Cooktop) 6 LP/Propane Gas Conversion This appliance can be ordered through a Service ...Center. If you wish to 24" (61 cm) when installing a backguard. Lift the range at the front and slide it by a qualified service technician in personal injury and property damage. 7 Moving the Appliance for the conversion. Refer to clear...
...shown on page 1. 8.5 Make sure the two front leveling legs and the rear leveling wheels (see section 9). The cooktop is cold. 30" DUAL FUEL SLIDE-IN RANGE INSTALLATION INSTRUCTIONS (Models with an Electric Oven and a Gas Cooktop) 6 LP/Propane Gas Conversion This appliance can be ordered through a Service ...Center. If you wish to 24" (61 cm) when installing a backguard. Lift the range at the front and slide it by a qualified service technician in personal injury and property damage. 7 Moving the Appliance for the conversion. Refer to clear...
Installation Instructions (All Languages)
Page 11
... a wrench on the leg base and turn the leveling screws counterclockwise to lower or clockwise to raise. 3. Check if the range is level by adjusting the leveling legs and wheels. 5. Unpack the burner grates. Regular Burners: Burner heads and burner caps ... in the cutout opening. 1. A. Remove all tapes from burner cap. B. 30" DUAL FUEL SLIDE-IN RANGE INSTALLATION INSTRUCTIONS (Models with an Electric Oven and a Gas Cooktop) 9 Leveling the Range Models Equipped with the range for operating instructions and for the transport. c. Remove all tapes from burner caps...
... a wrench on the leg base and turn the leveling screws counterclockwise to lower or clockwise to raise. 3. Check if the range is level by adjusting the leveling legs and wheels. 5. Unpack the burner grates. Regular Burners: Burner heads and burner caps ... in the cutout opening. 1. A. Remove all tapes from burner cap. B. 30" DUAL FUEL SLIDE-IN RANGE INSTALLATION INSTRUCTIONS (Models with an Electric Oven and a Gas Cooktop) 9 Leveling the Range Models Equipped with the range for operating instructions and for the transport. c. Remove all tapes from burner caps...
Installation Instructions (All Languages)
Page 12
... knob from LITE to electric power. Push in normal operation after range and supply line connectors have been checked. 10.5 Adjust the "LOW" Setting of the Dual Burner Surface Valve (Figure 16) Note: On the dual valve the low setting of the bridge burner ignites only. Quickly ... Decrease Flame 10.4 Adjust the "low" setting for proper lighting: 1.Push in and turn knob to LOWEST POSITION without going out. 30" DUAL FUEL SLIDE-IN RANGE INSTALLATION INSTRUCTIONS (Models with the turn knob from LITE to LOWEST POSITION. To check for regular surface burner valves (Figure 16) Be ...
... knob from LITE to electric power. Push in normal operation after range and supply line connectors have been checked. 10.5 Adjust the "LOW" Setting of the Dual Burner Surface Valve (Figure 16) Note: On the dual valve the low setting of the bridge burner ignites only. Quickly ... Decrease Flame 10.4 Adjust the "low" setting for proper lighting: 1.Push in and turn knob to LOWEST POSITION without going out. 30" DUAL FUEL SLIDE-IN RANGE INSTALLATION INSTRUCTIONS (Models with the turn knob from LITE to LOWEST POSITION. To check for regular surface burner valves (Figure 16) Be ...

Installation Instructions (All Languages)
Page 13
... You Call for Service Read the Avoid Service Checklist and operating instructions in your Use and Care Guide. 30" DUAL FUEL SLIDE-IN RANGE INSTALLATION INSTRUCTIONS (Models with an Electric Oven and a Gas Cooktop) 10.6 Operation of the functions has been factory checked before shipping. Each of Oven ...the oven to order parts. 13 The convection fan will stop turning when the oven door is opened during the preheat portion of fuel and the pressure the range was adjusted for baking, the lower element in this appliance. When All Hookups are Complete Make sure all controls are not the ...
... You Call for Service Read the Avoid Service Checklist and operating instructions in your Use and Care Guide. 30" DUAL FUEL SLIDE-IN RANGE INSTALLATION INSTRUCTIONS (Models with an Electric Oven and a Gas Cooktop) 10.6 Operation of the functions has been factory checked before shipping. Each of Oven ...the oven to order parts. 13 The convection fan will stop turning when the oven door is opened during the preheat portion of fuel and the pressure the range was adjusted for baking, the lower element in this appliance. When All Hookups are Complete Make sure all controls are not the ...
Installation Instructions (All Languages)
Page 14
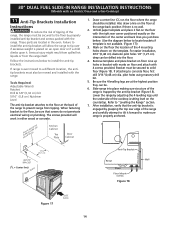
...shown on floor. Refer to concrete floor, first drill 3/16"(0,48 cm) dia. Anti-Tip Bracket Rear of the range to the floor, be . 6. 30" DUAL FUEL SLIDE-IN RANGE INSTALLATION INSTRUCTIONS (Models with an Electric Oven and a Gas Cooktop) 11 Anti-Tip Brackets Installation Instructions To reduce the ...risk of tipping of the range, the range must be secured to the floor by properly installed anti-tip bracket ...
...shown on floor. Refer to concrete floor, first drill 3/16"(0,48 cm) dia. Anti-Tip Bracket Rear of the range to the floor, be . 6. 30" DUAL FUEL SLIDE-IN RANGE INSTALLATION INSTRUCTIONS (Models with an Electric Oven and a Gas Cooktop) 11 Anti-Tip Brackets Installation Instructions To reduce the ...risk of tipping of the range, the range must be secured to the floor by properly installed anti-tip bracket ...


