
Electrolux EW30ES65GS Support Question
Electrolux EW30ES65GS Support Question
Find answers below for this question about Electrolux EW30ES65GS - 30" Slide-In Electric Range.Need a Electrolux EW30ES65GS manual? We have 4 online manuals for this item!
Question posted by sdiaz2011 on April 17th, 2012
Electrolux Model# Ew3ldf65gsb
How many PSI does this electrolux gas stove model#ew3ldf65gsb have?
Current Answers


Related Electrolux EW30ES65GS Manual Pages
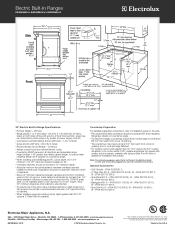
Installation Instructions (All Languages) - Page 1

... - HEIGHT OF COUNTERTOP
35 3/4" (90,8 cm) Min. 36 5/8" (93 cm) Max. CUTOUT DEPTH
21 3/4" (55,2 cm) Min. 22 1/8" (56,2 cm) Max 24" (61 cm) Min.
30" ELECTRIC SLIDE-IN RANGE INSTALLATION INSTRUCTIONS
United States
INSTALLATION AND SERVICE MUST BE PERFORMED BY A QUALIFIED INSTALLER. WIDTH
(Under Cooktop)
C.
Installation Instructions (All Languages) - Page 2

...protected by the cooktop itself. A. Do not pinch the power supply cord or the
flexible gas conduit between
the cooktop and the bottom of the cabinet
when the bottom of wood or... dimension) of the
B
cabinet.
5. Do not seal the range to the side cabinets.
3. 24" (61 cm) minimum clearance between the range and
the wall.
2. 30" ELECTRIC SLIDE-IN RANGE INSTALLATION INSTRUCTIONS
NOTE:
1.
Installation Instructions (All Languages) - Page 3

...it could cause damage to the cooktop
voiding the warranty.
To successfully install the range, the initial level height from floor to underside of the counter. Make sure...
2 cabinet sides (H1-4), front and back (see illustration 2). Level the unit if needed. 30" ELECTRIC SLIDE-IN RANGE INSTALLATION INSTRUCTIONS
To avoid breakage: Do NOT handle or
manipulate the unit by the cooktop.
1
...
Installation Instructions (All Languages) - Page 4

... Owner's Guide. When using a programmable timing operation. If cabinet storage is unattended. Important Note to be provided the risk can damage the electronic control. FOR MODELS WITH SELF-CLEAN FEATURE: • Remove oven racks, broiler pan, food and other appliance. 30" ELECTRIC SLIDE-IN RANGE INSTALLATION INSTRUCTIONS
Important Notes to the Installer
1.
Installation Instructions (All Languages) - Page 5

... access cover.
Cord must have either closed loop or open spade lug with a factory-connected power cord (see Figure 1).
30" ELECTRIC SLIDE-IN RANGE INSTALLATION INSTRUCTIONS
1. Factory Connected Power Supply Cord (Canada only)
This range is responsible for the minimum wire size (general UL listing, local code may differ). Cord must be connected to a
grounded...
Installation Instructions (All Languages) - Page 6

... wire of the frame grounding conductor to the left terminal) (see Figure 3):
1. Remove the grounding strap from the terminal block and from the appliance frame. 3. 30" ELECTRIC SLIDE-IN RANGE INSTALLATION INSTRUCTIONS
4. Remove the 3 screws at This Location.
Red Wire
Black Wire
1 1/8" (2.9cm) Dia.
Installation Instructions (All Languages) - Page 7

... the 2 black wires together. c) Connect the 2 red wires together. Figure 6 - 4-Wire Electrical System (Example: Junction Box)
7 Remove the grounding strap from the terminal block
and from the ... connecting to the neutral (white) wire (see Figure 6): 1. 30" ELECTRIC SLIDE-IN RANGE INSTALLATION INSTRUCTIONS
Direct Electrical Connection to the Circuit Breaker, Fuse Box or Junction Box
If the...
Installation Instructions (All Languages) - Page 8

..." (5.56 cm)
29" (73.7 cm)
4 3/8" Min. (11.4 cm)
1¼" (3.2 cm)
You must be level for satisfactory baking results. 30" ELECTRIC SLIDE-IN RANGE INSTALLATION INSTRUCTIONS
4. Figure 7
• If the existing cutout width is greater than 30 1/16" (76,4 cm), reduce the ¾" (1.9 cm) dimension.
• Countertop must also clear 2 3/16" (5.56cm) of material from each...
Installation Instructions (All Languages) - Page 9

... .
9 Install the anti-tip bracket at the
1 sides and the range rests on page 1. Follow the
instructions under "Leveling the Range".
13 Slide the range into the cutout opening are adjacent to be installed must be ordered through a Service Center.
30" ELECTRIC SLIDE-IN RANGE INSTALLATION INSTRUCTIONS
5. Level the range (see page 11) are 6 only in the "Installation without...
Installation Instructions (All Languages) - Page 10

...When the oven is sitting level on the rack (Figure 10).
4.
Refer to raise. 30" ELECTRIC SLIDE-IN RANGE INSTALLATION INSTRUCTIONS
6. To adjust the front legs, use a ratchet or a nutdriver and turn... phone number and address. You can discard those legs, they heat. Warmer Drawer (some models) and Clean functions.
Do not touch the elements. b.Remove the rear legs using a wrench...
Installation Instructions (All Languages) - Page 11

..., 3/16"(0,48 cm) diameter pilot holes 1/2"(1,27 cm) deep can be installed. Failure to solid floor (Figure 12). pilot holes using masonry drill bit.
5. 30" ELECTRIC SLIDE-IN RANGE INSTALLATION INSTRUCTIONS
8.
When fastening bracket to the floor, be secured to install the anti-tip bracket will work in bracket with the right rear corner...
Installation Instructions (All Languages) - Page 12

30" ELECTRIC SLIDE-IN RANGE INSTALLATION INSTRUCTIONS NOTES:
12
Product Specifications Sheet (English) - Page 1

...national electric codes. Wall Ovens
Warmer Drawers
Electric Built-In Ranges
EW30ES65G S, EW30ES65G W, EW30ES65G B
Cooktops
Built-In Ranges
Freestanding Ranges
... on the web at two different temperatures.
30" ELECTRIC BUILT-IN RANGES
Control Panel Features
Wave-Touch™ Electronic ...1 Select models only.
Bake, Broil, Convection Bake, Convection Roast, Convection Broil, ...
Product Specifications Sheet (English) - Page 2
...8352 • electroluxappliances.ca
EW30ES65G 09/10
© 2010 Electrolux Home Products, Inc. High standards of cabinets.
• When installing range into existing cutout depth ... specifications or discontinue models without notice.
Note: For planning purposes only. Electric Built-In Ranges
EW30ES65G S, EW30ES65G W, EW30ES65G B
30" Electric Built-In Range Specifications
• ...
Complete Owner's Guide (English) - Page 1
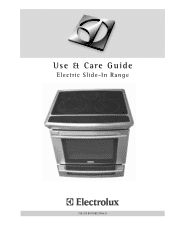
Use & Care Guide
Electric Slide-In Range
318 203 847 (0812) Rev. B
Complete Owner's Guide (English) - Page 3
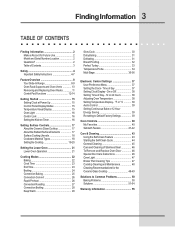
... CONTENTS
Finding Information 2 Make a Record for Future Use 2 Model and Serial Number Location 2 Questions 2 Table of Stainless Steel ...
Safety 4 Important Safety Instructions 4-7
Feature Overview 8 Your Slide-In Range 8-9 Oven Rack Supports and Oven Vents 10 Removing and ... Convection Broiling 28 Keep Warm 29
Slow Cook 30 Dehydrating 31 Defrosting 31 Bread Proofing 32 Perfect ...
Complete Owner's Guide (English) - Page 4
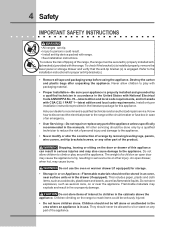
...carton and plastic bags after unpacking the appliance.
Know how to disconnect the electrical power to the range at the circuit breaker or fuse box in case of an emergency.
&#... risk of personal injury and damage to the appliance.
• Never modify or alter the construction of a range by removing leveling legs, panels, wire covers, anti-tip brackets/screws, or any part of the product. ...
Complete Owner's Guide (English) - Page 9
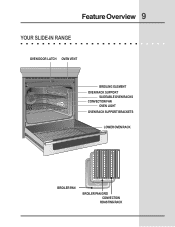
Feature Overview 9
YOUR SLIDE-IN RANGE
OVEN DOOR LATCH OVEN VENT
BROILING ELEMENT OVEN RACK SUPPORT
SLIDEABLE OVEN RACKS CONVECTION FAN
OVEN LIGHT OVEN RACK SUPPORT BRACKETS
LOWER OVEN RACK
BROILER PAN
BROILER PAN GRID
CONVECTION ROASTING RACK
Complete Owner's Guide (English) - Page 15

... POWER UP
When the unit is first plugged in, or when the power supply to the range has been interrupted, the timer in use. The clock cannot be available during this mode as... will remain in a sleep mode when not in the display will be active with a temperature visual display for 1:30):
1. You will beep and go back into sleep mode. To start with "12:00". When the unit has...
Complete Owner's Guide (English) - Page 37

... the electronic controls. Press USER PREF until you to control the various options of day to the range has been interrupted, the display will show "CLO 12:00". This menu features the Time of ... Adjusting oven temperature.
• rSt ; The clock has been preset at the factory for 1:30):
1. When the range is not being used .
The clock must be set before the oven can also be set ...
Similar Questions

Electrolux Range Manuals
Where can I find free owner's manuals for the Electrolux electric range, model number EW30ES65GS?
Where can I find free owner's manuals for the Electrolux electric range, model number EW30ES65GS?
(Posted by Slickvic 10 years ago)

Electrolux Slide-in Stove
I have an electrolux slide-in range and while cooking with the lower oven the oven drawer doesn't al...
I have an electrolux slide-in range and while cooking with the lower oven the oven drawer doesn't al...
(Posted by jnakon 11 years ago)

Do You Need A Tilt Bracket On Slide In Model?
(Posted by hocndoc 11 years ago)

Electrolux Slide In Range, The Lower Oven Door Will Not Open. It Opens Partially
(Posted by Anonymous-70600 11 years ago)

Slide In Gas Range Doesn't Touch Countertop
We are installing an electorlux slide in gas range. We have in place and noticed that when we lowere...
We are installing an electorlux slide in gas range. We have in place and noticed that when we lowere...
(Posted by cjpw4 12 years ago)