Use and Care Manual
Page 2
... and Canada: 1-877-4ELECTROLUX (1-877-435-3287) For online support and Internet production information visit http://www.electroluxusa.com ©2007 Electrolux Home Products, Inc. All rights reserved. We view your Product Registration Card in home appliances. 2 Finding Information Table of contents Please ...23 • Convection bake 24 • Using convection convert 25 • Convection roast 26-27 • Probe 28-29 • Convection broil 30 • Keep warm 31 • Slow cook 32 • Perfect turkey 33 • Defrost 34 • Dehydrate 34 • Bread proof...
... and Canada: 1-877-4ELECTROLUX (1-877-435-3287) For online support and Internet production information visit http://www.electroluxusa.com ©2007 Electrolux Home Products, Inc. All rights reserved. We view your Product Registration Card in home appliances. 2 Finding Information Table of contents Please ...23 • Convection bake 24 • Using convection convert 25 • Convection roast 26-27 • Probe 28-29 • Convection broil 30 • Keep warm 31 • Slow cook 32 • Perfect turkey 33 • Defrost 34 • Dehydrate 34 • Bread proof...

Use and Care Manual
Page 7
...• Bake -pg 19 • Broil -pg 22-23 • Convection bake -pg 24 • Convection roast -pg 26-27 • Convection broil -pg 30 • Keep warm -pg 31 • Slow cook -pg 32 4. Rapid preheat -pg 18 11. Specialized cooking • Perfect turkey -pg 33 • Defrost... maximum control settings Feature Min. Cook options 8. temp Bake (upper) 170°F/76°C Bake (lower) 170°F / 76°C Bread Proof Lo(85°F/30°C) Broil 300°F / 148°C Conv Bake 170°F / 76°C Conv Roast 170°F / 76°C Conv Broil 300°F / 148°...
...• Bake -pg 19 • Broil -pg 22-23 • Convection bake -pg 24 • Convection roast -pg 26-27 • Convection broil -pg 30 • Keep warm -pg 31 • Slow cook -pg 32 4. Rapid preheat -pg 18 11. Specialized cooking • Perfect turkey -pg 33 • Defrost... maximum control settings Feature Min. Cook options 8. temp Bake (upper) 170°F/76°C Bake (lower) 170°F / 76°C Bread Proof Lo(85°F/30°C) Broil 300°F / 148°C Conv Bake 170°F / 76°C Conv Roast 170°F / 76°C Conv Broil 300°F / 148°...
Use and Care Manual
Page 20
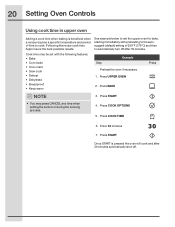
... oven for bake, starting immediately with preheating to the autosuggest (default) setting of time to automatically turn off after 30 minutes automatically shut-off. Step Example Preheat the oven if necessary 1. Enter 30 minutes 7. Press START Once START is beneficial when a recipe requires a specific temperature and period of 350°F (176°... COOK OPTIONS 5. 20 Setting Oven Controls Using cook time in upper oven Adding a cook time when baking is pressed the oven will cook and after 30 minutes. Press START 4.
... oven for bake, starting immediately with preheating to the autosuggest (default) setting of time to automatically turn off after 30 minutes automatically shut-off. Step Example Preheat the oven if necessary 1. Enter 30 minutes 7. Press START Once START is beneficial when a recipe requires a specific temperature and period of 350°F (176°... COOK OPTIONS 5. 20 Setting Oven Controls Using cook time in upper oven Adding a cook time when baking is pressed the oven will cook and after 30 minutes. Press START 4.

Use and Care Manual
Page 21
...temperature for 50 minutes and to automatically shut-off and a beep will indicate the oven is pressed, the oven will calculate the start time at 5:30. Press BAKE 3. After the oven reaches set . • You may press CANCEL any time when setting the control or during the cooking process.... • You may also choose to use COOK TIME with no END TIME. Enter 5:30 9. Press START Once START is ready. Press COOK OPTIONS NOTE 5. The oven display shows PRE-HEATING. Enter 50 minutes 7. Press UPPER OVEN Press...
...temperature for 50 minutes and to automatically shut-off and a beep will indicate the oven is pressed, the oven will calculate the start time at 5:30. Press BAKE 3. After the oven reaches set . • You may press CANCEL any time when setting the control or during the cooking process.... • You may also choose to use COOK TIME with no END TIME. Enter 5:30 9. Press START Once START is ready. Press COOK OPTIONS NOTE 5. The oven display shows PRE-HEATING. Enter 50 minutes 7. Press UPPER OVEN Press...
Use and Care Manual
Page 24
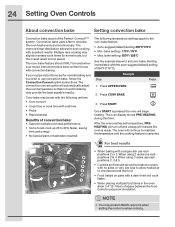
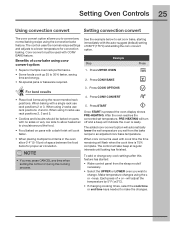
... rack positions 2, 3 & 5. • Cookies and biscuits should ONLY be used when your recipe instructions are for even cooking with the following temperature settings apply to 30% faster, saving time and energy. • No special pans or bakeware required.
... rack positions 2, 3 & 5. • Cookies and biscuits should ONLY be used when your recipe instructions are for even cooking with the following temperature settings apply to 30% faster, saving time and energy. • No special pans or bakeware required.
Use and Care Manual
Page 25
.... Press CONV CONVERT 5. Make temperature changes using 3 racks use rack positions 2 and 4. will cook faster. 4. The control uses the normal recipe settings and adjusts to 30% faster, saving time and energy. • No special pans or bakeware required. 1.
.... Press CONV CONVERT 5. Make temperature changes using 3 racks use rack positions 2 and 4. will cook faster. 4. The control uses the normal recipe settings and adjusts to 30% faster, saving time and energy. • No special pans or bakeware required. 1.
Use and Care Manual
Page 26
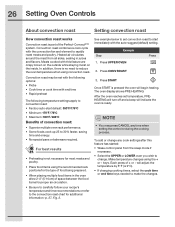
...;F / 76°C • Maximum: 550°F / 288°C Benefits of convection roast: • Superior multiple oven rack performance. • Some foods cook up 25 to 30% faster, saving time and energy. • No special pans or bakeware required. NOTE • You may be set convection roast to make the changes. Each...
...;F / 76°C • Maximum: 550°F / 288°C Benefits of convection roast: • Superior multiple oven rack performance. • Some foods cook up 25 to 30% faster, saving time and energy. • No special pans or bakeware required. NOTE • You may be set convection roast to make the changes. Each...

Use and Care Manual
Page 27
...;F 16 to 20 lbs. 20 to 24 lbs. 3 to 4 lbs. 325°F 325°F 350°F -375°F Internal temp Minute per lb. * 25-30 * 25-30 * 15-25 180°F 8-10 180°F 180°F 180°F 10-15 12-16 12-16 Ham roast, fresh 4 to the bottom oven rack... and the roasting rack supplied with your appliance. Do not cover the insert with foil to prevent overbrowning and drying of the skin. 30-40 20-30 20-25 30-40 Fig. 2 Position food (fat side up) on oven rack in the oven. Roasting rack Insert Broil pan Fig. 1 Meat Beef Standing rib...
...;F 16 to 20 lbs. 20 to 24 lbs. 3 to 4 lbs. 325°F 325°F 350°F -375°F Internal temp Minute per lb. * 25-30 * 25-30 * 15-25 180°F 8-10 180°F 180°F 180°F 10-15 12-16 12-16 Ham roast, fresh 4 to the bottom oven rack... and the roasting rack supplied with your appliance. Do not cover the insert with foil to prevent overbrowning and drying of the skin. 30-40 20-30 20-25 30-40 Fig. 2 Position food (fat side up) on oven rack in the oven. Roasting rack Insert Broil pan Fig. 1 Meat Beef Standing rib...
Use and Care Manual
Page 30
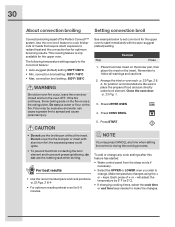
... conv broil feature to cook thicker cuts of meats that require direct exposure to follow all warnings and cautions. 2. Make temperature changes using the + or - 30 About convection broiling Setting convection broil Convection broiling is only available for position recommendations.
... conv broil feature to cook thicker cuts of meats that require direct exposure to follow all warnings and cautions. 2. Make temperature changes using the + or - 30 About convection broiling Setting convection broil Convection broiling is only available for position recommendations.

Use and Care Manual
Page 35
Setting Oven Controls 35 About bread proof Setting bread proof The bread proof feature maintains a warm environment useful for 85°F / 30°C). bread proof setting: 100°F / 38°C For best results See the example below . • Use the oven light to...be set in conjunction with the following feature: • My favorite The following temperature settings apply to make the changes. bread proof setting: 85°F/30°C • Max. Step EExxaammpplele Press 1. keys. Make temperature changes using the + or - Bread proof may press CANCEL any cook settings ...
Setting Oven Controls 35 About bread proof Setting bread proof The bread proof feature maintains a warm environment useful for 85°F / 30°C). bread proof setting: 100°F / 38°C For best results See the example below . • Use the oven light to...be set in conjunction with the following feature: • My favorite The following temperature settings apply to make the changes. bread proof setting: 85°F/30°C • Max. Step EExxaammpplele Press 1. keys. Make temperature changes using the + or - Bread proof may press CANCEL any cook settings ...

Use and Care Manual
Page 44
...every preference each preference. Step 1. Fig. 2 NOTE User preference options are not available while cooking or when using the kitchen timer. Enter 1:30 or use the numeric keys to reject. Setting clock display (CLO) The clock display mode allows you reach the pre-set the clock to ... before changing the user preferences functions: • Press and continue to press USER PREF to navigate through the preferences. • Press or to 1:30. to advance to the next Fig. 1 • Press CANCEL after pressing START to increase or decrease numeric values. Setting clock (CLO) See ...
...every preference each preference. Step 1. Fig. 2 NOTE User preference options are not available while cooking or when using the kitchen timer. Enter 1:30 or use the numeric keys to reject. Setting clock display (CLO) The clock display mode allows you reach the pre-set the clock to ... before changing the user preferences functions: • Press and continue to press USER PREF to navigate through the preferences. • Press or to 1:30. to advance to the next Fig. 1 • Press CANCEL after pressing START to increase or decrease numeric values. Setting clock (CLO) See ...
Use and Care Manual
Page 51
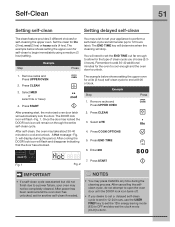
... upper oven. Enter 800 Fig. 1 7. Step Example Press You may wish to set the END TIME out far enough to 24 hr. Remember to add 30-40 additional minutes for a lite (2 hour) self-clean cycle to 12 hours later). A Hot message -Fig. 2- After cooling the DOOR lock icon will automatically lock.... 2 IMPORTANT • If a self-clean cycle was started but did not finish due to cool and unlock. After self-clean, the oven may take about 30-40 minutes to a power failure, your appliance to perform a self-clean cycle sometime later (up to end at 8:00 o'clock. Press END TIME 6. Self-...
... upper oven. Enter 800 Fig. 1 7. Step Example Press You may wish to set the END TIME out far enough to 24 hr. Remember to add 30-40 additional minutes for a lite (2 hour) self-clean cycle to 12 hours later). A Hot message -Fig. 2- After cooling the DOOR lock icon will automatically lock.... 2 IMPORTANT • If a self-clean cycle was started but did not finish due to cool and unlock. After self-clean, the oven may take about 30-40 minutes to a power failure, your appliance to perform a self-clean cycle sometime later (up to end at 8:00 o'clock. Press END TIME 6. Self-...
Use and Care Manual
Page 52
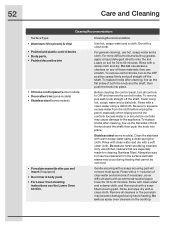
... spots with a soft clean cloth. Remove all controls to 60 minutes. Rinse with clean water and dry with an ammonia-soaked paper towel for 30 to OFF and remove the control knobs. Leave on the cooktop. Stainless steel (some models) • Porcelain enamel broiler pan and insert (if... sponge or cloth. then push the knob into place. Rinse with a clean cloth. Do not use spray oven cleaners on soil for 30 to squeeze excess water from the surface as bluish stains may occur during future heating. especially when wiping around the controls may become damaged ...
... spots with a soft clean cloth. Remove all controls to 60 minutes. Rinse with clean water and dry with an ammonia-soaked paper towel for 30 to OFF and remove the control knobs. Leave on the cooktop. Stainless steel (some models) • Porcelain enamel broiler pan and insert (if... sponge or cloth. then push the knob into place. Rinse with a clean cloth. Do not use spray oven cleaners on soil for 30 to squeeze excess water from the surface as bluish stains may occur during future heating. especially when wiping around the controls may become damaged ...

