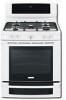
Use and Care Manual
Page 2
... life of your Product Registration Card in home appliances. You can register online at www.electroluxusa.com or by dropping your new appliance. For toll-free telephone support in the USA Printed in the U.S. Keep a record for choosing Electrolux, the new premium brand in the mail. ...Broil 22-23 • Convection bake 24 • Using convection convert 25 • Convection roast 26-27 • Probe 28-29 • Convection broil 30 • Keep warm 31 • Slow cook 32 • Perfect turkey 33 • Defrost 34 • Dehydrate 34 • Bread proof 35 &#...
... life of your Product Registration Card in home appliances. You can register online at www.electroluxusa.com or by dropping your new appliance. For toll-free telephone support in the USA Printed in the U.S. Keep a record for choosing Electrolux, the new premium brand in the mail. ...Broil 22-23 • Convection bake 24 • Using convection convert 25 • Convection roast 26-27 • Probe 28-29 • Convection broil 30 • Keep warm 31 • Slow cook 32 • Perfect turkey 33 • Defrost 34 • Dehydrate 34 • Bread proof 35 &#...
Use and Care Manual
Page 3
... as described below: This symbol alerts you cannot reach your gas supplier, call your gas supplier from a neighbor's phone. For models with range. • See Installation Instructions. Do not allow children to heat or warm the room. Safety 3 Important safety instructions Recognize safety symbols, ... this manual are labeled with a WARNING or CAUTION based on the range to reach items could result. • Install anti-tip device packed. with a warmer drawer, grasp the top rear edge of this appliance as aluminum foil. Doing so may result causing property damage, personal ...
... as described below: This symbol alerts you cannot reach your gas supplier, call your gas supplier from a neighbor's phone. For models with range. • See Installation Instructions. Do not allow children to heat or warm the room. Safety 3 Important safety instructions Recognize safety symbols, ... this manual are labeled with a WARNING or CAUTION based on the range to reach items could result. • Install anti-tip device packed. with a warmer drawer, grasp the top rear edge of this appliance as aluminum foil. Doing so may result causing property damage, personal ...
Use and Care Manual
Page 4
...; Storage in or on to the range at the circuit breaker or fuse box in accordance with the National Fuel Gas Code ANSI Z223- Among these areas until they have been designed, tested and listed by blowing a downward air flow on Appliance-Flammable materials should be stored in an... oven, warmer drawer, near the range. Fat or grease may reduce the...
...; Storage in or on to the range at the circuit breaker or fuse box in accordance with the National Fuel Gas Code ANSI Z223- Among these areas until they have been designed, tested and listed by blowing a downward air flow on Appliance-Flammable materials should be stored in an... oven, warmer drawer, near the range. Fat or grease may reduce the...
Use and Care Manual
Page 5
Proper relationship of utensil to the side of the range when opening oven door or lower oven drawer (if equipped)-Stand to flame will expose...utensils from the high heat of the broiler. • Do not cover the broiler insert with both hands to the appliance. Also, do not place plastic or heat-sensitive items on the power to reposition. If rack must be positioned so... that burner has lit. When using the appliance for the first time or when the appliance has not been used for an extended period of time, be kept away from the rack ...
Proper relationship of utensil to the side of the range when opening oven door or lower oven drawer (if equipped)-Stand to flame will expose...utensils from the high heat of the broiler. • Do not cover the broiler insert with both hands to the appliance. Also, do not place plastic or heat-sensitive items on the power to reposition. If rack must be positioned so... that burner has lit. When using the appliance for the first time or when the appliance has not been used for an extended period of time, be kept away from the rack ...
Use and Care Manual
Page 6
...Safe Drinking Water and Toxic Enforcement Act requires the Governor of California to publish a list of any kind should be used in this appliance for a good seal. Self cleaning ovens • Clean in the self-cleaning cycle only the parts listed in or around any ... parts free of some birds is essential for complete installation and grounding instructions. 6 Safety Important safety instructions Important cleaning instructions • Clean the range regularly to Liquefied Petroleum (L.P.) Gas. • Do not use . Care should be taken not to rub, damage or move the gasket. ...
...Safe Drinking Water and Toxic Enforcement Act requires the Governor of California to publish a list of any kind should be used in this appliance for a good seal. Self cleaning ovens • Clean in the self-cleaning cycle only the parts listed in or around any ... parts free of some birds is essential for complete installation and grounding instructions. 6 Safety Important safety instructions Important cleaning instructions • Clean the range regularly to Liquefied Petroleum (L.P.) Gas. • Do not use . Care should be taken not to rub, damage or move the gasket. ...
Use and Care Manual
Page 10
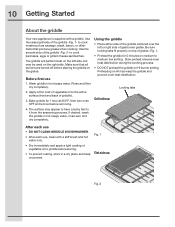
... the left or right side of gas burner grates. Grill side up Fig. 2 Fig. 1 Flat side up 4. 10 Getting Started About the griddle Your new appliance is supplied with a stiff brush and hot water only. • Dry immediately and apply a light coating of vegetable oil to griddle before storing. • To...
... the left or right side of gas burner grates. Grill side up Fig. 2 Fig. 1 Flat side up 4. 10 Getting Started About the griddle Your new appliance is supplied with a stiff brush and hot water only. • Dry immediately and apply a light coating of vegetable oil to griddle before storing. • To...
Use and Care Manual
Page 11
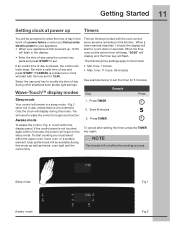
... 3. Sleep mode Awake mode Fig.1 Fig.2 Awake mode To awake the control -Fig. 2- To start cooking you first provide electric power to your appliance. • When your clock will start to count down in the kitchen. NOTE The timer(s) will flash. When a timer reaches less than 1 minute...Touch™ display modes The two timers provided with the time set . time: 1 minute • Max. If CANCEL is pressed your appliance is first powered up Timers You will be available during this mode as well as extra reminders in seconds. Getting Started 11 Setting clock at...
... 3. Sleep mode Awake mode Fig.1 Fig.2 Awake mode To awake the control -Fig. 2- To start cooking you first provide electric power to your appliance. • When your clock will start to count down in the kitchen. NOTE The timer(s) will flash. When a timer reaches less than 1 minute...Touch™ display modes The two timers provided with the time set . time: 1 minute • Max. If CANCEL is pressed your appliance is first powered up Timers You will be available during this mode as well as extra reminders in seconds. Getting Started 11 Setting clock at...
Use and Care Manual
Page 12
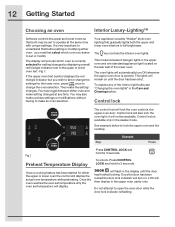
... modifications without having to full brightness. This model includes 2 halogen lights in the awake mode. To unlock, Press CONTROL LOCK and hold for 3 seconds. Your appliance includes "theater" style oven lighting that both the upper and lower oven interiors to make the setting/ changes. Control lock is flashing. To replace any... a small red triangle indicator next to open the oven door while the door lock indicator is available only in the upper oven and one standard appliance light located on .
... modifications without having to full brightness. This model includes 2 halogen lights in the awake mode. To unlock, Press CONTROL LOCK and hold for 3 seconds. Your appliance includes "theater" style oven lighting that both the upper and lower oven interiors to make the setting/ changes. Control lock is flashing. To replace any... a small red triangle indicator next to open the oven door while the door lock indicator is available only in the upper oven and one standard appliance light located on .
Use and Care Manual
Page 13
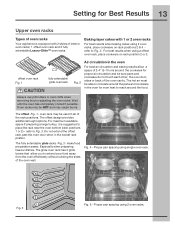
... postion. Oven racks may cause burns. The fully extendable glide racks -Fig. 2- Setting for Best Results 13 Upper oven racks Types of oven racks Your appliance is suggested to place the rack near the oven bottom (rack positions 1 or 2) -
... postion. Oven racks may cause burns. The fully extendable glide racks -Fig. 2- Setting for Best Results 13 Upper oven racks Types of oven racks Your appliance is suggested to place the rack near the oven bottom (rack positions 1 or 2) -
Use and Care Manual
Page 17
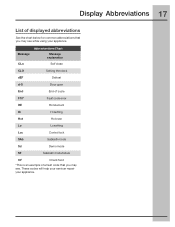
... failure CF Check food *This is an example of displayed abbreviations See the chart below for common abbreviations that you may see while using your appliance. These codes will help your servicer repair your appliance. Display Abbreviations 17 List of a fault code that you may see .
... failure CF Check food *This is an example of displayed abbreviations See the chart below for common abbreviations that you may see while using your appliance. These codes will help your servicer repair your appliance. Display Abbreviations 17 List of a fault code that you may see .

Use and Care Manual
Page 27
...;F 16 to 20 lbs. 20 to 24 lbs. 3 to 4 lbs. 325°F 325°F 350°F -375°F Internal temp Minute per lb. * 25-30 * 25-30 * 15-25 180°F 8-10 180°F 180°F 180°F 10-15 12-16 12-16 Ham roast, fresh 4 to 6 lbs. Pork Shoulder blade.... The broiler pan will catch grease spills and the insert will help prevent grease splatters. Place oven rack on top of the skin. 30-40 20-30 20-25 30-40 Fig. 2 Position food (fat side up) on the broiler pan. 3. Loin 3 to 4 lbs. Place the insert on the roasting rack. -Fig. 1- 5. Do...
...;F 16 to 20 lbs. 20 to 24 lbs. 3 to 4 lbs. 325°F 325°F 350°F -375°F Internal temp Minute per lb. * 25-30 * 25-30 * 15-25 180°F 8-10 180°F 180°F 180°F 10-15 12-16 12-16 Ham roast, fresh 4 to 6 lbs. Pork Shoulder blade.... The broiler pan will catch grease spills and the insert will help prevent grease splatters. Place oven rack on top of the skin. 30-40 20-30 20-25 30-40 Fig. 2 Position food (fat side up) on the broiler pan. 3. Loin 3 to 4 lbs. Place the insert on the roasting rack. -Fig. 1- 5. Do...
Use and Care Manual
Page 28
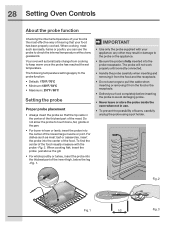
.... 3. any guesswork. Do not allow the probe to touch bone, fat, gristle or the pan. • For bone-in damage to the probe or the appliance. • Be sure the probe is the most effective way of insuring that the tip rests in use the probe to keep warm once the...; Never leave or store the probe inside the oven when not in the center of the thickest part of the food visually measure with your appliance; When cooking fish, insert the probe just above the gill. • For whole poultry or turkey, insert the probe into the thickest part of the...
.... 3. any guesswork. Do not allow the probe to touch bone, fat, gristle or the pan. • For bone-in damage to the probe or the appliance. • Be sure the probe is the most effective way of insuring that the tip rests in use the probe to keep warm once the...; Never leave or store the probe inside the oven when not in the center of the thickest part of the food visually measure with your appliance; When cooking fish, insert the probe just above the gill. • For whole poultry or turkey, insert the probe into the thickest part of the...
Use and Care Manual
Page 34
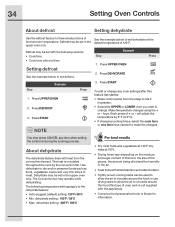
Press UPPER OVEN 2. Press UPPER OVEN 2. NOTE Example You may press CANCEL any cook settings after this appliance). • Consult a food preservation book or library for information. Dehydrate may be set defrost. Step EExxaammpplele 1. Press START Step 1. About dehydrate The dehydrate feature dries ...
Press UPPER OVEN 2. Press UPPER OVEN 2. NOTE Example You may press CANCEL any cook settings after this appliance). • Consult a food preservation book or library for information. Dehydrate may be set defrost. Step EExxaammpplele 1. Press START Step 1. About dehydrate The dehydrate feature dries ...
Use and Care Manual
Page 39
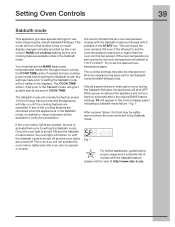
...For further assistance, guidelines for use when observing the Jewish Sabbath/Holidays. Should a power failure or interruption occur during the Sabbath/Holidays, the appliance will not activate the oven interior lights when the oven door is in the Sabbath mode, no audible or visual indicators will appear in the... Sabbath mode. SF will be changed even after the appliance has been set prior to setting the Sabbath mode will remain on until the cooking features are cancelled. Setting Oven Controls 39 Sabbath...
...For further assistance, guidelines for use when observing the Jewish Sabbath/Holidays. Should a power failure or interruption occur during the Sabbath/Holidays, the appliance will not activate the oven interior lights when the oven door is in the Sabbath mode, no audible or visual indicators will appear in the... Sabbath mode. SF will be changed even after the appliance has been set prior to setting the Sabbath mode will remain on until the cooking features are cancelled. Setting Oven Controls 39 Sabbath...
Use and Care Manual
Page 40
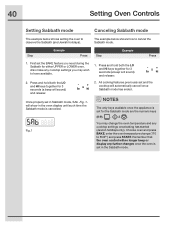
... Jewish holidays). Step Example Press Step Example Press 1. First set and the cooktop will sound) and release: 2. NOTES Example The only keys available once the appliance is cancelled. 2. seconds (a beep will automatically cancell once Sabbath mode has ended. Fig. 1 You may wish and HI keys together for 3 & seconds (a beep will no...
... Jewish holidays). Step Example Press Step Example Press 1. First set and the cooktop will sound) and release: 2. NOTES Example The only keys available once the appliance is cancelled. 2. seconds (a beep will automatically cancell once Sabbath mode has ended. Fig. 1 You may wish and HI keys together for 3 & seconds (a beep will no...
Use and Care Manual
Page 46
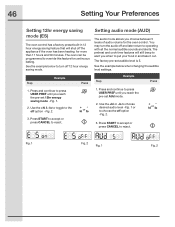
... saving mode (ES) The oven control has a factory preset built-in and take it out. The preheat and cook time features will shut off the appliance if the oven has been heating for more than 11 hours and 59 minutes. Step Example Press 1. Press and continue to choose the off option...
... saving mode (ES) The oven control has a factory preset built-in and take it out. The preheat and cook time features will shut off the appliance if the oven has been heating for more than 11 hours and 59 minutes. Step Example Press 1. Press and continue to choose the off option...
Use and Care Manual
Page 47
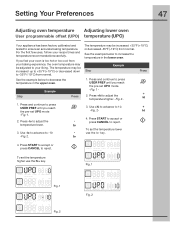
...-set the temperature lower use the hi+ key. Setting Your Preferences 47 Adjusting oven temperature Adjusting lower oven User programmable offset (UPO) temperature (UPO) Your appliance has been factory calibrated and tested to reject. Press and continue to press USER PREF until you feel your oven is too hot or too...
...-set the temperature lower use the hi+ key. Setting Your Preferences 47 Adjusting oven temperature Adjusting lower oven User programmable offset (UPO) temperature (UPO) Your appliance has been factory calibrated and tested to reject. Press and continue to press USER PREF until you feel your oven is too hot or too...
Use and Care Manual
Page 50
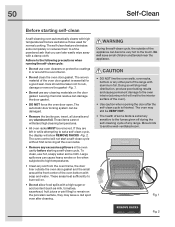
...center of the oven bottom with a damp cloth. Do not leave small children unattended near the appliance. • DO NOT line the oven walls, oven racks, bottom or any other part of the appliance can cause heavy smoke or fire when subjected to another well-ventilated room. The oven may ...baking results and cause permanent damage to the oven interior (aluminum foil will not start a self-clean cycle without first removing all utensils and any range. The automatic door locking system can damage the door gasket. • DO NOT force the oven door open. The oven control will melt to...
...center of the oven bottom with a damp cloth. Do not leave small children unattended near the appliance. • DO NOT line the oven walls, oven racks, bottom or any other part of the appliance can cause heavy smoke or fire when subjected to another well-ventilated room. The oven may ...baking results and cause permanent damage to the oven interior (aluminum foil will not start a self-clean cycle without first removing all utensils and any range. The automatic door locking system can damage the door gasket. • DO NOT force the oven door open. The oven control will melt to...
Use and Care Manual
Page 51
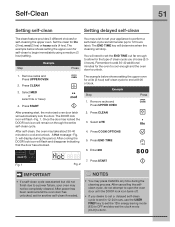
...Press UPPER OVEN 2. After self-clean, the oven may not be completely cleaned. A Hot message -Fig. 2- Select LITE 4. Remember to add 30-40 additional minutes for self-cleaning the upper oven. Press COOK OPTIONS 5. Example You will need to set for another self-clean if needed. Press... unlock. Press START Fig. 2 IMPORTANT • If a self-clean cycle was started but did not finish due to a power failure, your appliance to perform a self-clean cycle sometime later (up to 12 hours later). The DOOR lock icon will display during the cleaning process. Press CLEAN ...
...Press UPPER OVEN 2. After self-clean, the oven may not be completely cleaned. A Hot message -Fig. 2- Select LITE 4. Remember to add 30-40 additional minutes for self-cleaning the upper oven. Press COOK OPTIONS 5. Example You will need to set for another self-clean if needed. Press... unlock. Press START Fig. 2 IMPORTANT • If a self-clean cycle was started but did not finish due to a power failure, your appliance to perform a self-clean cycle sometime later (up to 12 hours later). The DOOR lock icon will display during the cleaning process. Press CLEAN ...
Use and Care Manual
Page 52
...a soft clean cloth. If necessary, cover difficult spots with a clean cloth. Rinse and wipe dry with an ammonia-soaked paper towel for 30 to the appliance.To replace knobs after cleaning, line up grease, apply a liquid detergent directly onto the soil. For general cleaning, use harsh scrubbing cleaners.... and a cloth. To remove control knobs, turn all cleaners or the porcelain may become damaged during heating that are especially made for 30 to rinse the cleaners from the cloth before wiping the panel; then push the knob into place. To remove, pull each knob straight...
...a soft clean cloth. If necessary, cover difficult spots with a clean cloth. Rinse and wipe dry with an ammonia-soaked paper towel for 30 to the appliance.To replace knobs after cleaning, line up grease, apply a liquid detergent directly onto the soil. For general cleaning, use harsh scrubbing cleaners.... and a cloth. To remove control knobs, turn all cleaners or the porcelain may become damaged during heating that are especially made for 30 to rinse the cleaners from the cloth before wiping the panel; then push the knob into place. To remove, pull each knob straight...
