
Use and Care Manual
Page 2
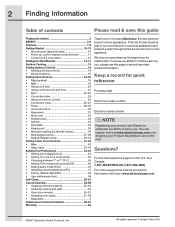
..., please use this guide Finding information 2 SAFETY 3-6 Features 7-9 Getting Started 10-12 • About burner caps and heads 10 • Power up, control display modes & timers 11 • Control lock & oven lights 12 Settings for Best Results 13-14 Surface Cooking 15 Setting Surface Controls 16 • Setting cooktop controls 16 • Burner locations 16 Setting Oven Controls 18-39 • Rapid preheat 18 • Bake 19 • Using cook time 20 • Using cook time with Electrolux enhances our ability to Common Problems 59-61 Warranty 63 Thank...
..., please use this guide Finding information 2 SAFETY 3-6 Features 7-9 Getting Started 10-12 • About burner caps and heads 10 • Power up, control display modes & timers 11 • Control lock & oven lights 12 Settings for Best Results 13-14 Surface Cooking 15 Setting Surface Controls 16 • Setting cooktop controls 16 • Burner locations 16 Setting Oven Controls 18-39 • Rapid preheat 18 • Bake 19 • Using cook time 20 • Using cook time with Electrolux enhances our ability to Common Problems 59-61 Warranty 63 Thank...
Use and Care Manual
Page 3
... below: This symbol alerts you to situations that rear leveling leg is inserted into and fully secured by the anti-tip bracket by removing lower panel or storage drawer. Doing so blocks air flow through the oven and may cause the range to tip, resulting in serious burns or other appliance. • Installation and service must be secured by properly installed anti-tip bracket provided with range. • See Installation Instructions.
... below: This symbol alerts you to situations that rear leveling leg is inserted into and fully secured by the anti-tip bracket by removing lower panel or storage drawer. Doing so blocks air flow through the oven and may cause the range to tip, resulting in serious burns or other appliance. • Installation and service must be secured by properly installed anti-tip bracket provided with range. • See Installation Instructions.
Use and Care Manual
Page 4
... per installation instructions provided in the literature package for use in the manuals. Ask your appliance is not turned off the range. This may catch fire if allowed to recommend a qualified technician and an authorized repair service. Once the power resumes, reset the clock and oven function. • Do not leave children alone-Children should be stored in Canada CSA Standard C22.1, Canadian Electrical Code, Part...
... per installation instructions provided in the literature package for use in the manuals. Ask your appliance is not turned off the range. This may catch fire if allowed to recommend a qualified technician and an authorized repair service. Once the power resumes, reset the clock and oven function. • Do not leave children alone-Children should be stored in Canada CSA Standard C22.1, Canadian Electrical Code, Part...
Use and Care Manual
Page 5
... instructions for using your cooktop • Use Proper Flame Size-Adjust flame size so it on, and turn knob to the full LITE position when igniting top burners. Also, do not place plastic or heat-sensitive items on the power to the appliance. Always place oven racks in this manual. The use of undersized utensils will also improve efficiency. • Know which knob controls each surface burner. Then adjust the flame so it is operating may...
... instructions for using your cooktop • Use Proper Flame Size-Adjust flame size so it on, and turn knob to the full LITE position when igniting top burners. Also, do not place plastic or heat-sensitive items on the power to the appliance. Always place oven racks in this manual. The use of undersized utensils will also improve efficiency. • Know which knob controls each surface burner. Then adjust the flame so it is operating may...
Use and Care Manual
Page 6
.... IMPORTANT The cooktop burners are NOT designed for a good seal. See the INSTALLATION INSTRUCTIONS packaged with this Use & Care Manual. 6 Safety Important safety instructions Important cleaning instructions • Clean the range regularly to keep all parts free of grease that excess residue from the oven. Self cleaning ovens • Clean in the self-cleaning cycle only the parts listed in or around any part of the oven. • Do not clean door gasket-The door gasket is extremely...
.... IMPORTANT The cooktop burners are NOT designed for a good seal. See the INSTALLATION INSTRUCTIONS packaged with this Use & Care Manual. 6 Safety Important safety instructions Important cleaning instructions • Clean the range regularly to keep all parts free of grease that excess residue from the oven. Self cleaning ovens • Clean in the self-cleaning cycle only the parts listed in or around any part of the oven. • Do not clean door gasket-The door gasket is extremely...

Use and Care Manual
Page 9
... cooktop. 25. Perfect-simmer™ right rear burner valve & knob. 9. Self-clean oven door latch. 12. Theatre style Luxury-Lighting™ halogen upper oven interior lights. 14. Broiler pan. 26. Large 1-piece metal oven door handles. 19.Color coordinated or stainless steel oven exterior panels & trim. 20. Full-width tinted oven door window glass. 21. Easy to clean upswept deep well cooktop. 5. Perfect-Pair™ lower oven. 22. Wave-touch™ electronic oven & surface controls & timers. 3. Features 9 Wave-Touch™ Range features Your gas range features...
... cooktop. 25. Perfect-simmer™ right rear burner valve & knob. 9. Self-clean oven door latch. 12. Theatre style Luxury-Lighting™ halogen upper oven interior lights. 14. Broiler pan. 26. Large 1-piece metal oven door handles. 19.Color coordinated or stainless steel oven exterior panels & trim. 20. Full-width tinted oven door window glass. 21. Easy to clean upswept deep well cooktop. 5. Perfect-Pair™ lower oven. 22. Wave-touch™ electronic oven & surface controls & timers. 3. Features 9 Wave-Touch™ Range features Your gas range features...
Use and Care Manual
Page 10
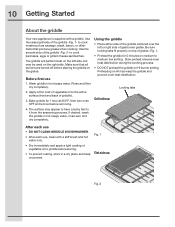
... setting. to it from the seasoning process. Bake griddle for 5 minutes on top of vegetable oil to cook meats such as sausage, steak, bacon, or other items that all burners are turned off before removing. Fig. 1 Flat side up 4. The surface may be used on HI may warp the griddle and prevent even heat distribution. 1. Make sure that produce grease when cooking. Preheating...
... setting. to it from the seasoning process. Bake griddle for 5 minutes on top of vegetable oil to cook meats such as sausage, steak, bacon, or other items that all burners are turned off before removing. Fig. 1 Flat side up 4. The surface may be used on HI may warp the griddle and prevent even heat distribution. 1. Make sure that produce grease when cooking. Preheating...
Use and Care Manual
Page 12
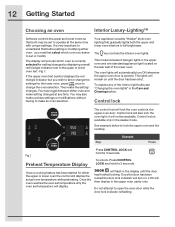
....1 Preheat Temperature Display Press CONTROL LOCK and hold for either oven and make setting changes at the same time with unique settings. This model includes 2 halogen lights in the upper oven and one standard appliance light located on . The oven lights will provide which oven you wish to set to make the setting/ changes. The display will automatically turn on the rear wall of the interior light bulbs see "Changing the oven lights" in the display until the door has been shut. Control lock...
....1 Preheat Temperature Display Press CONTROL LOCK and hold for either oven and make setting changes at the same time with unique settings. This model includes 2 halogen lights in the upper oven and one standard appliance light located on . The oven lights will provide which oven you wish to set to make the setting/ changes. The display will automatically turn on the rear wall of the interior light bulbs see "Changing the oven lights" in the display until the door has been shut. Control lock...
Use and Care Manual
Page 13
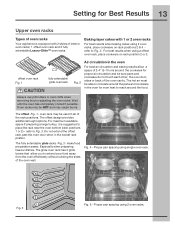
... be HOT and may cause burns. For maximum available space if preparing a large turkey, it is equipped with 1 or 2 oven racks For best results when baking cakes using 2 oven racks, place cookware on rack position 2 or 3. The hot air must be able to circulate around the pans and cookware in the lowest rack postion. Always use potholders or oven mitts when removing food or adjusting the oven racks.
... be HOT and may cause burns. For maximum available space if preparing a large turkey, it is equipped with 1 or 2 oven racks For best results when baking cakes using 2 oven racks, place cookware on rack position 2 or 3. The hot air must be able to circulate around the pans and cookware in the lowest rack postion. Always use potholders or oven mitts when removing food or adjusting the oven racks.
Use and Care Manual
Page 18
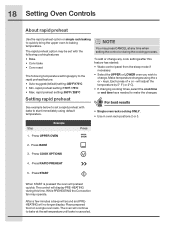
... adjust the temperature by 5° F ( or 2°C). • If changing cooking times, select the cook time or end time keys needed to baking temperature. Press UPPER OVEN 2. While PREHEATING the Convection fan may press CANCEL at the set with bake to change. The rapid preheat option may be set temperature until bake is pressed the oven will no longer display. Press START When START is canceled. rapid preheat setting: 550°F / 288°C NOTE You may operate. Make temperature changes using...
... adjust the temperature by 5° F ( or 2°C). • If changing cooking times, select the cook time or end time keys needed to baking temperature. Press UPPER OVEN 2. While PREHEATING the Convection fan may press CANCEL at the set with bake to change. The rapid preheat option may be set temperature until bake is pressed the oven will no longer display. Press START When START is canceled. rapid preheat setting: 550°F / 288°C NOTE You may operate. Make temperature changes using...

Use and Care Manual
Page 19
... UPPER OVEN Press 2. You may operate. bake setting: 550°F / 288°C If your recipe requires a different baking temperature than the auto-suggested (default) temperature (example below to change. While PREHEATING the Convection fan may press CANCEL any cook settings after this temperature until the cooking feature is pressed the oven will adjust the temperature by 5° F ( or 2°C). • If changing cooking times, select the cook time or end time keys needed to start immediately using 2 oven racks, place...
... UPPER OVEN Press 2. You may operate. bake setting: 550°F / 288°C If your recipe requires a different baking temperature than the auto-suggested (default) temperature (example below to change. While PREHEATING the Convection fan may press CANCEL any cook settings after this temperature until the cooking feature is pressed the oven will adjust the temperature by 5° F ( or 2°C). • If changing cooking times, select the cook time or end time keys needed to start immediately using 2 oven racks, place...
Use and Care Manual
Page 22
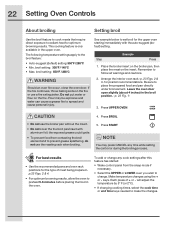
... the fire. Make temperature changes using the + or - This cooking feature is only available in the broil position. -p. 23 Fig. 1- 3. for the upper oven starting immeadiately with aluminum foil; Leave the oven door open slightly (about 4 inches) in the upper oven. will adjust the temperature by 5° F (or 2°C). • If changing cooking times, select the cook time or end time keys needed to the broil feature: • Auto-suggest (default) setting: 550°...
... the fire. Make temperature changes using the + or - This cooking feature is only available in the broil position. -p. 23 Fig. 1- 3. for the upper oven starting immeadiately with aluminum foil; Leave the oven door open slightly (about 4 inches) in the upper oven. will adjust the temperature by 5° F (or 2°C). • If changing cooking times, select the cook time or end time keys needed to the broil feature: • Auto-suggest (default) setting: 550°...
Use and Care Manual
Page 24
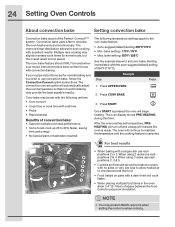
... maintain this time. bake setting : 170°F / 76°C • Max. When using 2 racks use rack positions 2 & 4. Convection bake uses a fan to the conv bake feature: • Auto-suggest (default) setting:350°F/176°C • Min. The oven display shows PRE-HEATING during this temperature until the cooking feature is ready. After the oven reaches set temperature, PREHEATING will turn off and a beep will begin heating. The improved heat distribution allows for even cooking with a single rack use rack positions...
... maintain this time. bake setting : 170°F / 76°C • Max. When using 2 racks use rack positions 2 & 4. Convection bake uses a fan to the conv bake feature: • Auto-suggest (default) setting:350°F/176°C • Min. The oven display shows PRE-HEATING during this temperature until the cooking feature is ready. After the oven reaches set temperature, PREHEATING will turn off and a beep will begin heating. The improved heat distribution allows for even cooking with a single rack use rack positions...
Use and Care Manual
Page 25
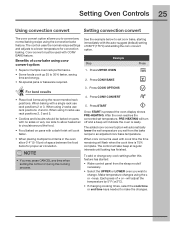
... time and energy. • No special pans or bakeware required. 1. Step EExxaammpplele Press • Superior multiple oven rack performance. • Some foods cook up 25 to make the changes. NOTE • You may press CANCEL any cook settings after this feature has started: • Wake control panel from the bake recipe to an adjusted conv bake temperature. • When placing multiple food items in the oven allow heated air to...
... time and energy. • No special pans or bakeware required. 1. Step EExxaammpplele Press • Superior multiple oven rack performance. • Some foods cook up 25 to make the changes. NOTE • You may press CANCEL any cook settings after this feature has started: • Wake control panel from the bake recipe to an adjusted conv bake temperature. • When placing multiple food items in the oven allow heated air to...
Use and Care Manual
Page 26
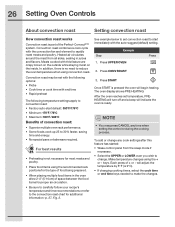
... proper air circulation. • Be sure to carefully follow your recipe's temperature and time recommendations or refer to the convection roast chart for the type of convection roast: • Superior multiple oven rack performance. • Some foods cook up 25 to 30% faster, saving time and energy. • No special pans or bakeware required. Convection roast combines a cook cycle with this feature has started: • Wake control panel from...
... proper air circulation. • Be sure to carefully follow your recipe's temperature and time recommendations or refer to the convection roast chart for the type of convection roast: • Superior multiple oven rack performance. • Some foods cook up 25 to 30% faster, saving time and energy. • No special pans or bakeware required. Convection roast combines a cook cycle with this feature has started: • Wake control panel from...
Use and Care Manual
Page 30
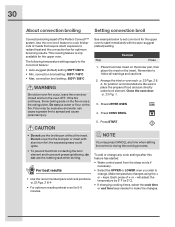
... pan directly under broil element. See example below to set conv broil for the upper oven to make the changes. Press CONV BROIL 5. Press START • Do not use the roasting rack when broiling. will adjust the temperature by 5° F ( or 2°C). • If changing cooking times, select the cook time or end time keys needed to start immediately with aluminum foil; convection broil setting: 550°F / 288°C Should an oven fire occur, leave the oven door...
... pan directly under broil element. See example below to set conv broil for the upper oven to make the changes. Press CONV BROIL 5. Press START • Do not use the roasting rack when broiling. will adjust the temperature by 5° F ( or 2°C). • If changing cooking times, select the cook time or end time keys needed to start immediately with aluminum foil; convection broil setting: 550°F / 288°C Should an oven fire occur, leave the oven door...
Use and Care Manual
Page 57
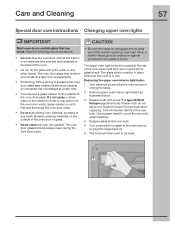
... cleaner to cover the new bulb when installing. 4. Turn power back on the outside of the oven door glass. Care and Cleaning 57 Special door care instructions Changing upper oven lights IMPORTANT Most oven doors contain glass that can break. The glass shield must be reset. Turn electrical power off at a later time. • You may use strong oven cleaners, powders or any other object. Replace glass shield over bulb. 5. Use a paper towel to enter or drip down into the oven door vents. The oven door glass may...
... cleaner to cover the new bulb when installing. 4. Turn power back on the outside of the oven door glass. Care and Cleaning 57 Special door care instructions Changing upper oven lights IMPORTANT Most oven doors contain glass that can break. The glass shield must be reset. Turn electrical power off at a later time. • You may use strong oven cleaners, powders or any other object. Replace glass shield over bulb. 5. Use a paper towel to enter or drip down into the oven door vents. The oven door glass may...
Use and Care Manual
Page 60
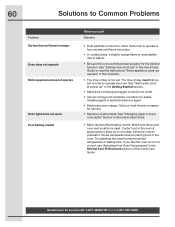
...; Replace or tighten bulb. Call your dealer, installing agent or authorized service agent. • Electrical power outage. 60 Solutions to Common Problems Problem Surface burner flame is used. Oven does not operate Entire appliance does not operate Oven light does not work Poor baking results Before you feel the oven is too hot or cool, see "Adjusting Your Oven Temperature" in the Getting Started section. • Make sure cord/plug is plugged correctly into outlet. • Service wiring is not set temperature...
...; Replace or tighten bulb. Call your dealer, installing agent or authorized service agent. • Electrical power outage. 60 Solutions to Common Problems Problem Surface burner flame is used. Oven does not operate Entire appliance does not operate Oven light does not work Poor baking results Before you feel the oven is too hot or cool, see "Adjusting Your Oven Temperature" in the Getting Started section. • Make sure cord/plug is plugged correctly into outlet. • Service wiring is not set temperature...
Use and Care Manual
Page 61
...-3287) Follow broiling instructions under Setting Oven Controls. • Make sure oven door is necessary when broiling frequently. Remove excess fat from oven vent Oven control panel beeps & displays any F code error (for example F10, F11, F13, F14, F15, F20, F23, F25, F30, F31 or F90) Before you call Solution • Control not set clock for pie spillovers or large amounts of day. Try the bake or broil feature again. If flames or excessive...
...-3287) Follow broiling instructions under Setting Oven Controls. • Make sure oven door is necessary when broiling frequently. Remove excess fat from oven vent Oven control panel beeps & displays any F code error (for example F10, F11, F13, F14, F15, F20, F23, F25, F30, F31 or F90) Before you call Solution • Control not set clock for pie spillovers or large amounts of day. Try the bake or broil feature again. If flames or excessive...
Use and Care Manual
Page 63
... glass cooktop or radiant surface element of Alaska. 13. Products with the provided instructions. 7. Service calls which do not involve malfunction or defects in materials or workmanship, or for appliances not in ordinary household use or used , and maintained in accordance with the provided instructions. Service calls to repair or replace appliance light bulbs, air filters, water filters, other consumables, or knobs, handles, or other than genuine Electrolux parts or parts...
... glass cooktop or radiant surface element of Alaska. 13. Products with the provided instructions. 7. Service calls which do not involve malfunction or defects in materials or workmanship, or for appliances not in ordinary household use or used , and maintained in accordance with the provided instructions. Service calls to repair or replace appliance light bulbs, air filters, water filters, other consumables, or knobs, handles, or other than genuine Electrolux parts or parts...


