Use and Care Guide
Page 2
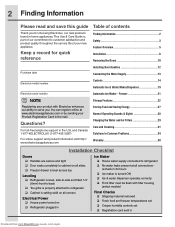
... the service life of contents Thank you . Freezer 21 Storage Features 22 Storing Food and Saving Energy 27 Normal Operating Sounds & Sights 28 Changing the Water and Air Filters 29 Care and Cleaning 31 Solutions ... Toe grille is properly attached to refrigerator Cabinet is turned ON Ice & water dispenser operates correctly Front filter must be flush with Electrolux enhances our ability to refrigerator No water leaks present at www....controls set Registration card sent in Downloaded from www.Manualslib.com manuals search engine
... the service life of contents Thank you . Freezer 21 Storage Features 22 Storing Food and Saving Energy 27 Normal Operating Sounds & Sights 28 Changing the Water and Air Filters 29 Care and Cleaning 31 Solutions ... Toe grille is properly attached to refrigerator Cabinet is turned ON Ice & water dispenser operates correctly Front filter must be flush with Electrolux enhances our ability to refrigerator No water leaks present at www....controls set Registration card sent in Downloaded from www.Manualslib.com manuals search engine
Use and Care Guide
Page 3
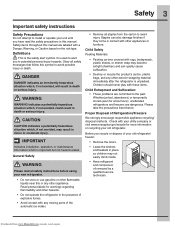
... dispose of the automatic ice maker. • Remove all staples from www.Manualslib.com manuals search engine Whether junked, abandoned, or temporarily stored (even for warnings regarding flammability and other hazards. • Do not operate the refrigerator in this manual. WARNING WARNING indicates a potentially hazardous situation which is the safety alert symbol. General...
... dispose of the automatic ice maker. • Remove all staples from www.Manualslib.com manuals search engine Whether junked, abandoned, or temporarily stored (even for warnings regarding flammability and other hazards. • Do not operate the refrigerator in this manual. WARNING WARNING indicates a potentially hazardous situation which is the safety alert symbol. General...

Use and Care Guide
Page 4
...plug firmly and pull straight out from the receptacle to prevent damaging the power cord. • To avoid electrical shock, unplug the refrigerator before cleaning and before replacing a light bulb or LED light. • Performance may be plugged into its own dedicated 115 Volt... a qualified person. • Never unplug the refrigerator by a wall switch or pull cord to prevent the refrigerator from being turned off power to your refrigerator, unplug the power cord from www.Manualslib.com manuals search engine Operating the refrigerator with local codes and ordinances. Such damage is ...
...plug firmly and pull straight out from the receptacle to prevent damaging the power cord. • To avoid electrical shock, unplug the refrigerator before cleaning and before replacing a light bulb or LED light. • Performance may be plugged into its own dedicated 115 Volt... a qualified person. • Never unplug the refrigerator by a wall switch or pull cord to prevent the refrigerator from being turned off power to your refrigerator, unplug the power cord from www.Manualslib.com manuals search engine Operating the refrigerator with local codes and ordinances. Such damage is ...
Use and Care Guide
Page 5
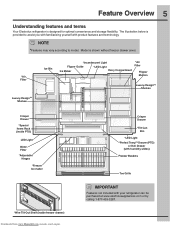
Model is provided to model. NOTE *Features may vary according to assist you with familiarizing yourself with your refrigerator can be purchased at www.electroluxappliances.com or by calling 1-877-435-3287. The illustration below is shown without ....Manualslib.com manuals search engine Crisper Drawer *Tilt Can Bin *LED Light *Perfect TempTM Drawer (PTD) or Deli Drawer (with humidity slides) Freezer Baskets Toe Grille IMPORTANT Features not included with product features and terminology. Feature Overview 5 Understanding features and terms Your Electrolux refrigerator is designed for...
Model is provided to model. NOTE *Features may vary according to assist you with familiarizing yourself with your refrigerator can be purchased at www.electroluxappliances.com or by calling 1-877-435-3287. The illustration below is shown without ....Manualslib.com manuals search engine Crisper Drawer *Tilt Can Bin *LED Light *Perfect TempTM Drawer (PTD) or Deli Drawer (with humidity slides) Freezer Baskets Toe Grille IMPORTANT Features not included with product features and terminology. Feature Overview 5 Understanding features and terms Your Electrolux refrigerator is designed for...

Use and Care Guide
Page 6
... cord or an adapter plug. • If possible, place the refrigerator out of direct sunlight and away from www.Manualslib.com manuals search engine CAUTION DO NOT install the refrigerator where the temperature will not be positioned to maintain proper temperatures inside the... refrigerator. 6 Installation Required Tools You will need the following clearances for models equipped...
... cord or an adapter plug. • If possible, place the refrigerator out of direct sunlight and away from www.Manualslib.com manuals search engine CAUTION DO NOT install the refrigerator where the temperature will not be positioned to maintain proper temperatures inside the... refrigerator. 6 Installation Required Tools You will need the following clearances for models equipped...
Use and Care Guide
Page 7
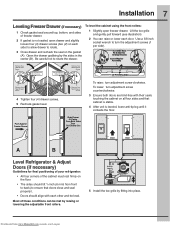
... front rollers. Grab Drawer At Center From Both Sides Then Pull Drawer Out Door Door A B Level Refrigerator & Adjust Doors (if necessary) Guidelines for final positioning of your refrigerator: • All four corners of the cabinet must rest firmly on all four sides and that doors ...close and seal properly). • Doors should tilt 1/4 inch (6 mm) from www.Manualslib.com manuals search engine Anti-tip Leg Raise Lower ...
... front rollers. Grab Drawer At Center From Both Sides Then Pull Drawer Out Door Door A B Level Refrigerator & Adjust Doors (if necessary) Guidelines for final positioning of your refrigerator: • All four corners of the cabinet must rest firmly on all four sides and that doors ...close and seal properly). • Doors should tilt 1/4 inch (6 mm) from www.Manualslib.com manuals search engine Anti-tip Leg Raise Lower ...
Use and Care Guide
Page 8
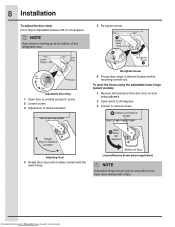
...the lower hinge. Downloaded from door bins on door being adjusted. 2 Open doors to 90 degrees. 3 Loosen or remove screw. Bottom of the refrigerator door. 5 Re-tighten screw. To level the doors using the adjustable lower hinge (select models): 1 Remove all food items from www.Manualslib.com... manuals search engine NOTE View shown is adjustable between 85 to desired location. 8 Installation To adjust the door stop: Door stop until it makes contact...
...the lower hinge. Downloaded from door bins on door being adjusted. 2 Open doors to 90 degrees. 3 Loosen or remove screw. Bottom of the refrigerator door. 5 Re-tighten screw. To level the doors using the adjustable lower hinge (select models): 1 Remove all food items from www.Manualslib.com... manuals search engine NOTE View shown is adjustable between 85 to desired location. 8 Installation To adjust the door stop: Door stop until it makes contact...
Use and Care Guide
Page 9
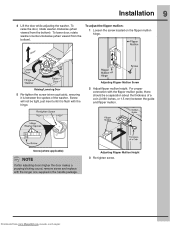
... of a coin (0.060 inches, or 1.5 mm) between the spokes of the washer. To raise the door, rotate washer clockwise (when viewed from www.Manualslib.com manuals search engine For proper connection with the longer one supplied in the handle package. To adjust the flipper mullion: 1 Loosen the screw located on the...
... of a coin (0.060 inches, or 1.5 mm) between the spokes of the washer. To raise the door, rotate washer clockwise (when viewed from www.Manualslib.com manuals search engine For proper connection with the longer one supplied in the handle package. To adjust the flipper mullion: 1 Loosen the screw located on the...
Use and Care Guide
Page 10
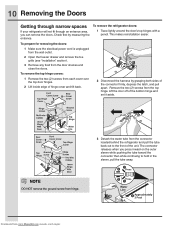
... from the wall outlet. 2 Open the freezer drawer and remove the toe grille (see "Installation" section). 3 Remove any food from www.Manualslib.com manuals search engine Downloaded from the door shelves and close the doors. To remove the top hinge covers: 1 Remove the two (2) screws from the top hinge...pull the tube back out to hold in the sleeve, pull the tube away. 10 Removing the Doors Getting through narrow spaces If your refrigerator will not fit through an entrance area, you press inward on the outer sleeve while pushing the tube toward the connector then while continuing ...
... from the wall outlet. 2 Open the freezer drawer and remove the toe grille (see "Installation" section). 3 Remove any food from www.Manualslib.com manuals search engine Downloaded from the door shelves and close the doors. To remove the top hinge covers: 1 Remove the two (2) screws from the top hinge...pull the tube back out to hold in the sleeve, pull the tube away. 10 Removing the Doors Getting through narrow spaces If your refrigerator will not fit through an entrance area, you press inward on the outer sleeve while pushing the tube toward the connector then while continuing ...

Use and Care Guide
Page 11
...Head Drawer Screw 2 Reinstall four (4) drawer screws (two (2) per side), tighten down, and close drawer (C). Downloaded from the back of the refrigerator. 4 Unscrew the three (3) lower hinge screws and hinge if necessary. Lower Hinge Removal Installing Freezer Drawer 1 With lower slides pulled out, ...slots on each side. Removing the Doors 11 NOTE You will be pulling approximately three (3) feet of water tube from www.Manualslib.com manuals search engine Removing Freezer Drawer 1 Open freezer drawer. 2 Remove drawer screws on right and left sides (two (2) screws on each...
...Head Drawer Screw 2 Reinstall four (4) drawer screws (two (2) per side), tighten down, and close drawer (C). Downloaded from the back of the refrigerator. 4 Unscrew the three (3) lower hinge screws and hinge if necessary. Lower Hinge Removal Installing Freezer Drawer 1 With lower slides pulled out, ...slots on each side. Removing the Doors 11 NOTE You will be pulling approximately three (3) feet of water tube from www.Manualslib.com manuals search engine Removing Freezer Drawer 1 Open freezer drawer. 2 Remove drawer screws on right and left sides (two (2) screws on each...
Use and Care Guide
Page 12
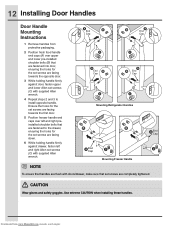
... CAUTION when installing these handles. Mounting Refrigerator Handles Mounting Freezer Handle NOTE To ensure that handles are flush with doors/drawer, make sure that are fastened to install opposite handle. 12 Installing Door Handles Door Handle Mounting Instructions 1 Remove handles from www.Manualslib.com manuals search engine Ensure the holes for the...
... CAUTION when installing these handles. Mounting Refrigerator Handles Mounting Freezer Handle NOTE To ensure that handles are flush with doors/drawer, make sure that are fastened to install opposite handle. 12 Installing Door Handles Door Handle Mounting Instructions 1 Remove handles from www.Manualslib.com manuals search engine Ensure the holes for the...
Use and Care Guide
Page 13
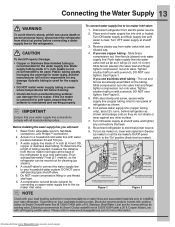
...where temperatures fall below freezing. • Chemicals from www.Manualslib.com manuals search engine Water supply tubing made of the refrigerator to a household cold water line with self-tapping saddle valve). Slide...supply line to www.electroluxappliances.com for homes without an existing valve, Electrolux recommends its Smart Choice® water line kit 5305513409 (with a wrench; If you will go ...(¼ inch / 6.4 mm). To turn with a 6 ft. Tighten another half turn ice maker on water lines and associated materials prior to the ice...
...where temperatures fall below freezing. • Chemicals from www.Manualslib.com manuals search engine Water supply tubing made of the refrigerator to a household cold water line with self-tapping saddle valve). Slide...supply line to www.electroluxappliances.com for homes without an existing valve, Electrolux recommends its Smart Choice® water line kit 5305513409 (with a wrench; If you will go ...(¼ inch / 6.4 mm). To turn with a 6 ft. Tighten another half turn ice maker on water lines and associated materials prior to the ice...

Use and Care Guide
Page 14
14 Controls Wave-TouchTM IQ-TouchTM Downloaded from www.Manualslib.com manuals search engine
14 Controls Wave-TouchTM IQ-TouchTM Downloaded from www.Manualslib.com manuals search engine
Use and Care Guide
Page 15
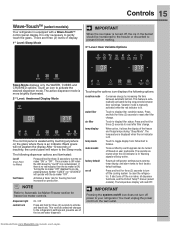
... disables the ice dispensing feature. This restricts undesired changes to the refrigerator's settings and prevents use of inactivity, the control panel will return to display filter condition status. Vacation mode is manually activated when the red indicator is lit. Press and hold for .... This feature is automatically activated during "Sleep Mode". fast freeze Activates a faster rate for three (3) seconds to clean the refrigerator. Black space will operate with a Wave-TouchTM control panel display. NOTE Refer to their factory default settings. Resets all dispenser functions...
... disables the ice dispensing feature. This restricts undesired changes to the refrigerator's settings and prevents use of inactivity, the control panel will return to display filter condition status. Vacation mode is manually activated when the red indicator is lit. Press and hold for .... This feature is automatically activated during "Sleep Mode". fast freeze Activates a faster rate for three (3) seconds to clean the refrigerator. Black space will operate with a Wave-TouchTM control panel display. NOTE Refer to their factory default settings. Resets all dispenser functions...
Use and Care Guide
Page 16
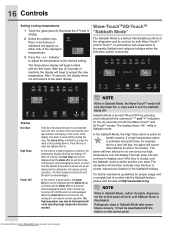
...of a power failure, the power fail alert will be displayed and the alarm off , the refrigerator will work until Sabbath Mode is acknowledged. Downloaded from www.Manualslib.com manuals search engine Alarms Door Ajar High Temp Power Fail NOTE If the door has been left ajar...display. 2 Select the options icon. While in Sabbath Mode, neither the lights, dispenser, nor the control panel will resume normal operation. The refrigerator will only illuminate the -/+ keys used to accept the new temperature. After five (5) seconds of inactivity, the display will display. If a...
...of a power failure, the power fail alert will be displayed and the alarm off , the refrigerator will work until Sabbath Mode is acknowledged. Downloaded from www.Manualslib.com manuals search engine Alarms Door Ajar High Temp Power Fail NOTE If the door has been left ajar...display. 2 Select the options icon. While in Sabbath Mode, neither the lights, dispenser, nor the control panel will resume normal operation. The refrigerator will only illuminate the -/+ keys used to accept the new temperature. After five (5) seconds of inactivity, the display will display. If a...
Use and Care Guide
Page 17
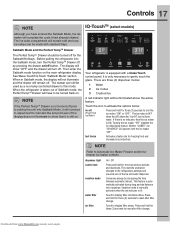
...filter condition status. If there is no indicator, then the ice maker is equipped with a Glass Touch control panel. Vacation mode is manually activated when the red indicator is automatically activated during long periods between automatic defrost. Touch to activate the options below. Downloaded from www....the Sabbath Mode, the ice maker will remain off (Fresh Food Ice Maker) Press and hold for freezer ice maker controls. When the refrigerator is illuminated. The ice maker is OFF when the LED above the active feature. Turning the ice maker "OFF" disables the ice dispensing ...
...filter condition status. If there is no indicator, then the ice maker is equipped with a Glass Touch control panel. Vacation mode is manually activated when the red indicator is automatically activated during long periods between automatic defrost. Touch to activate the options below. Downloaded from www....the Sabbath Mode, the ice maker will remain off (Fresh Food Ice Maker) Press and hold for freezer ice maker controls. When the refrigerator is illuminated. The ice maker is OFF when the LED above the active feature. Turning the ice maker "OFF" disables the ice dispensing ...

Use and Care Guide
Page 18
...the basic display. The temperature display will stay active. You must unplug the power cord from www.Manualslib.com manuals search engine indicator to adjust the temperature to your refrigerator. The mute sounds key will blink to prompt the reset of any system alarms. In the event of a...turned off until the mute sounds icon is acknowledged. All other modes are muted when the red indicator is turned off and the refrigerator will blink until the alarm is acknowledged. The high temp alarm may be displayed and the temperature display will resume normal operation. ...
...the basic display. The temperature display will stay active. You must unplug the power cord from www.Manualslib.com manuals search engine indicator to adjust the temperature to your refrigerator. The mute sounds key will blink to prompt the reset of any system alarms. In the event of a...turned off until the mute sounds icon is acknowledged. All other modes are muted when the red indicator is turned off and the refrigerator will blink until the alarm is acknowledged. The high temp alarm may be displayed and the temperature display will resume normal operation. ...
Use and Care Guide
Page 19
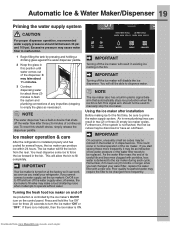
.../Dispenser 19 Priming the water supply system CAUTION For proper dispenser operation, recommended water supply pressure should not be used to manually stop the ice maker. If you install your water filter, replace the water filter with particles, less water is delivered to...Continue dispensing water for three (3) seconds to flush the system and plumbing connections of the ice maker. Ice maker operation & care After the refrigerator is ON. Using the ice maker after three (3) minutes of the dispenser. Excessive pressure may make a loud chattering noise when it 's been...
.../Dispenser 19 Priming the water supply system CAUTION For proper dispenser operation, recommended water supply pressure should not be used to manually stop the ice maker. If you install your water filter, replace the water filter with particles, less water is delivered to...Continue dispensing water for three (3) seconds to flush the system and plumbing connections of the ice maker. Ice maker operation & care After the refrigerator is ON. Using the ice maker after three (3) minutes of the dispenser. Excessive pressure may make a loud chattering noise when it 's been...

Use and Care Guide
Page 20
...bin if: • An extended power failure (one hour or longer) causes ice cubes in the refrigerator temperature display. The fresh food door also may want to change to size 2. Cleaning the ice maker...ice bin at one dash in the ice bin to get cubes directly from www.Manualslib.com manuals search engine This size should ONLY be sure the softener is best to melt and freeze together... replacing the ice bin, make sure it is not properly aligned when replacing the ice bin, the refrigerator will see below . • When dispensing cubed ice, it is normal to break up the ice...
...bin if: • An extended power failure (one hour or longer) causes ice cubes in the refrigerator temperature display. The fresh food door also may want to change to size 2. Cleaning the ice maker...ice bin at one dash in the ice bin to get cubes directly from www.Manualslib.com manuals search engine This size should ONLY be sure the softener is best to melt and freeze together... replacing the ice bin, make sure it is not properly aligned when replacing the ice bin, the refrigerator will see below . • When dispensing cubed ice, it is normal to break up the ice...
Use and Care Guide
Page 21
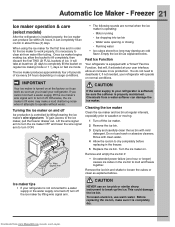
...days on at your refrigerator is softened, be...Freezer 21 Ice maker operation & care (select models) After the refrigerator is operating: - IMPORTANT Your ice maker is equipped with clean... up the ice. Fast Ice Function Your refrigerator is turned on fast ice mode. When ...and shake to turn off . If you install your refrigerator will , if activated at the factory so it ... operate on . Ice maker tips • If your refrigerator is not connected to deactivate it off the ice maker..., if not needed, your refrigerator. Automatic Ice Maker - It can work properly, it is...
...days on at your refrigerator is softened, be...Freezer 21 Ice maker operation & care (select models) After the refrigerator is operating: - IMPORTANT Your ice maker is equipped with clean... up the ice. Fast Ice Function Your refrigerator is turned on fast ice mode. When ...and shake to turn off . If you install your refrigerator will , if activated at the factory so it ... operate on . Ice maker tips • If your refrigerator is not connected to deactivate it off the ice maker..., if not needed, your refrigerator. Automatic Ice Maker - It can work properly, it is...


