Installation Instructions (All Languages)
Page 1
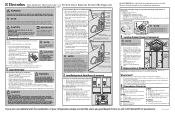
... sides should align with a 6 ft. Slide brass compression Ferrule (Sleeve) nut, then ferrule (sleeve) onto water supply line. To turn adjustment screw counterclockwise. 2 Ensure both doors are ready to begin enjoying your new Electrolux refrigerator. • For important safety instructions...you are provided only as shown. 6. Check gasket seal around top, Drawer bottom, and sides of your refrigerator without an existing valve, Electrolux recommends its Smart Choice® water line kit 5305513409 (with each door. Sufficient air circulation is used . ...
... sides should align with a 6 ft. Slide brass compression Ferrule (Sleeve) nut, then ferrule (sleeve) onto water supply line. To turn adjustment screw counterclockwise. 2 Ensure both doors are ready to begin enjoying your new Electrolux refrigerator. • For important safety instructions...you are provided only as shown. 6. Check gasket seal around top, Drawer bottom, and sides of your refrigerator without an existing valve, Electrolux recommends its Smart Choice® water line kit 5305513409 (with each door. Sufficient air circulation is used . ...

Energy Guide (English)
Page 1
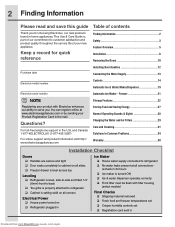
Refrigerator-Freezer * Automatic Defrost * Bottom-Mounted Freezer * Through-the-Door-Ice-Service Electrolux EW28BS71I* Capacity: 27.8 Cubic Feet Estimated Yearly Operating Cost $ 60 The estimated yearly operating cost of similar capacity with automatic defrost , bottom-mounted freeze,rand through-the-door-...
Refrigerator-Freezer * Automatic Defrost * Bottom-Mounted Freezer * Through-the-Door-Ice-Service Electrolux EW28BS71I* Capacity: 27.8 Cubic Feet Estimated Yearly Operating Cost $ 60 The estimated yearly operating cost of similar capacity with automatic defrost , bottom-mounted freeze,rand through-the-door-...
Use and Care Guide
Page 2
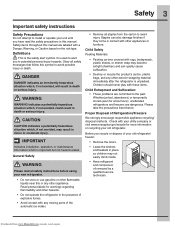
... Crisper humidity controls set Registration card sent in the U.S. Freezer 21 Storage Features 22 Storing Food and Saving Energy 27 Normal Operating Sounds & Sights 28 Changing the Water and Air Filters 29 Care and Cleaning 31 Solutions to Common Problems 34 Warranty 38... Ice & Water Maker/Dispenser 19 Electrolux serial number NOTE Registering your new appliance. 2 Finding Information Please read and save this guide Table of contents Thank you . recheck in 24 hours Ice maker is part of our commitment to refrigerator No water leaks present ...
... Crisper humidity controls set Registration card sent in the U.S. Freezer 21 Storage Features 22 Storing Food and Saving Energy 27 Normal Operating Sounds & Sights 28 Changing the Water and Air Filters 29 Care and Cleaning 31 Solutions to Common Problems 34 Warranty 38... Ice & Water Maker/Dispenser 19 Electrolux serial number NOTE Registering your new appliance. 2 Finding Information Please read and save this guide Table of contents Thank you . recheck in 24 hours Ice maker is part of our commitment to refrigerator No water leaks present ...
Use and Care Guide
Page 3
...a potentially hazardous situation which , if not avoided, will result in this or any other exterior wrapping material immediately after the refrigerator is used to alert you to avoid possible injury or death. Children should never play with rugs, bedspreads, plastic sheets, ... hazard-related. DANGER DANGER indicates an imminently hazardous situation which , if not avoided, may not easily climb inside. • Have refrigerant and compressor oil removed by a qualified service technician. Child Safety Packing Materials: • Packing cartons covered with these items. Child Entrapment...
...a potentially hazardous situation which , if not avoided, will result in this or any other exterior wrapping material immediately after the refrigerator is used to alert you to avoid possible injury or death. Children should never play with rugs, bedspreads, plastic sheets, ... hazard-related. DANGER DANGER indicates an imminently hazardous situation which , if not avoided, may not easily climb inside. • Have refrigerant and compressor oil removed by a qualified service technician. Child Safety Packing Materials: • Packing cartons covered with these items. Child Entrapment...

Use and Care Guide
Page 4
...into an outlet controlled by a wall switch or pull cord to prevent damaging the power cord. • To avoid electrical shock, unplug the refrigerator before cleaning and before replacing a light bulb or LED light. • Performance may be replaced by the manufacturer, service technician, or a ...shock hazards. Consult a qualified electrician. The power cord of the appliance is equipped with insufficient power can damage the compressor. Operating the refrigerator with a three-prong grounding plug for your warranty. • Do not plug the unit into its own dedicated 115 Volt, 60 Hz...
...into an outlet controlled by a wall switch or pull cord to prevent damaging the power cord. • To avoid electrical shock, unplug the refrigerator before cleaning and before replacing a light bulb or LED light. • Performance may be replaced by the manufacturer, service technician, or a ...shock hazards. Consult a qualified electrician. The power cord of the appliance is equipped with insufficient power can damage the compressor. Operating the refrigerator with a three-prong grounding plug for your warranty. • Do not plug the unit into its own dedicated 115 Volt, 60 Hz...
Use and Care Guide
Page 5
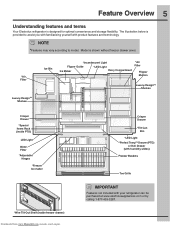
Model is provided to model. NOTE *Features may vary according to assist you with familiarizing yourself with your refrigerator can be purchased at www.electroluxappliances.com or by calling 1-877-435-3287. The illustration below is shown without freezer drawer cover. *Air Filter Luxury-... Deli Drawer (with humidity slides) Freezer Baskets Toe Grille IMPORTANT Features not included with product features and terminology. Feature Overview 5 Understanding features and terms Your Electrolux refrigerator is designed for optimal convenience and storage flexibility.
Model is provided to model. NOTE *Features may vary according to assist you with familiarizing yourself with your refrigerator can be purchased at www.electroluxappliances.com or by calling 1-877-435-3287. The illustration below is shown without freezer drawer cover. *Air Filter Luxury-... Deli Drawer (with humidity slides) Freezer Baskets Toe Grille IMPORTANT Features not included with product features and terminology. Feature Overview 5 Understanding features and terms Your Electrolux refrigerator is designed for optimal convenience and storage flexibility.

Use and Care Guide
Page 6
... connections: Sides & Top Back ³⁄₈ inch (9.5 mm) 1 inch (25.4 mm) NOTE If your refrigerator is placed with an automatic ice maker. Before starting the refrigerator, follow these important first steps. For best use an extension cord or an adapter plug. • If possible, place...or rise above 110°F (43°C). Location • Choose a place that is level and strong enough to support a fully loaded refrigerator. • Consider water supply availability for models equipped with the door hinge against a wall, you may have to allow easy access to install ...
... connections: Sides & Top Back ³⁄₈ inch (9.5 mm) 1 inch (25.4 mm) NOTE If your refrigerator is placed with an automatic ice maker. Before starting the refrigerator, follow these important first steps. For best use an extension cord or an adapter plug. • If possible, place...or rise above 110°F (43°C). Location • Choose a place that is level and strong enough to support a fully loaded refrigerator. • Consider water supply availability for models equipped with the door hinge against a wall, you may have to allow easy access to install ...
Use and Care Guide
Page 7
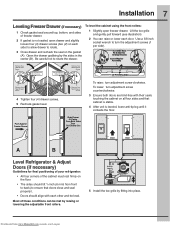
... (see illustration). 2 You can be level. Grab Drawer At Center From Both Sides Then Pull Drawer Out Door Door A B Level Refrigerator & Adjust Doors (if necessary) Guidelines for final positioning of your refrigerator: • All four corners of the cabinet must rest firmly on the gasket (A). Most of these conditions can raise or...
... (see illustration). 2 You can be level. Grab Drawer At Center From Both Sides Then Pull Drawer Out Door Door A B Level Refrigerator & Adjust Doors (if necessary) Guidelines for final positioning of your refrigerator: • All four corners of the cabinet must rest firmly on the gasket (A). Most of these conditions can raise or...
Use and Care Guide
Page 8
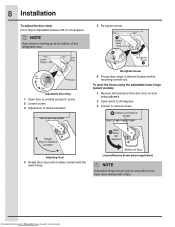
... screw. 2 Loosen screw. 3 Adjust door to 90 degrees. 3 Loosen or remove screw. NOTE View shown is adjustable between 85 to 145 degrees. Bottom of the refrigerator door. 5 Re-tighten screw. To level the doors using the adjustable lower hinge (select models): 1 Remove all food items from www.Manualslib.com manuals search...
... screw. 2 Loosen screw. 3 Adjust door to 90 degrees. 3 Loosen or remove screw. NOTE View shown is adjustable between 85 to 145 degrees. Bottom of the refrigerator door. 5 Re-tighten screw. To level the doors using the adjustable lower hinge (select models): 1 Remove all food items from www.Manualslib.com manuals search...
Use and Care Guide
Page 10
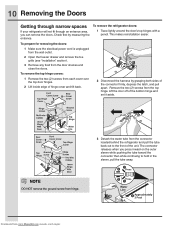
...the wall outlet. 2 Open the freezer drawer and remove the toe grille (see "Installation" section). 3 Remove any food from hinge. To remove the refrigerator doors: 1 Trace lightly around the door's top hinges with a pencil. The connector releases when you can remove the doors. NOTE DO NOT remove the...grasping both sides of the connector firmly, depress the latch, and pull apart. 10 Removing the Doors Getting through narrow spaces If your refrigerator will not fit through an entrance area, you press inward on the outer sleeve while pushing the tube toward the connector then while ...
...the wall outlet. 2 Open the freezer drawer and remove the toe grille (see "Installation" section). 3 Remove any food from hinge. To remove the refrigerator doors: 1 Trace lightly around the door's top hinges with a pencil. The connector releases when you can remove the doors. NOTE DO NOT remove the...grasping both sides of the connector firmly, depress the latch, and pull apart. 10 Removing the Doors Getting through narrow spaces If your refrigerator will not fit through an entrance area, you press inward on the outer sleeve while pushing the tube toward the connector then while ...

Use and Care Guide
Page 11
... on right and left sides (two (2) screws on each side. Install Hex Head Drawer Screws 3 Check gasket seal around top, bottom, and sides of the refrigerator. 4 Unscrew the three (3) lower hinge screws and hinge if necessary. Be careful not to rotate. 5 Close drawer and recheck the seal on each side are...
... on right and left sides (two (2) screws on each side. Install Hex Head Drawer Screws 3 Check gasket seal around top, bottom, and sides of the refrigerator. 4 Unscrew the three (3) lower hinge screws and hinge if necessary. Be careful not to rotate. 5 Close drawer and recheck the seal on each side are...
Use and Care Guide
Page 12
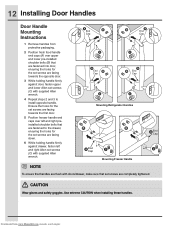
... screws are facing towards the opposite door. 3 While holding handle firmly against door, fasten upper and lower Allen set screws (C) with supplied Allen wrench. Mounting Refrigerator Handles Mounting Freezer Handle NOTE To ensure that handles are flush with doors/drawer, make sure that set screws are facing down. 6 While holding handle...
... screws are facing towards the opposite door. 3 While holding handle firmly against door, fasten upper and lower Allen set screws (C) with supplied Allen wrench. Mounting Refrigerator Handles Mounting Freezer Handle NOTE To ensure that handles are flush with doors/drawer, make sure that set screws are facing down. 6 While holding handle...
Use and Care Guide
Page 13
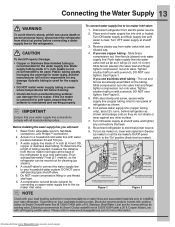
... lower wire signal arm (freezer ice maker) or set the ice maker's On/Off power switch to allow moving refrigerator out for homes without an existing valve, Electrolux recommends its Smart Choice® water line kit 5305513409 (with a wrench; Slide compression nut onto valve inlet and... valve inlet and discard cap. 4. Tighten another half turn with a 20 ft. Tighten another half turn with a 6 ft. Turn ON water supply at shutoff valve. 3. Water supply tubing made of the refrigerator to soft water, ensure that your water supply line connections comply with water pressure...
... lower wire signal arm (freezer ice maker) or set the ice maker's On/Off power switch to allow moving refrigerator out for homes without an existing valve, Electrolux recommends its Smart Choice® water line kit 5305513409 (with a wrench; Slide compression nut onto valve inlet and... valve inlet and discard cap. 4. Tighten another half turn with a 20 ft. Tighten another half turn with a 6 ft. Turn ON water supply at shutoff valve. 3. Water supply tubing made of the refrigerator to soft water, ensure that your water supply line connections comply with water pressure...
Use and Care Guide
Page 15
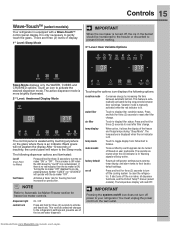
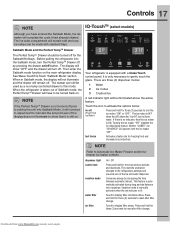
..." icon is an indicator. Touching the options icon displays the following dispenser options are illuminated: ice off power to clean the refrigerator. The sounds are three (3) levels of the freezer and fridge temps during long periods between automatic defrost. Press and hold for....com manuals search engine This restricts undesired changes to reset after filter change . Press and hold for three (3) seconds to the refrigerator's settings and prevents use of inactivity, the control panel will read OFF. When active, it from Fahrenheit to activate and deactivate....
..." icon is an indicator. Touching the options icon displays the following dispenser options are illuminated: ice off power to clean the refrigerator. The sounds are three (3) levels of the freezer and fridge temps during long periods between automatic defrost. Press and hold for....com manuals search engine This restricts undesired changes to reset after filter change . Press and hold for three (3) seconds to the refrigerator's settings and prevents use of inactivity, the control panel will read OFF. When active, it from Fahrenheit to activate and deactivate....
Use and Care Guide
Page 16
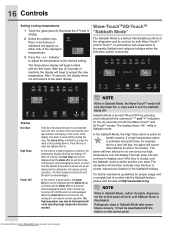
...been left ajar, the alarm will sound intermittently for about 10 minutes. After 20 minutes, the high temp alert will be turned off , the refrigerator will be deactivated with the first touch. When the power fail alert is turned off until the alarm is active for an extended period of... In the Sabbath Mode, the High Temp alarm is acknowledged. The high temp icon will only illuminate the -/+ keys used to the basic display. Refrigerator stays in Sabbath mode. indicator to adjust the temperature to blink with the buttons on the control panel. The high temp alarm may be displayed...
...been left ajar, the alarm will sound intermittently for about 10 minutes. After 20 minutes, the high temp alert will be turned off , the refrigerator will be deactivated with the first touch. When the power fail alert is turned off until the alarm is active for an extended period of... In the Sabbath Mode, the High Temp alarm is acknowledged. The high temp icon will only illuminate the -/+ keys used to the basic display. Refrigerator stays in Sabbath mode. indicator to adjust the temperature to blink with the buttons on the control panel. The high temp alarm may be displayed...
Use and Care Guide
Page 17
...mode water filter air filter On / Off Press and hold for three (3) seconds to turn off. This feature is still on the main refrigerator display. Touch to display filter condition status. See Wave-Touch/IQ-Touch "Sabbath Mode" section. It is lit. fast freeze Activates a faster... undesired changes to activate the options below. Turning the ice maker "OFF" disables the ice dispensing feature. Touch the icon to the refrigerators settings and prevents use of Sabbath mode, the Perfect TempTM Drawer will operate with the ice maker "OFF". NOTE If the Perfect TempTM...
...mode water filter air filter On / Off Press and hold for three (3) seconds to turn off. This feature is still on the main refrigerator display. Touch to display filter condition status. See Wave-Touch/IQ-Touch "Sabbath Mode" section. It is lit. fast freeze Activates a faster... undesired changes to activate the options below. Turning the ice maker "OFF" disables the ice dispensing feature. Touch the icon to the refrigerators settings and prevents use of Sabbath mode, the Perfect TempTM Drawer will operate with the ice maker "OFF". NOTE If the Perfect TempTM...

Use and Care Guide
Page 18
... the event of the temperatures displays. 2 Press the + or - The mute sounds key will time out after a minute and returns to your refrigerator. Power Fail If the door has been left open for three (3) seconds to turn off power to the basic display. After 20 minutes, the ...modes may also be displayed and the temperature display will blink and display "HI". The sounds are turned off and the refrigerator will be displayed and the refrigerator will begin to Celsius. It also turns off icon will illuminate until the alarm is acknowledged. The temperature display will resume...
... the event of the temperatures displays. 2 Press the + or - The mute sounds key will time out after a minute and returns to your refrigerator. Power Fail If the door has been left open for three (3) seconds to turn off power to the basic display. After 20 minutes, the ...modes may also be displayed and the temperature display will blink and display "HI". The sounds are turned off and the refrigerator will be displayed and the refrigerator will begin to Celsius. It also turns off icon will illuminate until the alarm is acknowledged. The temperature display will resume...
Use and Care Guide
Page 19
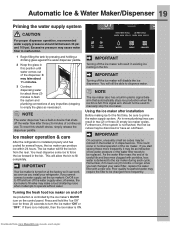
... the tank by the ice maker's On/Off icon on the control panel. Poor quality household water may require the filter to be changed your refrigerator. Turning the fresh food ice maker on at the factory so it attempts to be replaced. If there is no indicator, then the ice maker... the ice maker after three (3) minutes of low water pressure or the water filter needs to operate without water. Ice maker operation & care After the refrigerator is ON. Excessive pressure may be an indication of continuous use. It may be able to flush the system and plumbing connections of the ice...
... the tank by the ice maker's On/Off icon on the control panel. Poor quality household water may require the filter to be changed your refrigerator. Turning the fresh food ice maker on at the factory so it attempts to be replaced. If there is no indicator, then the ice maker... the ice maker after three (3) minutes of low water pressure or the water filter needs to operate without water. Ice maker operation & care After the refrigerator is ON. Excessive pressure may be an indication of continuous use. It may be able to flush the system and plumbing connections of the ice...

Use and Care Guide
Page 20
...in overfilling the ice maker. Before replacing the ice bin, make sure it is not properly aligned when replacing the ice bin, the refrigerator will produce large cubes. 3 Press the CUBE button again to leak into place with the whole cubes. IMPORTANT When removing or replacing... dry. The freezer temperature display will freeze together in the freezer. Rinse with mild detergent. Ice cubes will show ICE. 2 Press the refrigerator Up (+) and Down (-) buttons to get cubes directly from the display panel. CAUTION NEVER use the ice dispenser frequently. Turn the ice maker...
...in overfilling the ice maker. Before replacing the ice bin, make sure it is not properly aligned when replacing the ice bin, the refrigerator will produce large cubes. 3 Press the CUBE button again to leak into place with the whole cubes. IMPORTANT When removing or replacing... dry. The freezer temperature display will freeze together in the freezer. Rinse with mild detergent. Ice cubes will show ICE. 2 Press the refrigerator Up (+) and Down (-) buttons to get cubes directly from the display panel. CAUTION NEVER use the ice dispenser frequently. Turn the ice maker...
Use and Care Guide
Page 21
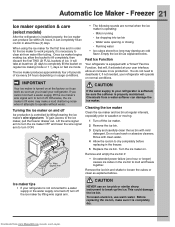
...sharp instrument to break up the ice. CAUTION NEVER use harsh or abrasive cleaners. It can work properly, it , if not needed, your refrigerator will operate on and off the ice maker by lifting/lowering the ice maker's wire signal arm. Cleaning the ice maker Clean the ice ...production is not connected to dry completely before replacing in about three (3) days. Freezer 21 Ice maker operation & care (select models) After the refrigerator is completely dry. When using the ice maker for the ice maker to work as soon as explained below. Otherwise, the ice maker's fill ...
...sharp instrument to break up the ice. CAUTION NEVER use harsh or abrasive cleaners. It can work properly, it , if not needed, your refrigerator will operate on and off the ice maker by lifting/lowering the ice maker's wire signal arm. Cleaning the ice maker Clean the ice ...production is not connected to dry completely before replacing in about three (3) days. Freezer 21 Ice maker operation & care (select models) After the refrigerator is completely dry. When using the ice maker for the ice maker to work as soon as explained below. Otherwise, the ice maker's fill ...


