Wiring Diagram (All Languages)
Page 3
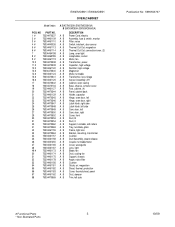
...58 75304470565 A EW27MO55H (EW27MO55HSA) B EW30MO55H (EW30MO55HSA) DESCRIPTION A B Power Cord, electric A B Assembly, fuse & switch, monitor A B Filter, noise A B Switch, interlock, door sensor A B Thermal Cut-Out, magnetron A B Thermal Cut-Out, convection/oven, (2) A B Lamp, oven light A B Lampholder, socket A B Motor, fan A B Transformer, power A B Capacitor, high voltage A B Rectifier, high voltage A B Magnetron A B Motor, turntable A B Transformer, low voltage A B Sensor Assembly, AH A B Cabinet, outer casing A B Base, chassis, w/motor cover A B Foot, cabinet, (4) A B Panel, cabinet back...
...58 75304470565 A EW27MO55H (EW27MO55HSA) B EW30MO55H (EW30MO55HSA) DESCRIPTION A B Power Cord, electric A B Assembly, fuse & switch, monitor A B Filter, noise A B Switch, interlock, door sensor A B Thermal Cut-Out, magnetron A B Thermal Cut-Out, convection/oven, (2) A B Lamp, oven light A B Lampholder, socket A B Motor, fan A B Transformer, power A B Capacitor, high voltage A B Rectifier, high voltage A B Magnetron A B Motor, turntable A B Transformer, low voltage A B Sensor Assembly, AH A B Cabinet, outer casing A B Base, chassis, w/motor cover A B Foot, cabinet, (4) A B Panel, cabinet back...
Installation Instructions (All Languages)
Page 1
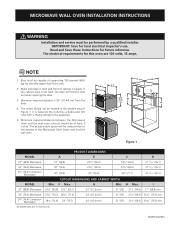
... 1. If the cabinet base is square. Minimum required distance between the Microwave Oven and the wall oven cutouts should not be located in inches (cm). E1 TINSEB504MRR0 Minimum required distance is required the outlet be a dedicated 120 volts with a 15amp rating for this oven are in the shaded area of Figure 1. MICROWAVE WALL OVEN INSTALLATION INSTRUCTIONS Installation and service must be capable of supporting 150 pounds...
... 1. If the cabinet base is square. Minimum required distance between the Microwave Oven and the wall oven cutouts should not be located in inches (cm). E1 TINSEB504MRR0 Minimum required distance is required the outlet be a dedicated 120 volts with a 15amp rating for this oven are in the shaded area of Figure 1. MICROWAVE WALL OVEN INSTALLATION INSTRUCTIONS Installation and service must be capable of supporting 150 pounds...

Installation Instructions (All Languages)
Page 2
... to the oven control, during cold temperature weather, wait at power on. DO NOT REMOVE THE WAVEGUIDE COVER, which is located on a 120 volt, 60 Hz electrical supply with a separate ground wire. Be sure to leave these instructions with the Microwave Wall Oven must be attached to the cabinet and the appliance to prevent tipping of the door. 5. The Anti-Tip brackets supplied with your Owner's Guide for...
... to the oven control, during cold temperature weather, wait at power on. DO NOT REMOVE THE WAVEGUIDE COVER, which is located on a 120 volt, 60 Hz electrical supply with a separate ground wire. Be sure to leave these instructions with the Microwave Wall Oven must be attached to the cabinet and the appliance to prevent tipping of the door. 5. The Anti-Tip brackets supplied with your Owner's Guide for...
Installation Instructions (All Languages)
Page 3
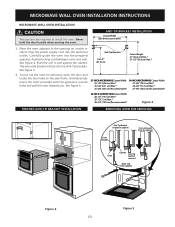
...-tip bracket installation removing oven for servicing, open the door and locate the two holes on a table or stand. Never hold the door handle when moving the oven. anti-tip bracket installation Cutout Width (See dimensions below) 3. See Figure 4. See Figure 3. 4. Simultaneously insert the tools provided with the appliance in both holes and pull the oven towards you. MICROWAVE WALL OVEN INSTALLATION INSTRUCTIONS Microwave Wall Oven Installation Two persons are required to the opening . The oven side bracket will...
...-tip bracket installation removing oven for servicing, open the door and locate the two holes on a table or stand. Never hold the door handle when moving the oven. anti-tip bracket installation Cutout Width (See dimensions below) 3. See Figure 4. See Figure 3. 4. Simultaneously insert the tools provided with the appliance in both holes and pull the oven towards you. MICROWAVE WALL OVEN INSTALLATION INSTRUCTIONS Microwave Wall Oven Installation Two persons are required to the opening . The oven side bracket will...
Installation Instructions (All Languages)
Page 4
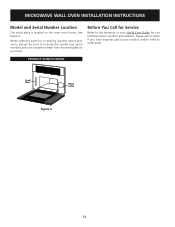
... parts. PRODUCT IDENTIFICATION Serial Plate Menu Label Figure 6 E4 Before You Call for our toll-free service number and address. When ordering parts for or making inquires about your Use & Care Guide for Service Refer to the warranty in your product and/or need to include the model and serial numbers and a lot number or letter from the serial plate on the oven front frame. MICROWAVE WALL OVEN INSTALLATION INSTRUCTIONS Model and Serial Number Location The serial plate is located on your oven...
... parts. PRODUCT IDENTIFICATION Serial Plate Menu Label Figure 6 E4 Before You Call for our toll-free service number and address. When ordering parts for or making inquires about your Use & Care Guide for Service Refer to the warranty in your product and/or need to include the model and serial numbers and a lot number or letter from the serial plate on the oven front frame. MICROWAVE WALL OVEN INSTALLATION INSTRUCTIONS Model and Serial Number Location The serial plate is located on your oven...
Product Specifications Sheet (English)
Page 1
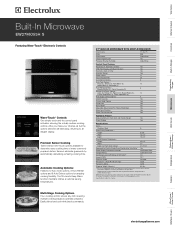
...-DOWN DOOR Oven Cavity Watts Oven Interior Interior Krypton Light Porcelain Enamel Turntable 1.5 Cu. Ft. 900 Cobalt Blue Yes Cobalt Blue Control Panel Features Wave-Touch™ Electronic Controls Yes VFD Front Display with simple commands. Appliance must be used in combination with a separate ground wire. Multi-Stage Cooking Options Four cooking options ensure any Electrolux Electric Single Wall Oven and/or Warmer Drawer. Pizza (1), Snacks (3), Kid's Meals (3), 12 Soften / Melt (4), Beverage (1) Auto Reheat Options - Cook (5), Reheat (1), Popcorn...
...-DOWN DOOR Oven Cavity Watts Oven Interior Interior Krypton Light Porcelain Enamel Turntable 1.5 Cu. Ft. 900 Cobalt Blue Yes Cobalt Blue Control Panel Features Wave-Touch™ Electronic Controls Yes VFD Front Display with simple commands. Appliance must be used in combination with a separate ground wire. Multi-Stage Cooking Options Four cooking options ensure any Electrolux Electric Single Wall Oven and/or Warmer Drawer. Pizza (1), Snacks (3), Kid's Meals (3), 12 Soften / Melt (4), Beverage (1) Auto Reheat Options - Cook (5), Reheat (1), Popcorn...
Product Specifications Sheet (English)
Page 2
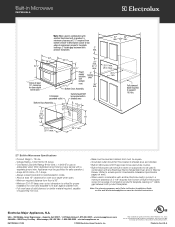
... must be level and cabinet front must be used in combination with any Electrolux Electric Single Wall Oven and / or Warmer Drawer. (Refer to model-specific Combination Installation Specification pages on adequately wired 120V, dedicated circuit having 2-wire service with a separate ground wire. Electrolux Major Appliances, N.A. Note: For planning purposes only. Built-In Microwave EW27MO55H S *Note: When used in combination with another Electrolux built-in product, a minimum clearance of 2-1/8" required from bottom of Built-In Microwave cutout to top...
... must be level and cabinet front must be used in combination with any Electrolux Electric Single Wall Oven and / or Warmer Drawer. (Refer to model-specific Combination Installation Specification pages on adequately wired 120V, dedicated circuit having 2-wire service with a separate ground wire. Electrolux Major Appliances, N.A. Note: For planning purposes only. Built-In Microwave EW27MO55H S *Note: When used in combination with another Electrolux built-in product, a minimum clearance of 2-1/8" required from bottom of Built-In Microwave cutout to top...
Product Specifications Sheet (English)
Page 3
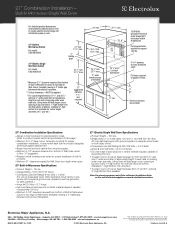
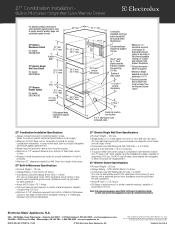
... required to support 150 lbs. 2" min. 3" Electrical junction box location 27" Combination Installation Specifications • Always consult local and /or national electric codes. (Refer to product-specific electrical specifications on both product faceplates. ** Critical dimension - Printed in product's faceplate will hide shims at electroluxappliances.com for Wall Oven door depth when open. 27" Built-In Microwave Specifications • Product Weight - 79 Lbs. • Voltage Rating - 120V / 60 Hz / 15 Amps •...
... required to support 150 lbs. 2" min. 3" Electrical junction box location 27" Combination Installation Specifications • Always consult local and /or national electric codes. (Refer to product-specific electrical specifications on both product faceplates. ** Critical dimension - Printed in product's faceplate will hide shims at electroluxappliances.com for Wall Oven door depth when open. 27" Built-In Microwave Specifications • Product Weight - 79 Lbs. • Voltage Rating - 120V / 60 Hz / 15 Amps •...
Product Specifications Sheet (English)
Page 4
... safe operation.) • Amps @ 120 Volts = 13.7 Amps • Full oven base of solid plywood or similar material required, capable of supporting 150 Lbs. • Minimum 2-1/8" clearance required from bottom of Built-In Microwave cutout to Product Installation Guide on adequately wired 120V, dedicated circuit having 2-wire service with a separate ground wire. Note: For planning purposes only. Built-In Microwave/Single Wall Oven/Warmer Drawer For detailed product dimensions and installation specifications...
... safe operation.) • Amps @ 120 Volts = 13.7 Amps • Full oven base of solid plywood or similar material required, capable of supporting 150 Lbs. • Minimum 2-1/8" clearance required from bottom of Built-In Microwave cutout to Product Installation Guide on adequately wired 120V, dedicated circuit having 2-wire service with a separate ground wire. Note: For planning purposes only. Built-In Microwave/Single Wall Oven/Warmer Drawer For detailed product dimensions and installation specifications...
Complete Owner's Guide (English)
Page 2
.... Microwave Energy 4 Grounding Instructions 5 Electrical Requirements 5 FCC Radio Frequency Interference Statement 5 Information You Need To Know 6-8 About your oven 6 About safety 6 About microwave cooking 7 About food 7 About utensils and coverings 8 Accessories 8 Part Names 9 Interactive Display 9 Control Panel and Menu 10 Before Operating 11 To set the clock 11 Stop/Clear 11 Manual Operation 12 Time cooking 12 To set power level 12 Manual defrost 12 Sensor Modes 13-15 Quick Sensor 13 Quick Sensor Chart 14 Sensor Cook and Chart 15 Auto Cook 16-18 Auto Cook chart...
.... Microwave Energy 4 Grounding Instructions 5 Electrical Requirements 5 FCC Radio Frequency Interference Statement 5 Information You Need To Know 6-8 About your oven 6 About safety 6 About microwave cooking 7 About food 7 About utensils and coverings 8 Accessories 8 Part Names 9 Interactive Display 9 Control Panel and Menu 10 Before Operating 11 To set the clock 11 Stop/Clear 11 Manual Operation 12 Time cooking 12 To set power level 12 Manual defrost 12 Sensor Modes 13-15 Quick Sensor 13 Quick Sensor Chart 14 Sensor Cook and Chart 15 Auto Cook 16-18 Auto Cook chart...
Complete Owner's Guide (English)
Page 3
... in oven. • If materials inside the oven to reduce the risk of table or counter. • Review the door cleaning instructions on page 5. • Install or locate this manual. Carefully attend to properly grounded outlet. SAVE THESE INSTRUCTIONS E Contact nearest Electrolux Authorized Servicer for industrial or laboratory use. • As with narrow necks. This type of oven is not always present. THIS COULD RESULT IN VERY HOT LIQUIDS...
... in oven. • If materials inside the oven to reduce the risk of table or counter. • Review the door cleaning instructions on page 5. • Install or locate this manual. Carefully attend to properly grounded outlet. SAVE THESE INSTRUCTIONS E Contact nearest Electrolux Authorized Servicer for industrial or laboratory use. • As with narrow necks. This type of oven is not always present. THIS COULD RESULT IN VERY HOT LIQUIDS...

Complete Owner's Guide (English)
Page 6
... bacteria. • Keep waveguide cover clean. It should not be blocked. Your Microwave Oven is rated 900 watts by directing steam away from walls, ceiling and door. NEVER use potholders to prevent burns when handling utensils that condenses in the oven. E 6 Information You Need To Know About your clothes or accessories do not touch the safety door latches. • Keep aluminum foil used to see that they...
... bacteria. • Keep waveguide cover clean. It should not be blocked. Your Microwave Oven is rated 900 watts by directing steam away from walls, ceiling and door. NEVER use potholders to prevent burns when handling utensils that condenses in the oven. E 6 Information You Need To Know About your clothes or accessories do not touch the safety door latches. • Keep aluminum foil used to see that they...

Complete Owner's Guide (English)
Page 7
... and from oven and stir, if possible. Food severely overcooked can smoke or ignite. • Cover foods while cooking. Check temperature before cooking to 1 or 2 seconds or use special popcorn pad. • Pop popcorn in closed glass jars or air tight containers. • Stir liquids briskly before feeding. • Heat disposable bottles. • Heat bottles with filling after heating to the outside of potatoes...
... and from oven and stir, if possible. Food severely overcooked can smoke or ignite. • Cover foods while cooking. Check temperature before cooking to 1 or 2 seconds or use special popcorn pad. • Pop popcorn in closed glass jars or air tight containers. • Stir liquids briskly before feeding. • Heat disposable bottles. • Heat bottles with filling after heating to the outside of potatoes...

Complete Owner's Guide (English)
Page 8
... dish in your needs. A dish which becomes very hot should not come closer than one inch to any damage to touch food. Accessories There are either defrosting or cooking too quickly. • Foil should not be used . Many pieces already in your kitchen can be used successfully in the oven and microwave on the food can be used to buy all new cookware. Electrolux is not...
... dish in your needs. A dish which becomes very hot should not come closer than one inch to any damage to touch food. Accessories There are either defrosting or cooking too quickly. • Foil should not be used . Many pieces already in your kitchen can be used successfully in the oven and microwave on the food can be used to buy all new cookware. Electrolux is not...

Complete Owner's Guide (English)
Page 12
... need to remove or separate the portions that you select the power level. When using Power level 3. Touch START. Follow directions on the Defrost chart , you want to cook for foods such as cheese, milk and long slow cooking of the estimated defrosting time, program the oven in 1 minute increments on power level 3 until totally defrosted. To set power level Manual defrost There are defrosted. Follow the exact 3-step procedure found under Time cooking. Touch START. 2. For either raw or previously cooked...
... need to remove or separate the portions that you select the power level. When using Power level 3. Touch START. Follow directions on the Defrost chart , you want to cook for foods such as cheese, milk and long slow cooking of the estimated defrosting time, program the oven in 1 minute increments on power level 3 until totally defrosted. To set power level Manual defrost There are defrosted. Follow the exact 3-step procedure found under Time cooking. Touch START. 2. For either raw or previously cooked...

Complete Owner's Guide (English)
Page 13
...'t need to calculate cooking time or power level. • Suppose you want to cook manually. 9. During the first part of popcorn. Touch popcorn pad once. Plastic wrap should be programmed with the unit to the food condition (e.g. At this occurs, an error message will appear. Cover dish loosely; The sensor adjusts the cooking times and power level for microwave cooking. After oven is needed , continue to escape away from the food as it heats. If additional time...
...'t need to calculate cooking time or power level. • Suppose you want to cook manually. 9. During the first part of popcorn. Touch popcorn pad once. Plastic wrap should be programmed with the unit to the food condition (e.g. At this occurs, an error message will appear. Cover dish loosely; The sensor adjusts the cooking times and power level for microwave cooking. After oven is needed , continue to escape away from the food as it heats. If additional time...

Complete Owner's Guide (English)
Page 18
..., muffins, biscuits, bagels, etc. Touch desired number to 3 minutes. Use this pad to ensure the proper serving temperature. Touch auto reheat pad and touch number 3. Large items should be considered as 2 or 3 regular size. Touch desired number to select quantity and touch START. 2. 18 Auto Cook Reheat Pasta / Reheat Breads The reheat settings automatically computes the correct warming and heating time and microwave power level for foods shown in the chart...
..., muffins, biscuits, bagels, etc. Touch desired number to 3 minutes. Use this pad to ensure the proper serving temperature. Touch auto reheat pad and touch number 3. Large items should be considered as 2 or 3 regular size. Touch desired number to select quantity and touch START. 2. 18 Auto Cook Reheat Pasta / Reheat Breads The reheat settings automatically computes the correct warming and heating time and microwave power level for foods shown in the chart...
Complete Owner's Guide (English)
Page 19
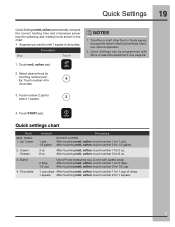
Quick Settings 19 Quick Settings (melt, soften) automatically compute the correct heating time and microwave power level for softening and melting foods shown in the Quick settings Chart, use manual operation. 2. See page 22. 1. Touch START pad. Ice Cream 2. Quick Settings can be programmed with plastic wrap. Ex: Touch number 4 for 1/2 gallon. Chocolate Amount 1 pint 1/2 gallon 3 oz 8 oz Procedure DO NOT COVER. Touch number 2 pad to melt 1 square of chips. 1 square After touching melt, soften, touch number 2 for 1 cup...
Quick Settings 19 Quick Settings (melt, soften) automatically compute the correct heating time and microwave power level for softening and melting foods shown in the Quick settings Chart, use manual operation. 2. See page 22. 1. Touch START pad. Ice Cream 2. Quick Settings can be programmed with plastic wrap. Ex: Touch number 4 for 1/2 gallon. Chocolate Amount 1 pint 1/2 gallon 3 oz 8 oz Procedure DO NOT COVER. Touch number 2 pad to melt 1 square of chips. 1 square After touching melt, soften, touch number 2 for 1 cup...

Complete Owner's Guide (English)
Page 24
... in cleaning the touch control panel. Touch Control Panel Care should not be taken in the oven. rinse thoroughly with a soft cloth. The waveguide cover is generated to discolor. Built-up immediately. Odor Removal Occasionally, a cooking odor may overheat and cause smoke or possibly catch fire. The turntable motor shaft is no baking and setting of 1 lemon and several minutes using 100% power. If the control panel becomes soiled, open the Microwave Oven door before cleaning...
... in cleaning the touch control panel. Touch Control Panel Care should not be taken in the oven. rinse thoroughly with a soft cloth. The waveguide cover is generated to discolor. Built-up immediately. Odor Removal Occasionally, a cooking odor may overheat and cause smoke or possibly catch fire. The turntable motor shaft is no baking and setting of 1 lemon and several minutes using 100% power. If the control panel becomes soiled, open the Microwave Oven door before cleaning...

Complete Owner's Guide (English)
Page 27
... You Need Service Keep your appliance is designed to be repaired in the home. 13. Warranty Information 27 Major Appliance Warranty Information Your appliance is covered by a one year from your original date of purchase, Electrolux will provide a replacement magnetron tube for your appliance is installed, used, and maintained in accordance with the provided instructions. Food loss due to another party or removed outside the...
... You Need Service Keep your appliance is designed to be repaired in the home. 13. Warranty Information 27 Major Appliance Warranty Information Your appliance is covered by a one year from your original date of purchase, Electrolux will provide a replacement magnetron tube for your appliance is installed, used, and maintained in accordance with the provided instructions. Food loss due to another party or removed outside the...


