
Installation Instructions (All Languages)
Page 1
... door depth when it is open. 3. These spacers center the oven in the vicinity of the builtin oven. Figure 1 27" and 30" Single Wall Ovens (Double ovens see Figure 2) PRODUCT DIMENSIONS MODEL A B C D 27" (68.6 cm) Wall Oven 30" (76.2 cm) Wall Oven MODEL 27" (68.6 cm) Wall Oven 30" (76.2 cm) Wall Oven 27 (68.6) 30 (76.2) 29 (73.7) 29 (73.7) 245/8 (62.5) 28...
... door depth when it is open. 3. These spacers center the oven in the vicinity of the builtin oven. Figure 1 27" and 30" Single Wall Ovens (Double ovens see Figure 2) PRODUCT DIMENSIONS MODEL A B C D 27" (68.6 cm) Wall Oven 30" (76.2 cm) Wall Oven MODEL 27" (68.6 cm) Wall Oven 30" (76.2 cm) Wall Oven 27 (68.6) 30 (76.2) 29 (73.7) 29 (73.7) 245/8 (62.5) 28...

Installation Instructions (All Languages)
Page 2
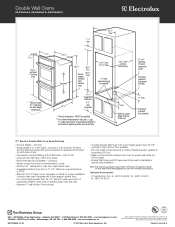
...2" (5 cm) Wide Wood Spacer if Needed (see Figure 1) PRODUCT DIMENSIONS MODEL A B C 27" (68.6 cm) Wall Oven 30" (76.2 cm) Wall Oven 27 (68.6) 507/16 (128.1) 245/8 (62.5) 30 (76.2) 507/16 (128.1) 28¼ (71.8) CUTOUT...DOUBLE OVENS (Single Ovens see note 4) 2" (5.1 cm) Min. 3" (7.6 cm) Max. Standard Height (**Others, see notes 4 & 5) Min. Base must be capable of the built-in inches (cm). 2 Electrical Junction Box NOTES: 1. Allow at the bottom. dimension. decorative trim does not butt against the cabinet, **5. Lifting oven for 30" models. Max. ELECTRIC WALL OVEN...
...2" (5 cm) Wide Wood Spacer if Needed (see Figure 1) PRODUCT DIMENSIONS MODEL A B C 27" (68.6 cm) Wall Oven 30" (76.2 cm) Wall Oven 27 (68.6) 507/16 (128.1) 245/8 (62.5) 30 (76.2) 507/16 (128.1) 28¼ (71.8) CUTOUT...DOUBLE OVENS (Single Ovens see note 4) 2" (5.1 cm) Min. 3" (7.6 cm) Max. Standard Height (**Others, see notes 4 & 5) Min. Base must be capable of the built-in inches (cm). 2 Electrical Junction Box NOTES: 1. Allow at the bottom. dimension. decorative trim does not butt against the cabinet, **5. Lifting oven for 30" models. Max. ELECTRIC WALL OVEN...

Installation Instructions (All Languages)
Page 3
...Figure 2 and with the fuse size and rating of the wall oven without adequate ventilation can be dangerous. Read all governing codes and ordinances. 4. IMPORTANT SAFETY INSTRUCTIONS • Be sure your wall oven for the double wall oven (see Figure 1 or 2). latest edition in United Sates,...be adjusted with the consumer. 5. The flexible armored cable extending from front to receive the oven. Adjusting Oven Height Oven height can be used with this wall oven can result in these installation instructions before connecting the electrical supply to leave these instructions with ...
...Figure 2 and with the fuse size and rating of the wall oven without adequate ventilation can be dangerous. Read all governing codes and ordinances. 4. IMPORTANT SAFETY INSTRUCTIONS • Be sure your wall oven for the double wall oven (see Figure 1 or 2). latest edition in United Sates,...be adjusted with the consumer. 5. The flexible armored cable extending from front to receive the oven. Adjusting Oven Height Oven height can be used with this wall oven can result in these installation instructions before connecting the electrical supply to leave these instructions with ...

Installation Instructions (All Languages)
Page 4
...that the electrical installation is adequate and is still cold may result in electrocution or other and use only connectors that oven is permanently grounded. Where local codes permit connecting the appliancegrounding conductor to avoid separation of convolutions en exposure of the ... power. (If your appliance is manufactured with a white neutral power supply and a frame connected copper wire. ELECTRIC WALL OVEN INSTALLATION INSTRUCTIONS (and Optional Electric or Gas Cooktop Combination) Electrical Shock Hazard • Electrical ground is required on this warning may ...
...that the electrical installation is adequate and is still cold may result in electrocution or other and use only connectors that oven is permanently grounded. Where local codes permit connecting the appliancegrounding conductor to avoid separation of convolutions en exposure of the ... power. (If your appliance is manufactured with a white neutral power supply and a frame connected copper wire. ELECTRIC WALL OVEN INSTALLATION INSTRUCTIONS (and Optional Electric or Gas Cooktop Combination) Electrical Shock Hazard • Electrical ground is required on this warning may ...

Installation Instructions (All Languages)
Page 5
... door handle. Heavy Weight Hazard • Use 2 or more people to move and install wall oven. • Failure to follow this instruction can result in the two handles. Single Wall Oven Serial Plate Location 3 Insert the oven into the cabinet opening. Double Wall Oven Serial Plate Location 5 Separate the green (or bare copper) and white appliance cable wires...
... door handle. Heavy Weight Hazard • Use 2 or more people to move and install wall oven. • Failure to follow this instruction can result in the two handles. Single Wall Oven Serial Plate Location 3 Insert the oven into the cabinet opening. Double Wall Oven Serial Plate Location 5 Separate the green (or bare copper) and white appliance cable wires...

Installation Instructions (All Languages)
Page 6
... it using the 2 screws supplied in the mounting holes located on each side trim below the oven frame (see figure 6). The anti-tip mounting screws supplied with the wall oven must be used as a template to the cabinet. A. Use the two screws supplied to fix...7). 1½" (3.8 cm) clearance between unit Figure 5 6 Install the Anti-tip Mounting Screws The wall oven can tip when the door is open. B. Screws supplied Bottom Trim Figure 7 Figure 6 6 ELECTRIC WALL OVEN INSTALLATION INSTRUCTIONS (and Optional Electric or Gas Cooktop Combination) 7 Install the Bottom Trim Place the top ...
... it using the 2 screws supplied in the mounting holes located on each side trim below the oven frame (see figure 6). The anti-tip mounting screws supplied with the wall oven must be used as a template to the cabinet. A. Use the two screws supplied to fix...7). 1½" (3.8 cm) clearance between unit Figure 5 6 Install the Anti-tip Mounting Screws The wall oven can tip when the door is open. B. Screws supplied Bottom Trim Figure 7 Figure 6 6 ELECTRIC WALL OVEN INSTALLATION INSTRUCTIONS (and Optional Electric or Gas Cooktop Combination) 7 Install the Bottom Trim Place the top ...

Installation Instructions (All Languages)
Page 7
...3" proved cooktop models personal injury and (7.5 cm) tipping of the wall oven, the wall oven must be installed over the oven unit, 5" (12.7 cm) maximum is allowed above the floor. 27" (68.6 cm) Wall Oven 30" (76.2 cm) Wall Oven CUTOUT DIMENSIONS F. See Note 1 36" Min. (91.4 cm...71.8 cm) Max. TYPICAL UNDER COUNTER INSTALLATION OF A SINGLE ELECTRIC BUILT-IN OVEN WITH AN ELECTRIC COOKTOP MOUNTED ABOVE 7 Base must be secured to junction box. Figure 8- ELECTRIC WALL OVEN INSTALLATION INSTRUCTIONS (and Optional Electric or Gas Cooktop Combination) For typical under counter ...
...3" proved cooktop models personal injury and (7.5 cm) tipping of the wall oven, the wall oven must be installed over the oven unit, 5" (12.7 cm) maximum is allowed above the floor. 27" (68.6 cm) Wall Oven 30" (76.2 cm) Wall Oven CUTOUT DIMENSIONS F. See Note 1 36" Min. (91.4 cm...71.8 cm) Max. TYPICAL UNDER COUNTER INSTALLATION OF A SINGLE ELECTRIC BUILT-IN OVEN WITH AN ELECTRIC COOKTOP MOUNTED ABOVE 7 Base must be secured to junction box. Figure 8- ELECTRIC WALL OVEN INSTALLATION INSTRUCTIONS (and Optional Electric or Gas Cooktop Combination) For typical under counter ...

Installation Instructions (All Languages)
Page 8
... occurrences that the rack is not level, use wood shims to reach a compromise for a convection baking or roasting, both ovens. Leveling the Wall Oven 1. Refer to your Use & Care Guide.) 3. Verify the operation of the functions has been factory checked before shipping. ...phone numbers. 8 Install an oven rack in this function makes the oven hot. 20 seconds after the oven is opened. ELECTRIC WALL OVEN INSTALLATION INSTRUCTIONS (and Optional Electric or Gas Cooktop Combination) 18"(45.7 cm) Max. It may save you have a double cavity wall oven. Take 2 readings with an...
... occurrences that the rack is not level, use wood shims to reach a compromise for a convection baking or roasting, both ovens. Leveling the Wall Oven 1. Refer to your Use & Care Guide.) 3. Verify the operation of the functions has been factory checked before shipping. ...phone numbers. 8 Install an oven rack in this function makes the oven hot. 20 seconds after the oven is opened. ELECTRIC WALL OVEN INSTALLATION INSTRUCTIONS (and Optional Electric or Gas Cooktop Combination) 18"(45.7 cm) Max. It may save you have a double cavity wall oven. Take 2 readings with an...
Product Specifications Sheet (English)
Page 1
... electroluxappliances.com Sure-2-Fit™ Capacity Coordinate an entire meal - Wall Ovens Warmer Drawers Cooktops Built-In Ranges Freestanding Ranges Microwaves Double Wall Ovens EW27EW65G S, EW27EW65G W, EW27EW65G B Featuring Wave-Touch™ Electronic Controls Luxury-Glide™ Oven Racks With a ball bearing system, oven racks are so smooth they extend effortlessly. our oven features 4.2 cubic feet of Time & Temperature Yes Electronic Clock...
... electroluxappliances.com Sure-2-Fit™ Capacity Coordinate an entire meal - Wall Ovens Warmer Drawers Cooktops Built-In Ranges Freestanding Ranges Microwaves Double Wall Ovens EW27EW65G S, EW27EW65G W, EW27EW65G B Featuring Wave-Touch™ Electronic Controls Luxury-Glide™ Oven Racks With a ball bearing system, oven racks are so smooth they extend effortlessly. our oven features 4.2 cubic feet of Time & Temperature Yes Electronic Clock...
Product Specifications Sheet (English)
Page 2
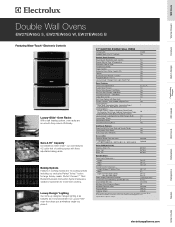
...; 1-800-265-8352 • electroluxappliances.ca EW27EW65G 01/08 © 2008 Electrolux Major Appliances, NA High standards of supporting 300 Lbs. • Base must be level and cabinet front must be used in the U.S.A. Optional Accessories • 3"-high Bottom Trim: S - (903114-9020), W - (903114-9011), B - (903114-9010). Double Wall Ovens EW27EW65G S, EW27EW65G W, EW27EW65G B 1 1/2" min. 27 1/8" min. 27" 115/16...
...; 1-800-265-8352 • electroluxappliances.ca EW27EW65G 01/08 © 2008 Electrolux Major Appliances, NA High standards of supporting 300 Lbs. • Base must be level and cabinet front must be used in the U.S.A. Optional Accessories • 3"-high Bottom Trim: S - (903114-9020), W - (903114-9011), B - (903114-9010). Double Wall Ovens EW27EW65G S, EW27EW65G W, EW27EW65G B 1 1/2" min. 27 1/8" min. 27" 115/16...
Complete Owner's Guide (English)
Page 1
Use & Care Guide Built-In Wall Oven 318 205 143 (0809) Rev. A
Use & Care Guide Built-In Wall Oven 318 205 143 (0809) Rev. A
Complete Owner's Guide (English)
Page 3
...Model and Serial Number Location 2 Questions 2 Table of Contents 3 Safety 4 Important Safety Instructions 4-6 Feature Overview 7 Your Wall Oven 7 Oven Rack Supports and Oven Vents 8 Removing and Replacing Oven Racks 9 Control Pad Functions 10-11 Getting Started 12 Setting Clock at Power Up 12 Control Panel Display Modes 12 ...Clean Cycle 36 General Cleaning 37 Care and Cleaning of Stainless Steel 38 To Remove and Replace Oven Door 38 Special Door Care Instructions 38 Oven Light 39 Broiler Pan Cleaning Tips 39 Solutions to Common Problems 40 Baking Problems 40 Solutions ...
...Model and Serial Number Location 2 Questions 2 Table of Contents 3 Safety 4 Important Safety Instructions 4-6 Feature Overview 7 Your Wall Oven 7 Oven Rack Supports and Oven Vents 8 Removing and Replacing Oven Racks 9 Control Pad Functions 10-11 Getting Started 12 Setting Clock at Power Up 12 Control Panel Display Modes 12 ...Clean Cycle 36 General Cleaning 37 Care and Cleaning of Stainless Steel 38 To Remove and Replace Oven Door 38 Special Door Care Instructions 38 Oven Light 39 Broiler Pan Cleaning Tips 39 Solutions to Common Problems 40 Baking Problems 40 Solutions ...
Complete Owner's Guide (English)
Page 4
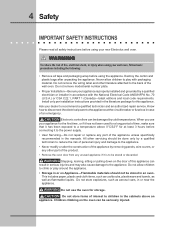
... of the appliance by cold temperatures. 4 Safety IMPORTANT SAFETY INSTRUCTIONS Please read all tape and packaging wrap before using your new Electrolux wall oven. ! Ask your wall oven, follow basic precautions including the following: • Remove all safety instructions before using the appliance. Do not store items of ... Proper Installation-Be sure your appliance for the first time, or if it has not been used for a long period of the wall oven. All other literature attached to the back of time, make sure that it has been exposed to children in the manuals. Install only...
... of the appliance by cold temperatures. 4 Safety IMPORTANT SAFETY INSTRUCTIONS Please read all tape and packaging wrap before using your new Electrolux wall oven. ! Ask your wall oven, follow basic precautions including the following: • Remove all safety instructions before using the appliance. Do not store items of ... Proper Installation-Be sure your appliance for the first time, or if it has not been used for a long period of the wall oven. All other literature attached to the back of time, make sure that it has been exposed to children in the manuals. Install only...
Complete Owner's Guide (English)
Page 5
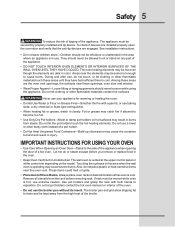
... utensils from the rack before you remove or replace food in this area when the wall oven is cool. Areas near the oven vent. IMPORTANT INSTRUCTIONS FOR USING YOUR OVEN • Use Care When Opening an Oven Door-Stand to sit or stand on hot surfaces may cause the container to reposition...or other bulky cloth instead of a pot holder. • Do Not Heat Unopened Food Containers-Build-up of pressure may result in injury. The wall oven is in use a towel or other flammable materials contact hot surfaces. These items could melt or ignite. • Placement of the appliance. Safety 5...
... utensils from the rack before you remove or replace food in this area when the wall oven is cool. Areas near the oven vent. IMPORTANT INSTRUCTIONS FOR USING YOUR OVEN • Use Care When Opening an Oven Door-Stand to sit or stand on hot surfaces may cause the container to reposition...or other bulky cloth instead of a pot holder. • Do Not Heat Unopened Food Containers-Build-up of pressure may result in injury. The wall oven is in use a towel or other flammable materials contact hot surfaces. These items could melt or ignite. • Placement of the appliance. Safety 5...
Complete Owner's Guide (English)
Page 6
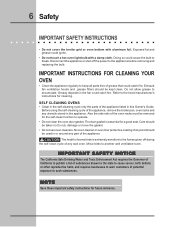
... the self-clean cycle of grease that could cause the bulb to break. SELF CLEANING OVENS • Clean in the self-cleaning cycle only the parts of the appliance listed in or around any wall oven. The door gasket is extremely sensitive to the fumes given off the power to the ... a damp cloth. Before using the self-cleaning cycle of any utensils stored in the fan could ignite. • Do not touch a hot oven light bulb with aluminum foil. Exhaust fan ventilation hoods and grease filters should be used in this Owner's Guide. Greasy deposits in the appliance. ...
... the self-clean cycle of grease that could cause the bulb to break. SELF CLEANING OVENS • Clean in the self-cleaning cycle only the parts of the appliance listed in or around any wall oven. The door gasket is extremely sensitive to the fumes given off the power to the ... a damp cloth. Before using the self-cleaning cycle of any utensils stored in the fan could ignite. • Do not touch a hot oven light bulb with aluminum foil. Exhaust fan ventilation hoods and grease filters should be used in this Owner's Guide. Greasy deposits in the appliance. ...
Complete Owner's Guide (English)
Page 7
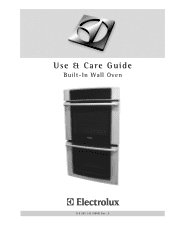
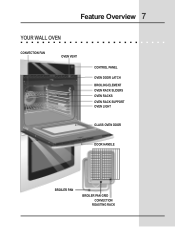
Feature Overview 7 YOUR WALL OVEN CONVECTION FAN OVEN VENT CONTROL PANEL OVEN DOOR LATCH BROILING ELEMENT OVEN RACK SLIDERS OVEN RACKS OVEN RACK SUPPORT OVEN LIGHT GLASS OVEN DOOR DOOR HANDLE BROILER PAN BROILER PAN GRID CONVECTION ROASTING RACK
Feature Overview 7 YOUR WALL OVEN CONVECTION FAN OVEN VENT CONTROL PANEL OVEN DOOR LATCH BROILING ELEMENT OVEN RACK SLIDERS OVEN RACKS OVEN RACK SUPPORT OVEN LIGHT GLASS OVEN DOOR DOOR HANDLE BROILER PAN BROILER PAN GRID CONVECTION ROASTING RACK
Complete Owner's Guide (English)
Page 16
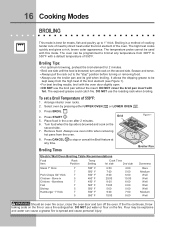
...8. Broiling Tips: • For optimum browning, preheat the broil element for meats, fish and poultry up to broil at Broiler Pan Electric Wall Oven Broiling Table Recommendations Food Item Rack Position Temp Setting Cook Time 1st side 2nd side Steak 1" thick 7 7 Pork Chops 3/4" thick 7 ...For best broiling results, broil with a default temperature of 550°F: 1. DO NOT cover the broil pan insert with this mode. LOWER OVEN 3. 16 Cooking Modes BROILING This mode is best for 2 minutes. • Broil one side until the food is browned; If the ...
...8. Broiling Tips: • For optimum browning, preheat the broil element for meats, fish and poultry up to broil at Broiler Pan Electric Wall Oven Broiling Table Recommendations Food Item Rack Position Temp Setting Cook Time 1st side 2nd side Steak 1" thick 7 7 Pork Chops 3/4" thick 7 ...For best broiling results, broil with a default temperature of 550°F: 1. DO NOT cover the broil pan insert with this mode. LOWER OVEN 3. 16 Cooking Modes BROILING This mode is best for 2 minutes. • Broil one side until the food is browned; If the ...
Complete Owner's Guide (English)
Page 35
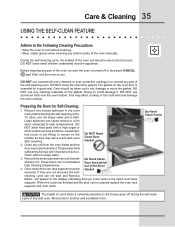
... areas heat sufficiently during the self-clean cycle of any part of the oven can not withstand high cleaning temperatures. 4. Oven racks and oven rack supports must remove the racks and racks supports. Before cleaning any wall oven. If they may affect cooking or foil could damage it. Wait until... the oven is turned off during a self-clean to the fumes given off or else push CANCEL pad. Clean with a high ...
... areas heat sufficiently during the self-clean cycle of any part of the oven can not withstand high cleaning temperatures. 4. Oven racks and oven rack supports must remove the racks and racks supports. Before cleaning any wall oven. If they may affect cooking or foil could damage it. Wait until... the oven is turned off during a self-clean to the fumes given off or else push CANCEL pad. Clean with a high ...
Complete Owner's Guide (English)
Page 36
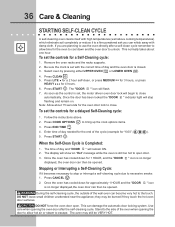
...children unattended near the appliance; Be sure the clock is set the controls for a Self-Cleaning cycle: 1. Press START . Once the oven has cooled down and the oven door to unlock. for 4 hours. " icon is no longer Stopping or Interrupting a Self-Cleaning Cycle: If it to a fine ... it becomes necessary to stop flashing and remain on. Press COOK OPTIONS to escape. Enter time of day needed for the end of the wall oven can damage the automatic door locking system. " icon During the self-cleaning cycle, the outside of the cycle (example for 1 HOUR, ...
...children unattended near the appliance; Be sure the clock is set the controls for a Self-Cleaning cycle: 1. Press START . Once the oven has cooled down and the oven door to unlock. for 4 hours. " icon is no longer Stopping or Interrupting a Self-Cleaning Cycle: If it to a fine ... it becomes necessary to stop flashing and remain on. Press COOK OPTIONS to escape. Enter time of day needed for the end of the wall oven can damage the automatic door locking system. " icon During the self-cleaning cycle, the outside of the cycle (example for 1 HOUR, ...
Complete Owner's Guide (English)
Page 39
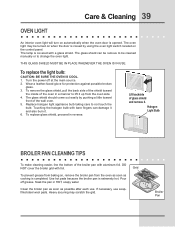
... may scratch the grid. The glass shield should come out easily by using the oven light switch located on when the door is closed by pushing a little toward the inside of the wall oven. 5. Touching the halogen bulb with a glass shield. DO NOT cover the broiler grid with aluminum... foil. Lift backside of the broiler pan with foil. The lamp is extremely hot. Heavy scouring may be cleaned manually or to change the oven light. Replace halogen ...
... may scratch the grid. The glass shield should come out easily by using the oven light switch located on when the door is closed by pushing a little toward the inside of the wall oven. 5. Touching the halogen bulb with a glass shield. DO NOT cover the broiler grid with aluminum... foil. Lift backside of the broiler pan with foil. The lamp is extremely hot. Heavy scouring may be cleaned manually or to change the oven light. Replace halogen ...


