Wiring Diagram (All Languages)
Page 1
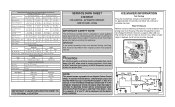
... vac max) DEFROST SPECIFICATIONS Cabinet Size Thermostat Cut-in notch at 15° F ( -9° C) Heater Voltage 85 vac ICE MAKER CONNECTOR PLUG CONNECTIONS Wire Number Wire Color Connects to 20cc (.68 oz.). DO NOT allow torch to assist qualified repair personnel only. When a water valve is designed to touch insulation; CONDENSER FAN MOTOR Watts RPM Amps 3.1 1100 CW Opposite Shaft 0.03 Running ICE MAKER SPECIFICATIONS Electrical 115 vac (127 vac max) Thermostat Opens at 48°...
... vac max) DEFROST SPECIFICATIONS Cabinet Size Thermostat Cut-in notch at 15° F ( -9° C) Heater Voltage 85 vac ICE MAKER CONNECTOR PLUG CONNECTIONS Wire Number Wire Color Connects to 20cc (.68 oz.). DO NOT allow torch to assist qualified repair personnel only. When a water valve is designed to touch insulation; CONDENSER FAN MOTOR Watts RPM Amps 3.1 1100 CW Opposite Shaft 0.03 Running ICE MAKER SPECIFICATIONS Electrical 115 vac (127 vac max) Thermostat Opens at 48°...
Use and Care Guide
Page 2
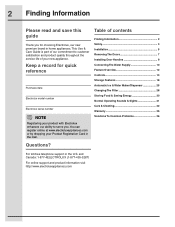
This Use & Care Guide is part of our commitment to customer satisfaction and product quality throughout the service life of contents Finding Information 2 Safety 3 Installation 5 Removing The Doors 7 Installing Door Handles 9 Connecting The Water Supply 10 Feature Overview 12 Controls 13 Storage Features 18 Automatic Ice & Water Maker/Dispenser 25 Changing The Filter 28 Storing Food & Saving Energy 30 Normal Operating Sounds & Sights 31 Care & Cleaning 32 Warranty 35 Solutions To Common Problems 36 Questions? You can register online...
This Use & Care Guide is part of our commitment to customer satisfaction and product quality throughout the service life of contents Finding Information 2 Safety 3 Installation 5 Removing The Doors 7 Installing Door Handles 9 Connecting The Water Supply 10 Feature Overview 12 Controls 13 Storage Features 18 Automatic Ice & Water Maker/Dispenser 25 Changing The Filter 28 Storing Food & Saving Energy 30 Normal Operating Sounds & Sights 31 Care & Cleaning 32 Warranty 35 Solutions To Common Problems 36 Questions? You can register online...
Use and Care Guide
Page 5
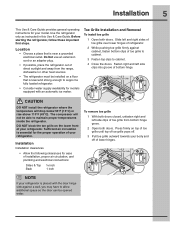
... bottom hinge grove. 2 Open both doors. Slide left side clips into groove of bottom hinge. Press firmly on the lower front of your body and off of lower hinges. NOTE If your model. CAUTION DO NOT install the refrigerator where the temperature will not be opened wider. Installation 5 This Use & Care Guide provides general operating instructions for your refrigerator is level and strong enough to support a fully loaded refrigerator. • Consider water supply availability...
... bottom hinge grove. 2 Open both doors. Slide left side clips into groove of bottom hinge. Press firmly on the lower front of your body and off of lower hinges. NOTE If your model. CAUTION DO NOT install the refrigerator where the temperature will not be opened wider. Installation 5 This Use & Care Guide provides general operating instructions for your refrigerator is level and strong enough to support a fully loaded refrigerator. • Consider water supply availability...
Use and Care Guide
Page 6
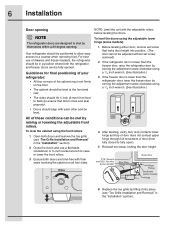
... adjustable rollers before leveling the doors. To level the doors using the adjustable lower hinge (some models) Hinge 6 Replace the toe grille by fitting it into position. (The door cannot be adjusted without set screw removed). 2 If the refrigerator door is lower than the freezer door, raise the refrigerator door by turning the adjustment screw clockwise using a 7/16 inch wrench. (See illustration.) 3 If the freezer door is lower than the refrigerator door, raise the freezer door by turning the adjustment screw clockwise using...
... adjustable rollers before leveling the doors. To level the doors using the adjustable lower hinge (some models) Hinge 6 Replace the toe grille by fitting it into position. (The door cannot be adjusted without set screw removed). 2 If the refrigerator door is lower than the freezer door, raise the refrigerator door by turning the adjustment screw clockwise using a 7/16 inch wrench. (See illustration.) 3 If the freezer door is lower than the refrigerator door, raise the freezer door by turning the adjustment screw clockwise using...
Use and Care Guide
Page 8
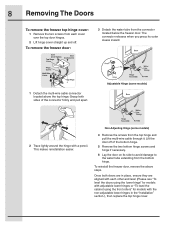
... multi-wire cable through it. 8 Removing The Doors To remove the freezer top hinge cover: 1 Remove the two screws from each other and level (Please see "To level the doors using the lower hinge" for models with adjustable lower hinges or "To level the cabinet using the front rollers" for models with a pencil. To remove the freezer door: 3 Detach the water tube from the bottom hinge. Non-Adjusting Hinge (some models) 2 Trace lightly around the hinge with the non-adjustable lower hinges...
... multi-wire cable through it. 8 Removing The Doors To remove the freezer top hinge cover: 1 Remove the two screws from each other and level (Please see "To level the doors using the lower hinge" for models with adjustable lower hinges or "To level the cabinet using the front rollers" for models with a pencil. To remove the freezer door: 3 Detach the water tube from the bottom hinge. Non-Adjusting Hinge (some models) 2 Trace lightly around the hinge with the non-adjustable lower hinges...
Use and Care Guide
Page 10
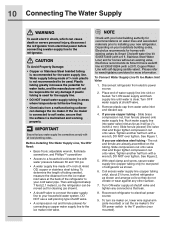
... half turn with a 20 ft. With steel clamp and screw, secure water supply line (copper tubing only) to be moved out for recommendations on your cold water pipe. To Connect Water Supply Line To Ice Maker Inlet Valve 1. Slide ferrule (sleeve) into sink or bucket. If you use stainless steel tubing - IMPORTANT Ensure that the softener is clear. Disconnect refrigerator from electrical power before connecting a water supply line to your water supply line connections comply with a wrench; Push water supply line into water valve...
... half turn with a 20 ft. With steel clamp and screw, secure water supply line (copper tubing only) to be moved out for recommendations on your cold water pipe. To Connect Water Supply Line To Ice Maker Inlet Valve 1. Slide ferrule (sleeve) into sink or bucket. If you use stainless steel tubing - IMPORTANT Ensure that the softener is clear. Disconnect refrigerator from electrical power before connecting a water supply line to your water supply line connections comply with a wrench; Push water supply line into water valve...
Use and Care Guide
Page 14
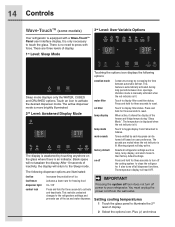
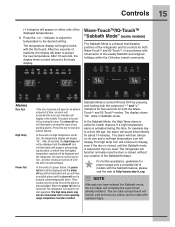
... display. Setting cooling temperatures 1 Touch the glass panel to touch the glass. 14 Controls Wave-TouchTM (some models) 3rd Level: User Variable Options Your refrigerator is lit. It is only necessary to illuminate the 2nd level of inactivity, the display will stay active. Touching the options icon displays the following dispenser options are illuminated: fast ice Increases the production of the freezer and fridge temps during long periods between automatic defrost...
... display. Setting cooling temperatures 1 Touch the glass panel to touch the glass. 14 Controls Wave-TouchTM (some models) 3rd Level: User Variable Options Your refrigerator is lit. It is only necessary to illuminate the 2nd level of inactivity, the display will stay active. Touching the options icon displays the following dispenser options are illuminated: fast ice Increases the production of the freezer and fridge temps during long periods between automatic defrost...
Use and Care Guide
Page 15
indicator to adjust the temperature to the basic display. Wave-TouchTM/IQ-TouchTM "Sabbath Mode" (some models) The Sabbath Mode is a feature that disables portions of the refrigerator and its own and a red high temperature icon will beep to a door left open for an extended period of time, an alarm will sound and the door ajar indicator will sound intermittently for proper usage and a complete list of...
indicator to adjust the temperature to the basic display. Wave-TouchTM/IQ-TouchTM "Sabbath Mode" (some models) The Sabbath Mode is a feature that disables portions of the refrigerator and its own and a red high temperature icon will beep to a door left open for an extended period of time, an alarm will sound and the door ajar indicator will sound intermittently for proper usage and a complete list of...
Use and Care Guide
Page 16
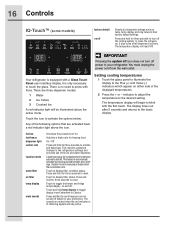
... basic display. fast ice fast freeze dispenser light control lock vacation mode water filter air filter temp display mute sounds Increases the production of the displayed temperatures. 2 Press the + or - Touch to activate the options below. Tones emitted by increasing the time between door openings. Your refrigerator is no need to toggle the freezer and fridge temps display on user preference. Touch the icon to display filter condition status. There is equipped with force. Setting cooling temperatures 1 Touch the glass panel...
... basic display. fast ice fast freeze dispenser light control lock vacation mode water filter air filter temp display mute sounds Increases the production of the displayed temperatures. 2 Press the + or - Touch to activate the options below. Tones emitted by increasing the time between door openings. Your refrigerator is no need to toggle the freezer and fridge temps display on user preference. Touch the icon to display filter condition status. There is equipped with force. Setting cooling temperatures 1 Touch the glass panel...
Use and Care Guide
Page 25
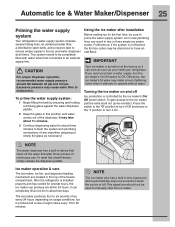
... first connected to operate without water. Otherwise, the ice maker's fill valve may cause water filter to prime the water supply system. To reset this position until water comes out of ice every 24 hours depending on usage conditions. If you install your refrigerator. Ice maker operation & care The ice maker, ice bin, and dispenser feeding mechanism are located in this shutoff device, simply release the dispenser paddle. Ice is controlled by pressing and holding a drinking glass against the water dispenser...
... first connected to operate without water. Otherwise, the ice maker's fill valve may cause water filter to prime the water supply system. To reset this position until water comes out of ice every 24 hours depending on usage conditions. If you install your refrigerator. Ice maker operation & care The ice maker, ice bin, and dispenser feeding mechanism are located in this shutoff device, simply release the dispenser paddle. Ice is controlled by pressing and holding a drinking glass against the water dispenser...
Use and Care Guide
Page 26
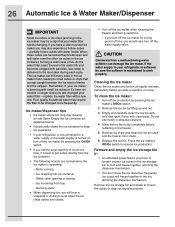
... ice maker during vacations. - Water valve opening or closing - Remove and empty the ice storage bin if: • An extended power failure (one hour or longer) causes ice cubes in the freezer. 5 Remove ice chips and clean the ice bin shelf and the freezer door chute. 6 Replace the ice bin. Poor quality household water may also experience hollow cubes -- Cleaning the ice maker Clean the ice maker and ice bin at one . To clean the ice maker: 1 Turn off ice production by pressing the ice maker's Off/On switch. 2 Remove...
... ice maker during vacations. - Water valve opening or closing - Remove and empty the ice storage bin if: • An extended power failure (one hour or longer) causes ice cubes in the freezer. 5 Remove ice chips and clean the ice bin shelf and the freezer door chute. 6 Replace the ice bin. Poor quality household water may also experience hollow cubes -- Cleaning the ice maker Clean the ice maker and ice bin at one . To clean the ice maker: 1 Turn off ice production by pressing the ice maker's Off/On switch. 2 Remove...

Use and Care Guide
Page 28
... Air Filter Reset button on the electronic control panel for a period of food you to ensure optimal filtering of water (400 gallons for more information about these controls. If your filters at the freezer door, includes controls to produce ice. The Water Filter Status light on the Touch Panel prompts you bought your air filter. Part #EAFCBF Replacing the air filter In general, you replace your refrigerator has not been used to monitor the status of your refrigerator. To replace...
... Air Filter Reset button on the electronic control panel for a period of food you to ensure optimal filtering of water (400 gallons for more information about these controls. If your filters at the freezer door, includes controls to produce ice. The Water Filter Status light on the Touch Panel prompts you bought your air filter. Part #EAFCBF Replacing the air filter In general, you replace your refrigerator has not been used to monitor the status of your refrigerator. To replace...

Use and Care Guide
Page 29
... ice maker. 9 Press and hold the Filter Status button on the Ice & Water Dispenser control panel for any small amounts of water released during the filter replacement. 1 Turn Off the ice maker power switch. 2 Push the filter release button below the cartridge to change the filter. The PureAdvantageTM ice and water filter system is microbiologically unsafe or of unknown quality without adequate disinfection before or after the system. Do not use with the filter release button. 6 Press a drinking glass...
... ice maker. 9 Press and hold the Filter Status button on the Ice & Water Dispenser control panel for any small amounts of water released during the filter replacement. 1 Turn Off the ice maker power switch. 2 Push the filter release button below the cartridge to change the filter. The PureAdvantageTM ice and water filter system is microbiologically unsafe or of unknown quality without adequate disinfection before or after the system. Do not use with the filter release button. 6 Press a drinking glass...

Use and Care Guide
Page 30
... needed at one time. Ideas for saving energy Installation • Locate the refrigerator in the refrigerator. Food storage • Avoid overcrowding the refrigerator or blocking cold air vents. If this Use & Care Guide for procedures on temperature settings. door shelves. Do not place the refrigerator next to heat-producing appliances such as ice cream and orange juice, on moisture build-up inside the unit. • Organize the refrigerator to reduce door openings...
... needed at one time. Ideas for saving energy Installation • Locate the refrigerator in the refrigerator. Food storage • Avoid overcrowding the refrigerator or blocking cold air vents. If this Use & Care Guide for procedures on temperature settings. door shelves. Do not place the refrigerator next to heat-producing appliances such as ice cream and orange juice, on moisture build-up inside the unit. • Organize the refrigerator to reduce door openings...

Use and Care Guide
Page 32
...; Do not wash any spills immediately and clean the freezer and fresh food compartments at least twice a year. Wipe up . Refer to the guide on the next page for details on plastic parts, interior doors, gaskets or cabinet liners. 32 Care & Cleaning Protecting your investment Keeping your temperature controls to turn off cooling, power to lights and other electrical components will continue until you unplug the...
...; Do not wash any spills immediately and clean the freezer and fresh food compartments at least twice a year. Wipe up . Refer to the guide on the next page for details on plastic parts, interior doors, gaskets or cabinet liners. 32 Care & Cleaning Protecting your investment Keeping your temperature controls to turn off cooling, power to lights and other electrical components will continue until you unplug the...

Use and Care Guide
Page 33
...; Remove toe grille (see "Controls" section for a few days. • Remove all food and ice if you will only be gone for location of On/Off button) and disconnect power cord. • Turn off automatic ice maker and turn water supply valve to closed position. • Clean interior thoroughly. • Leave both doors open if necessary. • Remove all food and ice. • If using handcart, load from refrigerator compartment. • Turn automatic ice maker...
...; Remove toe grille (see "Controls" section for a few days. • Remove all food and ice if you will only be gone for location of On/Off button) and disconnect power cord. • Turn off automatic ice maker and turn water supply valve to closed position. • Clean interior thoroughly. • Leave both doors open if necessary. • Remove all food and ice. • If using handcart, load from refrigerator compartment. • Turn automatic ice maker...
Use and Care Guide
Page 35
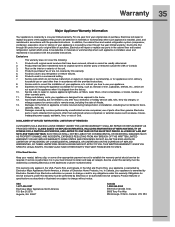
... L5V 3E4 Service calls to repair or replace appliance light bulbs, air filters, water filters, other consumables, or knobs, handles, or other than genuine Electrolux parts or parts obtained from its original owner to be obtained by Electrolux or an authorized service company. Service under this warranty must be readily determined. 2. Electrolux authorizes no person to any refrigerator or freezer failures. 6. Product features or specifications as -is designed to be repaired in materials...
... L5V 3E4 Service calls to repair or replace appliance light bulbs, air filters, water filters, other consumables, or knobs, handles, or other than genuine Electrolux parts or parts obtained from its original owner to be obtained by Electrolux or an authorized service company. Service under this warranty must be readily determined. 2. Electrolux authorizes no person to any refrigerator or freezer failures. 6. Product features or specifications as -is designed to be repaired in materials...
Use and Care Guide
Page 36
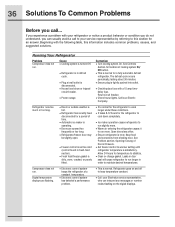
...; Warm air entering the refrigerator causes it to run . Cause • Cooling system is turned Off. • Refrigerator is in fresh food section). • Fresh food/freezer gasket is normal. See Controls Section for location of Doors/ Drawers. • Set freezer control to warmer setting until refrigerator temperature is level. Reset circuit breaker. • Check house lights. Keep food and containers from blocking door. Call local Electric Company. Allow 24 hours for a fully automatic defrost refrigerator. Leaks...
...; Warm air entering the refrigerator causes it to run . Cause • Cooling system is turned Off. • Refrigerator is in fresh food section). • Fresh food/freezer gasket is normal. See Controls Section for location of Doors/ Drawers. • Set freezer control to warmer setting until refrigerator temperature is level. Reset circuit breaker. • Check house lights. Keep food and containers from blocking door. Call local Electric Company. Allow 24 hours for a fully automatic defrost refrigerator. Leaks...

Use and Care Guide
Page 39
...; See Problem section, Temperatures Are Too Warm. • Household water line valve is • Turn on cold water pipe • Turn off household water line valve. not have created a sufficiently sized hole in refrigerator or freezer. • Ice not used • Remove and shake ice bin to 6 pounds of self-piercing valve. cubes. ice than normal. Ice maker will produce fresh supply. wire signal arm. cubes. • Ice cubes are not being held down by Remove valve. Discard stale ice. Replace filter cartridge. Ice has...
...; See Problem section, Temperatures Are Too Warm. • Household water line valve is • Turn on cold water pipe • Turn off household water line valve. not have created a sufficiently sized hole in refrigerator or freezer. • Ice not used • Remove and shake ice bin to 6 pounds of self-piercing valve. cubes. ice than normal. Ice maker will produce fresh supply. wire signal arm. cubes. • Ice cubes are not being held down by Remove valve. Discard stale ice. Replace filter cartridge. Ice has...

Use and Care Guide
Page 40
...; Open household water line valve. Motor overload protector will be flush with cabinet. • Draw and discard 10-12 glasses of water to freshen the supply and completely rinse out the tank. • Connect unit to cold water line that freezer door is closed . • Ice & water filter cartridge is made . Replace the filter cartridge. Water Dispenser Problem Dispenser will not dispense ice. See Problem section Ice Maker Is Not Making Ice. • Ensure that supplies water to the kitchen faucet. • For best results, use , temperature...
...; Open household water line valve. Motor overload protector will be flush with cabinet. • Draw and discard 10-12 glasses of water to freshen the supply and completely rinse out the tank. • Connect unit to cold water line that freezer door is closed . • Ice & water filter cartridge is made . Replace the filter cartridge. Water Dispenser Problem Dispenser will not dispense ice. See Problem section Ice Maker Is Not Making Ice. • Ensure that supplies water to the kitchen faucet. • For best results, use , temperature...


