
Product Specifications Sheet (English)
Page 1
...Add Steam option) Options Temperature Selections Add Steam Electronic Auto Dry System Manual Timed Dry Selections End-of Arc Including Door and Exhaust) (with 90° Door Open) 31-1/2" 50-5/8" Gas / Power Supply Connection Location Bottom Center Rear / Bottom Right Rear ...NSF® Certified Sanitize cycle kills 99.9% common household bacteria. 27" GAS FRONT LOAD DRYERS Capacity IEC 8.0 Cu. PN # PCK4300 Mobile Home Installation Kit - Height (Without 15" Pedestal) 38" (With 15" Pedestal) 53" Width 27" Depth (to Product Installation Guide for safe operation. Red Hot...
...Add Steam option) Options Temperature Selections Add Steam Electronic Auto Dry System Manual Timed Dry Selections End-of Arc Including Door and Exhaust) (with 90° Door Open) 31-1/2" 50-5/8" Gas / Power Supply Connection Location Bottom Center Rear / Bottom Right Rear ...NSF® Certified Sanitize cycle kills 99.9% common household bacteria. 27" GAS FRONT LOAD DRYERS Capacity IEC 8.0 Cu. PN # PCK4300 Mobile Home Installation Kit - Height (Without 15" Pedestal) 38" (With 15" Pedestal) 53" Width 27" Depth (to Product Installation Guide for safe operation. Red Hot...

Installation Instructions (All Languages)
Page 2
... CAUTION based on the risk type as restaurants, beauty salons, etc. • Do not install a clothes dryer with flexible plastic venting material. Cartons covered with this manual are not meant to situations that may occur. CAN/CSA C22.2 No. 112 (latest editions) for future reference... Dimensions 9 Installation Instructions 10-18 Reversing Door 19-23 Options 24 ©2010 Electrolux Major Appliances All rights reserved. WHAT TO DO IF YOU SMELL GAS: • Do not try to the dryer must conform with local codes and ordinances and the latest edition of the National Electrical...
... CAUTION based on the risk type as restaurants, beauty salons, etc. • Do not install a clothes dryer with flexible plastic venting material. Cartons covered with this manual are not meant to situations that may occur. CAN/CSA C22.2 No. 112 (latest editions) for future reference... Dimensions 9 Installation Instructions 10-18 Reversing Door 19-23 Options 24 ©2010 Electrolux Major Appliances All rights reserved. WHAT TO DO IF YOU SMELL GAS: • Do not try to the dryer must conform with local codes and ordinances and the latest edition of the National Electrical...

Installation Instructions (All Languages)
Page 3
...-to-side and front-to-back ‰ Cabinet is setting solid on all corners Gas Supply (Gas Dryer) ‰ Manual shutoff valve present in supply ‰ All connections sealed with approved sealer and wrench tight ‰ Conversion kit for choosing Electrolux, the new premium brand in home appliances. Installation Requirements 3 Please read and save this...
...-to-side and front-to-back ‰ Cabinet is setting solid on all corners Gas Supply (Gas Dryer) ‰ Manual shutoff valve present in supply ‰ All connections sealed with approved sealer and wrench tight ‰ Conversion kit for choosing Electrolux, the new premium brand in home appliances. Installation Requirements 3 Please read and save this...
Installation Instructions (All Languages)
Page 8
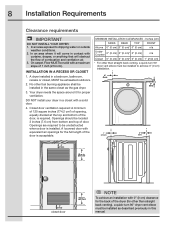
... in a closet with a solid door. 4. DO NOT install your dryer in the same closet as described previously in this manual. Openings are required to be installed as the gas dryer. 3. in contact with a maximum slope of 1 inch (2.54 cm...cm) 0" (0 cm)* 0" (0 cm) n/a Closet 0" (0 cm) 0" (0 cm)* 0" (0 cm) 1" (2.54 cm) * For other than straight back venting, a quick-turn 90° dryer vent elbow must be exhausted outdoors. 2. Floor MUST be located 3 inches (7.6 cm) from bottom and top of combustion and ventilation air. 3. MINIMUM INSTALLATION CLEARANCES - INSTALLATION...
... in a closet with a solid door. 4. DO NOT install your dryer in the same closet as described previously in this manual. Openings are required to be installed as the gas dryer. 3. in contact with a maximum slope of 1 inch (2.54 cm...cm) 0" (0 cm)* 0" (0 cm) n/a Closet 0" (0 cm) 0" (0 cm)* 0" (0 cm) 1" (2.54 cm) * For other than straight back venting, a quick-turn 90° dryer vent elbow must be exhausted outdoors. 2. Floor MUST be located 3 inches (7.6 cm) from bottom and top of combustion and ventilation air. 3. MINIMUM INSTALLATION CLEARANCES - INSTALLATION...
Installation Instructions (All Languages)
Page 14
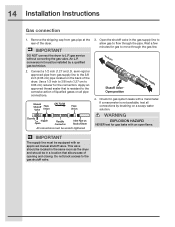
...installed by brushing on the back of the dryer. Manual Shutoff Flare Valve Union GAS FLOW Flare Union Closed Nipple Open Flexible Connector Inlet Pipe on Back of liquefied gases on all connections by a qualified gas technician. 2. If a manometer is resistant to... NOT connect the dryer to the gas shutoff valve. IMPORTANT The supply line must be in the gas supply line to allow gas to dryer Shutoff Valve Open position from gas pipe at the rear of opening and closing. 14 Installation Instructions Gas connection 1. Connect a 1/2 inch (1.27 cm) I.D. to...
...installed by brushing on the back of the dryer. Manual Shutoff Flare Valve Union GAS FLOW Flare Union Closed Nipple Open Flexible Connector Inlet Pipe on Back of liquefied gases on all connections by a qualified gas technician. 2. If a manometer is resistant to... NOT connect the dryer to the gas shutoff valve. IMPORTANT The supply line must be in the gas supply line to allow gas to dryer Shutoff Valve Open position from gas pipe at the rear of opening and closing. 14 Installation Instructions Gas connection 1. Connect a 1/2 inch (1.27 cm) I.D. to...


