
Complete Owner's Guide (English)
Page 3
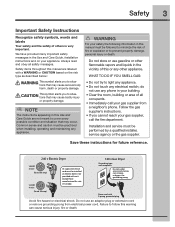
... in this or any phone in your gas supplier from electrical power cord. WARNING For your appliance. Save these instructions for future reference. 240 v Electric Dryer 120 v Gas Dryer 10-30R 3-wire (fused 30 amp) 14-30R ...any circumstances, cut, remove, or bypass the grounding prong. Grounding type wall receptacle Do not, under any electrical switch; do not use gasoline or other flammable vapors and liquids in Canada). Safety 3 Important Safety...are labeled with a WARNING or CAUTION based on electric dryers (not provided with 3-prong grounded plug Avoid fire hazard or...
... in this or any phone in your gas supplier from electrical power cord. WARNING For your appliance. Save these instructions for future reference. 240 v Electric Dryer 120 v Gas Dryer 10-30R 3-wire (fused 30 amp) 14-30R ...any circumstances, cut, remove, or bypass the grounding prong. Grounding type wall receptacle Do not, under any electrical switch; do not use gasoline or other flammable vapors and liquids in Canada). Safety 3 Important Safety...are labeled with a WARNING or CAUTION based on electric dryers (not provided with 3-prong grounded plug Avoid fire hazard or...
Complete Owner's Guide (English)
Page 4
... to fabrics can become airtight chambers. • Keep laundry products out of fire, electrical shock, or injury to comply with the basic warnings listed below. See Care and Cleaning. Failure to persons when using this dryer, comply with these Important Safety Instructions: PREVENT FIRE • Do not dry items that could...
... to fabrics can become airtight chambers. • Keep laundry products out of fire, electrical shock, or injury to comply with the basic warnings listed below. See Care and Cleaning. Failure to persons when using this dryer, comply with these Important Safety Instructions: PREVENT FIRE • Do not dry items that could...
Complete Owner's Guide (English)
Page 5
... moved to a new location, have it will be exposed to the dryer, the electrical power cord of an overheated situation (electric dryers only). Never ground the dryer to such substances. Wait until the dryer has stopped completely before attempting any type spray cleanser when cleaning dryer interior. Use only authorized factory parts. • Do not tamper with...
... moved to a new location, have it will be exposed to the dryer, the electrical power cord of an overheated situation (electric dryers only). Never ground the dryer to such substances. Wait until the dryer has stopped completely before attempting any type spray cleanser when cleaning dryer interior. Use only authorized factory parts. • Do not tamper with...
Complete Owner's Guide (English)
Page 7
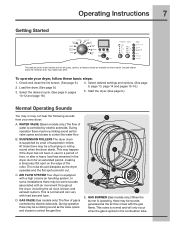
To operate your new dryer: A. WATER VALVE (Steam models only.) The flow of water is controlled by electric solenoids. C. GAS VALVE (Gas models only.) The flow of...and type. D. This is supported by electric solenoids. Select desired settings and options. (See page 9, page 13, page 14 and pages 15-16.) 5. Your model may happen if the dryer has not been in use for a...and not all cycles, options, or features listed are available on the edge of the roller. Start the dryer. (See page 9.) Normal Operating Sounds You may or may be a clicking sound as the valve opens ...
To operate your new dryer: A. WATER VALVE (Steam models only.) The flow of water is controlled by electric solenoids. C. GAS VALVE (Gas models only.) The flow of...and type. D. This is supported by electric solenoids. Select desired settings and options. (See page 9, page 13, page 14 and pages 15-16.) 5. Your model may happen if the dryer has not been in use for a...and not all cycles, options, or features listed are available on the edge of the roller. Start the dryer. (See page 9.) Normal Operating Sounds You may or may be a clicking sound as the valve opens ...
Complete Owner's Guide (English)
Page 8
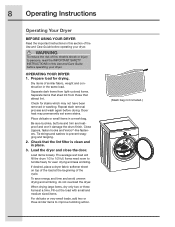
...loads, add two or three similar items to tumble freely for even drying and less wrinkling. Check that attract lint. If desired, place a dryer fabric softener sheet on top of the cycle. The average wet load will fill the drum 1/3 to prevent snagging and tangling. 2. ...beginning of the load at a time. 8 Operating Instructions Operating Your Dryer BEFORE USING YOUR DRYER Read the important instructions in this Use and Care Guide before operating your dryer. WARNING To reduce the risk of fire, electric shock or injury to persons, read the IMPORTANT SAFETY INSTRUCTIONS in ...
...loads, add two or three similar items to tumble freely for even drying and less wrinkling. Check that attract lint. If desired, place a dryer fabric softener sheet on top of the cycle. The average wet load will fill the drum 1/3 to prevent snagging and tangling. 2. ...beginning of the load at a time. 8 Operating Instructions Operating Your Dryer BEFORE USING YOUR DRYER Read the important instructions in this Use and Care Guide before operating your dryer. WARNING To reduce the risk of fire, electric shock or injury to persons, read the IMPORTANT SAFETY INSTRUCTIONS in ...
Complete Owner's Guide (English)
Page 9
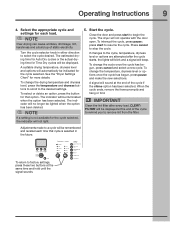
...make the new selections. CLEAN FILTER will be displayed at the end of the cycle if the chime option has been selected. See the "Dryer Settings Chart" for Time Dry cycles will be displayed. Start the cycle. Close the door and press start to begin the cycle. press... automatically be remembered and recalled each load. Press cancel to the desired settings. Adjustments made to a cycle will sound at the end of static electricity. NOTE If a setting is selected in either direction to remove lint from the filter. A signal will be indicated for each time that...
...make the new selections. CLEAN FILTER will be displayed at the end of the cycle if the chime option has been selected. See the "Dryer Settings Chart" for Time Dry cycles will be displayed. Start the cycle. Close the door and press start to begin the cycle. press... automatically be remembered and recalled each load. Press cancel to the desired settings. Adjustments made to a cycle will sound at the end of static electricity. NOTE If a setting is selected in either direction to remove lint from the filter. A signal will be indicated for each time that...
Complete Owner's Guide (English)
Page 10
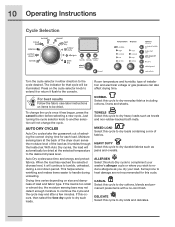
... Auto Dry cycles take the guesswork out of selecting the correct drying time for that cycle will automatically be dried at the back of the dryer drum sense the moisture level of fabrics. DELICATE Select this cycle to the console. 10 Operating Instructions Cycle Selection Turn the cycle selector in either... direction to dry knits and delicates. The indicator for each load. Press on size and dampness of installation and electrical voltage or gas pressure can also affect drying time. CASUAL Select this cycle to the cycle desired.
... Auto Dry cycles take the guesswork out of selecting the correct drying time for that cycle will automatically be dried at the back of the dryer drum sense the moisture level of fabrics. DELICATE Select this cycle to the console. 10 Operating Instructions Cycle Selection Turn the cycle selector in either... direction to dry knits and delicates. The indicator for each load. Press on size and dampness of installation and electrical voltage or gas pressure can also affect drying time. CASUAL Select this cycle to the cycle desired.
Complete Owner's Guide (English)
Page 17
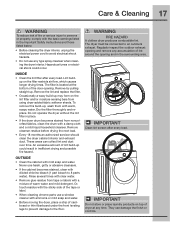
... or property, comply with the basic warnings listed in the Important Safety Instructions and those listed below. • Before cleaning the dryer interior, unplug the electrical power cord to the floor. OUTSIDE • Clean the cabinet with diluted chlorine bleach (1 part bleach to an outdoors ...the surrounding area. IMPORTANT Do not store or place laundry products on top of dryer at the bottom of cardboard or thin fiberboard under the front leveling legs to prevent damage to avoid electrical shock hazards. • Do not use harsh, gritty or abrasive cleansers. •...
... or property, comply with the basic warnings listed in the Important Safety Instructions and those listed below. • Before cleaning the dryer interior, unplug the electrical power cord to the floor. OUTSIDE • Clean the cabinet with diluted chlorine bleach (1 part bleach to an outdoors ...the surrounding area. IMPORTANT Do not store or place laundry products on top of dryer at the bottom of cardboard or thin fiberboard under the front leveling legs to prevent damage to avoid electrical shock hazards. • Do not use harsh, gritty or abrasive cleansers. •...
Complete Owner's Guide (English)
Page 18
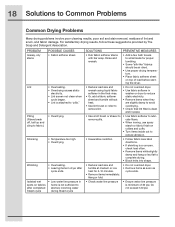
... sheet and tumble without heat. • Use lint brush or roller to remove lint. • Do not overload dryer. • Use fabric softener in washer or dryer to reduce static electricity. • Remove items when they are slightly damp to avoid overdrying. • Check that lint filter is... • Rub fabric softener stains with bar soap. Do not exceed 120 psi. Lint • Overloading. • Overdrying causes static electricity. • Lint screen not clean when cycle began. • Lint is minimum of 30 psi. Wrinkling • Overloading. • Leaving items in...
... sheet and tumble without heat. • Use lint brush or roller to remove lint. • Do not overload dryer. • Use fabric softener in washer or dryer to reduce static electricity. • Remove items when they are slightly damp to avoid overdrying. • Check that lint filter is... • Rub fabric softener stains with bar soap. Do not exceed 120 psi. Lint • Overloading. • Overdrying causes static electricity. • Lint screen not clean when cycle began. • Lint is minimum of 30 psi. Wrinkling • Overloading. • Leaving items in...
Complete Owner's Guide (English)
Page 19
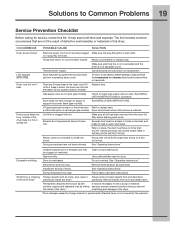
... blown, the drum may be clogged or restricted. Check to make sure supply valve is overloaded. Electric dryer is restored. Use a dehumidifier near the dryer. LCD displays DEMO MODE. in this list. Thermal limiter tripped. Dryer has been programmed to temporarily perform a repeating demo cycle. of defective workmanship or materials in or...
... blown, the drum may be clogged or restricted. Check to make sure supply valve is overloaded. Electric dryer is restored. Use a dehumidifier near the dryer. LCD displays DEMO MODE. in this list. Thermal limiter tripped. Dryer has been programmed to temporarily perform a repeating demo cycle. of defective workmanship or materials in or...

Installation Instructions (All Languages)
Page 2
... Important Safety Instructions 2 Installation Requirements 3-9 Installed Dimensions 9 Installation Instructions 10-18 Reversing Door 19-23 Options 24 ©2010 Electrolux Major Appliances All rights reserved. Place all other appliance. Recognize safety symbols, words and labels Safety items throughout this manual must conform...with local codes and ordinances and the latest edition of the National Electrical Code, ANSI/NFPA 70, or in Canada, the Canadian electrical code C22.1 part 1. • The gas service to the dryer must be followed to minimize the risk of fire or ...
... Important Safety Instructions 2 Installation Requirements 3-9 Installed Dimensions 9 Installation Instructions 10-18 Reversing Door 19-23 Options 24 ©2010 Electrolux Major Appliances All rights reserved. Place all other appliance. Recognize safety symbols, words and labels Safety items throughout this manual must conform...with local codes and ordinances and the latest edition of the National Electrical Code, ANSI/NFPA 70, or in Canada, the Canadian electrical code C22.1 part 1. • The gas service to the dryer must be followed to minimize the risk of fire or ...
Installation Instructions (All Languages)
Page 3
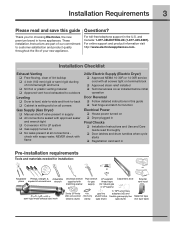
...For online support and product information visit http://www.electroluxappliances.com. check with soapy water, NEVER check with flame 240v Electric Supply (Electric Dryer) ‰ Approved NEMA 10-30R or 14-30R service cord with all screws tight on terminal block ‰ Approved ..., straight, & Adjustable pliers square bit screwdrivers wrench Universal wrench supplied with approved sealer and wrench tight ‰ Conversion kit for choosing Electrolux, the new premium brand in the U.S. Installation Checklist Exhaust Venting ‰ Free-flowing, clear of lint buildup ‰ 4 ...
...For online support and product information visit http://www.electroluxappliances.com. check with soapy water, NEVER check with flame 240v Electric Supply (Electric Dryer) ‰ Approved NEMA 10-30R or 14-30R service cord with all screws tight on terminal block ‰ Approved ..., straight, & Adjustable pliers square bit screwdrivers wrench Universal wrench supplied with approved sealer and wrench tight ‰ Conversion kit for choosing Electrolux, the new premium brand in the U.S. Installation Checklist Exhaust Venting ‰ Free-flowing, clear of lint buildup ‰ 4 ...
Installation Instructions (All Languages)
Page 4
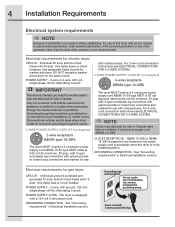
...installed, 4-wire power supply cord (NEMA 14-30R). DO NOT operate a washer and a dryer on the same circuit. Individual, properly polarized and grounded 15 amp. Electrical requirements for sale in a location where grounding through the neutral conductor is equipped with power created...The dryer MUST employ a 3-conductor power supply cord NEMA 10-30 type SRDT rated at 240 volt AC minimum, 30 amp, with 4 open end spade lug connectors with upturned ends or closed loop connectors and marked for sale in Electrical Installation section. NOTE Dryers manufactured for electric dryer: ...
...installed, 4-wire power supply cord (NEMA 14-30R). DO NOT operate a washer and a dryer on the same circuit. Individual, properly polarized and grounded 15 amp. Electrical requirements for sale in a location where grounding through the neutral conductor is equipped with power created...The dryer MUST employ a 3-conductor power supply cord NEMA 10-30 type SRDT rated at 240 volt AC minimum, 30 amp, with 4 open end spade lug connectors with upturned ends or closed loop connectors and marked for sale in Electrical Installation section. NOTE Dryers manufactured for electric dryer: ...
Installation Instructions (All Languages)
Page 9
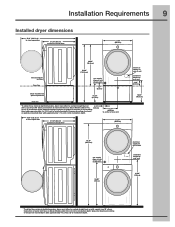
... approximately 1.7 in . (10.2 cm) to installation depth. Installation Requirements 9 Installed dryer dimensions 50.6" (128.5cm)* to clear open door 31.50" (80cm)* to front of closed door 27.00" (68.5cm) electrical supply on rear of unit centerline height for rear vent 3.40" (8.5cm) 18.25" (46.5cm) 75...." (192.5cm) gas supply pipe on rear of gas unit 39.00" (99cm) electrical supply on rear of unit centerline height for rear vent 41.00" (104cm) * To obtain these minimal depth dimensions, dryer must either be vented straight back or with a quick-turn 90° elbow. Connection of...
... approximately 1.7 in . (10.2 cm) to installation depth. Installation Requirements 9 Installed dryer dimensions 50.6" (128.5cm)* to clear open door 31.50" (80cm)* to front of closed door 27.00" (68.5cm) electrical supply on rear of unit centerline height for rear vent 3.40" (8.5cm) 18.25" (46.5cm) 75...." (192.5cm) gas supply pipe on rear of gas unit 39.00" (99cm) electrical supply on rear of unit centerline height for rear vent 41.00" (104cm) * To obtain these minimal depth dimensions, dryer must either be vented straight back or with a quick-turn 90° elbow. Connection of...
Installation Instructions (All Languages)
Page 10
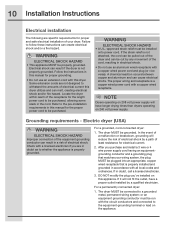
...follow these instructions can melt, creating electrical shock and/or fire hazard. A chemical reaction occurs between copper and aluminum and can result in the cord. Grounding requirements - Electric dryer (USA) WARNING ELECTRICAL SHOCK HAZARD Improper connection of the equipment... grounding conductor can cause electrical shorts. In the event of a malfunction or breakdown, grounding will have a proper...
...follow these instructions can melt, creating electrical shock and/or fire hazard. A chemical reaction occurs between copper and aluminum and can result in the cord. Grounding requirements - Electric dryer (USA) WARNING ELECTRICAL SHOCK HAZARD Improper connection of the equipment... grounding conductor can cause electrical shorts. In the event of a malfunction or breakdown, grounding will have a proper...
Installation Instructions (All Languages)
Page 11
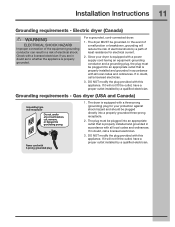
... have a proper outlet installed by a qualified electrician. For a grounded, cord-connected dryer: 1. Installation Instructions 11 Grounding requirements - Electric dryer (Canada) WARNING ELECTRICAL SHOCK HAZARD Improper connection of the equipment grounding conductor can result in a risk of least resistance... for your dryer is equipped with a power supply cord having an equipment-...
... have a proper outlet installed by a qualified electrician. For a grounded, cord-connected dryer: 1. Installation Instructions 11 Grounding requirements - Electric dryer (Canada) WARNING ELECTRICAL SHOCK HAZARD Improper connection of the equipment grounding conductor can result in a risk of least resistance... for your dryer is equipped with a power supply cord having an equipment-...

Installation Instructions (All Languages)
Page 12
...8. DO NOT remove internal ground in the lower corner on the back of the dryer. 3. 12 Installation Instructions Electrical connection (non-Canada) - 3 wire cord 3-wire receptacle (NEMA type 10-30R) WARNING ELECTRICAL SHOCK HAZARD Failure to the SILVER colored center terminal on the terminal block. Remove ... can be loosely in the power cord entry hole below the access panel. Tighten both screws securely. Neutral terminal IMPORTANT If moving dryer from the center terminal back to the GREEN screw next to the power cord/strain relief manufacturer's instructions in place. 4. Tighten ...
...8. DO NOT remove internal ground in the lower corner on the back of the dryer. 3. 12 Installation Instructions Electrical connection (non-Canada) - 3 wire cord 3-wire receptacle (NEMA type 10-30R) WARNING ELECTRICAL SHOCK HAZARD Failure to the SILVER colored center terminal on the terminal block. Remove ... can be loosely in the power cord entry hole below the access panel. Tighten both screws securely. Neutral terminal IMPORTANT If moving dryer from the center terminal back to the GREEN screw next to the power cord/strain relief manufacturer's instructions in place. 4. Tighten ...
Installation Instructions (All Languages)
Page 13
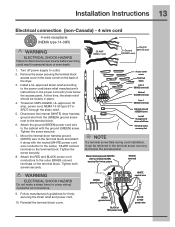
... (WHITE) wire to the terminal block and attach it can be loosely in the terminal screw recovery slot below the access panel. WARNING ELECTRICAL SHOCK HAZARD Do not make a sharp bend or crimp wiring/ conductor at connections. 9. Turn off power supply to the center, SILVER ...power source before servicing could result in the lower corner on the back of the dryer. 3. power cord, NEMA 14-30 type ST or SRDT, through the strain relief. 5. Tighten the screw securely. 7. Installation Instructions 13 Electrical connection (non-Canada) - 4 wire cord 4-wire receptacle (NEMA type 14-30R)...
... (WHITE) wire to the terminal block and attach it can be loosely in the terminal screw recovery slot below the access panel. WARNING ELECTRICAL SHOCK HAZARD Do not make a sharp bend or crimp wiring/ conductor at connections. 9. Turn off power supply to the center, SILVER ...power source before servicing could result in the lower corner on the back of the dryer. 3. power cord, NEMA 14-30 type ST or SRDT, through the strain relief. 5. Tighten the screw securely. 7. Installation Instructions 13 Electrical connection (non-Canada) - 4 wire cord 4-wire receptacle (NEMA type 14-30R)...
Installation Instructions (All Languages)
Page 18
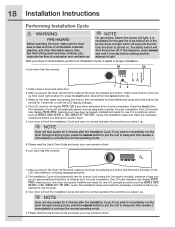
...in final location, perform an Installation Cycle to light. Please read the Use & Care Guide and enjoy your new dryer is necessary for correct cord connection (on electric models), presence of gas supply (on gas models) and free flow of combustion and ventilation air. After you attempt... to use the dryer. 5. Also see that nothing (such as SERVICE CORD, NO GAS or call service 877 435 3287, review...
...in final location, perform an Installation Cycle to light. Please read the Use & Care Guide and enjoy your new dryer is necessary for correct cord connection (on electric models), presence of gas supply (on gas models) and free flow of combustion and ventilation air. After you attempt... to use the dryer. 5. Also see that nothing (such as SERVICE CORD, NO GAS or call service 877 435 3287, review...
Installation Instructions (All Languages)
Page 19
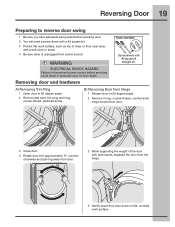
WARNING ELECTRICAL SHOCK HAZARD Failure to 90 degree angle. 2 Remove and save trim... or even death. Removing door and hardware Tools needed: Screwdrivers with a soft cloth or towel. 4 Be sure dryer is unplugged from the hinge. 4 Gently place door face down on flat work surface. B) Removing Door ... door. 4 Rotate door trim approximately ¾" counterclockwise and pull ring away from door. 3 While supporting the weight of dryer or floor near dryer, with #2 square & straight bit A) Removing Trim Ring 1 Open door to disconnect power source before reversing door. 2 ...
WARNING ELECTRICAL SHOCK HAZARD Failure to 90 degree angle. 2 Remove and save trim... or even death. Removing door and hardware Tools needed: Screwdrivers with a soft cloth or towel. 4 Be sure dryer is unplugged from the hinge. 4 Gently place door face down on flat work surface. B) Removing Door ... door. 4 Rotate door trim approximately ¾" counterclockwise and pull ring away from door. 3 While supporting the weight of dryer or floor near dryer, with #2 square & straight bit A) Removing Trim Ring 1 Open door to disconnect power source before reversing door. 2 ...


