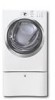
Installation Instructions
Page 2
... brand in the U.S. Electric dryer (3-wire cord)... 12 Electrical connection - We view your new appliance. Electric dryer (Canada)... 11 Grounding requirements - Gas dryer 11 Electrical connection - Electric dryer (USA) ........ 10 Grounding requirements - Electric dryer (4-wire cord)... 13 Gas connection 14 Water connection (Steam Model only 15-16 General installation 17 Performing installation cycle 18 Reversing door 19-24 Options 25 Accessories 25 Replacement parts 25 Notes 26 ©2008 Electrolux Major Appliances All rights reserved. and Canada...
... brand in the U.S. Electric dryer (3-wire cord)... 12 Electrical connection - We view your new appliance. Electric dryer (Canada)... 11 Grounding requirements - Gas dryer 11 Electrical connection - Electric dryer (USA) ........ 10 Grounding requirements - Electric dryer (4-wire cord)... 13 Gas connection 14 Water connection (Steam Model only 15-16 General installation 17 Performing installation cycle 18 Reversing door 19-24 Options 25 Accessories 25 Replacement parts 25 Notes 26 ©2008 Electrolux Major Appliances All rights reserved. and Canada...
Installation Instructions
Page 3
... (latest editions) for natural gas 3-wire or 4-wire 240 volt cord kit (electric dryer) 4 in this manual and all of the National Electrical Code, ANSI/ NFPA 70, or in a garbage container or make materials inaccessible to children. The instructions in . (10.2 cm) clamp or LP supply) 1//, NPT union flare gas line adapters (x2) and shutoff valve flexible gas supply line (gas dryer) (gas dryer) Metal foil tape (not duct tape) Good safe...
... (latest editions) for natural gas 3-wire or 4-wire 240 volt cord kit (electric dryer) 4 in this manual and all of the National Electrical Code, ANSI/ NFPA 70, or in a garbage container or make materials inaccessible to children. The instructions in . (10.2 cm) clamp or LP supply) 1//, NPT union flare gas line adapters (x2) and shutoff valve flexible gas supply line (gas dryer) (gas dryer) Metal foil tape (not duct tape) Good safe...

Installation Instructions
Page 4
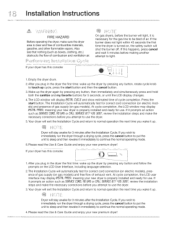
...4 open end spade lug connectors with clothes dryers. GROUNDING CONNECTION - The dryer is in Electrical installation section. individual 30 amp. POWER SUPPLY CORD - POWER SUPPLY - 2-wire, with a 120 volt 3-wire power cord. DO NOT operate a washer and a dryer on the same circuit. time delay fuses or circuit breakers. Grounding type wall receptacle Do not, under -'_ any circumstances, cut, remove, or bypass the grounding prong., Power cord with 15 amp. Use separately fused circuits for use OUTLET RECEPTACLE - branch circuit fused with 3-prong grounded plug...
...4 open end spade lug connectors with clothes dryers. GROUNDING CONNECTION - The dryer is in Electrical installation section. individual 30 amp. POWER SUPPLY CORD - POWER SUPPLY - 2-wire, with a 120 volt 3-wire power cord. DO NOT operate a washer and a dryer on the same circuit. time delay fuses or circuit breakers. Grounding type wall receptacle Do not, under -'_ any circumstances, cut, remove, or bypass the grounding prong., Power cord with 15 amp. Use separately fused circuits for use OUTLET RECEPTACLE - branch circuit fused with 3-prong grounded plug...

Installation Instructions
Page 5
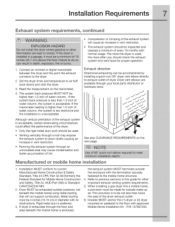
... test pressures equal to installing dryer duct. To avoid restricting the outlet, maintain a minimum of any other obstruction. . In Canada and the United States if metal (foil type) duct is installed, it with clothes dryers and in operation. Exhaust system requirements Use only 4 inch (10.2 cm) diameter (minimum) rigid or flexible metal duct and approved vent hood which has a swing-out damper(s) that open when the dryer is free...
... test pressures equal to installing dryer duct. To avoid restricting the outlet, maintain a minimum of any other obstruction. . In Canada and the United States if metal (foil type) duct is installed, it with clothes dryers and in operation. Exhaust system requirements Use only 4 inch (10.2 cm) diameter (minimum) rigid or flexible metal duct and approved vent hood which has a swing-out damper(s) that open when the dryer is free...
Installation Instructions
Page 7
... metal duct work should check the exhaust system and vent hood for other important exhaust venting system requirements. 5. Set the dryer timer and temperature to the floor with the termination securely fastened to exhaust outlet of dryer. The system back pressure MUST NOT be accomplished by installing a quick-turn 90 ° dryer vent elbow directly to the mobile home structure. 4. If the system back pressure is less than 1.0 inch of water column. Exhaust direction Directional exhausting...
... metal duct work should check the exhaust system and vent hood for other important exhaust venting system requirements. 5. Set the dryer timer and temperature to the floor with the termination securely fastened to exhaust outlet of dryer. The system back pressure MUST NOT be accomplished by installing a quick-turn 90 ° dryer vent elbow directly to the mobile home structure. 4. If the system back pressure is less than 1.0 inch of water column. Exhaust direction Directional exhausting...
Installation Instructions
Page 10
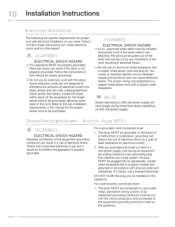
... dryers operating on the appliance. Electrical shock can cause electrical shorts. ELECTRICAL SHOCK HAZARD A U.h-approved strain relief must be cut by a path of least resistance for proper and safe electrical installation of the receptacle for the proper power cord to follow these instructions can melt, creating electrical shock and/or fire hazard. Check with a copper wired power cord and plug (or vice versa). "l installation instructions The following are specific requirements...
... dryers operating on the appliance. Electrical shock can cause electrical shorts. ELECTRICAL SHOCK HAZARD A U.h-approved strain relief must be cut by a path of least resistance for proper and safe electrical installation of the receptacle for the proper power cord to follow these instructions can melt, creating electrical shock and/or fire hazard. Check with a copper wired power cord and plug (or vice versa). "l installation instructions The following are specific requirements...
Installation Instructions
Page 11
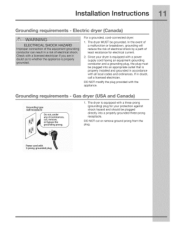
... electrical current. . Power cord with the appliance. Grounding requirements Grounding type wall receptacle / Do not, under any circumstances, cut or remove ground prong from the plug. Since your protection against shock hazard and should be plugged directly into an appropriate outlet that is equipped with a power supply cord having an equipment-grounding conductor and a grounding plug, the plug must be grounded. Installation instructions Grounding requirements o Electric dryer (Canada} For a grounded, cord-connected dryer...
... electrical current. . Power cord with the appliance. Grounding requirements Grounding type wall receptacle / Do not, under any circumstances, cut or remove ground prong from the plug. Since your protection against shock hazard and should be plugged directly into an appropriate outlet that is equipped with a power supply cord having an equipment-grounding conductor and a grounding plug, the plug must be grounded. Installation instructions Grounding requirements o Electric dryer (Canada} For a grounded, cord-connected dryer...

Installation Instructions
Page 14
... back of the dryer. If a manometer is resistant to flow through the gas line. Open the shutoff valve in a location that is not available, test all pipe connections. Apply an approved thread sealer that allows ease of Dryer All connections racistbe wrench-tightened " "- Manual Shutoff Valve Flare Union GAS FLOW _ Flare Union Shutoff ValveOpen position 4, Check for gas to LR gas service without converting the gas valve. Do not block access to the gas shutoff valve.
... back of the dryer. If a manometer is resistant to flow through the gas line. Open the shutoff valve in a location that is not available, test all pipe connections. Apply an approved thread sealer that allows ease of Dryer All connections racistbe wrench-tightened " "- Manual Shutoff Valve Flare Union GAS FLOW _ Flare Union Shutoff ValveOpen position 4, Check for gas to LR gas service without converting the gas valve. Do not block access to the gas shutoff valve.
Installation Instructions
Page 15
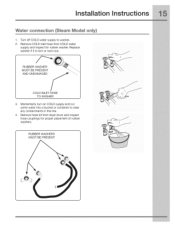
RUBBER WASHERS MUST BE PRESENT Installation instructions Water connection (Steam Model only} . RUBBER WASHER MUST BEPRESENT AND UNDAMAGED J J \ COLD INLET HOSE TO WASHER 3. Remove hose kit from COLD water supply and inspect for proper placement of rubber washers. Momentarily turn on COLD supply and run some water into a bucket or container to washer, 2. Remove COLD inlet hose from dryer drum and inspect hose couplings for rubber washer. Replace washer if it is torn or worn out. Turn off COLD water supply to clear any contaminants in the line. 4.
RUBBER WASHERS MUST BE PRESENT Installation instructions Water connection (Steam Model only} . RUBBER WASHER MUST BEPRESENT AND UNDAMAGED J J \ COLD INLET HOSE TO WASHER 3. Remove hose kit from COLD water supply and inspect for proper placement of rubber washers. Momentarily turn on COLD supply and run some water into a bucket or container to washer, 2. Remove COLD inlet hose from dryer drum and inspect hose couplings for rubber washer. Replace washer if it is torn or worn out. Turn off COLD water supply to clear any contaminants in the line. 4.
Installation Instructions
Page 17
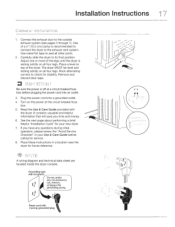
The dryer MUST be level and resting solidly on all four legs. Place a level on top of a 4" (10.2 cm) clamp is resting solidly on all four legs. Installation instructions i , Connect the exhaust duct to its final position. Adjust one or more of the legs until the dryer is recommended to connect the dryer to check for stability. Use metal foil tape to seal all other joints. , Carefully slide the dryer to the outside exhaust system (see pages 5 through 7). Rock alternating corners to the exhaust vent system. Use of the dryer. Remove and discard door tape.
The dryer MUST be level and resting solidly on all four legs. Place a level on top of a 4" (10.2 cm) clamp is resting solidly on all four legs. Installation instructions i , Connect the exhaust duct to its final position. Adjust one or more of the legs until the dryer is recommended to connect the dryer to check for stability. Use metal foil tape to seal all other joints. , Carefully slide the dryer to the outside exhaust system (see pages 5 through 7). Rock alternating corners to the exhaust vent system. Use of the dryer. Remove and discard door tape.
Installation Instructions
Page 18
... gas models) and free flow of cycle completion. If you w_sh to immediately run the dryer through a drying cycle, press the cancel button to put the unit to sleep and then rewake it immediately to continue the normal operating mode. 6. Empty the dryer drum. 2.After you plug in the dryer the first time: wake up the dryer by pressing any button, rotate cycle knob to touch up cycle, press the start button. installation instructions FIRE...
... gas models) and free flow of cycle completion. If you w_sh to immediately run the dryer through a drying cycle, press the cancel button to put the unit to sleep and then rewake it immediately to continue the normal operating mode. 6. Empty the dryer drum. 2.After you plug in the dryer the first time: wake up the dryer by pressing any button, rotate cycle knob to touch up cycle, press the start button. installation instructions FIRE...
Installation Instructions
Page 20
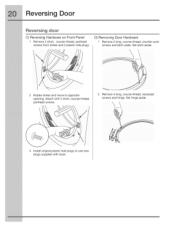
Rotate striker and move to opposite opening. Remove 4 long, course-thread, recessed screws and hinge. Reversing Door Reversing door C) Reversing Hardware on Front Panel 1 Remove 2 short, course-thread, panhead screws from striker and 2 plastic hole plugs. Set hinge aside. \ \ 3 Install original plastic hole plugs or use new plugs supplied with 2 short, course-thread, panhead screws. D) Removing Door Hardware 1 Remove 2 long, course-thread, counter-sunk screws and latch plate. Attach with dryer. Set latch aside.
Rotate striker and move to opposite opening. Remove 4 long, course-thread, recessed screws and hinge. Reversing Door Reversing door C) Reversing Hardware on Front Panel 1 Remove 2 short, course-thread, panhead screws from striker and 2 plastic hole plugs. Set hinge aside. \ \ 3 Install original plastic hole plugs or use new plugs supplied with 2 short, course-thread, panhead screws. D) Removing Door Hardware 1 Remove 2 long, course-thread, counter-sunk screws and latch plate. Attach with dryer. Set latch aside.
Installation Instructions
Page 25
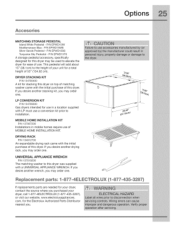
... The matching washer to elevate the dryer for this dryer was supplied with the initial purchase of this dryer. LP CONVERSION KIT P/N 134709300 Gas dryers intended for a total height of MOBILE HOME INSTALLATION KIT. Options MATCHING STORAGE PEDESTAL Island White Pedestal- Repmacement paAs: 1-877-4ELECTROLUX If replacements parts are needed for the Electrolux Authorized Parts Distributor nearest you purchased your unit for use in mobile homes require use of 53...
... The matching washer to elevate the dryer for this dryer was supplied with the initial purchase of this dryer. LP CONVERSION KIT P/N 134709300 Gas dryers intended for a total height of MOBILE HOME INSTALLATION KIT. Options MATCHING STORAGE PEDESTAL Island White Pedestal- Repmacement paAs: 1-877-4ELECTROLUX If replacements parts are needed for the Electrolux Authorized Parts Distributor nearest you purchased your unit for use in mobile homes require use of 53...
Use and Care Guide
Page 3
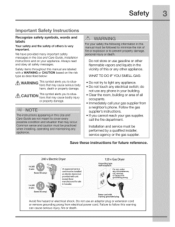
... light any appliance. _,Do not touch any electrical switch; WHAT TO DO IF YOU SMELL GAS: ,, Do not try to situations that may cause bodily injury or property damage. do not use any phone in Canada). 120 v Gas Dryer Grounding type wall receptacle _..\ --_'_I_ .i I_/ _ _'_ Do not, under any other flammable vapors and liquids in the Use and Care Guide, Installation Instructions and on electric dryers...
... light any appliance. _,Do not touch any electrical switch; WHAT TO DO IF YOU SMELL GAS: ,, Do not try to situations that may cause bodily injury or property damage. do not use any phone in Canada). 120 v Gas Dryer Grounding type wall receptacle _..\ --_'_I_ .i I_/ _ _'_ Do not, under any other flammable vapors and liquids in the Use and Care Guide, Installation Instructions and on electric dryers...

Use and Care Guide
Page 5
... extension cord or an adaptor plug. Use only authorized factory parts. A service technician must be exposed to do not reach into the dryer if the drum is moved to a gas pipe. The third grounding prong must never be installed and electrically grounded by an authorized servicer unless specifically recommended in the dryer for detailed grounding procedures. Installation instructions are packed in this Use & Care Guide. Do not use any service or cleaning...
... extension cord or an adaptor plug. Use only authorized factory parts. A service technician must be exposed to do not reach into the dryer if the drum is moved to a gas pipe. The third grounding prong must never be installed and electrically grounded by an authorized servicer unless specifically recommended in the dryer for detailed grounding procedures. Installation instructions are packed in this Use & Care Guide. Do not use any service or cleaning...
Use and Care Guide
Page 7
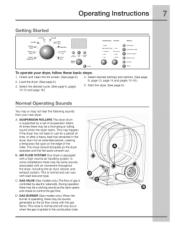
... tube. Operating instructions Getting Started normal towels _ casual © =XT_ fast _L:,/, dry my time control favorite dry lock Temperature Dryness O high @ medium/high O medium C) low © air {) max @ normal © less O damp Options wrinkle release i_ sanitize To operate your new dryer: A. The noise should dissipate as the valve opens and closes to control the gas flow. SUSPENSION ROLLERS The dryer drum is controlled by a set of the roller. This noise is normal...
... tube. Operating instructions Getting Started normal towels _ casual © =XT_ fast _L:,/, dry my time control favorite dry lock Temperature Dryness O high @ medium/high O medium C) low © air {) max @ normal © less O damp Options wrinkle release i_ sanitize To operate your new dryer: A. The noise should dissipate as the valve opens and closes to control the gas flow. SUSPENSION ROLLERS The dryer drum is controlled by a set of the roller. This noise is normal...
Use and Care Guide
Page 17
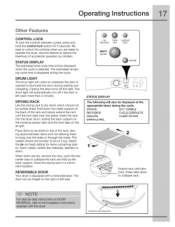
The estimated remaining cycle time is opened to illuminate the drum during loading and unloading. DRUM LIGHT The drum light will automatically turn off the light. The drum light will come on whenever the door is displayed during the cycle: DRMIn6 EHT.TUMBLE SRRITI21R6 CMCLE cOmPLETE cooun(3 CLERB FILTER LURIBHLEREL. 2 Extend rack until the lock tabs click into the dryer drum, resting the back support on the moisture sensor bars and the front legs...
The estimated remaining cycle time is opened to illuminate the drum during loading and unloading. DRUM LIGHT The drum light will automatically turn off the light. The drum light will come on whenever the door is displayed during the cycle: DRMIn6 EHT.TUMBLE SRRITI21R6 CMCLE cOmPLETE cooun(3 CLERB FILTER LURIBHLEREL. 2 Extend rack until the lock tabs click into the dryer drum, resting the back support on the moisture sensor bars and the front legs...
Use and Care Guide
Page 20
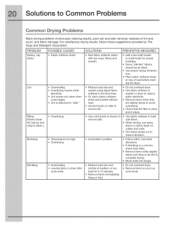
... static electricity. Lint is a concern, check load often. Check that lint filter is clean and in dryer after cycle ends. When ironing, use spray starch or fabric finish on top of lint and scum, and fabric damage. Lint screen not clean when cycle began. Temperature too high. Place fabric softener sheet on collars and cuffs. Reduce load size and rewash using liquid fabric softener in washer or dryer to complete drying. For satisfactory drying results...
... static electricity. Lint is a concern, check load often. Check that lint filter is clean and in dryer after cycle ends. When ironing, use spray starch or fabric finish on top of lint and scum, and fabric damage. Lint screen not clean when cycle began. Temperature too high. Place fabric softener sheet on collars and cuffs. Reduce load size and rewash using liquid fabric softener in washer or dryer to complete drying. For satisfactory drying results...
Use and Care Guide
Page 21
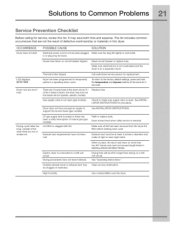
... more than drying on a separate circuit. Outside exhaust hood or exhaust duct may save both time and expense. High humidity. See "Operating Instructions." See INSTALLATION INSTRUCTIONS for 5 seconds. Exhaust duct requirements have enough air supply to support the burner flame (gas models). Make sure all lint has been removed from the dryer lint filter before starting each cycle. Exhaust duct must be loose. Solutions to Common Problems Semite Prevention Checklist Before calling for replacement. POSSIBLE CAUSE SOLUTION Electrical power cord is...
... more than drying on a separate circuit. Outside exhaust hood or exhaust duct may save both time and expense. High humidity. See "Operating Instructions." See INSTALLATION INSTRUCTIONS for 5 seconds. Exhaust duct requirements have enough air supply to support the burner flame (gas models). Make sure all lint has been removed from the dryer lint filter before starting each cycle. Exhaust duct must be loose. Solutions to Common Problems Semite Prevention Checklist Before calling for replacement. POSSIBLE CAUSE SOLUTION Electrical power cord is...
Use and Care Guide
Page 23
..., 11. or installation, including but not limited to use your appliance is warranted by Electrolux Canada Corp. use or used , and maintained in the home. USA 1-877-435-3287 Electrolux Major Appliances North America P.O. Service calls to change or add to 13. Obligations for this warranty must be readily determined. 2. Service calls which are subject to repair or replace appliance light bulbs, air filters, water filters, other consumables...
..., 11. or installation, including but not limited to use your appliance is warranted by Electrolux Canada Corp. use or used , and maintained in the home. USA 1-877-435-3287 Electrolux Major Appliances North America P.O. Service calls to change or add to 13. Obligations for this warranty must be readily determined. 2. Service calls which are subject to repair or replace appliance light bulbs, air filters, water filters, other consumables...


