Installation Instructions (English Español Français)
Page 2
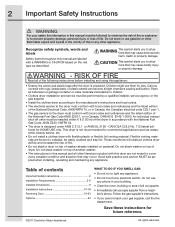
.... An individual manual shut-off valve must be installed within 6 ft (1.83 m) of the National Electrical Code, ANSI/NFPA 70, or in Canada, the Canadian electrical code C22.1 part 1. • The gas service to cover every possible condition and situation that may occur. CAN/CSA C22.2 No. 112 (latest editions) for future reference. ©2011 Electrolux Major Appliances All rights reserved. Flexible venting materials are...
.... An individual manual shut-off valve must be installed within 6 ft (1.83 m) of the National Electrical Code, ANSI/NFPA 70, or in Canada, the Canadian electrical code C22.1 part 1. • The gas service to cover every possible condition and situation that may occur. CAN/CSA C22.2 No. 112 (latest editions) for future reference. ©2011 Electrolux Major Appliances All rights reserved. Flexible venting materials are...
Installation Instructions (English Español Français)
Page 3
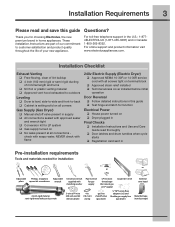
... terminal block ‰ Approved strain relief installed ‰ Terminal access cover installed before initial operation Door Reversal ‰ Follow detailed instructions in this guide ‰ Test hinge and latch for function Electrical Power ‰ House power turned on ‰ Dryer plugged in Final Checks ‰ Installation Instructions and Use and Care Guide read and save this guide Questions? Installation Requirements 3 Please read thoroughly ‰ Door latches and drum tumbles when cycle starts ‰ Registration card sent in Pre-installation requirements Tools and materials needed...
... terminal block ‰ Approved strain relief installed ‰ Terminal access cover installed before initial operation Door Reversal ‰ Follow detailed instructions in this guide ‰ Test hinge and latch for function Electrical Power ‰ House power turned on ‰ Dryer plugged in Final Checks ‰ Installation Instructions and Use and Care Guide read and save this guide Questions? Installation Requirements 3 Please read thoroughly ‰ Door latches and drum tumbles when cycle starts ‰ Registration card sent in Pre-installation requirements Tools and materials needed...
Installation Instructions (English Español Français)
Page 4
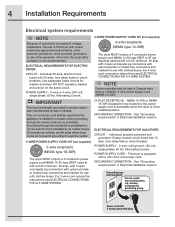
... recommended. Power cord with 30 amp. branch circuit fused with 3-prong grounded plug Use separately fused circuits for washer and dryer. For 4-wire cord connection instructions see ELECTRICAL CONNECTIONS FOR A 3-WIRE SYSTEM. 4-WIRE POWER SUPPLY CORD KIT (not supplied) 4-wire receptacle (NEMA type 14-30R) The dryer MUST employ a 4-conductor power supply cord NEMA 14-30 type SRDT or ST (as required) rated at 240 volt AC minimum, 30 amp, with 3 open end spade lug connectors with clothes dryers. GROUNDING CONNECTION - POWER SUPPLY CORD - POWER SUPPLY - 3-wire or 4-wire, 240...
... recommended. Power cord with 30 amp. branch circuit fused with 3-prong grounded plug Use separately fused circuits for washer and dryer. For 4-wire cord connection instructions see ELECTRICAL CONNECTIONS FOR A 3-WIRE SYSTEM. 4-WIRE POWER SUPPLY CORD KIT (not supplied) 4-wire receptacle (NEMA type 14-30R) The dryer MUST employ a 4-conductor power supply cord NEMA 14-30 type SRDT or ST (as required) rated at 240 volt AC minimum, 30 amp, with 3 open end spade lug connectors with clothes dryers. GROUNDING CONNECTION - POWER SUPPLY CORD - POWER SUPPLY - 3-wire or 4-wire, 240...

Installation Instructions (English Español Français)
Page 5
... any pressure testing of 1/2 psig (3.45 kPa). 7. plugged tapping, accessible for gas supply. 1. Exhaust system requirements Use only 4 inch (102 mm) diameter (minimum) rigid or flexible metal duct and approved vent hood which has a swing-out damper(s) that open when the dryer is made up of plastic duct or metal foil duct, replace it with the B149.1, Natural Gas and Propane Installation Code. 5. Installation MUST conform with local codes, or...
... any pressure testing of 1/2 psig (3.45 kPa). 7. plugged tapping, accessible for gas supply. 1. Exhaust system requirements Use only 4 inch (102 mm) diameter (minimum) rigid or flexible metal duct and approved vent hood which has a swing-out damper(s) that open when the dryer is made up of plastic duct or metal foil duct, replace it with the B149.1, Natural Gas and Propane Installation Code. 5. Installation MUST conform with local codes, or...
Installation Instructions (English Español Français)
Page 6
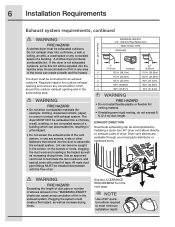
... all joints with exhaust system. Use an approved vent hood to assemble the exhaust system. WARNING FIRE HAZARD Exceeding the length of duct pipe or number of a building. The dryer must be exhausted outdoors. Number of 90° turns MAXIMUM LENGTH of air. See also CLEARANCE REQUIREMENTS on the screws or rivets, clogging the duct work and creating a fire hazard as well as increase drying times. Plugging the system...
... all joints with exhaust system. Use an approved vent hood to assemble the exhaust system. WARNING FIRE HAZARD Exceeding the length of duct pipe or number of a building. The dryer must be exhausted outdoors. Number of 90° turns MAXIMUM LENGTH of air. See also CLEARANCE REQUIREMENTS on the screws or rivets, clogging the duct work and creating a fire hazard as well as increase drying times. Plugging the system...
Installation Instructions (English Español Français)
Page 7
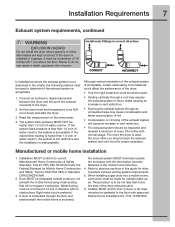
... Installation Kit - When installing a gas dryer into a mobile home, a provision must be inspected and cleaned a minimum of the exhaust system is acceptable. Set the dryer timer and temperature to the floor with normal usage. P/N 137067200. Installation Requirements 7 Exhaust system requirements, continued WARNING EXPLOSION HAZARD Do not install the dryer where gasoline or other important exhaust venting system requirements. 5. Installation MUST conform to down ) and start the dryer. 3. Install male fittings in correct direction...
... Installation Kit - When installing a gas dryer into a mobile home, a provision must be inspected and cleaned a minimum of the exhaust system is acceptable. Set the dryer timer and temperature to the floor with normal usage. P/N 137067200. Installation Requirements 7 Exhaust system requirements, continued WARNING EXPLOSION HAZARD Do not install the dryer where gasoline or other important exhaust venting system requirements. 5. Installation MUST conform to down ) and start the dryer. 3. Install male fittings in correct direction...
Installation Instructions (English Español Français)
Page 10
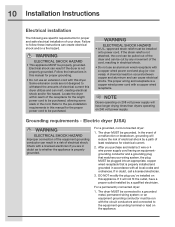
...;c requirements for proper and safe electrical installation of the receptacle for electrical current. 2. For a permanently connected dryer: 1. 10 Installation Instructions Electrical installation The following are not designed to follow these instructions can melt, creating electrical shock and/or fire hazard. WARNING ELECTRICAL SHOCK HAZARD • This appliance MUST be grounded. NOTE Dryers operating on 208 volt power supply will not fit the outlet, have longer drying times than dryers operating...
...;c requirements for proper and safe electrical installation of the receptacle for electrical current. 2. For a permanently connected dryer: 1. 10 Installation Instructions Electrical installation The following are not designed to follow these instructions can melt, creating electrical shock and/or fire hazard. WARNING ELECTRICAL SHOCK HAZARD • This appliance MUST be grounded. NOTE Dryers operating on 208 volt power supply will not fit the outlet, have longer drying times than dryers operating...
Installation Instructions (English Español Français)
Page 15
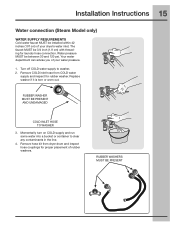
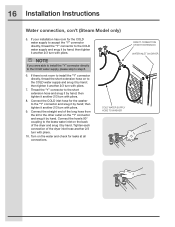
Installation Instructions 15 Water connection (Steam Model only) WATER SUPPLY REQUIREMENTS Cold water faucet MUST be installed within 42 inches (107 cm) of your dryer's water inlet. Replace washer if it is torn or worn out. RUBBER WASHER MUST BE PRESENT AND UNDAMAGED COLD INLET HOSE TO WASHER 3. Water pressure MUST be 3/4 inch (1.9 cm) with threading for laundry hose connection. Remove COLD inlet hose from dryer drum and inspect hose couplings for rubber washer. Turn off COLD water supply...
Installation Instructions 15 Water connection (Steam Model only) WATER SUPPLY REQUIREMENTS Cold water faucet MUST be installed within 42 inches (107 cm) of your dryer's water inlet. Replace washer if it is torn or worn out. RUBBER WASHER MUST BE PRESENT AND UNDAMAGED COLD INLET HOSE TO WASHER 3. Water pressure MUST be 3/4 inch (1.9 cm) with threading for laundry hose connection. Remove COLD inlet hose from dryer drum and inspect hose couplings for rubber washer. Turn off COLD water supply...
Installation Instructions (English Español Français)
Page 16
... connection of the dryer and snug it by hand. then tighten it another 2/3 turn with pliers. 9. Thread the "Y" connector to the "Y" connector and snug it by hand; Connect the hose's 90° coupling to step 8. 6. COLD WATER SUPPLY HOSE TO WASHER DIRECT CONNECTION OR WITH EXTENSION WATER INLET ON DRYER then tighten it another 2/3 turn with pliers. 7. then tighten it another 2/3 turn with pliers. 16 Installation Instructions Water connection, con't (Steam Model...
... connection of the dryer and snug it by hand. then tighten it another 2/3 turn with pliers. 9. Thread the "Y" connector to the "Y" connector and snug it by hand; Connect the hose's 90° coupling to step 8. 6. COLD WATER SUPPLY HOSE TO WASHER DIRECT CONNECTION OR WITH EXTENSION WATER INLET ON DRYER then tighten it another 2/3 turn with pliers. 7. then tighten it another 2/3 turn with pliers. 16 Installation Instructions Water connection, con't (Steam Model...

Installation Instructions (English Español Français)
Page 17
... dryer. Remove and discard door tape. Power cord with the dryer. The dryer MUST be level and A resting solidly on the power at a circuit breaker/fuse box before calling for future reference. Plug the power cord into an outlet. 3. See the next page about performing a brief, helpful "Installation Cycle" for stability. Installation Instructions 17 General installation 1. Carefully slide the dryer to the exhaust vent system. Turn on all four legs. Use metal foil tape to the outside exhaust...
... dryer. Remove and discard door tape. Power cord with the dryer. The dryer MUST be level and A resting solidly on the power at a circuit breaker/fuse box before calling for future reference. Plug the power cord into an outlet. 3. See the next page about performing a brief, helpful "Installation Cycle" for stability. Installation Instructions 17 General installation 1. Carefully slide the dryer to the exhaust vent system. Turn on all four legs. Use metal foil tape to the outside exhaust...
Installation Instructions (English Español Français)
Page 18
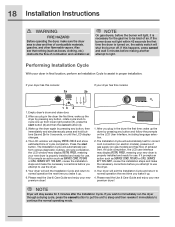
... right position (1), press the start button. The Installation Cycle will stay awake for the gas line to light. At cycle completion, the LCD user interface may display INSTAL PASS!, meaning your new premium dryer! NOTE Dryer will automatically test for use . 18 Installation Instructions WARNING FIRE HAZARD Before operating the dryer, make sure the dryer area is turned on, the safety switch will shut the burner off. Wake up the dryer by pressing any button...
... right position (1), press the start button. The Installation Cycle will stay awake for the gas line to light. At cycle completion, the LCD user interface may display INSTAL PASS!, meaning your new premium dryer! NOTE Dryer will automatically test for use . 18 Installation Instructions WARNING FIRE HAZARD Before operating the dryer, make sure the dryer area is turned on, the safety switch will shut the burner off. Wake up the dryer by pressing any button...
Installation Instructions (English Español Français)
Page 24
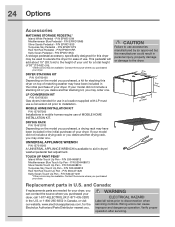
... dangerous operation. Verify proper operation after servicing. P/N EPWD15KG A storage pedestal accessory, specifically designed for ease of use of your dryer, call 1-877-4ELECTROLUX (1-877-435-3287) in dryer/ washer/pedestal feet adjustment. If your model did not include a drying rack or you desire another stacking kit, you purchased your unit for stacking this dryer may order one . P/N 5304468814 Turquoise Sky Touch Up Pen - Wiring errors can...
... dangerous operation. Verify proper operation after servicing. P/N EPWD15KG A storage pedestal accessory, specifically designed for ease of use of your dryer, call 1-877-4ELECTROLUX (1-877-435-3287) in dryer/ washer/pedestal feet adjustment. If your model did not include a drying rack or you desire another stacking kit, you purchased your unit for stacking this dryer may order one . P/N 5304468814 Turquoise Sky Touch Up Pen - Wiring errors can...
Complete Owner's Guide (English)
Page 3
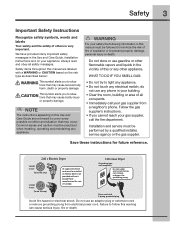
... this Use and Care Guide are labeled with 3-prong grounded plug Avoid fire hazard or electrical shock. Save these instructions for future reference. 240 v Electric Dryer 120 v Gas Dryer 10-30R 3-wire (fused 30 amp) 14-30R 4-wire (fused 30 amp) UL-approved service cord must be practiced when installing, operating and maintaining any circumstances, cut, remove, or bypass the grounding prong. do not use an adaptor plug or extension cord or remove grounding prong...
... this Use and Care Guide are labeled with 3-prong grounded plug Avoid fire hazard or electrical shock. Save these instructions for future reference. 240 v Electric Dryer 120 v Gas Dryer 10-30R 3-wire (fused 30 amp) 14-30R 4-wire (fused 30 amp) UL-approved service cord must be practiced when installing, operating and maintaining any circumstances, cut, remove, or bypass the grounding prong. do not use an adaptor plug or extension cord or remove grounding prong...
Complete Owner's Guide (English)
Page 5
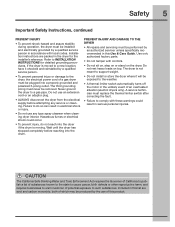
... factory parts. • Do not tamper with local codes. The dryer is not meant to support weight. • Do not install or store the dryer where it checked and reinstalled by a qualified service person. • To prevent personal injury or damage to the weather. • A thermal limiter switch automatically turns off the motor in this list are packed in this Use & Care Guide. Installation instructions are...
... factory parts. • Do not tamper with local codes. The dryer is not meant to support weight. • Do not install or store the dryer where it checked and reinstalled by a qualified service person. • To prevent personal injury or damage to the weather. • A thermal limiter switch automatically turns off the motor in this list are packed in this Use & Care Guide. Installation instructions are...
Complete Owner's Guide (English)
Page 7
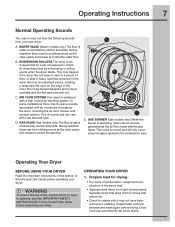
... rollers. GAS BURNER (Gas models only.) When the burner is ignited in this Use and Care Guide before drying. During operation there may be a clicking sound as the valve opens and closes to control the gas flow. B. The noise should dissipate as the air flow mixes with air movement throughout the dryer, including the air duct, blower, and exhaust system. SUSPENSION ROLLERS The dryer drum is controlled by a set some installations there...
... rollers. GAS BURNER (Gas models only.) When the burner is ignited in this Use and Care Guide before drying. During operation there may be a clicking sound as the valve opens and closes to control the gas flow. B. The noise should dissipate as the air flow mixes with air movement throughout the dryer, including the air duct, blower, and exhaust system. SUSPENSION ROLLERS The dryer drum is controlled by a set some installations there...
Complete Owner's Guide (English)
Page 13
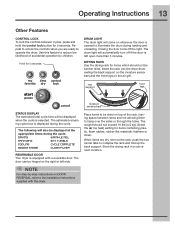
... drum light will automatically turn off the light. Closing the door turns off if the door is left side. The following will be tumble dried. TUMBLE COOLING CYCLE COMPLETE ADDING STEAM CLEAN FILTER REVERSIBLE DOOR Your dryer is displayed during the cycle: DRYING WRINKLE REL. Select the air (no heat) setting for 5 seconds. Operating Instructions 13 Other Features CONTROL LOCK To lock the controls between items and not allowing them to be displayed at the appropriate times during the cycle. DRYING RACK Use...
... drum light will automatically turn off the light. Closing the door turns off if the door is left side. The following will be tumble dried. TUMBLE COOLING CYCLE COMPLETE ADDING STEAM CLEAN FILTER REVERSIBLE DOOR Your dryer is displayed during the cycle: DRYING WRINKLE REL. Select the air (no heat) setting for 5 seconds. Operating Instructions 13 Other Features CONTROL LOCK To lock the controls between items and not allowing them to be displayed at the appropriate times during the cycle. DRYING RACK Use...
Complete Owner's Guide (English)
Page 16
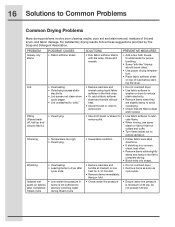
...; Or, add a fabric softener sheet and tumble without heat. • Use lint brush or roller to remove lint. • Do not overload dryer. • Use fabric softener in washer or dryer to reduce static electricity. • Remove items when they are slightly damp to avoid overdrying. • Check that lint filter is clean and in dryer after completed Steam cycle • Low water line pressure in home is attached...
...; Or, add a fabric softener sheet and tumble without heat. • Use lint brush or roller to remove lint. • Do not overload dryer. • Use fabric softener in washer or dryer to reduce static electricity. • Remove items when they are slightly damp to avoid overdrying. • Check that lint filter is clean and in dryer after completed Steam cycle • Low water line pressure in home is attached...
Complete Owner's Guide (English)
Page 17
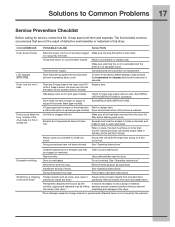
... (gas models). If 1 Replace fuse. Check to make sure supply valve is overloaded. Make sure all lint has been removed from pockets before of the drum finish. Outside exhaust hood or exhaust duct may turn but won't heat. High humidity. Dryer is open (gas models). buttons are inside of the 2 fuses is blown, the drum may be loose. It may be hitting securely around ornaments before starting each cycle. House fuse blown or circuit breaker...
... (gas models). If 1 Replace fuse. Check to make sure supply valve is overloaded. Make sure all lint has been removed from pockets before of the drum finish. Outside exhaust hood or exhaust duct may turn but won't heat. High humidity. Dryer is open (gas models). buttons are inside of the 2 fuses is blown, the drum may be loose. It may be hitting securely around ornaments before starting each cycle. House fuse blown or circuit breaker...
Product Specifications Sheet (English)
Page 1
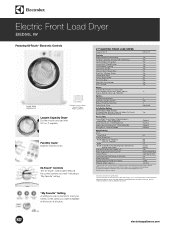
...; Touch-2-Open™ Pedestal Shown Largest Capacity Dryer1 Dry the most in under-counter installation require custom-built countertop and/or cabinetry. ft. Fast Dry Cycle2 Eighteen minutes to Center of Arc Including Door and Exhaust) (with 90° Door Open) 31-1/2" 50-5/8" Maximum Exhaust Duct Length3 (Ft.) 125 Power Supply Connection Location Bottom Right Rear Voltage Rating 240V / 60 Hz / 25A Connected Load (kW Rating) @ 240 Volts 6.0 Amps @ 240 Volts 25 Heating Element...
...; Touch-2-Open™ Pedestal Shown Largest Capacity Dryer1 Dry the most in under-counter installation require custom-built countertop and/or cabinetry. ft. Fast Dry Cycle2 Eighteen minutes to Center of Arc Including Door and Exhaust) (with 90° Door Open) 31-1/2" 50-5/8" Maximum Exhaust Duct Length3 (Ft.) 125 Power Supply Connection Location Bottom Right Rear Voltage Rating 240V / 60 Hz / 25A Connected Load (kW Rating) @ 240 Volts 6.0 Amps @ 240 Volts 25 Heating Element...
Product Specifications Sheet (English)
Page 2
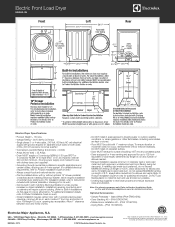
..., reinforcement of optional dryer stacking kit. (For installation details, refer to Product Installation Guide on web for detailed instructions. Do NOT install on carpeted surface. • Dryer MUST exhaust to outside of elbows needed. • Exhaust installation requires minimum 4"-diameter rigid or semi-rigid metal duct with matching Electrolux Washer in area exposed to change specifications or discontinue models without optional 15" drawer pedestal, or stacked above matching Electrolux Washer, which requires installation of floor may...
..., reinforcement of optional dryer stacking kit. (For installation details, refer to Product Installation Guide on web for detailed instructions. Do NOT install on carpeted surface. • Dryer MUST exhaust to outside of elbows needed. • Exhaust installation requires minimum 4"-diameter rigid or semi-rigid metal duct with matching Electrolux Washer in area exposed to change specifications or discontinue models without optional 15" drawer pedestal, or stacked above matching Electrolux Washer, which requires installation of floor may...


