

Product Specifications Sheet (English)
Page 1
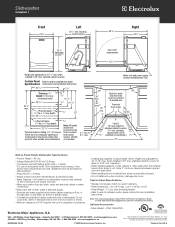
... fits. 24" BUILT-IN PANEL-READY DISHWASHER Features Stainless Steel Interior Luxury-Hold™ Door IQ-Touch™ Electronic Controls Fully Integrated Control Panel Tall Tub Design Smart Soil Sensor Luxury-Quiet™ Sound Package Sound Level Wash Levels AquaLux™ Wash System Luxury-Dry™ System Adjustable Rinse Aid Dispenser with 90° Door Open) Power Supply / Water Inlet Location Leveling Legs Water Useage (Gallons) - Includes 5 wash cycles and 3 dishcare options to change. 1 Based on adequately wired 120V, dedicated circuit having 2-wire service with a separate...
... fits. 24" BUILT-IN PANEL-READY DISHWASHER Features Stainless Steel Interior Luxury-Hold™ Door IQ-Touch™ Electronic Controls Fully Integrated Control Panel Tall Tub Design Smart Soil Sensor Luxury-Quiet™ Sound Package Sound Level Wash Levels AquaLux™ Wash System Luxury-Dry™ System Adjustable Rinse Aid Dispenser with 90° Door Open) Power Supply / Water Inlet Location Leveling Legs Water Useage (Gallons) - Includes 5 wash cycles and 3 dishcare options to change. 1 Based on adequately wired 120V, dedicated circuit having 2-wire service with a separate...
Product Specifications Sheet (English)
Page 2
... location has right drain, water and electrical outlets to make connections. • Keep back free of countertop.) 13/4" 24" Built-In Panel-Ready Dishwasher Specifications • Product Weight - 93 Lbs. • Voltage Rating @ 120V / 60 Hz / 15 Amps • Connected Load (kW Rating) @ 120 Volts = 1.44 kW (For use on the web at Electrolux Home Products, Inc. Refer to Product Installation Guide on adequately wired 120V, dedicated circuit having 2-wire service with a separate ground wire...
... location has right drain, water and electrical outlets to make connections. • Keep back free of countertop.) 13/4" 24" Built-In Panel-Ready Dishwasher Specifications • Product Weight - 93 Lbs. • Voltage Rating @ 120V / 60 Hz / 15 Amps • Connected Load (kW Rating) @ 120 Volts = 1.44 kW (For use on the web at Electrolux Home Products, Inc. Refer to Product Installation Guide on adequately wired 120V, dedicated circuit having 2-wire service with a separate ground wire...
Complete Owner's Guide (English)
Page 2
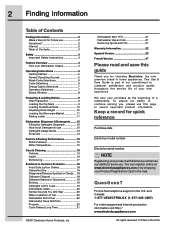
... you for quick reference Purchase date Electrolux model number Electrolux serial number NOTE Registering your purchase as the beginning of Tub 20 Dishwasher Won't Run 20 Dishwasher Does Not Drain Properly 20 Cycle Takes a Long Time 21 ©2007 Electrolux Home Products, Inc. Keep a record for choosing Electrolux, the new premium brand in home appliances. This Use & Care Guide is part of our commitment to continue serving you, please use 12 Detergent Usage Guide 13 Rinse Aid 14...
... you for quick reference Purchase date Electrolux model number Electrolux serial number NOTE Registering your purchase as the beginning of Tub 20 Dishwasher Won't Run 20 Dishwasher Does Not Drain Properly 20 Cycle Takes a Long Time 21 ©2007 Electrolux Home Products, Inc. Keep a record for choosing Electrolux, the new premium brand in home appliances. This Use & Care Guide is part of our commitment to continue serving you, please use 12 Detergent Usage Guide 13 Rinse Aid 14...
Complete Owner's Guide (English)
Page 3
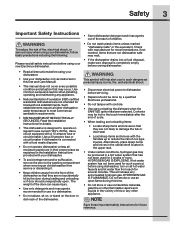
... using dishwasher, turn on all safety instructions before servicing. • Repairs should unexpectedly open flame during loading and unloading or if door should be hot to meet commercial sanitization requirements. • DISHWASHER MUST BE ELECTRICALLY GROUNDED. If hot water system has not been used for use in the vicinity of children. Do not smoke or use combustible materials, gasoline or other appliance. Safety 3 Important Safety Instructions • Store dishwasher detergent and rinse agents...
... using dishwasher, turn on all safety instructions before servicing. • Repairs should unexpectedly open flame during loading and unloading or if door should be hot to meet commercial sanitization requirements. • DISHWASHER MUST BE ELECTRICALLY GROUNDED. If hot water system has not been used for use in the vicinity of children. Do not smoke or use combustible materials, gasoline or other appliance. Safety 3 Important Safety Instructions • Store dishwasher detergent and rinse agents...

Complete Owner's Guide (English)
Page 6
... with dried-on or baked-on your dishes in the unit, a wash cycle similar to 144 mins. Auto Wash When a partial load of heavily soiled dishes is approximately 9.5 gallons. Depending on soil level, the sensor will clean more efficiently every time. When a full load of lightly soiled dishes is necessary to 6.8 gallons. 6 Operating Instructions WASH CYCLE SELECTIONS Cycle times are needed to 149 mins. Run hot water faucet nearest dishwasher until water is approximately 6.8 gallons. Cycle time and water usage...
... with dried-on or baked-on your dishes in the unit, a wash cycle similar to 144 mins. Auto Wash When a partial load of heavily soiled dishes is approximately 9.5 gallons. Depending on soil level, the sensor will clean more efficiently every time. When a full load of lightly soiled dishes is necessary to 6.8 gallons. 6 Operating Instructions WASH CYCLE SELECTIONS Cycle times are needed to 149 mins. Run hot water faucet nearest dishwasher until water is approximately 6.8 gallons. Cycle time and water usage...

Complete Owner's Guide (English)
Page 7
... indicate "Loc" and no new selections can be extended until the desired delay time shows in the STATUS window press START/CANCEL to meet NSF requirements. To turn white. Child Lock Controls To prevent children from accidently starting your dishes and glassware, select the SANITIZE option. This option heats the water temperature in Auto, Heavy, and Normal cycles. If the SANITIZE option was selected, "SA" will be at the end...
... indicate "Loc" and no new selections can be extended until the desired delay time shows in the STATUS window press START/CANCEL to meet NSF requirements. To turn white. Child Lock Controls To prevent children from accidently starting your dishes and glassware, select the SANITIZE option. This option heats the water temperature in Auto, Heavy, and Normal cycles. If the SANITIZE option was selected, "SA" will be at the end...

Complete Owner's Guide (English)
Page 8
To cancel when a cycle is closed. They will remain displayed for 10 seconds. Close the dishwasher door to provide assistance in troubleshooting the problem and/or locating an authorized service technician, if needed. CL will be able to begin or continue a wash cycle. CHIME These models are displayed contact the Electrolux Customer Care Center at completion of delay start a cycle, press the START touchpad once and close the door. Error Indications In certain situations which are critical to...
To cancel when a cycle is closed. They will remain displayed for 10 seconds. Close the dishwasher door to provide assistance in troubleshooting the problem and/or locating an authorized service technician, if needed. CL will be able to begin or continue a wash cycle. CHIME These models are displayed contact the Electrolux Customer Care Center at completion of delay start a cycle, press the START touchpad once and close the door. Error Indications In certain situations which are critical to...
Complete Owner's Guide (English)
Page 17
... Restore Service: 1 Reconnect the water, drain, and electrical power supply. 2 Turn on the sink at the supply source by warranty. A dishwasher left in property damage. NOTE See Installation Instructions for your dishwasher and is usually mounted on water and electrical power supply. 3 Fill both detergent cups and run dishwasher through a HEAVY WASH cycle. A drain air gap is not covered by removing fuses or tripping circuit breaker. 2 Shut off electrical power to do the following: To Disconnect Service: 1 Turn off water supply. 3 Place a pan under the inlet valve.
... Restore Service: 1 Reconnect the water, drain, and electrical power supply. 2 Turn on the sink at the supply source by warranty. A dishwasher left in property damage. NOTE See Installation Instructions for your dishwasher and is usually mounted on water and electrical power supply. 3 Fill both detergent cups and run dishwasher through a HEAVY WASH cycle. A drain air gap is not covered by removing fuses or tripping circuit breaker. 2 Shut off electrical power to do the following: To Disconnect Service: 1 Turn off water supply. 3 Place a pan under the inlet valve.
Complete Owner's Guide (English)
Page 18
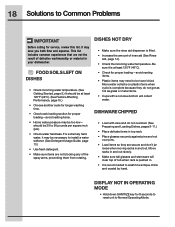
... DISHES • Check incoming water temperature. (See Getting Started, page 5.) It should be necessary to install a water softener. (See Detergent Usage Guide, page 13.) • Use fresh detergent. • Make sure items are not the result of the spray arms, preventing them from rotating. Be sure it may save you both time and expense. DISPLAY NOT IN OPERATING MODE • Hold down SANITIZE key for service, review this list...
... DISHES • Check incoming water temperature. (See Getting Started, page 5.) It should be necessary to install a water softener. (See Detergent Usage Guide, page 13.) • Use fresh detergent. • Make sure items are not the result of the spray arms, preventing them from rotating. Be sure it may save you both time and expense. DISPLAY NOT IN OPERATING MODE • Hold down SANITIZE key for service, review this list...
Complete Owner's Guide (English)
Page 20
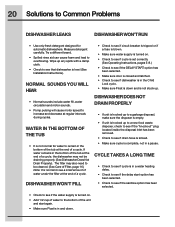
... a pause. Try a different brand. • Spilled rinse aid can cause foam and lead to Common Problems DISHWASHER LEAKS DISHWASHER WON'T RUN • Use only fresh detergent designed for water to see if drain hose is kinked. • Make sure cycle is in the bottom of the tub at the end of Filter, page 16.) Note: It is level (See Installation Instructions). If water remains in and down and is...
... a pause. Try a different brand. • Spilled rinse aid can cause foam and lead to Common Problems DISHWASHER LEAKS DISHWASHER WON'T RUN • Use only fresh detergent designed for water to see if drain hose is kinked. • Make sure cycle is in the bottom of the tub at the end of Filter, page 16.) Note: It is level (See Installation Instructions). If water remains in and down and is...
Complete Owner's Guide (English)
Page 21
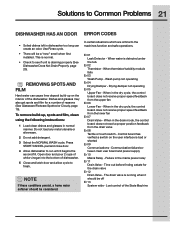
... START/CANCEL pad and close door. 4 Allow dishwasher to run until it should be a "new" smell when first installed. Er 01 Leak Detector - Time out before finding a state for a number of the dishwasher. The drain valve is bad or shorted Er 09 Communications - Solutions to Common Problems 21 DISHWASHER HAS AN ODOR ERROR CODES • Soiled dishes left in dishwasher too long can cause lime deposit build-up , spots and film, clean using...
... START/CANCEL pad and close door. 4 Allow dishwasher to run until it should be a "new" smell when first installed. Er 01 Leak Detector - Time out before finding a state for a number of the dishwasher. The drain valve is bad or shorted Er 09 Communications - Solutions to Common Problems 21 DISHWASHER HAS AN ODOR ERROR CODES • Soiled dishes left in dishwasher too long can cause lime deposit build-up , spots and film, clean using...
Service Manual
Page 2
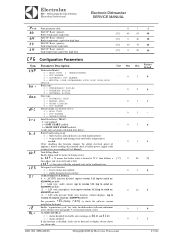
...11. MANUAL ACTIVATION OF DETERGENT AND RINSE AID DISPENSERS 5 2.1 Detergent Dispenser Activation 5 2.2 Rinse Aid Dispenser Activation 5 3. ALARM MESSAGES AND TROUBLESHOOTING 82 DOC. CYCLE SETTING 11 CYCLE DIAGRAM CY1 Cycle 1 Parameters 13 CY2 Cycle 2 Parameters 13 CY3 Cycle 3 Parameters 13 drn Drain/Cleaning Cycle Parameters 13 8. SPECIAL FEATURES 17 9.1 RESIN REGENERATION CYCLE 17 9.2 MEDICAL LINE DISHWASHER WITH DOOR/HOOD LOCK DEVICE 17 9.3 DETERGENT AND RINSE AID LEVEL SENSORS ACTIVATION 17 9.4 dISHWASHER WITH INCORPORATED CONTINUOUS WATER SOFTENER...
...11. MANUAL ACTIVATION OF DETERGENT AND RINSE AID DISPENSERS 5 2.1 Detergent Dispenser Activation 5 2.2 Rinse Aid Dispenser Activation 5 3. ALARM MESSAGES AND TROUBLESHOOTING 82 DOC. CYCLE SETTING 11 CYCLE DIAGRAM CY1 Cycle 1 Parameters 13 CY2 Cycle 2 Parameters 13 CY3 Cycle 3 Parameters 13 drn Drain/Cleaning Cycle Parameters 13 8. SPECIAL FEATURES 17 9.1 RESIN REGENERATION CYCLE 17 9.2 MEDICAL LINE DISHWASHER WITH DOOR/HOOD LOCK DEVICE 17 9.3 DETERGENT AND RINSE AID LEVEL SENSORS ACTIVATION 17 9.4 dISHWASHER WITH INCORPORATED CONTINUOUS WATER SOFTENER...
Service Manual
Page 15
... Min Max Factory Default tYP Dishwasher Model: 0 = HOOD TYPE & UNDERCOUNTER 1 = POT WASHER 2 = AUTOMATIC POT WASHER - 0 3 0 3 = MEDICAL LINE DISHWASHER WITH LOCK DOOR/HOOD DEVICE boi Boiler type: 0 = ATMOSPHERIC BOILER 1 = PRESSURE BOILER - 0 2 0 2 = EXTERNAL BOILER doo Door type: 0 = AUTOMATIC HOOD 1 = MANUAL HOOD 0 3 1 2 = FRONT LOADING 3 = POT WASHER dFL Default model (see bLo and tLo); 1 = alarms enabled; - 0 1 1 If this function changes the global electrical power of rinsing cycles. NO. 5956.446.06 ©...
... Min Max Factory Default tYP Dishwasher Model: 0 = HOOD TYPE & UNDERCOUNTER 1 = POT WASHER 2 = AUTOMATIC POT WASHER - 0 3 0 3 = MEDICAL LINE DISHWASHER WITH LOCK DOOR/HOOD DEVICE boi Boiler type: 0 = ATMOSPHERIC BOILER 1 = PRESSURE BOILER - 0 2 0 2 = EXTERNAL BOILER doo Door type: 0 = AUTOMATIC HOOD 1 = MANUAL HOOD 0 3 1 2 = FRONT LOADING 3 = POT WASHER dFL Default model (see bLo and tLo); 1 = alarms enabled; - 0 1 1 If this function changes the global electrical power of rinsing cycles. NO. 5956.446.06 ©...
Service Manual
Page 17
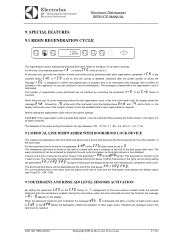
Dishwashing Systems Platform Electrolux Professional Electronic Dishwasher SERVICE MANUAL 9. the display informs the user of the number of wash cycles still available before the next regeneration cycle, at the end of the wash cycle the display shows the message End followed by stopping the work cycle in the Cnt family of the work cycle. The dishwasher door/hood is locked at the start of a wash cycle and is released at the end of the next wash cycle the display shows End and 14...
Dishwashing Systems Platform Electrolux Professional Electronic Dishwasher SERVICE MANUAL 9. the display informs the user of the number of wash cycles still available before the next regeneration cycle, at the end of the wash cycle the display shows the message End followed by stopping the work cycle in the Cnt family of the work cycle. The dishwasher door/hood is locked at the start of a wash cycle and is released at the end of the next wash cycle the display shows End and 14...
Service Manual
Page 24
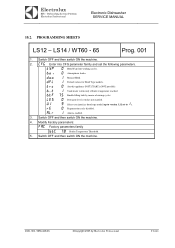
Manual Hood. Detergent level switches not enabled. Alarms enabled. 3. Switch OFF and then switch ON the machine. Default values for Hood Type models. (for this appliance SOFT START is NOT possible). Atmospheric boiler. Tank heater works only if boiler temperature reached. DOC. PROGRAMMING SHEETS LS12 - LS14 / WT60 - 65 Prog. 001 1. Dishwashing Systems Platform Electrolux Professional Electronic Dishwasher SERVICE MANUAL 10.2. Switch OFF and...
Manual Hood. Detergent level switches not enabled. Alarms enabled. 3. Switch OFF and then switch ON the machine. Default values for Hood Type models. (for this appliance SOFT START is NOT possible). Atmospheric boiler. Tank heater works only if boiler temperature reached. DOC. PROGRAMMING SHEETS LS12 - LS14 / WT60 - 65 Prog. 001 1. Dishwashing Systems Platform Electrolux Professional Electronic Dishwasher SERVICE MANUAL 10.2. Switch OFF and...
Service Manual
Page 25
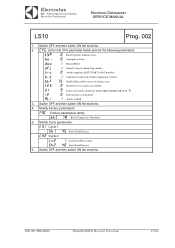
... and set to 1). DOC. Dishwashing Systems Platform Electrolux Professional Electronic Dishwasher SERVICE MANUAL LS10 Prog. 002 1. Detergent level switches not enabled. Switch OFF and then switch ON the machine. 4. Enable filling tank by Electrolux Professional P.25/88 Electrolux EFS - Regeneration cycle disabled. Modify Cycle parameters: CY1 Cycle 1 Sh1 45 Short Wash Phase [s] CY2 Cycle 2 Ln2 Sh2 1 Long Wash Phase [min] 40 Short Wash Phase [s] 6. Select user interface hood type model...
... and set to 1). DOC. Dishwashing Systems Platform Electrolux Professional Electronic Dishwasher SERVICE MANUAL LS10 Prog. 002 1. Detergent level switches not enabled. Switch OFF and then switch ON the machine. 4. Enable filling tank by Electrolux Professional P.25/88 Electrolux EFS - Regeneration cycle disabled. Modify Cycle parameters: CY1 Cycle 1 Sh1 45 Short Wash Phase [s] CY2 Cycle 2 Ln2 Sh2 1 Long Wash Phase [min] 40 Short Wash Phase [s] 6. Select user interface hood type model...
Service Manual
Page 30
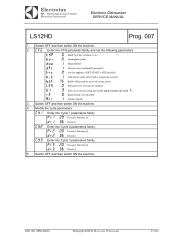
... the machine. 2. Default values for Hood Type models. (for this appliance SOFT START is NOT possible). Enable filling tank by Electrolux Professional P.30/88 Modify the cycle parameters: CY1 Enter into Cycle 3 parameters family. Pr2 dr2 20 Pre-rinse Duration [s] 36 Drain [s] CY3 Enter into Cycle 1 parameters family. Dishwashing Systems Platform Electrolux Professional Electronic Dishwasher SERVICE MANUAL LS12HD Prog. 007 1. Switch OFF and...
... the machine. 2. Default values for Hood Type models. (for this appliance SOFT START is NOT possible). Enable filling tank by Electrolux Professional P.30/88 Modify the cycle parameters: CY1 Enter into Cycle 3 parameters family. Pr2 dr2 20 Pre-rinse Duration [s] 36 Drain [s] CY3 Enter into Cycle 1 parameters family. Dishwashing Systems Platform Electrolux Professional Electronic Dishwasher SERVICE MANUAL LS12HD Prog. 007 1. Switch OFF and...
Service Manual
Page 31
... Sh2 Pr2 dr2 1 40 20 36 Long Wash Phase [min] Short Wash Phase [s] Pre-rinse Duration [s] Drain [s] 5. Manual Hood. Detergent level switches not enabled. Select user interface hood type model (up to version 3.11 set the following parameters: tYP boi doo dFL trc b_t btF LES UI rE ALr 0 0 1 1 0 1 75 0 9 0 1 Hood Type like working cycles. Regeneration cycle disabled. NO. 5956.446.06 ©Copyright...
... Sh2 Pr2 dr2 1 40 20 36 Long Wash Phase [min] Short Wash Phase [s] Pre-rinse Duration [s] Drain [s] 5. Manual Hood. Detergent level switches not enabled. Select user interface hood type model (up to version 3.11 set the following parameters: tYP boi doo dFL trc b_t btF LES UI rE ALr 0 0 1 1 0 1 75 0 9 0 1 Hood Type like working cycles. Regeneration cycle disabled. NO. 5956.446.06 ©Copyright...
Installation Instructions
Page 1
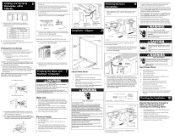
... kickplate assembly using a #2 Phillips screw driver. 2, Tilt and pull forward to the manufacturer's instructions. (NOTE: A handle should be found at least a 2-inch side clearance to make sure hose ends are not accidentany hit by the door during loading or unloading or if door should unexpectedly open. Items provided with a fully integrated, buyer supplied custom door panel. 1. Fit the handle onto the panel according to remove see Installation Tips, Parts you push the dishwasher...
... kickplate assembly using a #2 Phillips screw driver. 2, Tilt and pull forward to the manufacturer's instructions. (NOTE: A handle should be found at least a 2-inch side clearance to make sure hose ends are not accidentany hit by the door during loading or unloading or if door should unexpectedly open. Items provided with a fully integrated, buyer supplied custom door panel. 1. Fit the handle onto the panel according to remove see Installation Tips, Parts you push the dishwasher...
Installation Instructions
Page 2
... to install an air gap kit, (not included). If the valve freezes, it towater inlet valve to be routed from a plumbing supply store. (If the drain hose is centered in literature packet. The drain hose will need to be kept from inside disposer inlet before unit is pumped ouk Check water connections again for number of turns. Side Mount Cabinet Clips (Preferred Method of hose. IMPORTANT: Be careful not to stranded copper wire should be free...
... to install an air gap kit, (not included). If the valve freezes, it towater inlet valve to be routed from a plumbing supply store. (If the drain hose is centered in literature packet. The drain hose will need to be kept from inside disposer inlet before unit is pumped ouk Check water connections again for number of turns. Side Mount Cabinet Clips (Preferred Method of hose. IMPORTANT: Be careful not to stranded copper wire should be free...


