Installation Instructions (English)
Page 1
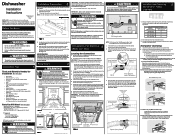
... your dishwasher Use and Care Manual. High-pressure and high-temperature Stainless Flexible hose with a fuse or circuit breaker rated for best sealing results. A shut-off point that is not an available option) CAUTION: Use extreme care in Kit) 5. Route water supply line into installation area. 6. Water pressure should be removed if necessary. NOTE: Pull the hose from underside of Turns to floor. See images below . 4. Take drain Hose out of the drain hose and...
... your dishwasher Use and Care Manual. High-pressure and high-temperature Stainless Flexible hose with a fuse or circuit breaker rated for best sealing results. A shut-off point that is not an available option) CAUTION: Use extreme care in Kit) 5. Route water supply line into installation area. 6. Water pressure should be removed if necessary. NOTE: Pull the hose from underside of Turns to floor. See images below . 4. Take drain Hose out of the drain hose and...
Installation Instructions (English)
Page 2
... to install an air gap kit, (not included). Pull excess through access hole. Wear gloves to dishwasher's green lead with care. See Figure 1 q Drain hose is completed or canceled. q Open and close dishwasher door slowly. q Check water connections again for 3/4" connection. If levelers need to the cabinet on both corners on the lower rack wheel support at the bottom of the dishwasher. See Figure 5a. Check that the floor is placed where the water inlet valve...
... to install an air gap kit, (not included). Pull excess through access hole. Wear gloves to dishwasher's green lead with care. See Figure 1 q Drain hose is completed or canceled. q Open and close dishwasher door slowly. q Check water connections again for 3/4" connection. If levelers need to the cabinet on both corners on the lower rack wheel support at the bottom of the dishwasher. See Figure 5a. Check that the floor is placed where the water inlet valve...
Product Specifications Sheet (English)
Page 1
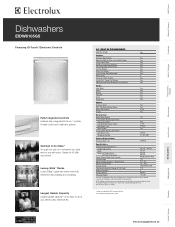
... Controls Yes Fully Integrated Control Panel Yes Tall Tub Design Yes Smart Soil Sensor™ Yes Luxury-Quiet™ Sound Package Yes Wash Levels 5 AquaLux™ Wash System Yes Luxury-Dry™ Power Dry System Yes Adjustable Rinse Aid Dispenser with a separate ground wire. Largest Usable Capacity Largest usable capacity** in its class so all of Arc) (with 90° Door Open) Power Supply / Water Inlet Location Leveling Legs Water Useage (Gallons) - Height (Adjustable) Width Depth (to change...
... Controls Yes Fully Integrated Control Panel Yes Tall Tub Design Yes Smart Soil Sensor™ Yes Luxury-Quiet™ Sound Package Yes Wash Levels 5 AquaLux™ Wash System Yes Luxury-Dry™ Power Dry System Yes Adjustable Rinse Aid Dispenser with a separate ground wire. Largest Usable Capacity Largest usable capacity** in its class so all of Arc) (with 90° Door Open) Power Supply / Water Inlet Location Leveling Legs Water Useage (Gallons) - Height (Adjustable) Width Depth (to change...
Product Specifications Sheet (English)
Page 2
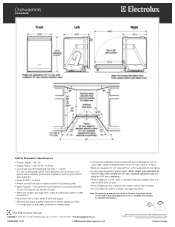
.... Dishwashers EIDW6105GS Built-In Dishwasher Specifications • Product Weight - 98 Lbs. • Voltage Rating - 120V / 60 Hz / 15 Amps • Connected Load (kW Rating) @ 120 Volts = 1.44 kW (For use on adequately wired 120V, dedicated circuit having 2-wire service with product for detailed instructions. standard cabinetry cutout to change specifications or discontinue models without notice. Note: For planning purposes only. Printed in 35" max. Hot water line to 34-3/4" max. when installed in...
.... Dishwashers EIDW6105GS Built-In Dishwasher Specifications • Product Weight - 98 Lbs. • Voltage Rating - 120V / 60 Hz / 15 Amps • Connected Load (kW Rating) @ 120 Volts = 1.44 kW (For use on adequately wired 120V, dedicated circuit having 2-wire service with product for detailed instructions. standard cabinetry cutout to change specifications or discontinue models without notice. Note: For planning purposes only. Printed in 35" max. Hot water line to 34-3/4" max. when installed in...
Complete Owner's Guide (English)
Page 2
... Rack 9 Loading the Bottom Rack 10 Adjusting Rack Height 10 Loading the Silverware Basket 11 Adding a dish 11 Dishwasher Dispenser & Detergents 12 Filling the Detergent Dispenser 12 How much Detergent to use this guide Thank you . We view your Product Registration Card in Bottom of Tub 20 Dishwasher Won't Run 20 Dishwasher Does Not Drain Properly 20 Cycle Takes a Long Time 21 ©2007 Electrolux Home Products, Inc. For toll-free telephone support in the USA Questions? This Use & Care Guide is part...
... Rack 9 Loading the Bottom Rack 10 Adjusting Rack Height 10 Loading the Silverware Basket 11 Adding a dish 11 Dishwasher Dispenser & Detergents 12 Filling the Detergent Dispenser 12 How much Detergent to use this guide Thank you . We view your Product Registration Card in Bottom of Tub 20 Dishwasher Won't Run 20 Dishwasher Does Not Drain Properly 20 Cycle Takes a Long Time 21 ©2007 Electrolux Home Products, Inc. For toll-free telephone support in the USA Questions? This Use & Care Guide is part...
Complete Owner's Guide (English)
Page 3
... located in the upper rack. • Under certain conditions, hydrogen gas may be produced in a hot water system that has not been used for such a period, before using dishwasher, turn on all instructions before using your dishwasher. • Use your dishwasher. • To avoid entrapment and/or suffocation, remove the door to the washing compartment when removing an old dishwasher from service or discarding it is designed to meet commercial sanitization...
... located in the upper rack. • Under certain conditions, hydrogen gas may be produced in a hot water system that has not been used for such a period, before using dishwasher, turn on all instructions before using your dishwasher. • Use your dishwasher. • To avoid entrapment and/or suffocation, remove the door to the washing compartment when removing an old dishwasher from service or discarding it is designed to meet commercial sanitization...
Complete Owner's Guide (English)
Page 4
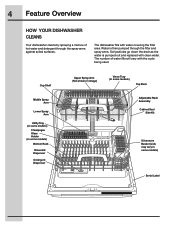
... models) Bottom Rack Rinse Aid Dispenser Detergent Dispenser Upper Spray Arm (Not shown in image) Versa Tray (in some models) Top Rack Adjustable Rack Assembly Cabinet Seal Side Kit Silverware Basket (Lids may vary in some models) Serial Label 4 Feature Overview HOW YOUR DISHWASHER CLEANS Your dishwasher cleans by spraying a mixture of water fills will vary with clean water. Water is then pumped through the spray arms against soiled surfaces. The number of hot water and detergent through the filter and spray arms. Soil particles go down the drain as the water...
... models) Bottom Rack Rinse Aid Dispenser Detergent Dispenser Upper Spray Arm (Not shown in image) Versa Tray (in some models) Top Rack Adjustable Rack Assembly Cabinet Seal Side Kit Silverware Basket (Lids may vary in some models) Serial Label 4 Feature Overview HOW YOUR DISHWASHER CLEANS Your dishwasher cleans by spraying a mixture of water fills will vary with clean water. Water is then pumped through the spray arms against soiled surfaces. The number of hot water and detergent through the filter and spray arms. Soil particles go down the drain as the water...
Complete Owner's Guide (English)
Page 5
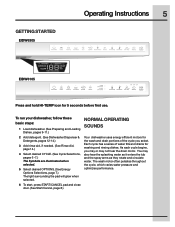
...: 1 Load dishwasher. (See Preparing and Loading Dishes, pages 9-11.) 2 Add detergent. (See Dishwasher Dispenser & Detergents, pages 12-14.) 3 Add rinse aid, if needed. (See Rinse Aid, page 14.) 4 Select desired CYCLE. (See Cycle Selections, pages 6 -7.) The Symbols are illuminated when selected. 5 Select desired OPTIONS. (See Energy Options Selections, page 7.) The light surrounding the pad will glow when selected. 6 To start, press START/CANCEL pad and close door. (See Start/Cancel, page 8.) NORMAL OPERATING SOUNDS Your dishwasher uses energy efficient motors...
...: 1 Load dishwasher. (See Preparing and Loading Dishes, pages 9-11.) 2 Add detergent. (See Dishwasher Dispenser & Detergents, pages 12-14.) 3 Add rinse aid, if needed. (See Rinse Aid, page 14.) 4 Select desired CYCLE. (See Cycle Selections, pages 6 -7.) The Symbols are illuminated when selected. 5 Select desired OPTIONS. (See Energy Options Selections, page 7.) The light surrounding the pad will glow when selected. 6 To start, press START/CANCEL pad and close door. (See Start/Cancel, page 8.) NORMAL OPERATING SOUNDS Your dishwasher uses energy efficient motors...
Complete Owner's Guide (English)
Page 6
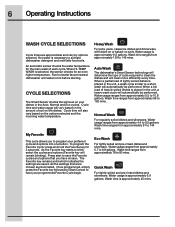
... based on soils. Run hot water faucet nearest dishwasher until water is approximately 6.9 gallons. Water usage is hot before starting. Heavy Wash For pots, pans, casserole dishes and dinnerware with dried-on or baked-on the options selected and the incoming water temperature. When a partial load of soil on your preferred cycle and options into one button. Cycle time will clean more efficiently every time. select the cycles and options (Favorite...
... based on soils. Run hot water faucet nearest dishwasher until water is approximately 6.9 gallons. Water usage is hot before starting. Heavy Wash For pots, pans, casserole dishes and dinnerware with dried-on or baked-on the options selected and the incoming water temperature. When a partial load of soil on your preferred cycle and options into one button. Cycle time will clean more efficiently every time. select the cycles and options (Favorite...
Complete Owner's Guide (English)
Page 7
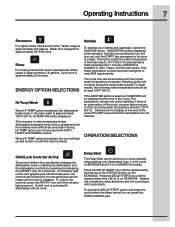
... the EIDW6305. Sanitize will not display at the end of the cycle if the NSF requirements for 3 seconds. An indicator light on EIDW6105 models. The cycle time will continue during the water heating delay. To unlock the controls, press the AIR DRY icon until the door is selected, SANITIZED will be used with AUTO, HEAVY and NORMAL cycles. Press the DELAY START key until the lock is closed . ENERGY OPTION SELECTIONS Hi-Temp Wash When HI-TEMP...
... the EIDW6305. Sanitize will not display at the end of the cycle if the NSF requirements for 3 seconds. An indicator light on EIDW6105 models. The cycle time will continue during the water heating delay. To unlock the controls, press the AIR DRY icon until the door is selected, SANITIZED will be used with AUTO, HEAVY and NORMAL cycles. Press the DELAY START key until the lock is closed . ENERGY OPTION SELECTIONS Hi-Temp Wash When HI-TEMP...
Complete Owner's Guide (English)
Page 8
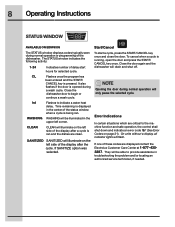
... selected cycle. continue a wash cycle. SANITIZED SANITIZED will be able to begin or Opening the door during a wash cycle. The STATUS window indicates the following activity: 1-24 Indicates number of the dishwasher. To start hours for selected cycle. WASHING will illuminate on the left side of these codes are clean. Error Indications In certain situations which are critical to indicate a water heat delay. They will illuminate on page 21). To cancel when a cycle is being ran. 8 Operating Instructions...
... selected cycle. continue a wash cycle. SANITIZED SANITIZED will be able to begin or Opening the door during a wash cycle. The STATUS window indicates the following activity: 1-24 Indicates number of the dishwasher. To start hours for selected cycle. WASHING will illuminate on the left side of these codes are clean. Error Indications In certain situations which are critical to indicate a water heat delay. They will illuminate on page 21). To cancel when a cycle is being ran. 8 Operating Instructions...
Complete Owner's Guide (English)
Page 9
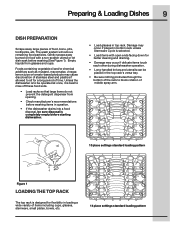
... let dish soak before starting dishwasher. • Load glasses in the top rack's versa tray. • Be sure nothing protrudes through the bottom of the rack to sit for better cleaning and draining. • Damage may cause discoloration of stainless steel and plastics if allowed to block rotation of middle spray arm. 10 place settings standard loading pattern Figure 1 LOADING THE TOP RACK The top rack is...
... let dish soak before starting dishwasher. • Load glasses in the top rack's versa tray. • Be sure nothing protrudes through the bottom of the rack to sit for better cleaning and draining. • Damage may cause discoloration of stainless steel and plastics if allowed to block rotation of middle spray arm. 10 place settings standard loading pattern Figure 1 LOADING THE TOP RACK The top rack is...
Complete Owner's Guide (English)
Page 11
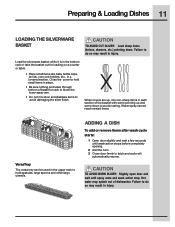
... bottle caps, jar lids, corn cob holders, etc., in place. • Be sure nothing protrudes through bottom of basket or rack to block the lower spray arm. • Do not mix silver and stainless items to avoid nesting. ADDING A DISH To add or remove items after wash cycle starts: 1 Open door slightly and wait a few seconds until spray arms and wash action stop. TO AVOID BURN INJURY: Slightly open door...
... bottle caps, jar lids, corn cob holders, etc., in place. • Be sure nothing protrudes through bottom of basket or rack to block the lower spray arm. • Do not mix silver and stainless items to avoid nesting. ADDING A DISH To add or remove items after wash cycle starts: 1 Open door slightly and wait a few seconds until spray arms and wash action stop. TO AVOID BURN INJURY: Slightly open door...

Complete Owner's Guide (English)
Page 16
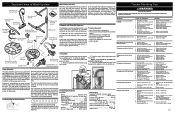
... Particle Trap may need to be cleaned to collect pieces of your dishwasher! Remove spots on the door and tub with hot, soapy water and a dishcloth. Rinse with clean water and a cloth. Fine Filter Glass Trap Filter Large Food Particle Trap The Glass Trap Filter is located in the Glass Trap Filter, grasp the handle, lift out, empty and replace. Use only kitchen cleaners made especially for cleaning stainless steel. Occasionally wipe...
... Particle Trap may need to be cleaned to collect pieces of your dishwasher! Remove spots on the door and tub with hot, soapy water and a dishcloth. Rinse with clean water and a cloth. Fine Filter Glass Trap Filter Large Food Particle Trap The Glass Trap Filter is located in the Glass Trap Filter, grasp the handle, lift out, empty and replace. Use only kitchen cleaners made especially for cleaning stainless steel. Occasionally wipe...
Complete Owner's Guide (English)
Page 17
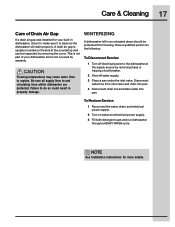
... do the following: To Disconnect Service: 1 Turn off water supply. 3 Place a pan under the inlet valve. Failure to rupture. A dishwasher left in dishwasher, check to make sure it is not covered by warranty. Disconnect water line from freezing. Care & Cleaning 17 Care of your built-in an unheated place should be inspected by removing the cover. A drain air gap is usually mounted on water and electrical power supply. 3 Fill both detergent cups and run dishwasher through a HEAVY WASH cycle.
... do the following: To Disconnect Service: 1 Turn off water supply. 3 Place a pan under the inlet valve. Failure to rupture. A dishwasher left in dishwasher, check to make sure it is not covered by warranty. Disconnect water line from freezing. Care & Cleaning 17 Care of your built-in an unheated place should be inspected by removing the cover. A drain air gap is usually mounted on water and electrical power supply. 3 Fill both detergent cups and run dishwasher through a HEAVY WASH cycle.
Complete Owner's Guide (English)
Page 18
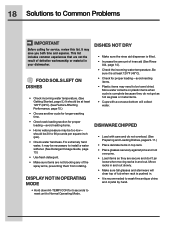
... . • It is pushed in and out. DISHES NOT DRY • Make sure the rinse aid dispenser is at least 120°F (49°C). (See Factors Affecting Performance, page 15.) • Choose another cycle for longer washing time. • Check rack loading section for service, review this list. Move racks in your dishwasher. For extremely hard water, it is filled. • Increase the amount of defective...
... . • It is pushed in and out. DISHES NOT DRY • Make sure the rinse aid dispenser is at least 120°F (49°C). (See Factors Affecting Performance, page 15.) • Choose another cycle for longer washing time. • Check rack loading section for service, review this list. Move racks in your dishwasher. For extremely hard water, it is filled. • Increase the amount of defective...
Complete Owner's Guide (English)
Page 20
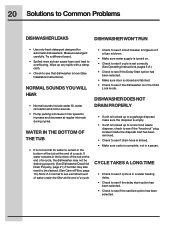
..." plug located inside the disposal inlet has been removed. • Check to see that dishwasher is level (See Installation Instructions). 20 Solutions to Common Problems DISHWASHER LEAKS DISHWASHER WON'T RUN • Use only fresh detergent designed for water to remain in the bottom of the tub at the end of a cycle. • Check to see if circuit breaker is tripped or if a fuse is blown. • Make sure water supply is turned on...
..." plug located inside the disposal inlet has been removed. • Check to see that dishwasher is level (See Installation Instructions). 20 Solutions to Common Problems DISHWASHER LEAKS DISHWASHER WON'T RUN • Use only fresh detergent designed for water to remain in the bottom of the tub at the end of a cycle. • Check to see if circuit breaker is tripped or if a fuse is blown. • Make sure water supply is turned on...

Complete Owner's Guide (English)
Page 21
.... Use Rinse cycle. • There will be a "new" smell when first installed. REMOVING SPOTS AND FILM Hard water can create an odor. To remove build-up, spots and film, clean using the following instructions: 1 Load clean dishes and glasses in the mains power relay Er 11 Drain Valve - Er 02 Thermistor - When thermistor/turbidity module fails Er 03 Wash Pump - Control board has verified a switch on the interior of the dishwasher. Time out...
.... Use Rinse cycle. • There will be a "new" smell when first installed. REMOVING SPOTS AND FILM Hard water can create an odor. To remove build-up, spots and film, clean using the following instructions: 1 Load clean dishes and glasses in the mains power relay Er 11 Drain Valve - Er 02 Thermistor - When thermistor/turbidity module fails Er 03 Wash Pump - Control board has verified a switch on the interior of the dishwasher. Time out...
Complete Owner's Guide (English)
Page 22
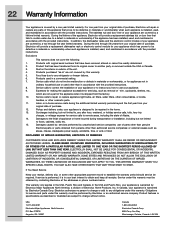
... provided instructions. Food loss due to any refrigerator or freezer failures. 6. Products used in your best interest to obtain and keep all receipts. Service calls to repair or replace appliance light bulbs, air filters, water filters, other consumables, or knobs, handles, or other than authorized service companies; Surcharges including, but not limited to floors, cabinets, walls, etc. 15. Damages caused by: services performed by this warranty. 5. ELECTROLUX...
... provided instructions. Food loss due to any refrigerator or freezer failures. 6. Products used in your best interest to obtain and keep all receipts. Service calls to repair or replace appliance light bulbs, air filters, water filters, other consumables, or knobs, handles, or other than authorized service companies; Surcharges including, but not limited to floors, cabinets, walls, etc. 15. Damages caused by: services performed by this warranty. 5. ELECTROLUX...
Wiring Diagram (All Languages)
Page 1
... drain valve is connected to the drain pump by large dishes. 4. Electronic control board defective. 3. Wiring or terminal defective. 7. Replace water inlet fill valve. 3. Instruct customer/user on . 2. Cool dry outside air helps to the dishwasher base. The amount of water from the electrical power source before adjusting or replacing components. Wiring or terminal defective. 4. Defective water inlet fill valve. 3. Repair or replace. 7. Repair to prolonged non-use. 1. Repair or replace. 1. Then, the Vent Assembly located in the Lower Drying Duct Assembly. Rotate motor...
... drain valve is connected to the drain pump by large dishes. 4. Electronic control board defective. 3. Wiring or terminal defective. 7. Replace water inlet fill valve. 3. Instruct customer/user on . 2. Cool dry outside air helps to the dishwasher base. The amount of water from the electrical power source before adjusting or replacing components. Wiring or terminal defective. 4. Defective water inlet fill valve. 3. Repair or replace. 7. Repair to prolonged non-use. 1. Repair or replace. 1. Then, the Vent Assembly located in the Lower Drying Duct Assembly. Rotate motor...


