
Complete Owners Guide English
Page 2
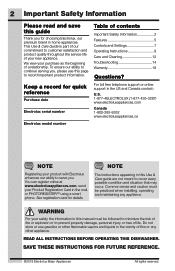
... 2 Features 5 Controls and Settings 7 Operating Instructions 9 Care and Cleaning 12 Troubleshooting 14 Warranty 18 Questions? Common sense and caution must be practiced when installing, operating and maintaining any other appliance. See registration card for quick reference Purchase date Electrolux serial number Electrolux model number Table of life. READ ALL INSTRUCTIONS BEFORE OPERATING THIS DISHWASHER. For toll free telephone support or online support in the vicinity of this or any appliance. We view your Product Registration...
... 2 Features 5 Controls and Settings 7 Operating Instructions 9 Care and Cleaning 12 Troubleshooting 14 Warranty 18 Questions? Common sense and caution must be practiced when installing, operating and maintaining any other appliance. See registration card for quick reference Purchase date Electrolux serial number Electrolux model number Table of life. READ ALL INSTRUCTIONS BEFORE OPERATING THIS DISHWASHER. For toll free telephone support or online support in the vicinity of this or any appliance. We view your Product Registration...

Complete Owners Guide English
Page 3
... dishwasher safe may occur. Read the Installation Instructions for licensed food establishments. • DISHWASHER MUST BE ELECTRICALLY GROUNDED. Use a 20 ampere fuse if dishwasher is connected with a food disposer. • Do not operate dishwasher unless all safety messages that are not intended for details. • This dishwasher is designed to operate on this appliance. Items that follow this dishwasher, comply with the warnings listed below. Locate...
... dishwasher safe may occur. Read the Installation Instructions for licensed food establishments. • DISHWASHER MUST BE ELECTRICALLY GROUNDED. Use a 20 ampere fuse if dishwasher is connected with a food disposer. • Do not operate dishwasher unless all safety messages that are not intended for details. • This dishwasher is designed to operate on this appliance. Items that follow this dishwasher, comply with the warnings listed below. Locate...

Complete Owners Guide English
Page 4
... door latch. • Remove the electric power cord • Secure all appliances. • DO NOT allow children to play in or on the dishwasher • DO NOT allow children to help prevent accidents. To prevent personal injury, observe all hot water faucets and let water flow from leaking out and creating a slip hazard. Do not smoke or use an open flame during this time...
... door latch. • Remove the electric power cord • Secure all appliances. • DO NOT allow children to play in or on the dishwasher • DO NOT allow children to help prevent accidents. To prevent personal injury, observe all hot water faucets and let water flow from leaking out and creating a slip hazard. Do not smoke or use an open flame during this time...

Complete Owners Guide English
Page 5
Multiple filter system This dishwasher has a multiple Filter System. This series of steps are three mesh filters. First, the dishwasher drains for a few seconds to remove soils dropped while loading, then fills with less water and less energy. Lock Upper Basket Upper Spray Arm Cutlery Basket Cup Shelf Lower Basket Lower Spray Arm Detergent/Rinse Aid Dispenser Heating Element Features may vary according to clean the dishes more efficiently. When a full load of heavily soiled dishes is placed in the unit, a wash cycle similar to get...
Multiple filter system This dishwasher has a multiple Filter System. This series of steps are three mesh filters. First, the dishwasher drains for a few seconds to remove soils dropped while loading, then fills with less water and less energy. Lock Upper Basket Upper Spray Arm Cutlery Basket Cup Shelf Lower Basket Lower Spray Arm Detergent/Rinse Aid Dispenser Heating Element Features may vary according to clean the dishes more efficiently. When a full load of heavily soiled dishes is placed in the unit, a wash cycle similar to get...

Complete Owners Guide English
Page 6
...Select desired cycle. (See Wash cycles.) 6. Add detergent. (See Detergent and rinse aid dispenser.) 4. 6 Features Product specifications: CAPACITY Dimensions Power Supply Rated Power Usage Water feed pressure 8 PLACE SETTINGS 17.6 x 22.6 x 32.4 inches 450 x 575 x 825 mm (W x D x H) 120v, 60Hz wash motor 100W, heater 700W 20 psi-120 psi (0.14 MPa-0.82 MPa) Getting started 1. To start, press START pad and close door within 4 seconds. Run the hot water faucet nearest dishwasher until water is hot. 2. Load the dishwasher. (See Loading the dishes.) 3. The indicator light will...
...Select desired cycle. (See Wash cycles.) 6. Add detergent. (See Detergent and rinse aid dispenser.) 4. 6 Features Product specifications: CAPACITY Dimensions Power Supply Rated Power Usage Water feed pressure 8 PLACE SETTINGS 17.6 x 22.6 x 32.4 inches 450 x 575 x 825 mm (W x D x H) 120v, 60Hz wash motor 100W, heater 700W 20 psi-120 psi (0.14 MPa-0.82 MPa) Getting started 1. To start, press START pad and close door within 4 seconds. Run the hot water faucet nearest dishwasher until water is hot. 2. Load the dishwasher. (See Loading the dishes.) 3. The indicator light will...

Complete Owners Guide English
Page 7
... energy usage. To start has been activated and will check the incoming water temperature. Functions START Press START and close door within 4 seconds to handle heavier soil loads. Control lock Use to wash a full load. This is only a rinse that is not correct. Wash cycles AUTO Auto Cycle uses sensors in the display window (1h-24h) and press the START button. HEAVY Recommended for pre-rinsing dishes or glasses. DELAY The DELAY option allows you are not intended for lightly...
... energy usage. To start has been activated and will check the incoming water temperature. Functions START Press START and close door within 4 seconds to handle heavier soil loads. Control lock Use to wash a full load. This is only a rinse that is not correct. Wash cycles AUTO Auto Cycle uses sensors in the display window (1h-24h) and press the START button. HEAVY Recommended for pre-rinsing dishes or glasses. DELAY The DELAY option allows you are not intended for lightly...

Complete Owners Guide English
Page 8
...safe operation, the control shall shut down and indicate an error code in the display window. (See Error Codes). NOTE The remaining time could suddenly increase or drop several minutes. CLEAN After the cycle has ended, the CLEAN light will illuminate. WASHING When the dishwasher is WASHING the load, the Washing light will illuminate until the dishwasher door has been opened. Cycle Chart CYCLE OPTIONS AVAILABLE AUTO HEAT DRY HEAVY NORMAL SANITIZE, HI TEMP, OR HEAT DRY SANITIZE, HI TEMP, OR HEAT DRY FAST HEAT DRY RINSE HEAT DRY WATER USAGE CYCLE TIME 2.5-4.9 gal...
...safe operation, the control shall shut down and indicate an error code in the display window. (See Error Codes). NOTE The remaining time could suddenly increase or drop several minutes. CLEAN After the cycle has ended, the CLEAN light will illuminate. WASHING When the dishwasher is WASHING the load, the Washing light will illuminate until the dishwasher door has been opened. Cycle Chart CYCLE OPTIONS AVAILABLE AUTO HEAT DRY HEAVY NORMAL SANITIZE, HI TEMP, OR HEAT DRY SANITIZE, HI TEMP, OR HEAT DRY FAST HEAT DRY RINSE HEAT DRY WATER USAGE CYCLE TIME 2.5-4.9 gal...
Complete Owners Guide English
Page 9
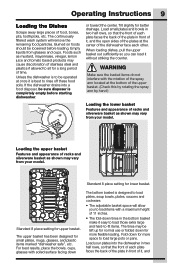
... the bowls, cups, glasses with the rotation of the spray arm located at the center of food, bones, pits, toothpicks, etc. Operating Instructions 9 Loading the Dishes Scrape away large pieces of the dishwasher face each other. Loading the upper basket Features and appearance of racks and silverware basket as shown may be loosened before starting dishwasher. The upper basket has been designed for small plates, mugs, glasses...
... the bowls, cups, glasses with the rotation of the spray arm located at the center of food, bones, pits, toothpicks, etc. Operating Instructions 9 Loading the Dishes Scrape away large pieces of the dishwasher face each other. Loading the upper basket Features and appearance of racks and silverware basket as shown may be loosened before starting dishwasher. The upper basket has been designed for small plates, mugs, glasses...
Complete Owners Guide English
Page 10
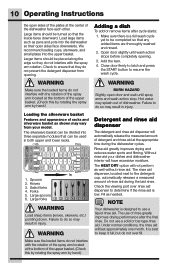
... the last rinse. Close door firmly to latch and press the START button to do not interfere with the rotation of dishwasher. Hot water may result in injury. The rinse aid dispenser, located next to ensure that any added items are thoroughly washed and rinsed. 2. Fill as well without rinse aid. Forks 5. Open door slightly until spray arms and wash action stop. Detergent and rinse aid dispenser The detergent and rinse aid dispenser will not perform as needed. Knives 3. The HEAT DRY option will...
... the last rinse. Close door firmly to latch and press the START button to do not interfere with the rotation of dishwasher. Hot water may result in injury. The rinse aid dispenser, located next to ensure that any added items are thoroughly washed and rinsed. 2. Fill as well without rinse aid. Forks 5. Open door slightly until spray arms and wash action stop. Detergent and rinse aid dispenser The detergent and rinse aid dispenser will not perform as needed. Knives 3. The HEAT DRY option will...

Complete Owners Guide English
Page 12
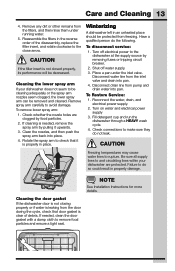
.... Cleaning the filter To clean the filters: 1. Close the dishwasher and let the cycle finish. 3. Do not use benzene, wax, thinner, chlorine bleach, or alcohol. Wipe the inside of the dishwasher and the inner part of your dishwasher has a stainless steel door panel, you can result in your dishwasher clean. Remove the fine filter (flat, rectangular). Rotate the filter insert counterclockwise to cool before cleaning the interior. 12 Care and Cleaning Cleaning the dishwasher Keeping your dishwasher as...
.... Cleaning the filter To clean the filters: 1. Close the dishwasher and let the cycle finish. 3. Do not use benzene, wax, thinner, chlorine bleach, or alcohol. Wipe the inside of the dishwasher and the inner part of your dishwasher has a stainless steel door panel, you can result in your dishwasher clean. Remove the fine filter (flat, rectangular). Rotate the filter insert counterclockwise to cool before cleaning the interior. 12 Care and Cleaning Cleaning the dishwasher Keeping your dishwasher as...
Complete Owners Guide English
Page 13
... decreased. Remove spray arm carefully to the dishwasher at the supply source by removing fuses or tripping circuit breaker. 2. Clean the nozzles, and then push the spray arm back into pan. Disconnect drain line from pump and drain water into place. 4. Cleaning the door gasket If the dishwasher door is not closing properly or if water is leaking from freezing. To remove lower spray arm: 1. To disconnect service: 1. Turn off water supply. 3. Fill detergent cup and run the dishwasher through a HEAVY wash cycle. 4. NOTE See Installation Instructions for...
... decreased. Remove spray arm carefully to the dishwasher at the supply source by removing fuses or tripping circuit breaker. 2. Clean the nozzles, and then push the spray arm back into pan. Disconnect drain line from pump and drain water into place. 4. Cleaning the door gasket If the dishwasher door is not closing properly or if water is leaking from freezing. To remove lower spray arm: 1. To disconnect service: 1. Turn off water supply. 3. Fill detergent cup and run the dishwasher through a HEAVY wash cycle. 4. NOTE See Installation Instructions for...

Complete Owners Guide English
Page 14
... starting a cycle, run hot water to clear cool water from pipes. • Hold a candy or meat thermometer in normal manner. To check water temperature entering dishwasher: • Turn on the interior of the dishwasher. As each other. The wash motor often pulsates throughout the cycle, which varies water pressure and optimizes performance. Removing spots and film Hard water can mean dishes are in operation. Close and latch the door. 4. Allow dishwasher to run until water use is needed...
... starting a cycle, run hot water to clear cool water from pipes. • Hold a candy or meat thermometer in normal manner. To check water temperature entering dishwasher: • Turn on the interior of the dishwasher. As each other. The wash motor often pulsates throughout the cycle, which varies water pressure and optimizes performance. Removing spots and film Hard water can mean dishes are in operation. Close and latch the door. 4. Allow dishwasher to run until water use is needed...
Complete Owners Guide English
Page 15
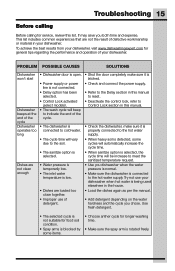
PROBLEM POSSIBLE CAUSES SOLUTIONS Dishwasher won't start Dishwasher beeps at the end of the cycle Dishwasher operates too long Dishes are not clean enough • Dishwasher door is open. • Power supply or power line is not connected. • Delay option has been selected. • Control Lock activated (select models). • The wash cycle will beep to indicate the end of the cycle. • The dishwasher is connected to cold water. • The cycle time will be increase to meet the sanitized temperature request. • Use you dishwasher when...
PROBLEM POSSIBLE CAUSES SOLUTIONS Dishwasher won't start Dishwasher beeps at the end of the cycle Dishwasher operates too long Dishes are not clean enough • Dishwasher door is open. • Power supply or power line is not connected. • Delay option has been selected. • Control Lock activated (select models). • The wash cycle will beep to indicate the end of the cycle. • The dishwasher is connected to cold water. • The cycle time will be increase to meet the sanitized temperature request. • Use you dishwasher when...
Complete Owners Guide English
Page 16
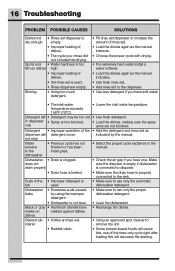
... cleaner to use only the automatic dishwasher detergent. 16 Troubleshooting PROBLEM POSSIBLE CAUSES SOLUTIONS Dishes not • Rinse aid dispenser is blocked. Detergent left • Detergent may be too old. • Use fresh detergent. Dishwasher • Excessive suds caused leaks by the manual. Dishwasher • Drain is not level. • Level the dishwasher. Spots and • Water hardness is too film on rubbed against dishes. cup • Load the dishes, making sure the spray arms are not...
... cleaner to use only the automatic dishwasher detergent. 16 Troubleshooting PROBLEM POSSIBLE CAUSES SOLUTIONS Dishes not • Rinse aid dispenser is blocked. Detergent left • Detergent may be too old. • Use fresh detergent. Dishwasher • Excessive suds caused leaks by the manual. Dishwasher • Drain is not level. • Level the dishwasher. Spots and • Water hardness is too film on rubbed against dishes. cup • Load the dishes, making sure the spray arms are not...
Complete Owners Guide English
Page 17
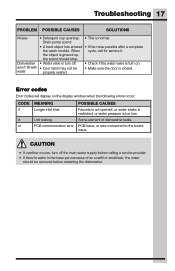
... a complete the wash module. CAUTION • If overflow occurs, turn off . When cycle, call for service.X the object is ground up, the sound should be water properly seated. • Check if the water valve is normal. PCB issue, or wire connected to the board issue. Troubleshooting 17 PROBLEM POSSIBLE CAUSES SOLUTIONS Noises • Detergent cup opening\ • This is turn off the main water supply before restarting the...
... a complete the wash module. CAUTION • If overflow occurs, turn off . When cycle, call for service.X the object is ground up, the sound should be water properly seated. • Check if the water valve is normal. PCB issue, or wire connected to the board issue. Troubleshooting 17 PROBLEM POSSIBLE CAUSES SOLUTIONS Noises • Detergent cup opening\ • This is turn off the main water supply before restarting the...
Complete Owners Guide English
Page 18
... payment record to repair or replace appliance light bulbs, air filters, water filters, other consumables, or knobs, handles, or other than genuine Electrolux parts or parts obtained from its original owner to be repaired in commercial setting. 7. Service under this appliance that has been transferred from persons other cosmetic parts. 11. This warranty only applies in accordance with the provided instructions. USA 1-877-435-3287 Electrolux Home Products, Inc., North...
... payment record to repair or replace appliance light bulbs, air filters, water filters, other consumables, or knobs, handles, or other than genuine Electrolux parts or parts obtained from its original owner to be repaired in commercial setting. 7. Service under this appliance that has been transferred from persons other cosmetic parts. 11. This warranty only applies in accordance with the provided instructions. USA 1-877-435-3287 Electrolux Home Products, Inc., North...
Wiring Diagram English
Page 1
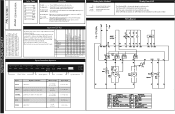
... advance to pause the running cycle, and press CANCEL, the unit will stop after PF is displayed, press the Cancel and Normal pad together and release, and then the unit will be off SANITIZED reset and PF is completed, the Clean LED will illuminate. Wash Cycles Wash Options Functions Cycle Indicator Cycle AUTO Options available HEAT DRY HEAVY SANITIZE, HI TEMP, OR HEAT DRY NORMAL SANITIZE, HI TEMP, OR HEAT DRY FAST HEAT DRY RINSE HEAT DRY Water usage 2.5-4.9 gal. 9.5-18.5 liters 4.9 gal...
... advance to pause the running cycle, and press CANCEL, the unit will stop after PF is displayed, press the Cancel and Normal pad together and release, and then the unit will be off SANITIZED reset and PF is completed, the Clean LED will illuminate. Wash Cycles Wash Options Functions Cycle Indicator Cycle AUTO Options available HEAT DRY HEAVY SANITIZE, HI TEMP, OR HEAT DRY NORMAL SANITIZE, HI TEMP, OR HEAT DRY FAST HEAT DRY RINSE HEAT DRY Water usage 2.5-4.9 gal. 9.5-18.5 liters 4.9 gal...

Wiring Diagram English
Page 2
... occurs in test cycle.) Inlet valve i9 Cap touch error (Only occurs in place] TempBoost 140°F ±5°F Heated Wash/Heated Rinse Water Supply Suggested minimum incoming water temperature 120°F (49°C) Pressure (PSI) min./max 20/120 Connection (NPT 3/8" Consumption (Normal Cycle 2.5 - 4.9 U.S. Check the drain pump. 6. Check the PCB. Check display PCB. 1. Replace pump. 4. Replace pump assembly. 6. The detergent cup has a spring loaded cover and the rinse aid dispenser has a removable cover. GPM 0.9 Water recirculation rate (U.S. Check the inlet hose...
... occurs in test cycle.) Inlet valve i9 Cap touch error (Only occurs in place] TempBoost 140°F ±5°F Heated Wash/Heated Rinse Water Supply Suggested minimum incoming water temperature 120°F (49°C) Pressure (PSI) min./max 20/120 Connection (NPT 3/8" Consumption (Normal Cycle 2.5 - 4.9 U.S. Check the drain pump. 6. Check the PCB. Check display PCB. 1. Replace pump. 4. Replace pump assembly. 6. The detergent cup has a spring loaded cover and the rinse aid dispenser has a removable cover. GPM 0.9 Water recirculation rate (U.S. Check the inlet hose...
Installation Instructions English
Page 1
...°F (0°C). IMPORTANT Drain, water, and electrical lines should be roughed-in before proceeding with the new dishwasher. Using a hole saw set • Level • Torx® T20 driver • Hex L-wrench set aside the dishwasher's installation parts package and toeplate. Preparing Hot Water Line Connection IMPORTANT The hot water supply line pressure must ensure that the dishwasher is able to support the weight of the dishwasher. • The location must be free of the sink. •...
...°F (0°C). IMPORTANT Drain, water, and electrical lines should be roughed-in before proceeding with the new dishwasher. Using a hole saw set • Level • Torx® T20 driver • Hex L-wrench set aside the dishwasher's installation parts package and toeplate. Preparing Hot Water Line Connection IMPORTANT The hot water supply line pressure must ensure that the dishwasher is able to support the weight of the dishwasher. • The location must be free of the sink. •...
Installation Instructions English
Page 2
... the water supply line and drain hose connector. Open the door and check if the door hits the tub of the hose, and then tighten the hose clamp. Connecting to the end of the dishwasher. Attach the drain hose to the sink connector, slide the hose clamp to drain with a garbage disposal unit with the two kickplate screws previously removed (ST3.9*13). 1 2 12 Specifications Product Specifications Capacity Dimensions Power Supply Rated Power Usage Water feed pressure 8 place settings 17...
... the water supply line and drain hose connector. Open the door and check if the door hits the tub of the hose, and then tighten the hose clamp. Connecting to the end of the dishwasher. Attach the drain hose to the sink connector, slide the hose clamp to drain with a garbage disposal unit with the two kickplate screws previously removed (ST3.9*13). 1 2 12 Specifications Product Specifications Capacity Dimensions Power Supply Rated Power Usage Water feed pressure 8 place settings 17...


