Quick Start Guide English
Page 1
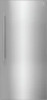
... Single Door Refrigerator A Quick Guide to Getting Started Before you begin • Set up any spills and cleaning your Use & Care Manual. Adjust the temperature by 1 or 2 degrees and allow the appliance to operate with an energy-efficient variable speed compressor that is mounted on a floor that saves energy by changing your Refrigerator. Care and cleaning • Clean your interior refrigerator wall. Your refrigerator is warmer or colder than preferred. Push the water nozzle...
... Single Door Refrigerator A Quick Guide to Getting Started Before you begin • Set up any spills and cleaning your Use & Care Manual. Adjust the temperature by 1 or 2 degrees and allow the appliance to operate with an energy-efficient variable speed compressor that is mounted on a floor that saves energy by changing your Refrigerator. Care and cleaning • Clean your interior refrigerator wall. Your refrigerator is warmer or colder than preferred. Push the water nozzle...

Quick Start Guide English
Page 2
... audible alert sounds indicating the door has been open 5 minutes or more with our TasteLock™ Plus Crispers to replace the air filter. (About every 6 months). SETTINGS The settings icon illuminates upon opening the refrigerator door. WATER DISP Illuminates when the water dispenser is used to making food last longer with product registration. Press and hold for the photo icon on the display. Alarm will fade except . ADJUSTING TEMP Press + to...
... audible alert sounds indicating the door has been open 5 minutes or more with our TasteLock™ Plus Crispers to replace the air filter. (About every 6 months). SETTINGS The settings icon illuminates upon opening the refrigerator door. WATER DISP Illuminates when the water dispenser is used to making food last longer with product registration. Press and hold for the photo icon on the display. Alarm will fade except . ADJUSTING TEMP Press + to...
Complete Owners Guide English
Page 2
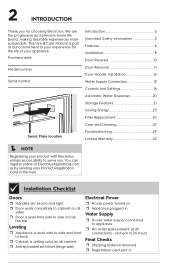
...;;;;jjjjffffddddaaaa jjjjffffkkkk;;;;ffffkkkkddddaaaa;;;;jjjjffffddddaaaa jjjjffffkkkk;;;;ffffkkkkddddaaaa;;;;jjjjffffddddaaaa Serial Plate location Introduction 2 Important Safety information 3 Features 6 Installation 8 Door Reversal 10 Door Removal 11 Door Handle Installation 12 Water Supply Connection 13 Controls and Settings 16 Automatic Water Dispenser 20 Storage Features 21 Saving Energy 23 Filter Replacement 24 Care and Cleaning 27 Troubleshooting 29 Limited Warranty 32 NOTE Registering your product with Electrolux enhances our ability to serve you for...
...;;;;jjjjffffddddaaaa jjjjffffkkkk;;;;ffffkkkkddddaaaa;;;;jjjjffffddddaaaa jjjjffffkkkk;;;;ffffkkkkddddaaaa;;;;jjjjffffddddaaaa Serial Plate location Introduction 2 Important Safety information 3 Features 6 Installation 8 Door Reversal 10 Door Removal 11 Door Handle Installation 12 Water Supply Connection 13 Controls and Settings 16 Automatic Water Dispenser 20 Storage Features 21 Saving Energy 23 Filter Replacement 24 Care and Cleaning 27 Troubleshooting 29 Limited Warranty 32 NOTE Registering your product with Electrolux enhances our ability to serve you for...

Complete Owners Guide English
Page 5
... out from the electrical outlet. Operating the appliance with local codes and ordinances. Avoid connecting the appliance to prevent any circumstances, cut, remove, or bypass the grounding prong. Electrical information • Plug the appliance into an electrical outlet controlled by a wall switch or pull cord to prevent the appliance from being turned off power to your old appliance, make sure the refrigerant is equipped with...
... out from the electrical outlet. Operating the appliance with local codes and ordinances. Avoid connecting the appliance to prevent any circumstances, cut, remove, or bypass the grounding prong. Electrical information • Plug the appliance into an electrical outlet controlled by a wall switch or pull cord to prevent the appliance from being turned off power to your old appliance, make sure the refrigerant is equipped with...

Complete Owners Guide English
Page 6
... vary according to model H IGI K J J IGI K F E L J J C D J J M B M A A Lower Drawer with Removable Dividers B Slide-out Shelf C Water Filter D Appliance Control Display E TasteLock™ Plus Crisper with Auto-Humidity Control F Internal Water Dispenser G Adjustable Full Width Glass Shelves with Metallic Trim H Air Filter I *LuxCool™ Cooling System Multi-Port Air Exhaust Ducts J LED Lighting K Adjustable Half Gallon Door Bins with Removable Dividers L Adjustable Gallon Door Bin with Removable Divider M Adjustable Tall Item Door Bins with Removable Dividers IMPORTANT...
... vary according to model H IGI K J J IGI K F E L J J C D J J M B M A A Lower Drawer with Removable Dividers B Slide-out Shelf C Water Filter D Appliance Control Display E TasteLock™ Plus Crisper with Auto-Humidity Control F Internal Water Dispenser G Adjustable Full Width Glass Shelves with Metallic Trim H Air Filter I *LuxCool™ Cooling System Multi-Port Air Exhaust Ducts J LED Lighting K Adjustable Half Gallon Door Bins with Removable Dividers L Adjustable Gallon Door Bin with Removable Divider M Adjustable Tall Item Door Bins with Removable Dividers IMPORTANT...
Complete Owners Guide English
Page 8
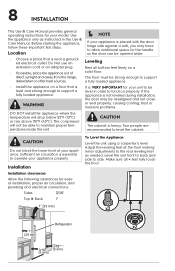
.... Make sure all bottom feet firmly on a floor that is VERY IMPORTANT for your model. Sufficient air circulation is not leveled during installation, the door may have to allow additional space for the handle so the door can be able to maintain proper temperatures inside the unit. CAUTION The cabinet is level and strong enough to support a fully loaded appliance. 8 INSTALLATION This Use & Care Manual provides general operating instructions for...
.... Make sure all bottom feet firmly on a floor that is VERY IMPORTANT for your model. Sufficient air circulation is not leveled during installation, the door may have to allow additional space for the handle so the door can be able to maintain proper temperatures inside the unit. CAUTION The cabinet is level and strong enough to support a fully loaded appliance. 8 INSTALLATION This Use & Care Manual provides general operating instructions for...
Complete Owners Guide English
Page 9
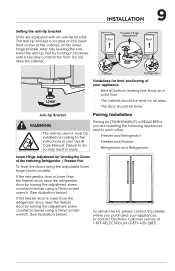
... purchased your Use & Care Manual. Door Freezer Hinge Adjustment Door Raise Door Raise Door Lower Freezer Refrigerator Guidelines for Leveling the Doors of the cabinet, on all bottom leveling feet firmly on a solid floor. • The cabinet should be installed according to do so may result in your appliances, or contact Electrolux customer service at 1-877-4ELECTROLUX (1-877-435-3287). Do not raise the cabinet. Failure to the instructions in injury...
... purchased your Use & Care Manual. Door Freezer Hinge Adjustment Door Raise Door Raise Door Lower Freezer Refrigerator Guidelines for Leveling the Doors of the cabinet, on all bottom leveling feet firmly on a solid floor. • The cabinet should be installed according to do so may result in your appliances, or contact Electrolux customer service at 1-877-4ELECTROLUX (1-877-435-3287). Do not raise the cabinet. Failure to the instructions in injury...

Complete Owners Guide English
Page 12
... tightened and sub-flush (Allen set screws (B) with no gaps. Remove handle from carton and any other protective packaging. 2. Position handle end caps over upper and lower pre-installed shoulder bolts (A) that are fastened into door, ensuring the holes for the set screws are facing toward the hinge. 3. 12 DOOR HANDLE INSTALLATION CAUTION Wear gloves and use extreme CAUTION when installing these handles. Door Handle Mounting Instructions 1.
... tightened and sub-flush (Allen set screws (B) with no gaps. Remove handle from carton and any other protective packaging. 2. Position handle end caps over upper and lower pre-installed shoulder bolts (A) that are fastened into door, ensuring the holes for the set screws are facing toward the hinge. 3. 12 DOOR HANDLE INSTALLATION CAUTION Wear gloves and use extreme CAUTION when installing these handles. Door Handle Mounting Instructions 1.

Complete Owners Guide English
Page 15
... codes, Electrolux recommends for homes with existing valves its Smart Choice® water line kit 5305513409 (with a 6' Stainless Steel Water Line) and for homes without an existing valve, Electrolux recommends its Smart Choice® water line kit 5305510264 (with a 20' copper water line with your new refrigerator. With the steel clamp and screw, secure the water supply line (copper tubing only) to ElectroluxAppliances.com for recommendations on water lines and associated materials prior to electrical power...
... codes, Electrolux recommends for homes with existing valves its Smart Choice® water line kit 5305513409 (with a 6' Stainless Steel Water Line) and for homes without an existing valve, Electrolux recommends its Smart Choice® water line kit 5305510264 (with a 20' copper water line with your new refrigerator. With the steel clamp and screw, secure the water supply line (copper tubing only) to ElectroluxAppliances.com for recommendations on water lines and associated materials prior to electrical power...

Complete Owners Guide English
Page 17
... water dispenser is ajar for instructions on . Turn the dispenser off by pressing the DOOR OPEN key or by closing the door. If the door is ON. Reset the alarm by pressing and holding AIR FILTERS. 10 WATER FILTER The WATER FILTER replacement alert will hear a beep if you try to reveal other function icons. While in the locked state, no changes can be used to lock the control panel. When the water dispenser...
... water dispenser is ajar for instructions on . Turn the dispenser off by pressing the DOOR OPEN key or by closing the door. If the door is ON. Reset the alarm by pressing and holding AIR FILTERS. 10 WATER FILTER The WATER FILTER replacement alert will hear a beep if you try to reveal other function icons. While in the locked state, no changes can be used to lock the control panel. When the water dispenser...

Complete Owners Guide English
Page 20
... the water comes out of any impurities (stopping to malfunction. A B 20 AUTOMATIC WATER DISPENSER Your refrigerator is turned on the appliance control display. Priming the water supply system CAUTION For proper dispenser operation, the recommended water supply pressure should fall between 30 psi and 100 psi. Water Dispenser On Water Dispenser Off The water nozzle inside the cabinet, along the left-hand cabinet wall. Keep the glass in use the water dispenser, push the water nozzle...
... the water comes out of any impurities (stopping to malfunction. A B 20 AUTOMATIC WATER DISPENSER Your refrigerator is turned on the appliance control display. Priming the water supply system CAUTION For proper dispenser operation, the recommended water supply pressure should fall between 30 psi and 100 psi. Water Dispenser On Water Dispenser Off The water nozzle inside the cabinet, along the left-hand cabinet wall. Keep the glass in use the water dispenser, push the water nozzle...

Complete Owners Guide English
Page 24
...), change the water filter every 6 months to produce and package bottled water *For the complete list, please see Performance DataSheet on sustainability efforts, the use of water released during moving for more information. Electrolux Genuine Filters are the product numbers to change the filter. Using the alignment guide, slide it gently into the filter housing until it stops against the snap-in your PureAdvantage™ water filter is tested...
...), change the water filter every 6 months to produce and package bottled water *For the complete list, please see Performance DataSheet on sustainability efforts, the use of water released during moving for more information. Electrolux Genuine Filters are the product numbers to change the filter. Using the alignment guide, slide it gently into the filter housing until it stops against the snap-in your PureAdvantage™ water filter is tested...

Complete Owners Guide English
Page 25
... fixed air water dispenser while checking for any filter housing. When the display changes from red to the housing and firmly pushing it until it into place (you should be installed facing outward in place. Here are normal. 3. Replace Reset Grab the cover with carbon technology. and sputters that occur as removable air filter cover which has a the cartridge engages the stainless steel decorative plate. Unpackage the new filter...
... fixed air water dispenser while checking for any filter housing. When the display changes from red to the housing and firmly pushing it until it into place (you should be installed facing outward in place. Here are normal. 3. Replace Reset Grab the cover with carbon technology. and sputters that occur as removable air filter cover which has a the cartridge engages the stainless steel decorative plate. Unpackage the new filter...

Complete Owners Guide English
Page 29
... set too low. • Turn control knob to stabilize. • Make sure the items are dirty, worn, cracked, or poorly fitted. • Clean or change gasket. (See Care and Cleaning Tips in CARE AND CLEANING section). Allow several hours for the temperature to a warmer setting. time-delay fuse. Call the local electric company. We may not be replaced. 29 TROUBLESHOOTING Let us help you need service, we can get...
... set too low. • Turn control knob to stabilize. • Make sure the items are dirty, worn, cracked, or poorly fitted. • Clean or change gasket. (See Care and Cleaning Tips in CARE AND CLEANING section). Allow several hours for the temperature to a warmer setting. time-delay fuse. Call the local electric company. We may not be replaced. 29 TROUBLESHOOTING Let us help you need service, we can get...

Complete Owners Guide English
Page 31
... in FILTER REPLACEMENT section. not working. • Call an Electrolux service technician. Refer to be cleaned. • Clean interior with strong odors • Cover the food tightly. LIGHTING PROBLEMS Cabinet light is not level. are in the appliance. • The air filter needs to "Leveling" in the door bins keeping the door from closing completely. DOOR PROBLEMS Door will not close. • Appliance is • LED has burned out. Replace air filter. • Foods with sponge, warm water...
... in FILTER REPLACEMENT section. not working. • Call an Electrolux service technician. Refer to be cleaned. • Clean interior with strong odors • Cover the food tightly. LIGHTING PROBLEMS Cabinet light is not level. are in the appliance. • The air filter needs to "Leveling" in the door bins keeping the door from closing completely. DOOR PROBLEMS Door will not close. • Appliance is • LED has burned out. Replace air filter. • Foods with sponge, warm water...

Complete Owners Guide English
Page 32
... IMPLIED WARRANTY. 32 LIMITED WARRANTY Major Appliance Warranty Information Your appliance is covered by a one year from your original date of purchase, Electrolux will repair or replace any parts in the cabinet liner and sealed refrigeration system which do not involve malfunction or defects in materials or workmanship, or for service calls to repair or replace appliance light bulbs, air filters, water filters, other consumables, or knobs, handles, or...
... IMPLIED WARRANTY. 32 LIMITED WARRANTY Major Appliance Warranty Information Your appliance is covered by a one year from your original date of purchase, Electrolux will repair or replace any parts in the cabinet liner and sealed refrigeration system which do not involve malfunction or defects in materials or workmanship, or for service calls to repair or replace appliance light bulbs, air filters, water filters, other consumables, or knobs, handles, or...

Product Specifications Sheet English
Page 1
...With Door Depth With Door 90° Open Electrical Specifications Minimum Circuit Required General Specifications Annual Energy Condenser Type Cooling System All Refrigerator 19 Cu. Electrolux Refrigerator Air Filter Crisper Color Door Bin Color Humidity Controls Interior Lighting Shelf Material Water Filter Total Number of Door Bins Number of Adjustable Shelves Number of Fixed Shelves Number of Pull Out Shelves Number of Crispers Controls Air Filter Indicator Digital Display Door Ajar Alarm Power Failure Alarm Sabbath Mode Vacation Mode Dimensions and Volume Height With Hinge Height Without...
...With Door Depth With Door 90° Open Electrical Specifications Minimum Circuit Required General Specifications Annual Energy Condenser Type Cooling System All Refrigerator 19 Cu. Electrolux Refrigerator Air Filter Crisper Color Door Bin Color Humidity Controls Interior Lighting Shelf Material Water Filter Total Number of Door Bins Number of Adjustable Shelves Number of Fixed Shelves Number of Pull Out Shelves Number of Crispers Controls Air Filter Indicator Digital Display Door Ajar Alarm Power Failure Alarm Sabbath Mode Vacation Mode Dimensions and Volume Height With Hinge Height Without...
Ice Kit Installation Instructions English
Page 1
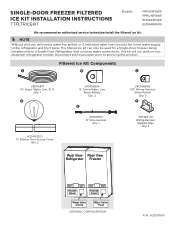
...kit you will not work on nondispenser refrigerator models. Disconnect electrical power prior to a Single-Door Refrigerator that contains water connections. Filtered Ice Kit Components A B C 218976831 ¼" Green Water Line, 16 ft. Qty: 1 D 240396804 ¼" Green Water Line Strain Reliefs Qty: 2 E A19408101 19' Wire Harness Qty: 1 A20060201 11" Rubber Trim Access Cover Qty: 2 Rear View Rear View Refrigerator Freezer 240396805 1/8" Wiring Harness Strain Reliefs Qty: 2 F 305346-00 Wiring Harness Support Clips Qty: 2 Access Cover Access Cover Water Valve 3 Coils Water Valve...
...kit you will not work on nondispenser refrigerator models. Disconnect electrical power prior to a Single-Door Refrigerator that contains water connections. Filtered Ice Kit Components A B C 218976831 ¼" Green Water Line, 16 ft. Qty: 1 D 240396804 ¼" Green Water Line Strain Reliefs Qty: 2 E A19408101 19' Wire Harness Qty: 1 A20060201 11" Rubber Trim Access Cover Qty: 2 Rear View Rear View Refrigerator Freezer 240396805 1/8" Wiring Harness Strain Reliefs Qty: 2 F 305346-00 Wiring Harness Support Clips Qty: 2 Access Cover Access Cover Water Valve 3 Coils Water Valve...
Trim Kit Installation Instructions English
Page 11
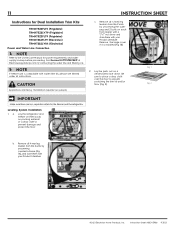
... requires two people. 11 INSTRUCTION SHEET Instructions for Dual Installation Trim Kits: TRMKTEZ2FL75 (Frigidaire) TRMKTEZ2LV79 (Frigidaire) TRMKTEZ2FL79 (Frigidaire) TRMKTSS2FL79 (Electrolux) TRMKTSS2LV84 (Electrolux) Power and Water Line Connection NOTE Refer to the Use & Care Manual for connecting the water line and filtering ice. NOTE If freezer unit is installed (Fig 1B). 2. Find Service Kit TTFLTRICEKIT at ElectroluxAppliances.com for power requirements and water supply hookup before proceeding. Remove all 4 front leg levelers from the 2 units by...
... requires two people. 11 INSTRUCTION SHEET Instructions for Dual Installation Trim Kits: TRMKTEZ2FL75 (Frigidaire) TRMKTEZ2LV79 (Frigidaire) TRMKTEZ2FL79 (Frigidaire) TRMKTSS2FL79 (Electrolux) TRMKTSS2LV84 (Electrolux) Power and Water Line Connection NOTE Refer to the Use & Care Manual for connecting the water line and filtering ice. NOTE If freezer unit is installed (Fig 1B). 2. Find Service Kit TTFLTRICEKIT at ElectroluxAppliances.com for power requirements and water supply hookup before proceeding. Remove all 4 front leg levelers from the 2 units by...

Trim Kit Installation Instructions English
Page 14
... Setup For: TRMKTEZ2FL75 (Frigidaire) TRMKTEZ2LV79 (Frigidaire) TRMKTEZ2FL79 (Frigidaire) TRMKTSS2FL79 (Electrolux) 20. a. Adjusting the height of the units as needed to the front of the Levelers (Fig. 14), keeping the left (Fig. 20A) of the bracket is an example. 14. Having the refrigerator/ freezer standing side by fastening the screws on the cabinet cutout final dimensions. 14 INSTRUCTION SHEET 13. Fig. 16 Open the doors...
... Setup For: TRMKTEZ2FL75 (Frigidaire) TRMKTEZ2LV79 (Frigidaire) TRMKTEZ2FL79 (Frigidaire) TRMKTSS2FL79 (Electrolux) 20. a. Adjusting the height of the units as needed to the front of the Levelers (Fig. 14), keeping the left (Fig. 20A) of the bracket is an example. 14. Having the refrigerator/ freezer standing side by fastening the screws on the cabinet cutout final dimensions. 14 INSTRUCTION SHEET 13. Fig. 16 Open the doors...


