Electrolux EI33AR80WS Support and Manuals
Get Help and Manuals for this Electrolux item

View All Support Options Below
Free Electrolux EI33AR80WS manuals!
Problems with Electrolux EI33AR80WS?
Ask a Question
Free Electrolux EI33AR80WS manuals!
Problems with Electrolux EI33AR80WS?
Ask a Question
Electrolux EI33AR80WS Videos

Electrolux EI33AR80WS Réfrigérateurs (Sans Congélateurs)
Duration: :37
Total Views: 11
Duration: :37
Total Views: 11
Electrolux EI33AR80WS All Refrigerator
Duration: :37
Total Views: 158
Duration: :37
Total Views: 158
Popular Electrolux EI33AR80WS Manual Pages
Quick Start Guide English - Page 1
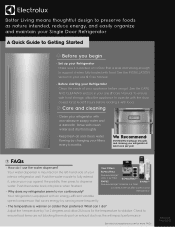
... support it when fully loaded with food. Check to ensure food items are not blocking the multi-port air exhaust ducts as nature intended, reduce energy, and easily organize and maintain your Single Door Refrigerator
A Quick Guide to Getting Started
Before you begin
• Set up any spills and cleaning your Use & Care Manual...
Quick Start Guide English - Page 2

... red HIGH TEMP LED illuminates and the alarm sounds. LOCK The lock button is time to replace the air filter. (About every 6 months).
Look for up to 24 hours before automatically deactivating or being manually exited. SETTINGS The settings icon illuminates upon opening the refrigerator door. POWER OUTAGE Illuminates and sounds if there has...
Complete Owners Guide English - Page 2
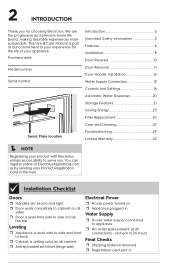
... Plate location
Introduction 2 Important Safety information 3 Features 6 Installation 8 Door Reversal 10 Door Removal 11 Door Handle Installation 12 Water Supply Connection 13 Controls and Settings 16 Automatic Water Dispenser 20 Storage Features 21 Saving Energy 23 Filter Replacement 24 Care and Cleaning 27 Troubleshooting 29 Limited Warranty 32
NOTE
Registering your...
Complete Owners Guide English - Page 8
... cooling, frost or moisture problems.
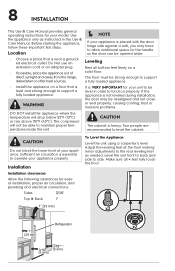
DO NOT install the appliance where the temperature will not be opened wider.
•
Choose a place that is VERY IMPORTANT for ease of
solid floor. Adjust the leveling feet at the front making minor adjustments to the rear leveling feet as instructed in order to support a fully loaded appliance...
Complete Owners Guide English - Page 9
... hinge (some models):
If the ... instructions in injury. Pairing Installation
Pairing ...INSTALLATION
9
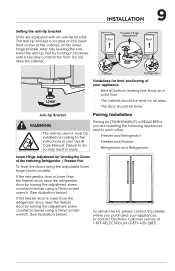
Setting the anti-tip bracket:
Units are installing the following appliances next to each other: • Freezer and Refrigerator • Freezer and Freezer • Refrigerator and Refrigerator
Lower Hinge Adjustment for final positioning of your appliances, or contact Electrolux customer service...
Complete Owners Guide English - Page 29

...PROBLEMS in TROUBLESHOOTING section.
• Temperature control is set too low.
• Turn control knob to a warmer setting.
Allow several hours for temperature to a colder setting until the desired temperature
stored recently. We may not be replaced...in front of warm • Warm food will help you need service, we can get that started for the temperature to stabilize.
&#...
Complete Owners Guide English - Page 31

... and misalign the door. Refer to "Leveling" in the INSTALLATION section.
• Floor is not level. LIGHTING PROBLEMS
Cabinet light is moved slightly.
• This condition can adequately support appliance. 31 TROUBLESHOOTING
CONCERN
CAUSE
SOLUTION
ODOR IN APPLIANCE
Odors in appliance.
• Interior needs to be replaced.
• Refer to "PureAdvantage Ultra II™ Air...
Complete Owners Guide English - Page 32

..., Electrolux will repair or replace any parts in the cabinet liner and sealed refrigeration system which do not involve malfunction or defects in accordance with the provided instructions. use of this warranty. 5. If You Need Service
Keep your
appliance is warranted by this appliance that prove to correct the installation of Alaska. 13. Product
features or specifications as...
Product Specifications Sheet English - Page 1

...working to change specifications or discontinue models without notice. USA • 10200 David Taylor Drive •Charlotte, NC 28262 • Charlotte, NC 28262 • 1-877-4electrolux (1-877-435-3287) • electroluxappliances.com CANADA • 5855... Mode Vacation Mode
Dimensions and Volume
Height With Hinge Height Without Hinge Width of quality at Electrolux Home Products, Inc.
Product Specifications Sheet English - Page 2

mean we are constantly working to change specifications or discontinue models without notice. Ft. We reserve the right to improve our products.
Single-Door Refrigerator
Electrolux
EI33AR80WS Version : 10/21
High standards of quality at Electrolux Home Products, Inc.
Electrolux Major Appliances, N.A. USA • 10200 David Taylor Drive •Charlotte, NC 28262 • Charlotte, NC...
Ice Kit Installation Instructions English - Page 1
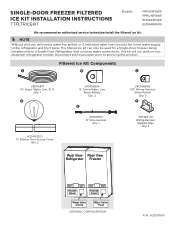
...INSTALLATION INSTRUCTIONS
TTFLTRICEKIT
Models:
FPFU19F8WF
FPRU19F8WF
EI33AF80WS
EI33AR80WS
We recommend an authorized service technician install the filtered ice kit.
NOTE
Without a kit you will not work on nondispenser refrigerator models... Wiring Harness
Strain Reliefs Qty: 2
F
305346-00 Wiring Harness Support Clips
Qty: 2
Access Cover
Access Cover
Water Valve 3 Coils
...
Trim Kit Installation Instructions English - Page 8

... shelves.
©2021 Electrolux Home Products, Inc. Instruction Sheet A00343906 9.30.21 8
INSTRUCTION SHEET
Dual Trim Kits (75" & 79" Tall Cabinet Cutouts)
IMPORTANT
Use two recessed duplex electrical outlets and a recessed water shutoff valve for a 24" minimum opening. For new construction, use a 25.25" cabinet depth dimension.
NOTE
To install a dual trim kit...
Trim Kit Installation Instructions English - Page 11
... down. a. Lay the parts out on each front leveler with a
5/16" nut driver and
store them with your Product Literature.
Leveling System Installation
1. 11
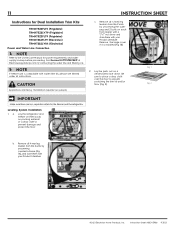
INSTRUCTION SHEET
Instructions for Dual Installation Trim Kits:
TRMKTEZ2FL75 (Frigidaire) TRMKTEZ2LV79 (Frigidaire) TRMKTEZ2FL79 (Frigidaire) TRMKTSS2FL79 (Electrolux) TRMKTSS2LV84 (Electrolux) Power and Water Line...
Trim Kit Installation Instructions English - Page 14

...Care Manual to INSTALLATION ...Installation
Fig. 13
IMPORTANT
• Before proceeding with the brackets touching the floor (Fig. 19). 14
INSTRUCTION SHEET
13. Fig. 15
NOTE: Before continuing, ensure doors close to the front left (Fig. 20A) of the screw will prevent any damage to centralize the middle trim. Electrolux TRMKTSS2LV84 Side Trim Attachment Setup (some models...
Trim Kit Installation Instructions English - Page 17

... Products, Inc. a. b. Place the unit into place, and ensure the dual installation is on Step 8d. Use a flat head screw
Fig. 8
driver or a 3/8" socket wrench to properly level the Top Trim.
1H
Fig. 10 Fig. 11
9. Electrolux TRMKTSS1LV84 Side Trim Attachment Setup
5. Repeat step 6 for later.
c. You do not hook
up power or water...
Electrolux EI33AR80WS Reviews
We have not received any reviews for Electrolux yet.