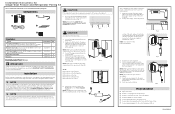
Pairing Kit Installation Instructions English
Page 1
... 1 A21545401 1 316237303 2 218990901 6 Recommended Tool: Gloves IMPORTANT Make sure there are pushed back in heater assembly B AC Power Cable: Ultra low profile 6ft NEMA 5-15P to Single-Door All Refrigerator and All Freezer Trim Kit Installation Instruction. Wipe down both sides of the refrigerator and the freezer. NOTE Never use the dual installation trim kit, install the levelers on top of clips shown is an example...
... 1 A21545401 1 316237303 2 218990901 6 Recommended Tool: Gloves IMPORTANT Make sure there are pushed back in heater assembly B AC Power Cable: Ultra low profile 6ft NEMA 5-15P to Single-Door All Refrigerator and All Freezer Trim Kit Installation Instruction. Wipe down both sides of the refrigerator and the freezer. NOTE Never use the dual installation trim kit, install the levelers on top of clips shown is an example...
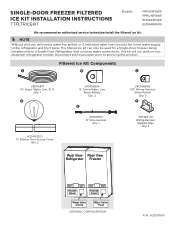
Ice Kit Installation Instructions English
Page 1
... 305346-00 Wiring Harness Support Clips Qty: 2 Access Cover Access Cover Water Valve 3 Coils Water Valve 1 Coil ORIGINAL CONFIGURATION P/N: A23393001 SINGLE-DOOR FREEZER FILTERED ICE KIT INSTALLATION INSTRUCTIONS TTFLTRICEKIT Models: FPFU19F8WF FPRU19F8WF EI33AF80WS EI33AR80WS We recommend an authorized service technician install the filtered ice kit. NOTE Without a kit you will not work on nondispenser refrigerator models. Disconnect electrical power prior to a Single-Door Refrigerator that contains water connections. This kit will need a water line splitter or...
... 305346-00 Wiring Harness Support Clips Qty: 2 Access Cover Access Cover Water Valve 3 Coils Water Valve 1 Coil ORIGINAL CONFIGURATION P/N: A23393001 SINGLE-DOOR FREEZER FILTERED ICE KIT INSTALLATION INSTRUCTIONS TTFLTRICEKIT Models: FPFU19F8WF FPRU19F8WF EI33AF80WS EI33AR80WS We recommend an authorized service technician install the filtered ice kit. NOTE Without a kit you will not work on nondispenser refrigerator models. Disconnect electrical power prior to a Single-Door Refrigerator that contains water connections. This kit will need a water line splitter or...
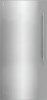
Product Specifications Sheet
Page 1
...Cabinet All Freezer 19 Cu. Electrolux Freezer Air Filter Door Bin Color Interior Lighting Shelf Material Soft Freeze Zone Number of Adjustable Door Bins Total Number of Door Bins Number of Adjustable Shelves Number of Fixed Shelves Number of Pull Out Shelves Total Number of Shelves Number of Drawers Ice Maker Ice Maker Ice Maker Location Controls Air Filter Indicator Digital Display Door Ajar Alarm High Temp Alarm Ice Maker On/Off On/Off Display Power Failure Alarm Sabbath Mode Vacation Mode Exterior Water Inlet Location Dimensions and Volume Height With Hinge Height Without Hinge Width of...
...Cabinet All Freezer 19 Cu. Electrolux Freezer Air Filter Door Bin Color Interior Lighting Shelf Material Soft Freeze Zone Number of Adjustable Door Bins Total Number of Door Bins Number of Adjustable Shelves Number of Fixed Shelves Number of Pull Out Shelves Total Number of Shelves Number of Drawers Ice Maker Ice Maker Ice Maker Location Controls Air Filter Indicator Digital Display Door Ajar Alarm High Temp Alarm Ice Maker On/Off On/Off Display Power Failure Alarm Sabbath Mode Vacation Mode Exterior Water Inlet Location Dimensions and Volume Height With Hinge Height Without Hinge Width of...
Quick Start Guide
Page 1
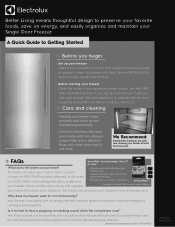
... the compressor runs? See the CARE AND CLEANING section in your door is located on energy, and easily organize and maintain your Single Door Freezer A Quick Guide to Getting Started Before you begin • Set up to 6 months of freshness. In the event of a HIGH TEMP, acknowledge the alarm, make sure your freezer is level, and the door closes with a proper Your Filter: PureAdvantage Ultra II™ Air Filter* • More powerful...
... the compressor runs? See the CARE AND CLEANING section in your door is located on energy, and easily organize and maintain your Single Door Freezer A Quick Guide to Getting Started Before you begin • Set up to 6 months of freshness. In the event of a HIGH TEMP, acknowledge the alarm, make sure your freezer is level, and the door closes with a proper Your Filter: PureAdvantage Ultra II™ Air Filter* • More powerful...
Quick Start Guide
Page 2
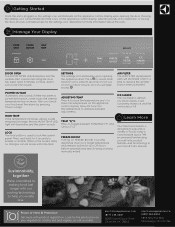
.... SETTINGS The settings icon illuminates upon opening the appliance door. After 10 seconds of Mind & Protection Get more . to toggle between adjustments. Press to raise the temperature and - ICE MAKER The ice maker is default on the appliance control display upon opening the door. Sustainability, together We're committed to making food last longer with our cooling technology to preserve a variety of the icons on the appliance control display. POWER...
.... SETTINGS The settings icon illuminates upon opening the appliance door. After 10 seconds of Mind & Protection Get more . to toggle between adjustments. Press to raise the temperature and - ICE MAKER The ice maker is default on the appliance control display upon opening the door. Sustainability, together We're committed to making food last longer with our cooling technology to preserve a variety of the icons on the appliance control display. POWER...

Complete Owners Guide
Page 2
...; House water supply connected to appliance ˆˆ No water leaks present at all connections - recheck in 24 hours ˆˆ Ice maker is part of our commitment to serve you for the life of your experience for choosing Electrolux. This Use & Care Guide is turned on ˆˆ Appliance plugged in Introduction 2 Important Safety information 3 Features 5 Installation 7 Purchase date Model number Door Removal/Reversal 9 Door Reversal 10 Door Handle Installation 11 Serial number Water Supply Connection 12 Controls and Settings 15 Ice Maker 19...
...; House water supply connected to appliance ˆˆ No water leaks present at all connections - recheck in 24 hours ˆˆ Ice maker is part of our commitment to serve you for the life of your experience for choosing Electrolux. This Use & Care Guide is turned on ˆˆ Appliance plugged in Introduction 2 Important Safety information 3 Features 5 Installation 7 Purchase date Model number Door Removal/Reversal 9 Door Reversal 10 Door Handle Installation 11 Serial number Water Supply Connection 12 Controls and Settings 15 Ice Maker 19...

Complete Owners Guide
Page 4
..., make sure the refrigerant is equipped with local codes and ordinances. Such damage is damaged, an authorized service technician should replace it directly into its own dedicated 115 Volt, 60 Hz., 15 Amp, AC only electrical outlet. Check with your utility company or visit energystar.gov/products/recycle for use an extension cord or adapter plug. • If the power...
..., make sure the refrigerant is equipped with local codes and ordinances. Such damage is damaged, an authorized service technician should replace it directly into its own dedicated 115 Volt, 60 Hz., 15 Amp, AC only electrical outlet. Check with your utility company or visit energystar.gov/products/recycle for use an extension cord or adapter plug. • If the power...

Complete Owners Guide
Page 7
... rear leveling feet as instructed in order to support a fully loaded appliance. Do Not use an extension cord or an adapter plug. • If possible, place the appliance out of installation, proper air circulation, and plumbing and electrical connections: Sides 3/16 in . 1" (25 mm) To Level the Appliance: Level the unit using a carpenter's level. Two people are recommended to level the cabinet. INSTALLATION 7 This Use & Care Guide provides general operating instructions for...
... rear leveling feet as instructed in order to support a fully loaded appliance. Do Not use an extension cord or an adapter plug. • If possible, place the appliance out of installation, proper air circulation, and plumbing and electrical connections: Sides 3/16 in . 1" (25 mm) To Level the Appliance: Level the unit using a carpenter's level. Two people are recommended to level the cabinet. INSTALLATION 7 This Use & Care Guide provides general operating instructions for...

Complete Owners Guide
Page 9
... heavy. CAUTION Doors are recommended to remove or replace the door assembly from the top hinge with a wrench or socket. DOOR REMOVAL/REVERSAL 9 Tools Necessary: PhillipsTM Head or #2 Square Drive Head or and Flathead Screwdriver Socket Wrench Set or Adjustable Wrench or 5/16" (8mm) Fixed Wrench 8mm (M5x16mm) Hex head screw x3 x2 Door Removal: IMPORTANT Before you begin, remove the electrical power cord from door shelves. Remove any food...
... heavy. CAUTION Doors are recommended to remove or replace the door assembly from the top hinge with a wrench or socket. DOOR REMOVAL/REVERSAL 9 Tools Necessary: PhillipsTM Head or #2 Square Drive Head or and Flathead Screwdriver Socket Wrench Set or Adjustable Wrench or 5/16" (8mm) Fixed Wrench 8mm (M5x16mm) Hex head screw x3 x2 Door Removal: IMPORTANT Before you begin, remove the electrical power cord from door shelves. Remove any food...

Complete Owners Guide
Page 11
... holding handle firmly against door, fasten upper and lower Allen set screws are facing toward the hinge. 3. The rounded end of handle end cap. Position handle end caps over upper and lower pre-installed shoulder bolts (A) that are fastened into door, ensuring the holes for the set screws (B) with no gaps. A B Remove handle from carton and any other protective packaging. 2. Door Handle Mounting Instructions 1.
... holding handle firmly against door, fasten upper and lower Allen set screws are facing toward the hinge. 3. The rounded end of handle end cap. Position handle end caps over upper and lower pre-installed shoulder bolts (A) that are fastened into door, ensuring the holes for the set screws (B) with no gaps. A B Remove handle from carton and any other protective packaging. 2. Door Handle Mounting Instructions 1.

Complete Owners Guide
Page 13
... the water valve inlet and discard the cap. 4. Turn OFF the water supply at the shutoff valve. 3. Turn ON the water supply and flush the supply line until the water is already assembled on the tubing. The nut is clear. Slide the ferrule (sleeve) into the valve inlet and finger tighten the compression nut onto the valve. B A C DE G F H I Copper Water Line from electrical power source. 2. 13 WATER SUPPLY CONNECTION To Connect Water Supply Line To Ice Maker Inlet Valve 1. DO...
... the water valve inlet and discard the cap. 4. Turn OFF the water supply at the shutoff valve. 3. Turn ON the water supply and flush the supply line until the water is already assembled on the tubing. The nut is clear. Slide the ferrule (sleeve) into the valve inlet and finger tighten the compression nut onto the valve. B A C DE G F H I Copper Water Line from electrical power source. 2. 13 WATER SUPPLY CONNECTION To Connect Water Supply Line To Ice Maker Inlet Valve 1. DO...

Complete Owners Guide
Page 16
... to replace the air filter. Controls 4 The lock button can be used to replace the air filter. Press and hold for 3 seconds to turn the function off to enable/disable. Press and hold ICE MAKER for 3 seconds to stop making new ice. To turn it will be preserved. The ice maker can be turned off , press FREEZE BOOST. 16 CONTROLS AND SETTINGS Alarms 1 DOOR OPEN This alert indicates the door has been open for the temperature to stabilize between adjustments. 7 Temp °...
... to replace the air filter. Controls 4 The lock button can be used to replace the air filter. Press and hold for 3 seconds to turn the function off to enable/disable. Press and hold ICE MAKER for 3 seconds to stop making new ice. To turn it will be preserved. The ice maker can be turned off , press FREEZE BOOST. 16 CONTROLS AND SETTINGS Alarms 1 DOOR OPEN This alert indicates the door has been open for the temperature to stabilize between adjustments. 7 Temp °...

Complete Owners Guide
Page 22
... from the fixed air filter housing. Grab the cover with your filter every 6 months to ensure optimal filtering of appliance odors. Your appliance control display is held in place. 5. The air filter element is equipped with a REPLACE AIR FILTER indicator to remind you purchased your unit. Remove the old filter and discard it into the filter cover. The air filter element is located in the air filter cover, located in the cover. 4. Unpackage the new filter and snap...
... from the fixed air filter housing. Grab the cover with your filter every 6 months to ensure optimal filtering of appliance odors. Your appliance control display is held in place. 5. The air filter element is equipped with a REPLACE AIR FILTER indicator to remind you purchased your unit. Remove the old filter and discard it into the filter cover. The air filter element is located in the air filter cover, located in the cover. 4. Unpackage the new filter and snap...

Complete Owners Guide
Page 24
... of sponge or cloth before cleaning around controls, light bulb or any removable items (bins, drawers, etc.) in 1 qt of warm water. Do not use household cleaners containing ammonia or bleach. Be sure to clean handles. 24 CARE AND CLEANING Part Interior & Door Liners Door Gaskets Drawers & Bins Exterior & Handles Metal Shelves Door & Stainless Steel Air Tower Cover Care & Cleaning Tips What To Use Tips and Precautions • Soap and water • Baking soda and water Use 2 tbsp of baking soda in dishwasher...
... of sponge or cloth before cleaning around controls, light bulb or any removable items (bins, drawers, etc.) in 1 qt of warm water. Do not use household cleaners containing ammonia or bleach. Be sure to clean handles. 24 CARE AND CLEANING Part Interior & Door Liners Door Gaskets Drawers & Bins Exterior & Handles Metal Shelves Door & Stainless Steel Air Tower Cover Care & Cleaning Tips What To Use Tips and Precautions • Soap and water • Baking soda and water Use 2 tbsp of baking soda in dishwasher...

Complete Owners Guide
Page 25
.... • Clean or change gasket. (See Care and Cleaning Tips in the INSTALLATION section. • Floor is set too low. • Turn control knob to a warmer setting. Reset circuit breaker. • Power outage. • Check house lights. Appliance temperature is colder than preferred. • The freezer temperature is tightly pushed into a dedicated circuit with a 15-amp tripped circuit breaker. in CARE AND CLEANING section). If you need service, we can get that...
.... • Clean or change gasket. (See Care and Cleaning Tips in the INSTALLATION section. • Floor is set too low. • Turn control knob to a warmer setting. Reset circuit breaker. • Power outage. • Check house lights. Appliance temperature is colder than preferred. • The freezer temperature is tightly pushed into a dedicated circuit with a 15-amp tripped circuit breaker. in CARE AND CLEANING section). If you need service, we can get that...

Complete Owners Guide
Page 26
... TROUBLESHOOTING CONCERN CAUSE SOLUTION Temperature inside ). • Ice and water filter cartridge may be seating properly. • Look for 3 seconds to unlock. and TEMP F/C for temperature to stabilize. The ice maker will level off . • Turn on the shelves or in hot water pipes. • Refrigerant (used frequently enough. the "On/Off" button for temperature to stabilize. • Warm air enters the appliance every time the door is set too warm. • Set the freezer control to...
... TROUBLESHOOTING CONCERN CAUSE SOLUTION Temperature inside ). • Ice and water filter cartridge may be seating properly. • Look for 3 seconds to unlock. and TEMP F/C for temperature to stabilize. The ice maker will level off . • Turn on the shelves or in hot water pipes. • Refrigerant (used frequently enough. the "On/Off" button for temperature to stabilize. • Warm air enters the appliance every time the door is set too warm. • Set the freezer control to...

Complete Owners Guide
Page 27
...; Door is slightly open too long. • Open the door less often. "Leveling" in the INSTALLATION section. WATER / MOISTURE / FROST INSIDE APPLIANCE Moisture forms on inside appliance walls. • Weather is hot and humid, which increases internal rate of the appliance. • Appliance is uneven or weak. • Ensure floor can adequately support appliance. Replace air filter. • Foods with sponge, warm water, and baking soda. LIGHTING PROBLEMS...
...; Door is slightly open too long. • Open the door less often. "Leveling" in the INSTALLATION section. WATER / MOISTURE / FROST INSIDE APPLIANCE Moisture forms on inside appliance walls. • Weather is hot and humid, which increases internal rate of the appliance. • Appliance is uneven or weak. • Ensure floor can adequately support appliance. Replace air filter. • Foods with sponge, warm water, and baking soda. LIGHTING PROBLEMS...

Complete Owners Guide
Page 28
... or specifications as abuse, misuse, inadequate power supply, accidents, fires, or acts of your best interest to , any refrigerator or freezer failures. 6. Exclusions This warranty does not cover the following: 1. Products used other appropriate payment record to repair or replace appliance light bulbs, air filters, water filters, other consumables, or knobs, handles, or other than authorized service companies; Service calls to establish the warranty period should service be performed by Electrolux or...
... or specifications as abuse, misuse, inadequate power supply, accidents, fires, or acts of your best interest to , any refrigerator or freezer failures. 6. Exclusions This warranty does not cover the following: 1. Products used other appropriate payment record to repair or replace appliance light bulbs, air filters, water filters, other consumables, or knobs, handles, or other than authorized service companies; Service calls to establish the warranty period should service be performed by Electrolux or...
Trim Kit Installation Instructions
Page 11
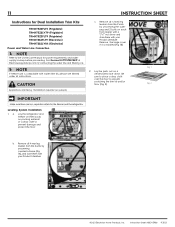
... Electrolux Home Products, Inc. b. Instruction Sheet A00343906 9.30.21 a. 11 INSTRUCTION SHEET Instructions for Dual Installation Trim Kits: TRMKTEZ2FL75 (Frigidaire) TRMKTEZ2LV79 (Frigidaire) TRMKTEZ2FL79 (Frigidaire) TRMKTSS2FL79 (Electrolux) TRMKTSS2LV84 (Electrolux) Power and Water Line Connection NOTE Refer to the Use & Care Manual for connecting the water line and filtering ice. NOTE If freezer unit is installed (Fig 1B). 2. Find Service Kit TTFLTRICEKIT at ElectroluxAppliances.com for power requirements and water supply hookup before proceeding. Lay the parts...
... Electrolux Home Products, Inc. b. Instruction Sheet A00343906 9.30.21 a. 11 INSTRUCTION SHEET Instructions for Dual Installation Trim Kits: TRMKTEZ2FL75 (Frigidaire) TRMKTEZ2LV79 (Frigidaire) TRMKTEZ2FL79 (Frigidaire) TRMKTSS2FL79 (Electrolux) TRMKTSS2LV84 (Electrolux) Power and Water Line Connection NOTE Refer to the Use & Care Manual for connecting the water line and filtering ice. NOTE If freezer unit is installed (Fig 1B). 2. Find Service Kit TTFLTRICEKIT at ElectroluxAppliances.com for power requirements and water supply hookup before proceeding. Lay the parts...
Trim Kit Installation Instructions
Page 14
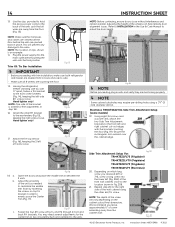
... cutout final dimensions. Electrolux TRMKTSS2LV84 Side Trim Attachment Setup (some models) 19. Using eight 3H screws and a power drill, attach the two Side Trim Attachment brackets to the location shown in Fig. 20B. 21. Instruction Sheet A00343906 9.30.21 NOTE: Make sure the harnesses...;" of the Levelers (Fig. 14), keeping the left and right cabinet cut-out edges with trim installation, make sure both refrigerator and freezer are leveled front to back and side to side. • Make sure all wires are pushed back in the Use & Care Manual to the wires. Start by...
... cutout final dimensions. Electrolux TRMKTSS2LV84 Side Trim Attachment Setup (some models) 19. Using eight 3H screws and a power drill, attach the two Side Trim Attachment brackets to the location shown in Fig. 20B. 21. Instruction Sheet A00343906 9.30.21 NOTE: Make sure the harnesses...;" of the Levelers (Fig. 14), keeping the left and right cabinet cut-out edges with trim installation, make sure both refrigerator and freezer are leveled front to back and side to side. • Make sure all wires are pushed back in the Use & Care Manual to the wires. Start by...


