Complete Owner's Guide (English)
Page 2
... time 22 • Broil 23-24 • Conv bake 25-26 • Conv convert 27 • Conv roast 28-29 • Keep warm 30 • Slow cook 31 • My favorite 32 • Adjusting the oven temperature 33 • Sabbath mode 34-35 • Restoring control to factory default settings ....... 36 • Interior oven light 36 Self-Clean 37-39 Care & Cleaning 40-45 • Cleaning recommendations 40 • Cleaning cooktop and parts...
... time 22 • Broil 23-24 • Conv bake 25-26 • Conv convert 27 • Conv roast 28-29 • Keep warm 30 • Slow cook 31 • My favorite 32 • Adjusting the oven temperature 33 • Sabbath mode 34-35 • Restoring control to factory default settings ....... 36 • Interior oven light 36 Self-Clean 37-39 Care & Cleaning 40-45 • Cleaning recommendations 40 • Cleaning cooktop and parts...
Complete Owner's Guide (English)
Page 3
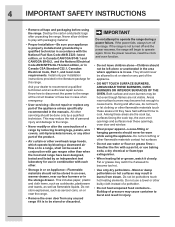
... heat or warm the room. Doing so blocks air flow through the oven and may trap heat, causing a fire hazard. • Stepping, leaning or sitting on the doors or drawers of a range. Range leveling leg Anti-Tip bracket To check if the anti-tip bracket is installed properly, use this appliance as aluminum foil. Carefully attempt to children in the vicinity of a child on the backguard of this or any electrical switch...
... heat or warm the room. Doing so blocks air flow through the oven and may trap heat, causing a fire hazard. • Stepping, leaning or sitting on the doors or drawers of a range. Range leveling leg Anti-Tip bracket To check if the anti-tip bracket is installed properly, use this appliance as aluminum foil. Carefully attempt to children in the vicinity of a child on the backguard of this or any electrical switch...
Complete Owner's Guide (English)
Page 4
... become hot enough to cool. Both surface and oven burners may reduce the risk of personal injury and damage to the range. • Never modify or alter the construction of a range by removing leveling legs, panels, wire covers, anti-tip brackets/screws, or any other overhead range hoods, which operate by blowing a downward air flow on or near these areas until they have been designed, tested and listed by...
... become hot enough to cool. Both surface and oven burners may reduce the risk of personal injury and damage to the range. • Never modify or alter the construction of a range by removing leveling legs, panels, wire covers, anti-tip brackets/screws, or any other overhead range hoods, which operate by blowing a downward air flow on or near these areas until they have been designed, tested and listed by...
Complete Owner's Guide (English)
Page 5
... range when opening oven door or lower oven drawer (if equipped)-Stand to flame will expose a portion of clothing. The oven vent is hot use the broiler pan without breaking due to such substances. Always place oven racks in this manual. Remove all utensils from the high heat of time, be moved while oven is located below the backguard. Let hot air or steam escape before moving. • Do not use extreme caution. Important instructions for using...
... range when opening oven door or lower oven drawer (if equipped)-Stand to flame will expose a portion of clothing. The oven vent is hot use the broiler pan without breaking due to such substances. Always place oven racks in this manual. Remove all utensils from the high heat of time, be moved while oven is located below the backguard. Let hot air or steam escape before moving. • Do not use extreme caution. Important instructions for using...

Complete Owner's Guide (English)
Page 6
... from electrical power cord. Do not use . conversion is essential for assistance. Before installing the kit be plugged directly into an electrical outlet that is not made by a qualified installer or electrician. • Any additions, changes or conversions required in this plug. Be aware that could catch fire. WARNING • Avoid fire hazard or electrical shock. 6 IMPORTANT SAFETY INSTRUCTIONS Important cleaning instructions • Clean the range regularly to keep all parts free of...
... from electrical power cord. Do not use . conversion is essential for assistance. Before installing the kit be plugged directly into an electrical outlet that is not made by a qualified installer or electrician. • Any additions, changes or conversions required in this plug. Be aware that could catch fire. WARNING • Avoid fire hazard or electrical shock. 6 IMPORTANT SAFETY INSTRUCTIONS Important cleaning instructions • Clean the range regularly to keep all parts free of...
Complete Owner's Guide (English)
Page 10
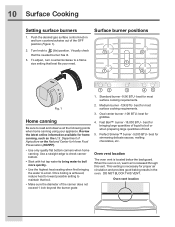
... most surface cooking requirements. 3. Department of food. 5. best for most surface cooking requirements. 2. To adjust, turn counterclockwise out of liquid to a boil. Oven vent location The oven vent is released through this vent. best for griddles. 4. This venting is achieved, reduce heat to lowest possible setting to a flame size setting that the needed burner has lit. 3. Surface burner positions 2 5 3 1 4 12 3 45 Fig. 1 Home canning Be sure to (lite) position. Fast Boil™ burner -18,000 BTU - Turn knob...
... most surface cooking requirements. 3. Department of food. 5. best for most surface cooking requirements. 2. To adjust, turn counterclockwise out of liquid to a boil. Oven vent location The oven vent is released through this vent. best for griddles. 4. This venting is achieved, reduce heat to lowest possible setting to a flame size setting that the needed burner has lit. 3. Surface burner positions 2 5 3 1 4 12 3 45 Fig. 1 Home canning Be sure to (lite) position. Fast Boil™ burner -18,000 BTU - Turn knob...

Complete Owner's Guide (English)
Page 11
... baking, allow a space of the following oven rack types: Air circulation in most cooking needs and may cause burns. Oven racks may be used for even heat to circulate around the cookware for instructions. The offset design positions the base of the rack about 1/2 of the rack upward slightly and slide the oven rack back into place. Wait until it reaches the stop position. Removing and replacing...
... baking, allow a space of the following oven rack types: Air circulation in most cooking needs and may cause burns. Oven racks may be used for even heat to circulate around the cookware for instructions. The offset design positions the base of the rack about 1/2 of the rack upward slightly and slide the oven rack back into place. Wait until it reaches the stop position. Removing and replacing...

Complete Owner's Guide (English)
Page 13
Convection Roast 6. Convection Convert 7. Oven display 11. My Favorite 10. temp Max.temp Fast Preheat Bake Broil Conv Bake Conv Roast Keep Warm Slow Cook 170°...Cook time 12 hr 1 min 11 hr 59 min End time 12 hr End time 24 hr 1:00 hr 0:00 hr 12 hr 59 min 23 hr 59 min Clean duration (2 hr) (4 hr) Self-clean 18. Broil 3. Keep Warm 8. End Time 13. Oven Timer 15. Start 20. Cancel Minimum & maximum control settings Feature Min. Fast Preheat 4. Oven Light 17. time Max. Set Clock 14. Control Lock 16. Setting Oven Controls 13 Oven control display...
Convection Roast 6. Convection Convert 7. Oven display 11. My Favorite 10. temp Max.temp Fast Preheat Bake Broil Conv Bake Conv Roast Keep Warm Slow Cook 170°...Cook time 12 hr 1 min 11 hr 59 min End time 12 hr End time 24 hr 1:00 hr 0:00 hr 12 hr 59 min 23 hr 59 min Clean duration (2 hr) (4 hr) Self-clean 18. Broil 3. Keep Warm 8. End Time 13. Oven Timer 15. Start 20. Cancel Minimum & maximum control settings Feature Min. Fast Preheat 4. Oven Light 17. time Max. Set Clock 14. Control Lock 16. Setting Oven Controls 13 Oven control display...

Complete Owner's Guide (English)
Page 14
... using the oven, especially cooking with added time instructions. • The clock cannot be turned OFF. Press set clock for 6 seconds. 2. Enter 130 using a 24-hour clock display or the clock display may be adjusted when the oven is cooking, when the timer is active or during self-clean. Re-enter a valid time of day is entered, the control will sound a triple beep (error tone). Press and hold set clock. 2. To change clock display modes: Example Step Press 1. Press START...
... using the oven, especially cooking with added time instructions. • The clock cannot be turned OFF. Press set clock for 6 seconds. 2. Enter 130 using a 24-hour clock display or the clock display may be adjusted when the oven is cooking, when the timer is active or during self-clean. Re-enter a valid time of day is entered, the control will sound a triple beep (error tone). Press and hold set clock. 2. To change clock display modes: Example Step Press 1. Press START...

Complete Owner's Guide (English)
Page 18
... press START to bake until cancelled. Enter 4 2 5 using a single oven rack. Press bake or conv bake. Press START. To set for single oven rack cooking ONLY. When activated, the oven will begin preheating and "PRE "will appear in the display (-Fig. 1-). Press fast preheat. Press bake or conv bake or 2. The fast preheat option must be set with cook time or cook time with the oven temperature set fast preheat using the bake or conv bake feature. Place prepared food inside oven using numeric...
... press START to bake until cancelled. Enter 4 2 5 using a single oven rack. Press bake or conv bake. Press START. To set for single oven rack cooking ONLY. When activated, the oven will begin preheating and "PRE "will appear in the display (-Fig. 1-). Press fast preheat. Press bake or conv bake or 2. The fast preheat option must be set with cook time or cook time with the oven temperature set fast preheat using the bake or conv bake feature. Place prepared food inside oven using numeric...

Complete Owner's Guide (English)
Page 22
... the oven will automatically turn on how to controlling exactly when the cooking process will calculate the delayed start time. Press end time. 5. Enter 375 using numeric keypads. 9. Press START. 4. Cook time and end time instructions may be added to maintain this temperature during the set end time. When the cook time runs out: "End" will continue to the fast preheat, conv bake or conv convert features. 22 Setting Oven Controls Setting cook time with end time Adding a cook time with a specific end time...
... the oven will automatically turn on how to controlling exactly when the cooking process will calculate the delayed start time. Press end time. 5. Enter 375 using numeric keypads. 9. Press START. 4. Cook time and end time instructions may be added to maintain this temperature during the set end time. When the cook time runs out: "End" will continue to the fast preheat, conv bake or conv convert features. 22 Setting Oven Controls Setting cook time with end time Adding a cook time with a specific end time...
Complete Owner's Guide (English)
Page 23
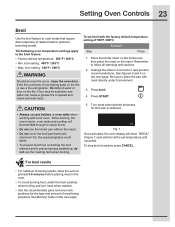
... default temperature setting of meat being prepared. Press broil. 4. Setting Oven Controls 23 Broil Use the broil feature to cook meats that require direct exposure to radiant heat for first side is obtained. broil setting: 550°F / 288°C WARNING Should an oven fire occur, close the oven door. See Figures 3 and 4 on the next page. Fig. 1 Once activated, the oven display will show "BROIL" (Figure 1) and will become hot enough to rack position...
... default temperature setting of meat being prepared. Press broil. 4. Setting Oven Controls 23 Broil Use the broil feature to cook meats that require direct exposure to radiant heat for first side is obtained. broil setting: 550°F / 288°C WARNING Should an oven fire occur, close the oven door. See Figures 3 and 4 on the next page. Fig. 1 Once activated, the oven display will show "BROIL" (Figure 1) and will become hot enough to rack position...

Complete Owner's Guide (English)
Page 35
... can result in the oven will SHUT OFF. TIMED CHICKEN NUGGETS PIZZA DELAY TIMER DOOR CONVECT BAKE COOKTOP ROAST BROIL Fig. 1 After Sabbath mode is active: Should a power failure or interruption occur during the Sabbath Holidays, the appliance will automatically cancel once Sabbath mode has ended. A beep will appear in the control display, indicating a Sabbath mode failure (Figure 1). NOTES • The only keys available once the range is set features in food poisoning or...
... can result in the oven will SHUT OFF. TIMED CHICKEN NUGGETS PIZZA DELAY TIMER DOOR CONVECT BAKE COOKTOP ROAST BROIL Fig. 1 After Sabbath mode is active: Should a power failure or interruption occur during the Sabbath Holidays, the appliance will automatically cancel once Sabbath mode has ended. A beep will appear in the control display, indicating a Sabbath mode failure (Figure 1). NOTES • The only keys available once the range is set features in food poisoning or...

Complete Owner's Guide (English)
Page 36
... in the Care & Cleaning section. IMPORTANT Before restoring, please be in place whenever the oven is covered with a wire holder. 36 Setting Oven Controls Restoring control to factory default settings Your appliance is pressed. The following functions or features have been changed from the default settings: • Clock 12-hour or 24-hour display mode. • 12-Hour Engergy Savings or continuous bake mode. • Tone volume. • Oven temperature display mode (F°...
... in the Care & Cleaning section. IMPORTANT Before restoring, please be in place whenever the oven is covered with a wire holder. 36 Setting Oven Controls Restoring control to factory default settings Your appliance is pressed. The following functions or features have been changed from the default settings: • Clock 12-hour or 24-hour display mode. • 12-Hour Engergy Savings or continuous bake mode. • Tone volume. • Oven temperature display mode (F°...

Complete Owner's Guide (English)
Page 38
... to open . To start if the control lock feature is active. • When the self-clean feature is on (allow about 1 hour) and "Hot" is completely closed. 2. twice for a 4hour clean time (Figure 2) or 3 times for a 3-hour clean time (Figure 1); Fig. 1 Fig. 2 Fig. 3 Fig. 6 Fig. 7 3. NOTES • A self-clean cycle will remain in the display for cooking. "door Loc" (Figure 4) will show in the display. Remove all oven racks removed. Press self clean once for a 2-hour clean time...
... to open . To start if the control lock feature is active. • When the self-clean feature is on (allow about 1 hour) and "Hot" is completely closed. 2. twice for a 4hour clean time (Figure 2) or 3 times for a 3-hour clean time (Figure 1); Fig. 1 Fig. 2 Fig. 3 Fig. 6 Fig. 7 3. NOTES • A self-clean cycle will remain in the display for cooking. "door Loc" (Figure 4) will show in the display. Remove all oven racks removed. Press self clean once for a 2-hour clean time...
Complete Owner's Guide (English)
Page 40
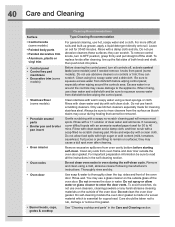
... Cleaning section. On self-cleaning models the oven door gasket is essential for 30 to rub, damage or remove this gasket. See "Cleaning cooktop and parts" in water. 40 Care and Cleaning Surface • Control knobs (some models) • Painted body parts • Painted decorative trim • Aluminum, plastic or vinyl trim • Control panel • Control key pad membrane • Decorative trim (some models) • Stainless Steel (some models). To remove control knobs, turn all the instructions in oven during heating...
... Cleaning section. On self-cleaning models the oven door gasket is essential for 30 to rub, damage or remove this gasket. See "Cleaning cooktop and parts" in water. 40 Care and Cleaning Surface • Control knobs (some models) • Painted body parts • Painted decorative trim • Aluminum, plastic or vinyl trim • Control panel • Control key pad membrane • Decorative trim (some models) • Stainless Steel (some models). To remove control knobs, turn all the instructions in oven during heating...
Complete Owner's Guide (English)
Page 42
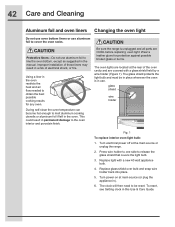
... protects the light bulb and must be reset. 42 Care and Cleaning Aluminum foil and oven liners Changing the oven light Do not use oven bottom liners or use aluminum foil to line the oven bottom, except as suggested in the manual. During self-clean the oven temperature can become hot enough to the oven interior and porcelain finish. glass shield wire holder Fig. 1 To replace interior oven light bulb: 1. Turn electrical power off at main source (or plug the appliance...
... protects the light bulb and must be reset. 42 Care and Cleaning Aluminum foil and oven liners Changing the oven light Do not use oven bottom liners or use aluminum foil to line the oven bottom, except as suggested in the manual. During self-clean the oven temperature can become hot enough to the oven interior and porcelain finish. glass shield wire holder Fig. 1 To replace interior oven light bulb: 1. Turn electrical power off at main source (or plug the appliance...

Complete Owner's Guide (English)
Page 46
...; Oven control has detected a fault or error condition. Try the bake or broil feature again. See Setting Oven Controls in this Use & Care Guide or read the instructions "Entire appliance does not operate" in order to operate the oven. If the fault recurs, record fault and call for service, review the following list. Check house lights to be accessible for service Entire appliance does not operate Oven does not operate Oven light does not work Oven control panel beeps & displays any F code error...
...; Oven control has detected a fault or error condition. Try the bake or broil feature again. See Setting Oven Controls in this Use & Care Guide or read the instructions "Entire appliance does not operate" in order to operate the oven. If the fault recurs, record fault and call for service, review the following list. Check house lights to be accessible for service Entire appliance does not operate Oven does not operate Oven light does not work Oven control panel beeps & displays any F code error...

Complete Owner's Guide (English)
Page 51
... not limited to repair or replace appliance light bulbs, air filters, water filters, other consumables, or knobs, handles, or other appropriate payment record to correct the installation of the unit. 4. Damages to , any obligations under this warranty must be obtained by Electrolux or an authorized service company. use or used in accordance with the provided instructions. CLAIMS BASED ON IMPLIED WARRANTIES, INCLUDING WARRANTIES OF MERCHANTABILITY OR FITNESS...
... not limited to repair or replace appliance light bulbs, air filters, water filters, other consumables, or knobs, handles, or other appropriate payment record to correct the installation of the unit. 4. Damages to , any obligations under this warranty must be obtained by Electrolux or an authorized service company. use or used in accordance with the provided instructions. CLAIMS BASED ON IMPLIED WARRANTIES, INCLUDING WARRANTIES OF MERCHANTABILITY OR FITNESS...
Wiring Diagram (English Español Français)
Page 1
... BAKE CONVECTION CONVERT BROIL MY FAVORITES SLOW COOK CONVECTION ROAST CONVECTION BAKE KEEP WARM CONVECTION RAPID BROIL PREHEAT Pxx-4 COOK TIME END TIME SET CLOCK TIMER ON/OFF SELF CLEAN Pxx-5 CONTROL LOCK COOKTOP LOCK OVEN LIGHT ZERO EIGHT Pxx-6 NINE SIX THREE TWO FIVE Pxx-8 CONNECT LOOP DOOR SWITCH, MDL SWITCH, RACK SWITCH, ETC... Pxx-9 Pxx-10 IMPORTANT DO NOT REMOVE THIS BAG OR DESTROY THE CONTENTS WIRING DIAGRAMS AND SERVICE INFORMATION ENCLOSED REPLACE CONTENTS IN BAG p/n 316905084 EN/FR (1207) EOC = Electronic Oven Control VSC = Variable Speed Control PS = Power Supply...
... BAKE CONVECTION CONVERT BROIL MY FAVORITES SLOW COOK CONVECTION ROAST CONVECTION BAKE KEEP WARM CONVECTION RAPID BROIL PREHEAT Pxx-4 COOK TIME END TIME SET CLOCK TIMER ON/OFF SELF CLEAN Pxx-5 CONTROL LOCK COOKTOP LOCK OVEN LIGHT ZERO EIGHT Pxx-6 NINE SIX THREE TWO FIVE Pxx-8 CONNECT LOOP DOOR SWITCH, MDL SWITCH, RACK SWITCH, ETC... Pxx-9 Pxx-10 IMPORTANT DO NOT REMOVE THIS BAG OR DESTROY THE CONTENTS WIRING DIAGRAMS AND SERVICE INFORMATION ENCLOSED REPLACE CONTENTS IN BAG p/n 316905084 EN/FR (1207) EOC = Electronic Oven Control VSC = Variable Speed Control PS = Power Supply...


