Use and Care Manual
Page 2
... mode (AUD 48 • Adjusting oven temperature (UPO 49 • Adjusting lower oven temperature (UPO 49 • Factory default reset (RST 50 • User preferences chart 51 Self-Clean 52-53 Care & Cleaning 54-61 • Cleaning recommendations 54-55 • Cooktop maintenance 56 • Cooktop cleaning 56-57 • Oven door removal 58-59 • Changing oven lights 60-61 Solutions to Common Problems 62-64 Warranty 67 Thank you . Keep a record for choosing Electrolux...
... mode (AUD 48 • Adjusting oven temperature (UPO 49 • Adjusting lower oven temperature (UPO 49 • Factory default reset (RST 50 • User preferences chart 51 Self-Clean 52-53 Care & Cleaning 54-61 • Cleaning recommendations 54-55 • Cooktop maintenance 56 • Cooktop cleaning 56-57 • Oven door removal 58-59 • Changing oven lights 60-61 Solutions to Common Problems 62-64 Warranty 67 Thank you . Keep a record for choosing Electrolux...
Use and Care Manual
Page 3
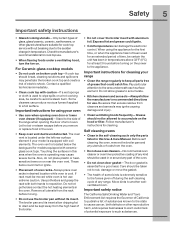
... of a range by removing leveling legs, panels, wire covers, anti-tip brackets/screws, or any part of the appliance unless specifically recommended in the cabinets above a range or on the doors or drawers of this range can tip. • Injury to persons could be seriously injured. This may cause bodily injury or property damage. Refer to the installation instructions for proper anti-tip bracket installation. • Never Use Your Appliance for Warming or Heating the...
... of a range by removing leveling legs, panels, wire covers, anti-tip brackets/screws, or any part of the appliance unless specifically recommended in the cabinets above a range or on the doors or drawers of this range can tip. • Injury to persons could be seriously injured. This may cause bodily injury or property damage. Refer to the installation instructions for proper anti-tip bracket installation. • Never Use Your Appliance for Warming or Heating the...
Use and Care Manual
Page 4
... extend over adjacent surface units. • Never leave surface elements unattended at high heat settings-Boilovers cause smoking and greasy spillovers that may ignite, or a pan that has boiled dry may result in a risk of electrical shock, or fire. • Storage in the manual. Heating elements clean themselves during a power failure. They should not be stored in an oven, lower oven drawer, near these openings, oven door and window...
... extend over adjacent surface units. • Never leave surface elements unattended at high heat settings-Boilovers cause smoking and greasy spillovers that may ignite, or a pan that has boiled dry may result in a risk of electrical shock, or fire. • Storage in the manual. Heating elements clean themselves during a power failure. They should not be stored in an oven, lower oven drawer, near these openings, oven door and window...
Use and Care Manual
Page 5
... cover the broiler insert with aluminum foil. For Ceramic-glass cooktop models • Do not cook on the hood or filter. Contact a qualified technician immediately. • Clean cook top with coil elements. The oven vent is located below the backguard for the first time, or when the appliance has not been used in this Use & Care Manual. Pay particular attention to a hot surface. Some cleaners can damage the electronic control. Use potholders and grasp the rack...
... cover the broiler insert with aluminum foil. For Ceramic-glass cooktop models • Do not cook on the hood or filter. Contact a qualified technician immediately. • Clean cook top with coil elements. The oven vent is located below the backguard for the first time, or when the appliance has not been used in this Use & Care Manual. Pay particular attention to a hot surface. Some cleaners can damage the electronic control. Use potholders and grasp the rack...
Use and Care Manual
Page 9
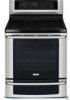
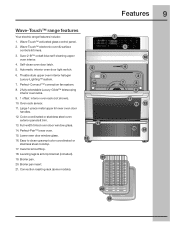
... coordinated or stainless steel oven exterior panels & trim. 13. Perfect-Pair™ lower oven. 15. Easy to clean upswept color coordinated or stainless steel cooktop. 17. Lower oven door window glass. 16. Self-clean oven door latch. 5. Automatic interior oven door light switch. 6. Features 9 Wave-Touch™ range features Your electric range features include: 1. Wave-Touch™ electronic oven & surface controls & timers. 3. Leveling legs & anti-tip bracket (included). 19. Large 1-piece metal upper & lower oven door handles. 12. Broiler pan. 20. Broiler pan insert. 21.
... coordinated or stainless steel oven exterior panels & trim. 13. Perfect-Pair™ lower oven. 15. Easy to clean upswept color coordinated or stainless steel cooktop. 17. Lower oven door window glass. 16. Self-clean oven door latch. 5. Automatic interior oven door light switch. 6. Features 9 Wave-Touch™ range features Your electric range features include: 1. Wave-Touch™ electronic oven & surface controls & timers. 3. Leveling legs & anti-tip bracket (included). 19. Large 1-piece metal upper & lower oven door handles. 12. Broiler pan. 20. Broiler pan insert. 21.
Use and Care Manual
Page 11
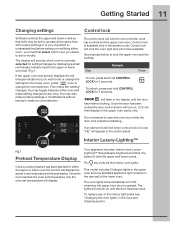
... oven the control will appear in use "HE" will display the actual oven temperature while preheating. Control lock is in the control panel. The lights will provide which oven you wish to set temperature will flash in the Care and Cleaning section. The display will remain on the rear wall of the interior light bulbs see "Changing the oven lights" in the display until the door has been shut. If the upper oven text symbol displays the red triangle indicator...
... oven the control will appear in use "HE" will display the actual oven temperature while preheating. Control lock is in the control panel. The lights will provide which oven you wish to set temperature will flash in the Care and Cleaning section. The display will remain on the rear wall of the interior light bulbs see "Changing the oven lights" in the display until the door has been shut. If the upper oven text symbol displays the red triangle indicator...
Use and Care Manual
Page 12
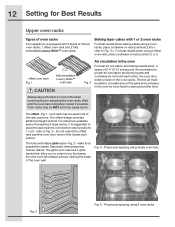
... using 2 oven racks. The hot air must be sure pans and cookware do not touch each other, the oven door, sides or back of the rack positions. Always use potholders or oven mitts when removing food or adjusting the oven racks. oven rack may cause burns. Do not extend the offset rack past the oven door when in all of the oven cavity. Especially when preparing heavier dishes. Proper pan spacing using single oven rack...
... using 2 oven racks. The hot air must be sure pans and cookware do not touch each other, the oven door, sides or back of the rack positions. Always use potholders or oven mitts when removing food or adjusting the oven racks. oven rack may cause burns. Do not extend the offset rack past the oven door when in all of the oven cavity. Especially when preparing heavier dishes. Proper pan spacing using single oven rack...
Use and Care Manual
Page 15
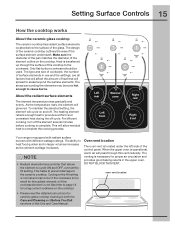
... Right rear Left front Right front Your range is operational, warm air will spread to the cookware. When the upper oven is equipped with radiant surface burners with different wattage ratings. The type and size of cookware, the number of the element outline on the cooktop). This will glow red. Setting Surface Controls 15 How the cooktop works About the ceramic glass cooktop The ceramic cooktop has radiant surface elements located below the surface of the surface element underneath...
... Right rear Left front Right front Your range is operational, warm air will spread to the cookware. When the upper oven is equipped with radiant surface burners with different wattage ratings. The type and size of cookware, the number of the element outline on the cooktop). This will glow red. Setting Surface Controls 15 How the cooktop works About the ceramic glass cooktop The ceramic cooktop has radiant surface elements located below the surface of the surface element underneath...
Use and Care Manual
Page 17
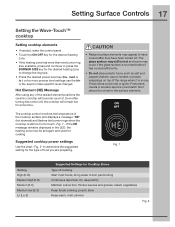
... make specific level changes. The cooktop control monitors the temperature of cooking Start most foods, bring water to boil, pan broiling Continue a rapid boil, fry, deep fat fry Maintain a slow boil, thicken sauces and gravies, steam vegetables Keep foods cooking, poach, stew Keep warm, melt, simmer Fig. 2 Suggested cooktop power settings Use the chart -Fig. 2- Setting Surface Controls 17 Setting the Wave-Touch™ cooktop Setting cooktop elements • If needed, wake the control panel. •...
... make specific level changes. The cooktop control monitors the temperature of cooking Start most foods, bring water to boil, pan broiling Continue a rapid boil, fry, deep fat fry Maintain a slow boil, thicken sauces and gravies, steam vegetables Keep foods cooking, poach, stew Keep warm, melt, simmer Fig. 2 Suggested cooktop power settings Use the chart -Fig. 2- Setting Surface Controls 17 Setting the Wave-Touch™ cooktop Setting cooktop elements • If needed, wake the control panel. •...
Use and Care Manual
Page 20
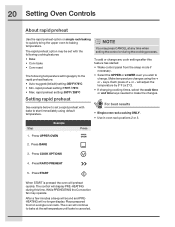
... - Make temperature changes using default temperature. will continue to make the changes. For best results • Single oven rack cooking ONLY. • Use in oven rack postions 2 or 3. The oven will adjust the temperature by 5° F ( or 2°C). • If changing cooking times, select the cook time or end time keys needed to bake at any cook settings after this time. To add or change any time when setting the control or during this feature has started: • Wake control panel from...
... - Make temperature changes using default temperature. will continue to make the changes. For best results • Single oven rack cooking ONLY. • Use in oven rack postions 2 or 3. The oven will adjust the temperature by 5° F ( or 2°C). • If changing cooking times, select the cook time or end time keys needed to bake at any cook settings after this time. To add or change any time when setting the control or during this feature has started: • Wake control panel from...
Use and Care Manual
Page 21
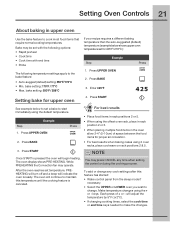
...-HEATING. After the oven reaches set for upper oven 4. Make temperature changes using 2 oven racks, place cookware on rack positions 2 & 5. 3. Press START See example below shows upper oven temperature set temperature, PREHEATING will turn off and a beep will indicate the oven is pressed the oven will adjust the temperature by 5° F ( or 2°C). • If changing cooking times, select the cook time or end time keys needed to cook most food items that require normal cooking temperatures. Step Example 1. Press BAKE Press 3. Bake may operate...
...-HEATING. After the oven reaches set for upper oven 4. Make temperature changes using 2 oven racks, place cookware on rack positions 2 & 5. 3. Press START See example below shows upper oven temperature set temperature, PREHEATING will turn off and a beep will indicate the oven is pressed the oven will adjust the temperature by 5° F ( or 2°C). • If changing cooking times, select the cook time or end time keys needed to cook most food items that require normal cooking temperatures. Step Example 1. Press BAKE Press 3. Bake may operate...
Use and Care Manual
Page 24
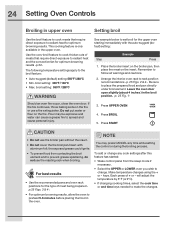
... use a fire extinguisher. 24 Setting Oven Controls Broiling in upper oven Setting broil Use the broil feature to cook meats that require direct exposure to set broil for the upper oven starting immeadiately with aluminum foil; Should an oven fire occur, close the oven door. Make temperature changes using the + or - If the fire continues, throw baking soda on the fire or use the roasting rack when broiling. will adjust the temperature by 5° F ( or 2°C). • If changing cooking times, select the cook time...
... use a fire extinguisher. 24 Setting Oven Controls Broiling in upper oven Setting broil Use the broil feature to cook meats that require direct exposure to set broil for the upper oven starting immeadiately with aluminum foil; Should an oven fire occur, close the oven door. Make temperature changes using the + or - If the fire continues, throw baking soda on the fire or use the roasting rack when broiling. will adjust the temperature by 5° F ( or 2°C). • If changing cooking times, select the cook time...
Use and Care Manual
Page 26
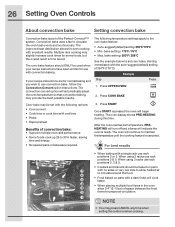
... for proper air circulation. 1 NOTE • You may be used when your recipe instructions are for use convection bake, follow the Convection Convert option instructions. Press UPPER OVEN 2. Press CONV BAKE Conv bake may press CANCEL any time when setting the control or when cooking. Convection bake uses a fan to use with the following temperature settings apply to 30% faster, saving time and energy. • No special pans or bakeware required. 3. The conv bake feature should be baked on pans 7 with...
... for proper air circulation. 1 NOTE • You may be used when your recipe instructions are for use convection bake, follow the Convection Convert option instructions. Press UPPER OVEN 2. Press CONV BAKE Conv bake may press CANCEL any time when setting the control or when cooking. Convection bake uses a fan to use with the following temperature settings apply to 30% faster, saving time and energy. • No special pans or bakeware required. 3. The conv bake feature should be baked on pans 7 with...
Use and Care Manual
Page 28
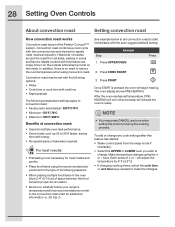
... to carefully follow your recipe's temperature and time recommendations or refer to change any time when setting the control or during the cooking process. Make temperature changes using the recommended rack positions for additional information -p. 29, Fig. 2-. Convection roast combines a cook cycle with this feature has started: • Wake control panel from all sides, sealing in the oven allow 2-4" (5-10cm) of + or - To add or change . keys. Press CONV ROAST 3. Heated air...
... to carefully follow your recipe's temperature and time recommendations or refer to change any time when setting the control or during the cooking process. Make temperature changes using the recommended rack positions for additional information -p. 29, Fig. 2-. Convection roast combines a cook cycle with this feature has started: • Wake control panel from all sides, sealing in the oven allow 2-4" (5-10cm) of + or - To add or change . keys. Press CONV ROAST 3. Heated air...

Use and Care Manual
Page 32
... example below to start immediately with aluminum foil; Step Example Press 1. Press CONV BROIL 5. Do not cover the the broil pan or insert with the auto-suggest (default) setting. To add or change . Make temperature changes using the + or - Use the conv broil feature to cook thicker cuts of meats that require direct exposure to radiant heat and the convection fan for the upper oven to set conv broil for optimum browning results...
... example below to start immediately with aluminum foil; Step Example Press 1. Press CONV BROIL 5. Do not cover the the broil pan or insert with the auto-suggest (default) setting. To add or change . Make temperature changes using the + or - Use the conv broil feature to cook thicker cuts of meats that require direct exposure to radiant heat and the convection fan for the upper oven to set conv broil for optimum browning results...
Use and Care Manual
Page 56
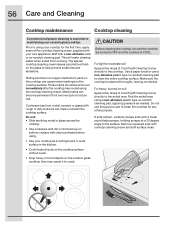
... a 30 degree angle to using your cooktop for any other purpose. Remove loosened soils with dirt or dirt build up on bottom; Prior to the surface. The special cooktop cleaning cream leaves a protective finish on the glass to OFF and the cooktop is cleaned thoroughly, leaving no -scratch cleaning pad, applying pressure as a cutting board or work surface in the kitchen. • Cook foods directly on the cooktop surface without a pan...
... a 30 degree angle to using your cooktop for any other purpose. Remove loosened soils with dirt or dirt build up on bottom; Prior to the surface. The special cooktop cleaning cream leaves a protective finish on the glass to OFF and the cooktop is cleaned thoroughly, leaving no -scratch cleaning pad, applying pressure as a cutting board or work surface in the kitchen. • Cook foods directly on the cooktop surface without a pan...
Use and Care Manual
Page 60
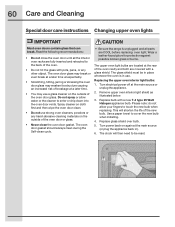
... range is in ). 6. Replace glass shield over bulb. 5. Turn electrical power off at a later time. • You may weaken its structure causing an increased risk of the oven door or glass. • Never clean the oven door gasket. Please note: do not allow water or the cleaner to cover the new bulb when installing. 4. Turn power back on again at the rear of the oven door glass. 60 Care and Cleaning Special door care instructions Changing upper oven lights IMPORTANT Most oven doors...
... range is in ). 6. Replace glass shield over bulb. 5. Turn electrical power off at a later time. • You may weaken its structure causing an increased risk of the oven door or glass. • Never clean the oven door gasket. Please note: do not allow water or the cleaner to cover the new bulb when installing. 4. Turn power back on again at the rear of the oven door glass. 60 Care and Cleaning Special door care instructions Changing upper oven lights IMPORTANT Most oven doors...
Use and Care Manual
Page 62
...) Place oven rack in this checklist. • Replace or tighten bulb. Flat pans heat better than warped pans. See "Changing upper or lower oven lights" sections in center of day is level. • Kitchen cabinet alignment may save you time & expense. Provide sufficient space so appliance can be set in the Getting Started section. • Make sure cord/plug is plugged correctly into outlet. • Service wiring is not level Cannot...
...) Place oven rack in this checklist. • Replace or tighten bulb. Flat pans heat better than warped pans. See "Changing upper or lower oven lights" sections in center of day is level. • Kitchen cabinet alignment may save you time & expense. Provide sufficient space so appliance can be set in the Getting Started section. • Make sure cord/plug is plugged correctly into outlet. • Service wiring is not level Cannot...
Use and Care Manual
Page 63
... broiler pan wrong side up on oven surfaces. Questions or for service. • Cooktop control has detected a fault or error condition. Follow broiling instructions under Setting Oven Controls. • Make sure oven door is necessary when broiling frequently. If flames or excessive smoke are present see "About broiling" in oven. Try the bake or broil feature again. If the F code error repeats, remove power supply to appliance, wait 5 minutes and then repower the appliance and set clock for the time...
... broiler pan wrong side up on oven surfaces. Questions or for service. • Cooktop control has detected a fault or error condition. Follow broiling instructions under Setting Oven Controls. • Make sure oven door is necessary when broiling frequently. If flames or excessive smoke are present see "About broiling" in oven. Try the bake or broil feature again. If the F code error repeats, remove power supply to appliance, wait 5 minutes and then repower the appliance and set clock for the time...
Use and Care Manual
Page 67
... when such appliance is installed, used in the USA, Puerto Rico and Canada. Products used , and maintained in accordance with original serial numbers that have been removed, altered or cannot be readily determined. 2. Service calls to repair or replace appliance light bulbs, air filters, water filters, other consumables, or knobs, handles, or other appropriate payment record to establish the warranty period should service be required. ELECTROLUX SHALL NOT BE...
... when such appliance is installed, used in the USA, Puerto Rico and Canada. Products used , and maintained in accordance with original serial numbers that have been removed, altered or cannot be readily determined. 2. Service calls to repair or replace appliance light bulbs, air filters, water filters, other consumables, or knobs, handles, or other appropriate payment record to establish the warranty period should service be required. ELECTROLUX SHALL NOT BE...


