Use and Care Manual
Page 31
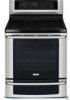
...door. Press UPPER OVEN 4. Press START * You may skip steps 6-8 if you may press once to review or change the probe target temperature. 3. Press CONV ROAST 5. Plug the probe COMPLETELY into the oven -p. 30, Fig. 1-. 2. Press COOK OPTIONS * 7. Enter 325 6. Step EExxaammpplele Press 1. By the default...by the probe. Press PROBE 8. Insert the probe into the food and place the food into the probe receptacle inside the oven -p. 30, Fig. 2- Setting Oven Controls 31 Setting the probe See the example below to set the probe target temperature to180°F/82°...
...door. Press UPPER OVEN 4. Press START * You may skip steps 6-8 if you may press once to review or change the probe target temperature. 3. Press CONV ROAST 5. Plug the probe COMPLETELY into the oven -p. 30, Fig. 1-. 2. Press COOK OPTIONS * 7. Enter 325 6. Step EExxaammpplele Press 1. By the default...by the probe. Press PROBE 8. Insert the probe into the food and place the food into the probe receptacle inside the oven -p. 30, Fig. 2- Setting Oven Controls 31 Setting the probe See the example below to set the probe target temperature to180°F/82°...
Use and Care Manual
Page 35
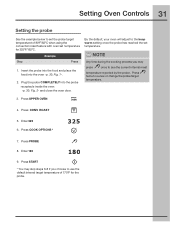
...skin. Press UPPER OVEN 4. The probe is not recommended to carefully read and follow setting the probe instructions - Press PROBE twice to review the probe set temperature, the oven will not start until the probe has been plugged in juices and flavors. Step EExxaammpplele Press 1....sides, sealing in . 5. See the example below to monitor the exact internal temperature of the meat and place the turkey in the oven -p. 30 Fig 1-. 2. Shield legs and breast with the convection fan. Press START Meat Turkey, whole* Turkey, whole* Poultry Turkey, whole* Chicken ...
...skin. Press UPPER OVEN 4. The probe is not recommended to carefully read and follow setting the probe instructions - Press PROBE twice to review the probe set temperature, the oven will not start until the probe has been plugged in juices and flavors. Step EExxaammpplele Press 1....sides, sealing in . 5. See the example below to monitor the exact internal temperature of the meat and place the turkey in the oven -p. 30 Fig 1-. 2. Shield legs and breast with the convection fan. Press START Meat Turkey, whole* Turkey, whole* Poultry Turkey, whole* Chicken ...
Use and Care Manual
Page 39
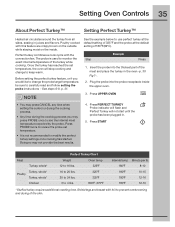
For stage 2, to brown, broil for at 350°F for 1 hr. Enter 350°F 12. See Reviewing stages for a casserole. Press CANCEL 2 times to clear the current stage. For your convenience the multi stage key will allow you want to program a multi... 4. Enter 15 minutes 17. Press START NOTES • You may press CANCEL 1 time to exit the muti stage feature. Each stage may be programmed with review. Press START 11. Press START 1 time to start cooking immediately. Press START Stage 2 8. Stage 3 13. Enter 500°F 10. Enter 170°F 15. Press ...
For stage 2, to brown, broil for at 350°F for 1 hr. Enter 350°F 12. See Reviewing stages for a casserole. Press CANCEL 2 times to clear the current stage. For your convenience the multi stage key will allow you want to program a multi... 4. Enter 15 minutes 17. Press START NOTES • You may press CANCEL 1 time to exit the muti stage feature. Each stage may be programmed with review. Press START 11. Press START 1 time to start cooking immediately. Press START Stage 2 8. Stage 3 13. Enter 500°F 10. Enter 170°F 15. Press ...

Use and Care Manual
Page 40
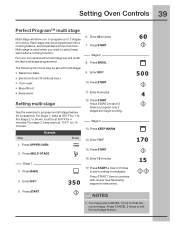
... your input after stages 2 or 3 have been programmed. Step Example Press 1. Enter new temperature and cook time. 4. To return to the review screen to begin cooking. Use numeric key pad, select stage to edit other stages. Select new cooking feature 3. Fig. 1 Press START 1 ...time to return back to the review screen to review. 2. 40 Setting Oven Controls Reviewing stages You may review your input in stages 2 or 3 by pressing start you will be directed to a review screen -Fig. 1-. See the example below to review/edit the cooking feature, set temperature and cook time...
... your input after stages 2 or 3 have been programmed. Step Example Press 1. Enter new temperature and cook time. 4. To return to the review screen to begin cooking. Use numeric key pad, select stage to edit other stages. Select new cooking feature 3. Fig. 1 Press START 1 ...time to return back to the review screen to review. 2. 40 Setting Oven Controls Reviewing stages You may review your input in stages 2 or 3 by pressing start you will be directed to a review screen -Fig. 1-. See the example below to review/edit the cooking feature, set temperature and cook time...
Use and Care Manual
Page 62
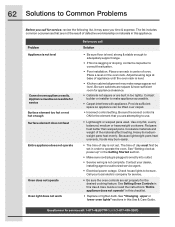
... accessible. • Carpet interferes with appliance. Because lightweight pans heat unevenly, foods may save you call for service, review the following list. Contact your local electric company for service. • Be sure the oven controls are set properly for service call: 1-877-4ELECTROLUX (1-877-... you call Solution • Be sure floor is level, strong & stable enough to adequately support range. • If floor is sagging or sloping, contact a carpenter to make range appear not level. Cookware materials and weight of day must be lifted over carpet. • Incorrect...
... accessible. • Carpet interferes with appliance. Because lightweight pans heat unevenly, foods may save you call for service, review the following list. Contact your local electric company for service. • Be sure the oven controls are set properly for service call: 1-877-4ELECTROLUX (1-877-... you call Solution • Be sure floor is level, strong & stable enough to adequately support range. • If floor is sagging or sloping, contact a carpenter to make range appear not level. Cookware materials and weight of day must be lifted over carpet. • Incorrect...
