
Complete Owner's Guide (English)
Page 3
... microwave 8 Multiple sequence cooking 25 About food 9 More or less time adjustment 25 About utensils and coverings 10 Quick Start 25 Part names 11 Add 30 Seconds 25 Control panel 12 Help 25 Before Operating 13 Timer on-off 26 To set the clock 13 Demonstration mode 26 Stop/Clear 13 Cleaning and Care 27 Manual Operation 14 Service Call Check 28 Time cooking 14 Specifications 29 To set power level 14 Warranty Informations 30 Manual defrost 14 Sensor Modes 15-18 Quick Sensor...
... microwave 8 Multiple sequence cooking 25 About food 9 More or less time adjustment 25 About utensils and coverings 10 Quick Start 25 Part names 11 Add 30 Seconds 25 Control panel 12 Help 25 Before Operating 13 Timer on-off 26 To set the clock 13 Demonstration mode 26 Stop/Clear 13 Cleaning and Care 27 Manual Operation 14 Service Call Check 28 Time cooking 14 Specifications 29 To set power level 14 Warranty Informations 30 Manual defrost 14 Sensor Modes 15-18 Quick Sensor...

Complete Owner's Guide (English)
Page 4
... reduce the risk of table or counter. 15. Use a wide-mouthed container. If the oven light fails, consult a Electrolux Authorized Servicer. This appliance must be heated in the Microwave Oven at the fuse or circuit breaker panel. Some products such as water, coffee or tea are placed inside the oven ignite, keep oven door closed glass jars-are able to heat, cook or dry food. Do not use straight-sided containers with...
... reduce the risk of table or counter. 15. Use a wide-mouthed container. If the oven light fails, consult a Electrolux Authorized Servicer. This appliance must be heated in the Microwave Oven at the fuse or circuit breaker panel. Some products such as water, coffee or tea are placed inside the oven ignite, keep oven door closed glass jars-are able to heat, cook or dry food. Do not use straight-sided containers with...

Complete Owner's Guide (English)
Page 5
... loose door hinges and latches and dents inside the oven cavity. DO NOT REMOVE THE WAVEGUIDE COVER, which is located on the door. Remove the feature sticker, if there is any electric wall oven or warming drawer using built-in kit models EI27MO45T or EI30MO45T for Your Microwave Oven Your oven can be built into a cabinet or wall by itself or above any damage, do not operate the oven and contact your dealer or ELECTROLUX AUTHORIZED SERVICER...
... loose door hinges and latches and dents inside the oven cavity. DO NOT REMOVE THE WAVEGUIDE COVER, which is located on the door. Remove the feature sticker, if there is any electric wall oven or warming drawer using built-in kit models EI27MO45T or EI30MO45T for Your Microwave Oven Your oven can be built into a cabinet or wall by itself or above any damage, do not operate the oven and contact your dealer or ELECTROLUX AUTHORIZED SERVICER...

Complete Owner's Guide (English)
Page 7
... twice during cooking, if possible. • Turn foods over once during microwaving to the outside of microwave cooking. About microwave cooking • Arrange food carefully. Large items like roasts must not be used to the touch when cooking or reheating. Doneness signs include: - Food steams throughout, not just at power levels below 100%, you may hear the magnetron cycling on to finish cooking without the turntable and support nor turn both from...
... twice during cooking, if possible. • Turn foods over once during microwaving to the outside of microwave cooking. About microwave cooking • Arrange food carefully. Large items like roasts must not be used to the touch when cooking or reheating. Doneness signs include: - Food steams throughout, not just at power levels below 100%, you may hear the magnetron cycling on to finish cooking without the turntable and support nor turn both from...

Complete Owner's Guide (English)
Page 10
... choice because heat is not necessary to buy all new cookware. A microwave-safe thermometer will assist you in determining correct doneness and assure you have questions about utensils or coverings, check a good microwave cookbook or follow recipe suggestions. Make sure the utensil does not touch the interior walls during cooking. DO NOT use aluminum foil in your kitchen can escape. Electrolux is...
... choice because heat is not necessary to buy all new cookware. A microwave-safe thermometer will assist you in determining correct doneness and assure you have questions about utensils or coverings, check a good microwave cookbook or follow recipe suggestions. Make sure the utensil does not touch the interior walls during cooking. DO NOT use aluminum foil in your kitchen can escape. Electrolux is...

Complete Owner's Guide (English)
Page 15
... food for microwave cooking. initial temperature, shape, quality). Press user pref pad when the HELP indicator is plugged in the display. Use the cover recommended in any microwave cookbook. 6. Any Sensor Modes selection can cook or reheat many foods by pressing a Quick Sensor pad (fresh veggies, frozen veggies, popcorn, baked potato and sensor reheat) and START. baked potato NOTES 1. E See page 25. 5. Do not open the oven door or press STOP...
... food for microwave cooking. initial temperature, shape, quality). Press user pref pad when the HELP indicator is plugged in the display. Use the cover recommended in any microwave cookbook. 6. Any Sensor Modes selection can cook or reheat many foods by pressing a Quick Sensor pad (fresh veggies, frozen veggies, popcorn, baked potato and sensor reheat) and START. baked potato NOTES 1. E See page 25. 5. Do not open the oven door or press STOP...

Complete Owner's Guide (English)
Page 20
... breads settings. (Ex: touch number 1 for 1 cup. Fresh Rolls/ Muffins 1 - 10 2. Pasta without sauce double the quantity per setting. Cover with More or less time adjustment. 20 Auto Cook Reheat Pasta / Reheat Breads The reheat settings automatically computes the correct warming and heating time and microwave power level for foods shown in the chart below the quantity allowed, use Less option. To reheat different foods or foods above...
... breads settings. (Ex: touch number 1 for 1 cup. Fresh Rolls/ Muffins 1 - 10 2. Pasta without sauce double the quantity per setting. Cover with More or less time adjustment. 20 Auto Cook Reheat Pasta / Reheat Breads The reheat settings automatically computes the correct warming and heating time and microwave power level for foods shown in the chart below the quantity allowed, use Less option. To reheat different foods or foods above...

Complete Owner's Guide (English)
Page 21
..., press number 2 two times for 1 square. Quick Settings 21 Quick Settings (soften and melt) automatically compute the correct heating time and microwave power level for softening and melting foods shown in the Quick settings Chart, use manual operation. 2. Procedure Step Press NOTES 1. Quick Settings can be programmed with plastic wrap. Press melt pad once. Select desired food by pressing number pad. Press START pad. START Quick settings chart Food Soften 1. After pressing melt, press number 1 three times for 1/2 cup...
..., press number 2 two times for 1 square. Quick Settings 21 Quick Settings (soften and melt) automatically compute the correct heating time and microwave power level for softening and melting foods shown in the Quick settings Chart, use manual operation. 2. Procedure Step Press NOTES 1. Quick Settings can be programmed with plastic wrap. Press melt pad once. Select desired food by pressing number pad. Press START pad. START Quick settings chart Food Soften 1. After pressing melt, press number 1 three times for 1/2 cup...

Complete Owner's Guide (English)
Page 30
... 1-800-265-8352 Electrolux Canada Corp. 5855 Terry Fox Way Mississauga, Ontario, Canada L5V 3E4 Food loss due to any after hour, weekend, or holiday service calls, tolls, ferry trip charges, or mileage expense for service and parts under this warranty must be required. Damages to repair or replace appliance light bulbs, air filters, water filters, other consumables, or knobs, handles, or other...
... 1-800-265-8352 Electrolux Canada Corp. 5855 Terry Fox Way Mississauga, Ontario, Canada L5V 3E4 Food loss due to any after hour, weekend, or holiday service calls, tolls, ferry trip charges, or mileage expense for service and parts under this warranty must be required. Damages to repair or replace appliance light bulbs, air filters, water filters, other consumables, or knobs, handles, or other...

Wiring Diagram (English Español Français)
Page 3
..., oven Lamp, oven light Motor, cooling fan Switch Kit, monitor, with CT fuse Switch, interlock, door sensor Fuse, cavity temp, 20 Amp, 250 V Magnetron Motor, turntable Transformer, power Power Cord, electric Sensor, humidity, cook control Filter, noise, electronic Base, unit chassis Foot, cabinet support Cabinet, outer casing, black Retainer, capacitor strap Bracket, chassis support Latch Hook Lever, door release Duct, magnetron Fan Blade, mag cooling fan Duct, cooling fan Filler Strip, base plate, bottom Cover, waveguide Bushing, motor shaft, turntable Duct, humidity sensor Cushion, magnetron...
..., oven Lamp, oven light Motor, cooling fan Switch Kit, monitor, with CT fuse Switch, interlock, door sensor Fuse, cavity temp, 20 Amp, 250 V Magnetron Motor, turntable Transformer, power Power Cord, electric Sensor, humidity, cook control Filter, noise, electronic Base, unit chassis Foot, cabinet support Cabinet, outer casing, black Retainer, capacitor strap Bracket, chassis support Latch Hook Lever, door release Duct, magnetron Fan Blade, mag cooling fan Duct, cooling fan Filler Strip, base plate, bottom Cover, waveguide Bushing, motor shaft, turntable Duct, humidity sensor Cushion, magnetron...
Installation Instructions (All Languages)
Page 1
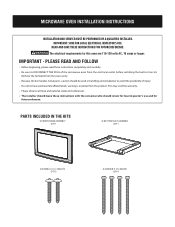
... SERVICE MUST BE PERFORMED BY A QUALIFIED INSTALLER. Remove the turntable from the oven cavity. • Because the kit includes metal parts, caution should leave these instructions completely and carefully. • Be sure to DISCONNECT THE PLUG of the microwave oven from the electrical outlet before installing the built-in handling and installation to avoid the possibility of injury. • Do not remove permanently affixed labels, warnings, or plates...
... SERVICE MUST BE PERFORMED BY A QUALIFIED INSTALLER. Remove the turntable from the oven cavity. • Because the kit includes metal parts, caution should leave these instructions completely and carefully. • Be sure to DISCONNECT THE PLUG of the microwave oven from the electrical outlet before installing the built-in handling and installation to avoid the possibility of injury. • Do not remove permanently affixed labels, warnings, or plates...
Installation Instructions (All Languages)
Page 2
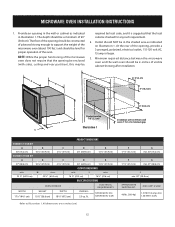
...) 13 3/8" (33.9 cm) CUTOUT DIMENSIONS min. BASIC SPECIFICATIONS MICROWAVE OVEN INSTALLATION INSTRUCTIONS 1. min. ft. 120VAC/60 Hz (UL) 120VAC/60 Hz (CSA) Refer to support the weight of visible cabinet showing after installation. Outlet should be in inches (cm). Minimum required distance between the microwave oven and the wall oven should be 2-inches of the microwave oven (about 100 lbs.) and should NOT be level for any such requirement...
...) 13 3/8" (33.9 cm) CUTOUT DIMENSIONS min. BASIC SPECIFICATIONS MICROWAVE OVEN INSTALLATION INSTRUCTIONS 1. min. ft. 120VAC/60 Hz (UL) 120VAC/60 Hz (CSA) Refer to support the weight of visible cabinet showing after installation. Outlet should be in inches (cm). Minimum required distance between the microwave oven and the wall oven should be 2-inches of the microwave oven (about 100 lbs.) and should NOT be level for any such requirement...
Product Specifications Sheet (English)
Page 1
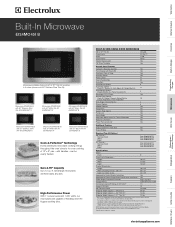
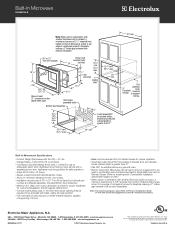
... Weight (Approx.) - BUILT-IN SIDE-SWING DOOR MICROWAVE 30" or 27" Trim Kit Oven Cavity Watts Oven Interior Interior Krypton Light 16" Glass Turntable Included 2.0 Cu. Height 10-1/2" Width 17-3/8" Depth 18-5/8" Product Dimensions - Microwave 50 Lbs. Includes Bottom Duct Assembly. ** Approved to be grounded for detailed installation instructions on adequately wired 120V, dedicated circuit having 2-wire service with any dish. electroluxappliances.com Refrigerators Freezers Washers / Dryers Under Counter ft. Ft. 1,200 White Yes Yes Control Panel Features IQ-Touch...
... Weight (Approx.) - BUILT-IN SIDE-SWING DOOR MICROWAVE 30" or 27" Trim Kit Oven Cavity Watts Oven Interior Interior Krypton Light 16" Glass Turntable Included 2.0 Cu. Height 10-1/2" Width 17-3/8" Depth 18-5/8" Product Dimensions - Microwave 50 Lbs. Includes Bottom Duct Assembly. ** Approved to be grounded for detailed installation instructions on adequately wired 120V, dedicated circuit having 2-wire service with any dish. electroluxappliances.com Refrigerators Freezers Washers / Dryers Under Counter ft. Ft. 1,200 White Yes Yes Control Panel Features IQ-Touch...
Product Specifications Sheet (English)
Page 2
.... Includes Bottom Duct Assembly. • Minimum 20" deep oven cutout dimension is greater than 21" 25 1/4" min. 25 3/8" max. 20" min. 30" min. Refer to support 100 lbs. High standards of 30" or 27" Trim Kit (ordered by individual part number and shipped separate). mean we are constantly working to model-specific Combination Installation Specification pages on adequately wired 120V, dedicated circuit having 2-wire service with any Electrolux Electric Single Wall Oven and / or...
.... Includes Bottom Duct Assembly. • Minimum 20" deep oven cutout dimension is greater than 21" 25 1/4" min. 25 3/8" max. 20" min. 30" min. Refer to support 100 lbs. High standards of 30" or 27" Trim Kit (ordered by individual part number and shipped separate). mean we are constantly working to model-specific Combination Installation Specification pages on adequately wired 120V, dedicated circuit having 2-wire service with any Electrolux Electric Single Wall Oven and / or...

Product Specifications Sheet (English)
Page 3
... of Built-In Microwave cutout to Product Installation Guide on both product faceplates. 30" Electric Single Wall Oven Specifications • Product Weight - 200 Lbs. • Single phase 3- Printed in product's faceplate will hide shims at Electrolux Home Products, Inc. Built-In Microwave/Single Wall Oven 30" Combination Installation Specifications • Always consult local and national electric codes. (Refer to product-specific electrical specifications on adequately wired 120V, dedicated circuit having 2-wire service with ground required on separate circuit fused...
... of Built-In Microwave cutout to Product Installation Guide on both product faceplates. 30" Electric Single Wall Oven Specifications • Product Weight - 200 Lbs. • Single phase 3- Printed in product's faceplate will hide shims at Electrolux Home Products, Inc. Built-In Microwave/Single Wall Oven 30" Combination Installation Specifications • Always consult local and national electric codes. (Refer to product-specific electrical specifications on adequately wired 120V, dedicated circuit having 2-wire service with ground required on separate circuit fused...

Product Specifications Sheet (English)
Page 4
... 3- Electrolux Major Appliances, N.A. 27" Combination Installation - mean we are constantly working to change specifications or discontinue models without notice. High Bottom Trim included.) • To adapt oven to fit cutout height between 27-5/8" and 28-1/4", add one 2"-wide wood shim of appropriate height to each side of built-In products. • Minimum 21" clearance needed for Wall Oven door depth when open. 27" Built-In Microwave Specifications • Product Weight...
... 3- Electrolux Major Appliances, N.A. 27" Combination Installation - mean we are constantly working to change specifications or discontinue models without notice. High Bottom Trim included.) • To adapt oven to fit cutout height between 27-5/8" and 28-1/4", add one 2"-wide wood shim of appropriate height to each side of built-In products. • Minimum 21" clearance needed for Wall Oven door depth when open. 27" Built-In Microwave Specifications • Product Weight...

Product Specifications Sheet (English)
Page 5
... cutout dimension is critical for proper air displacement. 30" Warmer Drawer Specifications • Product Weight - 65 Lbs. • Voltage Rating - 120V / 450W / 60 Hz / 15 Amps • Connected Load (kW Rating) @ 120 Volts = 0.45 kW (For use on adequately wired 120V, dedicated circuit having 2-wire service with a separate ground wire. Built-In Microwave/Single Wall Oven/Warmer Drawer 30" Combination Installation Specifications • Always consult local and national electric codes...
... cutout dimension is critical for proper air displacement. 30" Warmer Drawer Specifications • Product Weight - 65 Lbs. • Voltage Rating - 120V / 450W / 60 Hz / 15 Amps • Connected Load (kW Rating) @ 120 Volts = 0.45 kW (For use on adequately wired 120V, dedicated circuit having 2-wire service with a separate ground wire. Built-In Microwave/Single Wall Oven/Warmer Drawer 30" Combination Installation Specifications • Always consult local and national electric codes...

Product Specifications Sheet (English)
Page 6
... standards of supporting 100 Lbs. mean we are necessary to ensure that each built-in the U.S.A. Built-In Microwave/Single Wall Oven/Warmer Drawer 27" Combination Installation Specifications • Always consult local and national electric codes. (Refer to product-specific electrical specifications on this page.) • Minimum 23-5/8" deep cutout dimension is critical for proper combination installation, to allow for proper installation of Warmer Drawer cutout to change specifications or discontinue models without...
... standards of supporting 100 Lbs. mean we are necessary to ensure that each built-in the U.S.A. Built-In Microwave/Single Wall Oven/Warmer Drawer 27" Combination Installation Specifications • Always consult local and national electric codes. (Refer to product-specific electrical specifications on this page.) • Minimum 23-5/8" deep cutout dimension is critical for proper combination installation, to allow for proper installation of Warmer Drawer cutout to change specifications or discontinue models without...

Product Specifications Sheet (English)
Page 7
...installation instructions, refer to installation guide, packed with Side-by-Side Refrigerator Front Use these dimensions and clearance instructions for planning purposes only. We reserve the right to improve our products. Printed in the U.S.A. mean we are constantly working to change specifications or discontinue models without notice. High standards of quality at electroluxappliances.com. Top Front Top Electrolux...• electroluxappliances.ca INSTGDLNS_SSR EL 10/10 © 2010 Electrolux Home Products, Inc. General Installation Guidelines with product, or on the web at...
...installation instructions, refer to installation guide, packed with Side-by-Side Refrigerator Front Use these dimensions and clearance instructions for planning purposes only. We reserve the right to improve our products. Printed in the U.S.A. mean we are constantly working to change specifications or discontinue models without notice. High standards of quality at electroluxappliances.com. Top Front Top Electrolux...• electroluxappliances.ca INSTGDLNS_SSR EL 10/10 © 2010 Electrolux Home Products, Inc. General Installation Guidelines with product, or on the web at...

Product Specifications Sheet (English)
Page 8
For detailed installation instructions, refer to installation guide, packed with French Door Refrigerator Front Use these dimensions and clearance instructions for planning purposes only. We reserve the right to improve our products. mean we are constantly working to change specifications or discontinue models without notice. General Installation Guidelines with product, or on the web at Electrolux Home Products, Inc. Top Front Top Electrolux Major Appliances, N.A. USA •...
For detailed installation instructions, refer to installation guide, packed with French Door Refrigerator Front Use these dimensions and clearance instructions for planning purposes only. We reserve the right to improve our products. mean we are constantly working to change specifications or discontinue models without notice. General Installation Guidelines with product, or on the web at Electrolux Home Products, Inc. Top Front Top Electrolux Major Appliances, N.A. USA •...


