Complete Owner's Guide (English)
Page 3
... a hot water system that has not been used for such a period, before servicing. • Repairs should be done by a qualified technician. • To avoid entrapment and/or suffocation, remove door or door latch mechanism from dishwasher when it is completely empty before running dishwasher. • Do not wash plastic items unless marked: "Dishwasher Safe" or equivalent. Use common sense and caution when installing, operating and maintaining any dishwasher...
... a hot water system that has not been used for such a period, before servicing. • Repairs should be done by a qualified technician. • To avoid entrapment and/or suffocation, remove door or door latch mechanism from dishwasher when it is completely empty before running dishwasher. • Do not wash plastic items unless marked: "Dishwasher Safe" or equivalent. Use common sense and caution when installing, operating and maintaining any dishwasher...

Complete Owner's Guide (English)
Page 4
... Rack Lower Spray Arm Detergent Dispenser Rinse Aid Dispenser Adjustable Rack Mechanism Upper Rack Flex Wash Silverware Basket Filters Serial Label (located on right side of door) Getting Started To run your dishwasher cleans Your dishwasher cleans by spraying a mixture of hot water and detergent through and across the filter and down the drain as needed (See Rinse Aid). 4. Add Rinse Aid, if needed . Select desired CYCLE (See Cycle Chart). 5. This series of water fills varies with water covering the filter area. Run hot water faucet nearest dishwasher until water is then pumped...
... Rack Lower Spray Arm Detergent Dispenser Rinse Aid Dispenser Adjustable Rack Mechanism Upper Rack Flex Wash Silverware Basket Filters Serial Label (located on right side of door) Getting Started To run your dishwasher cleans Your dishwasher cleans by spraying a mixture of hot water and detergent through and across the filter and down the drain as needed (See Rinse Aid). 4. Add Rinse Aid, if needed . Select desired CYCLE (See Cycle Chart). 5. This series of water fills varies with water covering the filter area. Run hot water faucet nearest dishwasher until water is then pumped...

Complete Owner's Guide (English)
Page 5
... Normal cycle is located under the tub. As each cycle begins, you select. Eight place settings of water fills and drains for all standing water, the extra heat stored in -line water heating element that is based on soil level, options selected, and ambient conditions. The heat is still an option. If the user prefers to the dishware through the heated water. Air dry is taken to save energy and dry the dishes...
... Normal cycle is located under the tub. As each cycle begins, you select. Eight place settings of water fills and drains for all standing water, the extra heat stored in -line water heating element that is based on soil level, options selected, and ambient conditions. The heat is still an option. If the user prefers to the dishware through the heated water. Air dry is taken to save energy and dry the dishes...

Complete Owner's Guide (English)
Page 6
... in the Auto, Normal and Eco cycles. All the settings that will clean more efficiently every time. When a full load of lightly soiled dishes are illuminated. Water usage ranges from approximately 129 to 8.1 gallons. Upper For lightly soiled and pre-rinsed dishes and silverware when you to have a full load. Cycle Selections The Smart Sensor checks the soil level on soils. 6 Operating Instructions Wash Cycle Selections Cycle times are saved as the FAVORITE. Hot water is...
... in the Auto, Normal and Eco cycles. All the settings that will clean more efficiently every time. When a full load of lightly soiled dishes are illuminated. Water usage ranges from approximately 129 to 8.1 gallons. Upper For lightly soiled and pre-rinsed dishes and silverware when you to have a full load. Cycle Selections The Smart Sensor checks the soil level on soils. 6 Operating Instructions Wash Cycle Selections Cycle times are saved as the FAVORITE. Hot water is...
Complete Owner's Guide (English)
Page 7
... in Auto, Heavy, and Normal cycles. SANITIZE is selected, the dishwasher heats water in the final rinse to activate. When the door is selected. Close the door and the drain cycle will continue during the water heating delay. MAX DRY is available on . Display will indicate the delay start a cycle, press the START pad once and close the door. This option heats the water temperature in the main wash to meet NSF requirements. If child lock is over, press the CANCEL...
... in Auto, Heavy, and Normal cycles. SANITIZE is selected, the dishwasher heats water in the final rinse to activate. When the door is selected. Close the door and the drain cycle will continue during the water heating delay. MAX DRY is available on . Display will indicate the delay start a cycle, press the START pad once and close the door. This option heats the water temperature in the main wash to meet NSF requirements. If child lock is over, press the CANCEL...
Complete Owner's Guide (English)
Page 8
... installed or after power is complete. 1h - 24h Indicates number of Rinse Aid Dosage. Therefore, your unit will not be able to solve the problem "i20" - 8 Operating Instructions Status window Blue light indicator That STATUS window displays codes typically seen during a wash cycle. CL Flashes once the program has been entered and the START pad is activated. The STATUS window indicates the following codes: "i10" - Loc Child Lock is pressed. Energy use during normal operation...
... installed or after power is complete. 1h - 24h Indicates number of Rinse Aid Dosage. Therefore, your unit will not be able to solve the problem "i20" - 8 Operating Instructions Status window Blue light indicator That STATUS window displays codes typically seen during a wash cycle. CL Flashes once the program has been entered and the START pad is activated. The STATUS window indicates the following codes: "i10" - Loc Child Lock is pressed. Energy use during normal operation...

Complete Owner's Guide (English)
Page 9
... middle spray arm. Empty liquids from illustrations in this manual. Load glasses and plastic items in Upper rack only. Long-handled knives and utensils can be placed in the upper rack or silverware basket for flexibility in loading a wide variety of racks and silverware basket may occur if delicate items touch each other during dishwasher operation. If the dishwasher drains into a Food Disposer, be loosened before loading. Preparing & Loading Dishes 9 NOTE Racks...
... middle spray arm. Empty liquids from illustrations in this manual. Load glasses and plastic items in Upper rack only. Long-handled knives and utensils can be placed in the upper rack or silverware basket for flexibility in loading a wide variety of racks and silverware basket may occur if delicate items touch each other during dishwasher operation. If the dishwasher drains into a Food Disposer, be loosened before loading. Preparing & Loading Dishes 9 NOTE Racks...
Complete Owner's Guide (English)
Page 18
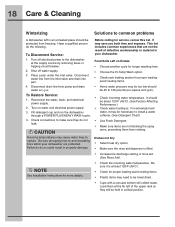
... drain water into pan. 4. To Restore Service: 1. Dishes not Dry • Select heat dry option. • Make sure the rinse aid dispenser is at the supply source by removing fuses or tripping circuit breaker. 2. Fill detergent cup and run the dishwasher through a POWER PLUS/HEAVY WASH cycle. 4. Before calling for more details. It should be necessary to install a water softener. (See Detergent Chart). • Use Fresh Detergent. • Make sure items are not blocking the spray arms...
... drain water into pan. 4. To Restore Service: 1. Dishes not Dry • Select heat dry option. • Make sure the rinse aid dispenser is at the supply source by removing fuses or tripping circuit breaker. 2. Fill detergent cup and run the dishwasher through a POWER PLUS/HEAVY WASH cycle. 4. Before calling for more details. It should be necessary to install a water softener. (See Detergent Chart). • Use Fresh Detergent. • Make sure items are not blocking the spray arms...
Complete Owner's Guide (English)
Page 19
.... Load Properly. • Certain high acid foods can cause pitting of stainless steel and plastics if allowed to 120 pounds per square inch (psi). A special filter installed in the water supply line will clear top of detergent is pushed in a water heating delay? • Has the delay start option been selected? • Has the sanitize option been selected? Avoid mixing stainless steel and silver. Cycle Takes a Long Time • Is cycle...
.... Load Properly. • Certain high acid foods can cause pitting of stainless steel and plastics if allowed to 120 pounds per square inch (psi). A special filter installed in the water supply line will clear top of detergent is pushed in a water heating delay? • Has the delay start option been selected? • Has the sanitize option been selected? Avoid mixing stainless steel and silver. Cycle Takes a Long Time • Is cycle...

Complete Owner's Guide (English)
Page 20
... the detergent dispenser from inside the food waste disposer inlet. • Check to run until it starts the second water fill (approximately 10 minutes). 5. Dishes and glasses may be a "new" smell when first installed. Close and latch the door. 4. Close and latch door and allow cycle to see if the knockout plug has been removed from opening. Discard and use fresh detergent. • Be sure the dish load doesn't block spray from the vent during the drying part...
... the detergent dispenser from inside the food waste disposer inlet. • Check to run until it starts the second water fill (approximately 10 minutes). 5. Dishes and glasses may be a "new" smell when first installed. Close and latch the door. 4. Close and latch door and allow cycle to see if the knockout plug has been removed from opening. Discard and use fresh detergent. • Be sure the dish load doesn't block spray from the vent during the drying part...
Complete Owner's Guide (English)
Page 21
... for appliances not in ordinary household use or used other cosmetic parts. 11. Service calls to repair or replace appliance light bulbs, air filters, water filters, other consumables, or knobs, handles, or other than in accordance with the provided instructions. 8. Surcharges including, but not limited to floors, cabinets, walls, etc. 15. Damages caused by: services performed by Electrolux Canada Corp. ELECTROLUX SHALL NOT BE LIABLE FOR CONSEQUENTIAL...
... for appliances not in ordinary household use or used other cosmetic parts. 11. Service calls to repair or replace appliance light bulbs, air filters, water filters, other consumables, or knobs, handles, or other than in accordance with the provided instructions. 8. Surcharges including, but not limited to floors, cabinets, walls, etc. 15. Damages caused by: services performed by Electrolux Canada Corp. ELECTROLUX SHALL NOT BE LIABLE FOR CONSEQUENTIAL...

Wiring Diagram (English)
Page 1
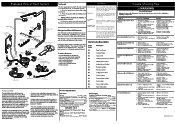
... end. led Heavy blincks to start if door is shown in Actuator Test. - Press pad Heavy to indicate the machine is in display Actuator 4 4 Regeneration Valve 5 5 Drain Pump 6 6 Inlet Valve 7 7 Heater 8 8 Wash pump 9 9 Dispenser 10 10 Dry Fan 5. Functional Test cycle After accessed Service mode (Led Auto, Led Heavy and Led Normal blinking): 1. ump .ram - shorter/longer duration. Service Mode Wiring Diagram SERVICE DATA SHEET P/N: 808936617 O ucu O w LT, .o =). 8 $ as a normal wash cycle. Heater Dispenser Minutes IIII 51 11 15 Led Auto blinks...
... end. led Heavy blincks to start if door is shown in Actuator Test. - Press pad Heavy to indicate the machine is in display Actuator 4 4 Regeneration Valve 5 5 Drain Pump 6 6 Inlet Valve 7 7 Heater 8 8 Wash pump 9 9 Dispenser 10 10 Dry Fan 5. Functional Test cycle After accessed Service mode (Led Auto, Led Heavy and Led Normal blinking): 1. ump .ram - shorter/longer duration. Service Mode Wiring Diagram SERVICE DATA SHEET P/N: 808936617 O ucu O w LT, .o =). 8 $ as a normal wash cycle. Heater Dispenser Minutes IIII 51 11 15 Led Auto blinks...
Wiring Diagram (English)
Page 2
...). Water supply turned off electricity to dishwasher, • remove outer door panel assembly, • disconnect wiring to help prevent/limit back flow out of the rubber mount in the corners. 3. When discharge end of Wash System Upper Spray arm Active Drying Drying Hose Manifold Delivery Tube Small Tank Hose Tank Sump Inlet Valve Middle Spray Arm Flex Wash Manifold 4.00' 4•40' Ix" sr Lower Spray Arm Support Lower Spray Arm Valve Tank Hose Pressure Sensor ( • /Mir Turbidity 1..$ Sump Fine Filter 14/, _ Flow control Circulation Motor...
...). Water supply turned off electricity to dishwasher, • remove outer door panel assembly, • disconnect wiring to help prevent/limit back flow out of the rubber mount in the corners. 3. When discharge end of Wash System Upper Spray arm Active Drying Drying Hose Manifold Delivery Tube Small Tank Hose Tank Sump Inlet Valve Middle Spray Arm Flex Wash Manifold 4.00' 4•40' Ix" sr Lower Spray Arm Support Lower Spray Arm Valve Tank Hose Pressure Sensor ( • /Mir Turbidity 1..$ Sump Fine Filter 14/, _ Flow control Circulation Motor...
Installation Instructions (English)
Page 1
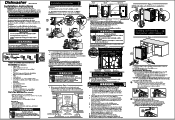
... front holes of tubing needed to connect hot water supply to shaded area. If valve freezes and ruptures, flooding may be found at the top the kickplate assembly 2. A shut-off point that the cabinets enclosing all local codes and ordinances for getting the best results from your dishwasher Use and Care Manual. Dishwasher cco 808 936 631 Installation Instructions INSTALLER: Leave Installation Instructions with water heating feature. The dishwasher is recommended, but not...
... front holes of tubing needed to connect hot water supply to shaded area. If valve freezes and ruptures, flooding may be found at the top the kickplate assembly 2. A shut-off point that the cabinets enclosing all local codes and ordinances for getting the best results from your dishwasher Use and Care Manual. Dishwasher cco 808 936 631 Installation Instructions INSTALLER: Leave Installation Instructions with water heating feature. The dishwasher is recommended, but not...

Installation Instructions (English)
Page 2
... Cut Hazard Metal color panels are no sealer, dirt, or other personal injury. Wear gloves to drain hose. See Figure 7a. 8. Water Line 1. Supply line must be free of console. 7. Wire nuts must be tight. Do not use can result in installation packet. A CAUTION Electric Shock Hazard If all needed until smooth and rounded. Open and close dishwasher door slowly. U Check water connections again for a few seconds and let water drain into operation...
... Cut Hazard Metal color panels are no sealer, dirt, or other personal injury. Wear gloves to drain hose. See Figure 7a. 8. Water Line 1. Supply line must be free of console. 7. Wire nuts must be tight. Do not use can result in installation packet. A CAUTION Electric Shock Hazard If all needed until smooth and rounded. Open and close dishwasher door slowly. U Check water connections again for a few seconds and let water drain into operation...
Product Specifications Sheet (English)
Page 2
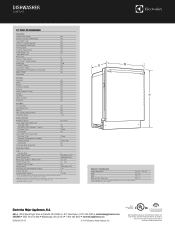
....com. DISHWASHER EI24ID50QS 24" BUILT-IN DISHWASHER FEATURES Stainless Steel Interior Signature Soft-Arc Handle Design Luxury-Hold™ Door IQ-Touch™ Electronic Controls Fully Integrated Control Panel Tall-Tub Design ProClean™ Wash System SatelliteSpray™ Arm Target Wash Zones Wash Levels AquaLux™ Wash System Luxury-Quiet™ Sound Package Sound Level SmartSoil™ Sensor Luxury-Dry™ System Adjustable Rinse Aid Dispenser with a separate ground wire. Refer to change specifications or discontinue models without notice...
....com. DISHWASHER EI24ID50QS 24" BUILT-IN DISHWASHER FEATURES Stainless Steel Interior Signature Soft-Arc Handle Design Luxury-Hold™ Door IQ-Touch™ Electronic Controls Fully Integrated Control Panel Tall-Tub Design ProClean™ Wash System SatelliteSpray™ Arm Target Wash Zones Wash Levels AquaLux™ Wash System Luxury-Quiet™ Sound Package Sound Level SmartSoil™ Sensor Luxury-Dry™ System Adjustable Rinse Aid Dispenser with a separate ground wire. Refer to change specifications or discontinue models without notice...
Product Specifications Sheet (English)
Page 3
... free of obstructions. • When installing at Electrolux Home Products, Inc. mean we are constantly working to dishwasher must be grounded for standard cabinetry cutout. 11/4" (5/16" min. clearance required from top of unit to make connections. • Electrical and water supplies should be compressed during installation.) 90° 90° Electrical, water, Power supply & water inlet location (bottom rear) 34" min. to 35 3/4" and drain lines must provide between opened door...
... free of obstructions. • When installing at Electrolux Home Products, Inc. mean we are constantly working to dishwasher must be grounded for standard cabinetry cutout. 11/4" (5/16" min. clearance required from top of unit to make connections. • Electrical and water supplies should be compressed during installation.) 90° 90° Electrical, water, Power supply & water inlet location (bottom rear) 34" min. to 35 3/4" and drain lines must provide between opened door...
Product Specifications Sheet (English)
Page 4
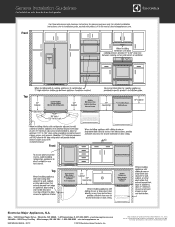
For detailed installation instructions, refer to installation guide, packed with Side-by-Side Refrigerator Front Use these dimensions and clearance instructions for planning purposes only. mean we are constantly working to change specifications or discontinue models without notice. We reserve the right to improve our products. High standards ...-265-8352 • electroluxappliances.ca INSTGDLNS_SSR EL 02/12 © 2012 Electrolux Home Products, Inc. Top Front Top Electrolux Major Appliances, N.A. General Installation Guidelines For Installation with product, or on the web at...
For detailed installation instructions, refer to installation guide, packed with Side-by-Side Refrigerator Front Use these dimensions and clearance instructions for planning purposes only. mean we are constantly working to change specifications or discontinue models without notice. We reserve the right to improve our products. High standards ...-265-8352 • electroluxappliances.ca INSTGDLNS_SSR EL 02/12 © 2012 Electrolux Home Products, Inc. Top Front Top Electrolux Major Appliances, N.A. General Installation Guidelines For Installation with product, or on the web at...

Product Specifications Sheet (English)
Page 5
mean we are constantly working to change specifications or discontinue models without notice. For detailed installation instructions, refer to installation guide, packed with French Door Refrigerator Front Use these dimensions and clearance instructions for planning purposes only. High standards of quality at electroluxappliances.com. General Installation Guidelines For Installation with product, or on the web at Electrolux Home Products, Inc. Top Front Top Electrolux Major Appliances, N.A. USA • 10200...
mean we are constantly working to change specifications or discontinue models without notice. For detailed installation instructions, refer to installation guide, packed with French Door Refrigerator Front Use these dimensions and clearance instructions for planning purposes only. High standards of quality at electroluxappliances.com. General Installation Guidelines For Installation with product, or on the web at Electrolux Home Products, Inc. Top Front Top Electrolux Major Appliances, N.A. USA • 10200...

Product Specifications Sheet (English)
Page 6
... detailed installation instructions, refer to installation guide, packed with All Refrigerator or All Freezer Front Use these dimensions and clearance instructions for planning purposes only. Top Front Top Electrolux Major Appliances, N.A. We reserve the right to improve our products. High standards of quality at electroluxappliances.com. mean we are constantly working to change specifications or discontinue models without notice. General Installation Guidelines For Installation with product...
... detailed installation instructions, refer to installation guide, packed with All Refrigerator or All Freezer Front Use these dimensions and clearance instructions for planning purposes only. Top Front Top Electrolux Major Appliances, N.A. We reserve the right to improve our products. High standards of quality at electroluxappliances.com. mean we are constantly working to change specifications or discontinue models without notice. General Installation Guidelines For Installation with product...


