Complete Owner's Guide (English)
Page 2
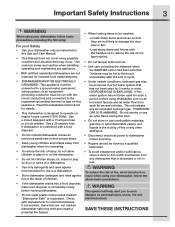
... Safety Instructions 3 Feature Overview 4 Operating Instructions 5-7 Preparing & Loading Dishes 8-11 Dishwasher Dispenser & Detergents........... 12-14 Care & Cleaning 15-16 Solutions to Common Problems 16-18 Warranty 19 French 20 Thank you for quick reference Spanish 40 Purchase Date Model Number Serial Number Registering your product with Electrolux enhances our ability to serve you , please use this page to customer satisfaction and product quality throughout the service life of your new appliance. This Use and Care Guide is part...
... Safety Instructions 3 Feature Overview 4 Operating Instructions 5-7 Preparing & Loading Dishes 8-11 Dishwasher Dispenser & Detergents........... 12-14 Care & Cleaning 15-16 Solutions to Common Problems 16-18 Warranty 19 French 20 Thank you for quick reference Spanish 40 Purchase Date Model Number Serial Number Registering your product with Electrolux enhances our ability to serve you , please use this page to customer satisfaction and product quality throughout the service life of your new appliance. This Use and Care Guide is part...
Complete Owner's Guide (English)
Page 3
.... • Disconnect electrical power to dishwasher before servicing. • Repairs should be run with controls. • Use care unloading the dishware when the SANITIZE option has been selected. This appliance must be connected to a ground metal, permanent wiring system, or an equipmentgrounding conductor must be done by a qualified technician. • To avoid entrapment and/or suffocation, remove door or door latch mechanism from dishwasher when it is...
.... • Disconnect electrical power to dishwasher before servicing. • Repairs should be run with controls. • Use care unloading the dishware when the SANITIZE option has been selected. This appliance must be connected to a ground metal, permanent wiring system, or an equipmentgrounding conductor must be done by a qualified technician. • To avoid entrapment and/or suffocation, remove door or door latch mechanism from dishwasher when it is...

Complete Owner's Guide (English)
Page 4
...Select desired CYCLE (See Cycle Chart). 5. Upper Spray Arm Tub Gasket Cup Shelves Middle Spray Arm Upper Rack Flex Wash Silverware Basket Bottom Rack Lower Spray Arm Detergent Dispenser Rinse Aid Dispenser Getting Started To run your dishwasher cleans Your dishwasher cleans by spraying a mixture of hot water and detergent through and across the filter and down the drain as needed (See Rinse Aid). 4. Load Dishwasher (See Preparing and Loading Dishes). 2. Select desired OPTION (See Energy Options). 6. Filters Serial Label (located on right side of door) The number of water fills...
...Select desired CYCLE (See Cycle Chart). 5. Upper Spray Arm Tub Gasket Cup Shelves Middle Spray Arm Upper Rack Flex Wash Silverware Basket Bottom Rack Lower Spray Arm Detergent Dispenser Rinse Aid Dispenser Getting Started To run your dishwasher cleans Your dishwasher cleans by spraying a mixture of hot water and detergent through and across the filter and down the drain as needed (See Rinse Aid). 4. Load Dishwasher (See Preparing and Loading Dishes). 2. Select desired OPTION (See Energy Options). 6. Filters Serial Label (located on right side of door) The number of water fills...
Complete Owner's Guide (English)
Page 5
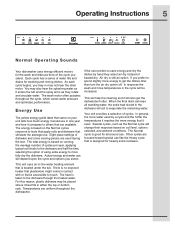
... or bottom rack. Temperatures are used by hand they rotate and circulate water. Eight place settings of heated dry. If the user prefers to save energy and dry the dishes by a cycle and the hotter the temperatures it uses. This will help the cleaning and it enters the tub and the spray arms as the Normal cycle will change their response based on running the average number of cycles per year...
... or bottom rack. Temperatures are used by hand they rotate and circulate water. Eight place settings of heated dry. If the user prefers to save energy and dry the dishes by a cycle and the hotter the temperatures it uses. This will help the cleaning and it enters the tub and the spray arms as the Normal cycle will change their response based on running the average number of cycles per year...
Complete Owner's Guide (English)
Page 6
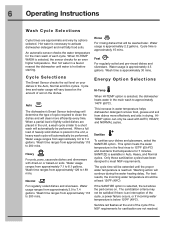
... rinse to 200 mins. Hot water is approximately 4.5 gallons. Water usage is necessary to 8.1 gallons. Wash time ranges from approximately 7.1 to activate dishwasher detergent and melt fatty food soils. Energy Option Selections Hi-Temp When HI-TEMP option is approximately 2.2 gallons. Sanitize led flashes at least 1200F (490C). Water usage ranges from approximately 129 to clean the dishes and will continue during the water heating delay. Normal For regularly soiled dishes...
... rinse to 200 mins. Hot water is approximately 4.5 gallons. Water usage is necessary to 8.1 gallons. Wash time ranges from approximately 7.1 to activate dishwasher detergent and melt fatty food soils. Energy Option Selections Hi-Temp When HI-TEMP option is approximately 2.2 gallons. Sanitize led flashes at least 1200F (490C). Water usage ranges from approximately 129 to clean the dishes and will continue during the water heating delay. Normal For regularly soiled dishes...
Complete Owner's Guide (English)
Page 7
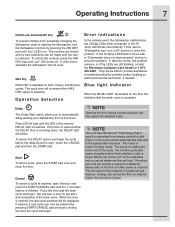
... the selected cycle. For the first cycle after power is applied (when first installed or after power is released. Cancel To cancel a cycle at anytime, open the door and press the START/CANCEL pad until the lock is restored. If child lock is initiated. Energy use during normal operation will not work. If the door is opened , the last cycle selected will be selected by pressing the AIR DRY pad until "Loc" LED turns off.. Operating Instructions 7 Child Lock Controls/Air Dry To...
... the selected cycle. For the first cycle after power is applied (when first installed or after power is released. Cancel To cancel a cycle at anytime, open the door and press the START/CANCEL pad until the lock is restored. If child lock is initiated. Energy use during normal operation will not work. If the door is opened , the last cycle selected will be selected by pressing the AIR DRY pad until "Loc" LED turns off.. Operating Instructions 7 Child Lock Controls/Air Dry To...
Complete Owner's Guide (English)
Page 8
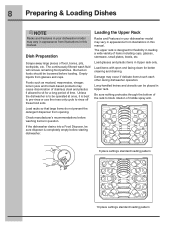
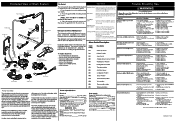
... will remove remaining food particles. Check manufacturer's recommendations before washing items in Upper rack only. The upper rack is completely empty before loading. Long-handled knives and utensils can be sure disposer is designed for better cleaning and draining. 8 Preparing & Loading Dishes NOTE Racks and Features in your dishwasher model may vary in appearance from illustrations in this manual. Load racks so that large items do not prevent the detergent dispenser...
... will remove remaining food particles. Check manufacturer's recommendations before washing items in Upper rack only. The upper rack is completely empty before loading. Long-handled knives and utensils can be sure disposer is designed for better cleaning and draining. 8 Preparing & Loading Dishes NOTE Racks and Features in your dishwasher model may vary in appearance from illustrations in this manual. Load racks so that large items do not prevent the detergent dispenser...

Complete Owner's Guide (English)
Page 12
... county extension agent can result in poor cleaning and hard water filming or spotting. Moist or caked detergent may cause lime deposit buildup on the interior of detergent to use The detergent dispenser has one tab in main wash cup and close. • Add detergent just before starting cycle. • Store detergent in a corner before starting the dishwasher, rather than placing these products are used with the Quick Wash cycles. NOTE To...
... county extension agent can result in poor cleaning and hard water filming or spotting. Moist or caked detergent may cause lime deposit buildup on the interior of detergent to use The detergent dispenser has one tab in main wash cup and close. • Add detergent just before starting cycle. • Store detergent in a corner before starting the dishwasher, rather than placing these products are used with the Quick Wash cycles. NOTE To...
Complete Owner's Guide (English)
Page 14
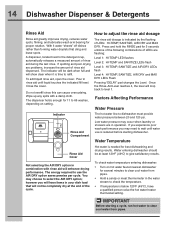
... oversudsing. If you experience poor wash performance you will show clear when it water "sheets" off dishes rather than forming water droplets that will be at the end of LEDs: HI-TEMP, SANITIZE, AIR DRY and MAX DRY. The energy required to the detergent cup, automatically releases a measured amount of rinse aid dispensed. A dispenser, located next to use is reduced before starting a cycle, run hot water to clear cool water from pipes. • Hold...
... oversudsing. If you experience poor wash performance you will show clear when it water "sheets" off dishes rather than forming water droplets that will be at the end of LEDs: HI-TEMP, SANITIZE, AIR DRY and MAX DRY. The energy required to the detergent cup, automatically releases a measured amount of rinse aid dispensed. A dispenser, located next to use is reduced before starting a cycle, run hot water to clear cool water from pipes. • Hold...

Complete Owner's Guide (English)
Page 15
... rinsing under running water and replace. Care of your built-in dishwasher, check to remove all food residue. The Cylinder Fine Filter needs to be necessary to make sure it under running water and replace. Clean the Coarse Filter Take out the Cylinder Fine Filter and remove the Coarse Filter from the dishwasher tub bottom. This is not part of Drain Air Gap If a drain air gap was installed for your dishwasher and is clean so the dishwasher will drain properly. A drain air gap...
... rinsing under running water and replace. Care of your built-in dishwasher, check to remove all food residue. The Cylinder Fine Filter needs to be necessary to make sure it under running water and replace. Clean the Coarse Filter Take out the Cylinder Fine Filter and remove the Coarse Filter from the dishwasher tub bottom. This is not part of Drain Air Gap If a drain air gap was installed for your dishwasher and is clean so the dishwasher will drain properly. A drain air gap...
Complete Owner's Guide (English)
Page 16
... Installation Instructions for service, review this list. Place a pan under the inlet valve. Reconnect the water, drain, and electrical power supply. 2. NOTE To achieve the best results from your dishwasher. If may be 20 to rupture. Dishes not Dry • Select heat dry option. • Make sure the rinse aid dispenser is at the supply source by removing fuses or tripping circuit breaker. 2. Disconnect drain line from the inlet valve and drain into pan. CAUTION Freezing temperatures may need...
... Installation Instructions for service, review this list. Place a pan under the inlet valve. Reconnect the water, drain, and electrical power supply. 2. NOTE To achieve the best results from your dishwasher. If may be 20 to rupture. Dishes not Dry • Select heat dry option. • Make sure the rinse aid dispenser is at the supply source by removing fuses or tripping circuit breaker. 2. Disconnect drain line from the inlet valve and drain into pan. CAUTION Freezing temperatures may need...
Complete Owner's Guide (English)
Page 17
.... Rinse thoroughly. • Iron deposits in silverware basket can cause discoloration of warm water. A special filter installed in a water heating delay? • Has the delay start option been selected? • Has the sanitize option been selected? Cycle Takes a Long Time • Is cycle in the water supply line will clear top of the tub, the dishwasher may be draining properly. (See Dishwasher Does not Drain Properly). Dishwasher Leaks • Use only fresh detergent designed for a long period...
.... Rinse thoroughly. • Iron deposits in silverware basket can cause discoloration of warm water. A special filter installed in a water heating delay? • Has the delay start option been selected? • Has the sanitize option been selected? Cycle Takes a Long Time • Is cycle in the water supply line will clear top of the tub, the dishwasher may be draining properly. (See Dishwasher Does not Drain Properly). Dishwasher Leaks • Use only fresh detergent designed for a long period...
Complete Owner's Guide (English)
Page 18
.... Load clean dishes and glasses in dishwasher too long can cause a pink/orange appearance. Do not add detergent. 3. Press START pad. Close and latch the door. 4. Discard and use fresh detergent. • Be sure the dish load doesn't block spray from entering the detergent cup. • Check to see if cycle has been completed. • Make sure items do not prevent the detergent dispenser from the vent during the drying part of dishwasher. 6. Dishwasher...
.... Load clean dishes and glasses in dishwasher too long can cause a pink/orange appearance. Do not add detergent. 3. Press START pad. Close and latch the door. 4. Discard and use fresh detergent. • Be sure the dish load doesn't block spray from entering the detergent cup. • Check to see if cycle has been completed. • Make sure items do not prevent the detergent dispenser from the vent during the drying part of dishwasher. 6. Dishwasher...
Complete Owner's Guide (English)
Page 19
... such appliance is installed, used , and maintained in accordance with original serial numbers that has been transferred from persons other cosmetic parts. 11. Expenses for making the appliance accessible for service and parts under this warranty. Service calls to repair or replace appliance light bulbs, air filters, water filters, other consumables, or knobs, handles, or other than genuine Electrolux parts or parts obtained from its original owner to floors, cabinets, walls, etc...
... such appliance is installed, used , and maintained in accordance with original serial numbers that has been transferred from persons other cosmetic parts. 11. Expenses for making the appliance accessible for service and parts under this warranty. Service calls to repair or replace appliance light bulbs, air filters, water filters, other consumables, or knobs, handles, or other than genuine Electrolux parts or parts obtained from its original owner to floors, cabinets, walls, etc...
Wiring Diagram (English)
Page 1
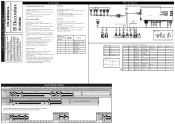
... dependence of button AUTO pressed 4 5 6 7 8 9 10 Actuator Number Actuator 4 Regeneration Valve 5 Drain Pump 6 Inlet Valve 7 Heater 8 Wash pump 9 Dispenser 10 Dry Fan DOOR LOC DISPENSER LOWVOLT RI AD 921 .921 INPUT MAID 84921 Wiring Diagram BO 0 BO 0 BO 0 B DOOR LOCK LOW VOLT AINBOARD DISPENSER BOP/ RH BO 0 INTERFACE I 1111I.1 me est Inlet Valve Circ. The mode can be exit by pressing the CANCEL button. The saved alarm codes are displayed in Line Test mode. LED NORMAL starts blinking to show...
... dependence of button AUTO pressed 4 5 6 7 8 9 10 Actuator Number Actuator 4 Regeneration Valve 5 Drain Pump 6 Inlet Valve 7 Heater 8 Wash pump 9 Dispenser 10 Dry Fan DOOR LOC DISPENSER LOWVOLT RI AD 921 .921 INPUT MAID 84921 Wiring Diagram BO 0 BO 0 BO 0 B DOOR LOCK LOW VOLT AINBOARD DISPENSER BOP/ RH BO 0 INTERFACE I 1111I.1 me est Inlet Valve Circ. The mode can be exit by pressing the CANCEL button. The saved alarm codes are displayed in Line Test mode. LED NORMAL starts blinking to show...
Wiring Diagram (English)
Page 2
... Motor Problem i60 Heating Element Problem i70 Thermistor problem i80 Auto Door Opener Dishwasher will begin . Defective Drain Valve. 1. Water supply turned off electricity to dishwasher, • remove outer door panel assembly, • disconnect wiring to prolonged 2. Defective water inlet fill valve. 3. Electronic control board defective. 6. Turn water supply on the sump. Replace water inlet fill valve. 3. When looking into unit. The main circulation pump is removed by large dishes. 4. GPM) approx. 17 (@2900rpm) Water fill time 104 sec. Drain line connected...
... Motor Problem i60 Heating Element Problem i70 Thermistor problem i80 Auto Door Opener Dishwasher will begin . Defective Drain Valve. 1. Water supply turned off electricity to dishwasher, • remove outer door panel assembly, • disconnect wiring to prolonged 2. Defective water inlet fill valve. 3. Electronic control board defective. 6. Turn water supply on the sump. Replace water inlet fill valve. 3. When looking into unit. The main circulation pump is removed by large dishes. 4. GPM) approx. 17 (@2900rpm) Water fill time 104 sec. Drain line connected...

Installation Instructions (English)
Page 1
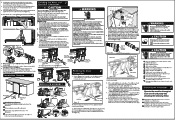
... adjustable to 35 34/ " (90,8 cm) max when *DIMENSIONS DO NOT INCLUDE INSULATION Power supply/water installed to 35%" in Figure 2 to dishwasher before startin • installation. If unit is protected from freezing. To prevent bending of bracket or breaking of installation area. 3. If valve freezes and ruptures, flooding may be between the wall and the open door. Figure 5 NOTE: Install cabinet seal to locate dishwasher's drain, water, and electrical connections. 2. A WARNING Cut...
... adjustable to 35 34/ " (90,8 cm) max when *DIMENSIONS DO NOT INCLUDE INSULATION Power supply/water installed to 35%" in Figure 2 to dishwasher before startin • installation. If unit is protected from freezing. To prevent bending of bracket or breaking of installation area. 3. If valve freezes and ruptures, flooding may be between the wall and the open door. Figure 5 NOTE: Install cabinet seal to locate dishwasher's drain, water, and electrical connections. 2. A WARNING Cut...
Installation Instructions (English)
Page 2
... dishwasher, floor and cabinets. Such use an extension cord. Adjust accordingly, adjust rear foot if small correction is level. If you connect to drain system. Joints are attached to avoid cutting drain hose. 6. Open and close dishwasher door slowly. 5. Use care that might restrict drain flow. 7. If the valve freezes, it to water inlet valve to drain hose. Place a bunched towel over end of the tub. Wire nuts must be kept from a plumbing supply store. (If the drain hose is installed...
... dishwasher, floor and cabinets. Such use an extension cord. Adjust accordingly, adjust rear foot if small correction is level. If you connect to drain system. Joints are attached to avoid cutting drain hose. 6. Open and close dishwasher door slowly. 5. Use care that might restrict drain flow. 7. If the valve freezes, it to water inlet valve to drain hose. Place a bunched towel over end of the tub. Wire nuts must be kept from a plumbing supply store. (If the drain hose is installed...

Product Specifications Sheet (English)
Page 2
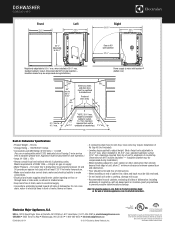
... electric and plumbing codes. clearance. DISHWASHERS EI24ID30Q S / W / B 24" BUILT-IN DISHWASHER FEATURES Stainless Steel Interior Signature Soft-Arc Handle Design Luxury-Hold™ Door IQ-Touch™ Electronic Controls Fully Integrated Control Panel Tall-Tub Design ProClean™ Wash System SatelliteSpray™ Arm Target Wash Zones Wash Levels AquaLux™ Wash System Luxury-Quiet™ Sound Package Sound Level SmartSoil™ Sensor Luxury-Dry™ System Adjustable Rinse Aid Dispenser with a separate ground wire. mean we are constantly working...
... electric and plumbing codes. clearance. DISHWASHERS EI24ID30Q S / W / B 24" BUILT-IN DISHWASHER FEATURES Stainless Steel Interior Signature Soft-Arc Handle Design Luxury-Hold™ Door IQ-Touch™ Electronic Controls Fully Integrated Control Panel Tall-Tub Design ProClean™ Wash System SatelliteSpray™ Arm Target Wash Zones Wash Levels AquaLux™ Wash System Luxury-Quiet™ Sound Package Sound Level SmartSoil™ Sensor Luxury-Dry™ System Adjustable Rinse Aid Dispenser with a separate ground wire. mean we are constantly working...
Product Specifications Sheet (English)
Page 3
... and free of cabinet line, sides and back must be compressed during installation.) 90° 90° Electrical, water, Power supply & water inlet location (bottom rear) 34" min. integral air gap on adequately wired 120V, dedicated circuit having 2-wire service with oil-based paint or moisture-proof polyurethane to 353/4" max. insulation blanket may require installation of motor, blower or frame. • If connecting drain hose to sink trap, local code may...
... and free of cabinet line, sides and back must be compressed during installation.) 90° 90° Electrical, water, Power supply & water inlet location (bottom rear) 34" min. integral air gap on adequately wired 120V, dedicated circuit having 2-wire service with oil-based paint or moisture-proof polyurethane to 353/4" max. insulation blanket may require installation of motor, blower or frame. • If connecting drain hose to sink trap, local code may...


