Product Specifications Sheet (English)
Page 1
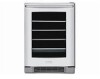
... as it is functional, keeping the contents clearly visible. 24" UNDER-COUNTER SIDE-SWING BEVERAGE CENTER Capacity Installation Type 6 Cu. PN # 241919801 PureAdvantage® Replacement Air Filter - the Beverage Center will maintain selected temperature to Product Installation Guide for detailed... Door Kit - Refer to keep your beverages perfectly chilled. NOTE: Always consult local and / or national electric codes. Wall Ovens Warmer Drawers Cooktops Built-In Ranges Freestanding Ranges Microwaves Under-Counter Beverage Center EI24BC65GS Perfect Set¤ Temperature Control Set a...
... as it is functional, keeping the contents clearly visible. 24" UNDER-COUNTER SIDE-SWING BEVERAGE CENTER Capacity Installation Type 6 Cu. PN # 241919801 PureAdvantage® Replacement Air Filter - the Beverage Center will maintain selected temperature to Product Installation Guide for detailed... Door Kit - Refer to keep your beverages perfectly chilled. NOTE: Always consult local and / or national electric codes. Wall Ovens Warmer Drawers Cooktops Built-In Ranges Freestanding Ranges Microwaves Under-Counter Beverage Center EI24BC65GS Perfect Set¤ Temperature Control Set a...
Product Specifications Sheet (English)
Page 2
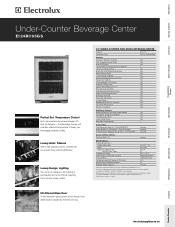
... 3E4 • 1-800-265-8352 • electroluxappliances.ca EI24BC65GS 12/10 © 2008 Electrolux Major Appliances, NA Printed in , under -counter installation does not require additional airspace for top, sides or rear of unit. • Proper built-in Canada PN # 5303918374). Under-Counter Beverage Center EI24BC65GS Under-Counter Beverage Center Specifications • Product Weight - 128 Lbs. •...
... 3E4 • 1-800-265-8352 • electroluxappliances.ca EI24BC65GS 12/10 © 2008 Electrolux Major Appliances, NA Printed in , under -counter installation does not require additional airspace for top, sides or rear of unit. • Proper built-in Canada PN # 5303918374). Under-Counter Beverage Center EI24BC65GS Under-Counter Beverage Center Specifications • Product Weight - 128 Lbs. •...
Energy Guide (English)
Page 1
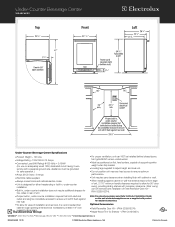
... average electricity cost of Similar Models 426 kWh Estimated Yearly Electricity Use Your cost will depend on your utility rates and use. Refrigerator * Automatic Defrost Electrolux EI24BC65G* Capacity: 05.7 Cubic Feet Estimated Yearly Operating Cost $ 45 $32 $58 Cost Range of 10.64 cents per kWh. PART NO. 241613763 For more information...
... average electricity cost of Similar Models 426 kWh Estimated Yearly Electricity Use Your cost will depend on your utility rates and use. Refrigerator * Automatic Defrost Electrolux EI24BC65G* Capacity: 05.7 Cubic Feet Estimated Yearly Operating Cost $ 45 $32 $58 Cost Range of 10.64 cents per kWh. PART NO. 241613763 For more information...

Complete Owner's Guide (English)
Page 2
... Save This Guide Thank you quickly identify a problem and get it remedied. This Use & Care Guide is part of our commitment to know your Electrolux wine cooler / beverage center was purchased. You can register online at the time your model number and serial number. Proper installation, in home appliances. Questions? We view your...
... Save This Guide Thank you quickly identify a problem and get it remedied. This Use & Care Guide is part of our commitment to know your Electrolux wine cooler / beverage center was purchased. You can register online at the time your model number and serial number. Proper installation, in home appliances. Questions? We view your...
Complete Owner's Guide (English)
Page 3
...Product Registration Card 2 Questions?...2 Safety 4 Important Safety Instructions 4 Safety Precautions...4 Definitions...4 General Precautions...4 Installation 5 Installing the Wine Cooler / Beverage Center 5 Site Preparation...6 Leveling 7 Leveling the Unit...7 Door Reversal 8 Reversing the Door...8 Start-Up and Temperature Control 11 Starting the Unit...13 Stocking Recommendations (Wine Cooler Only 13 Maintenance 14 Maintaining Your Wine Cooler / Beverage Center 14 Exterior Cleaning for Your Stainless Steel Model 14 Interior Cleaning...14 Wine Rack Removal/Installation 14 Glass ...
...Product Registration Card 2 Questions?...2 Safety 4 Important Safety Instructions 4 Safety Precautions...4 Definitions...4 General Precautions...4 Installation 5 Installing the Wine Cooler / Beverage Center 5 Site Preparation...6 Leveling 7 Leveling the Unit...7 Door Reversal 8 Reversing the Door...8 Start-Up and Temperature Control 11 Starting the Unit...13 Stocking Recommendations (Wine Cooler Only 13 Maintenance 14 Maintaining Your Wine Cooler / Beverage Center 14 Exterior Cleaning for Your Stainless Steel Model 14 Interior Cleaning...14 Wine Rack Removal/Installation 14 Glass ...
Complete Owner's Guide (English)
Page 4
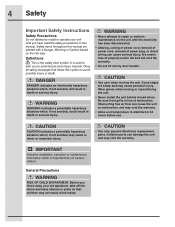
...shelves in this manual. Imitation parts can damage the unit and may void the warranty. • Allow unit temperature to stabilize for 24 hours before use. IMPORTANT Indicates installation, operation or maintenance information which , if not avoided, could result in death or serious injury.... Obey all safety messages that children may not easily climb inside. CAUTION • Use only genuine Electrolux replacement parts. Safety items throughout this symbol to avoid possible injury or death. CAUTION • Use care when moving or repositioning the ...
...shelves in this manual. Imitation parts can damage the unit and may void the warranty. • Allow unit temperature to stabilize for 24 hours before use. IMPORTANT Indicates installation, operation or maintenance information which , if not avoided, could result in death or serious injury.... Obey all safety messages that children may not easily climb inside. CAUTION • Use only genuine Electrolux replacement parts. Safety items throughout this symbol to avoid possible injury or death. CAUTION • Use care when moving or repositioning the ...
Complete Owner's Guide (English)
Page 5
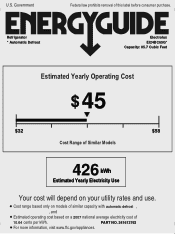
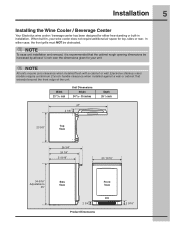
Width 23 /13 16 inch Unit Dimensions Height 34 5/16 - 35 inches Depth 26 3/4 inch 47" 2 7/8" 23 5/8" Top View 26 3/4" 24 1/4" 21 9/16" 23 13/16" 34-5/16" Adjustable to 35" Side View Front View 2 3/4" Product Dimensions 3 5/16" When built-in ...cabinet rough opening dimensions be obstructed. Installation 5 Installing the Wine Cooler / Beverage Center Your Electrolux wine cooler / beverage center has been designed for either case, the front grille must NOT be increased by at least ¼ inch over the dimensions given for your wine cooler does not require additional air space...
Width 23 /13 16 inch Unit Dimensions Height 34 5/16 - 35 inches Depth 26 3/4 inch 47" 2 7/8" 23 5/8" Top View 26 3/4" 24 1/4" 21 9/16" 23 13/16" 34-5/16" Adjustable to 35" Side View Front View 2 3/4" Product Dimensions 3 5/16" When built-in ...cabinet rough opening dimensions be obstructed. Installation 5 Installing the Wine Cooler / Beverage Center Your Electrolux wine cooler / beverage center has been designed for either case, the front grille must NOT be increased by at least ¼ inch over the dimensions given for your wine cooler does not require additional air space...
Complete Owner's Guide (English)
Page 6
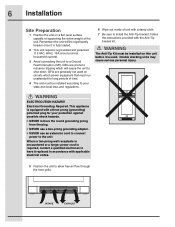
6 Installation Site Preparation 1 Position the unit on a flat, level surface capable of supporting the entire weight of time. 4 The unit must be installed on circuits which will be installed according to your state and local laws and regulations. 6 Wipe out inside of unit with a three prong (grounding) polarized plug for your protection against possible shock hazards. • NEVER remove the round grounding prong from the plug. • NEVER use a two-prong grounding adapter. • NEVER use an extension cord to connect power to nuisance tripping which power equipment that ...
6 Installation Site Preparation 1 Position the unit on a flat, level surface capable of supporting the entire weight of time. 4 The unit must be installed on circuits which will be installed according to your state and local laws and regulations. 6 Wipe out inside of unit with a three prong (grounding) polarized plug for your protection against possible shock hazards. • NEVER remove the round grounding prong from the plug. • NEVER use a two-prong grounding adapter. • NEVER use an extension cord to connect power to nuisance tripping which power equipment that ...

Complete Owner's Guide (English)
Page 7
Leveling 7 Leveling the Unit Position the unit on a flat, level surface capable of supporting the entire weight of the unit when full. Turn the legs clockwise to raise and counterclockwise to lower. This unit contains four (4) adjustable leveling legs.
Leveling 7 Leveling the Unit Position the unit on a flat, level surface capable of supporting the entire weight of the unit when full. Turn the legs clockwise to raise and counterclockwise to lower. This unit contains four (4) adjustable leveling legs.
Complete Owner's Guide (English)
Page 8
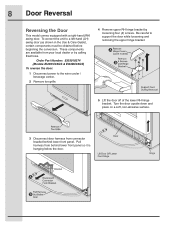
... before beginning the conversion. 8 Door Reversal Reversing the Door This model comes equipped with a right-hand (RH) swing door. Order Part Number: 5303918374 (Models EI24WC65GS & EI24BC65GS) To reverse the door: 1 Disconnect power to the wine cooler / beverage center. 2 Remove toe grille. 4 Remove upper RH hinge bracket by calling Electrolux.
... before beginning the conversion. 8 Door Reversal Reversing the Door This model comes equipped with a right-hand (RH) swing door. Order Part Number: 5303918374 (Models EI24WC65GS & EI24BC65GS) To reverse the door: 1 Disconnect power to the wine cooler / beverage center. 2 Remove toe grille. 4 Remove upper RH hinge bracket by calling Electrolux.

Complete Owner's Guide (English)
Page 9
Remove metal RH door stop by removing screw. 12 Install lower LH door closer in LH side. 8 Remove plastic RH door closer by removing screw. Do not overtighten. 10 Install plastic LH door stop by removing two (2) screws. Apply petroleum jelly to the other. Remove P-clamp and install in lower LH door hinge by installing screw. 13 Install lower LH door hinge by removing two (2) screws. 7 Shift door harness from one side to lower LH hinge pin. Replace access cover. 9 Install metal LH door stop by installing screw. 11 Remove lower RH door hinge by installing screw. Door Reversal...
Remove metal RH door stop by removing screw. 12 Install lower LH door closer in LH side. 8 Remove plastic RH door closer by removing screw. Do not overtighten. 10 Install plastic LH door stop by removing two (2) screws. Apply petroleum jelly to the other. Remove P-clamp and install in lower LH door hinge by installing screw. 13 Install lower LH door hinge by removing two (2) screws. 7 Shift door harness from one side to lower LH hinge pin. Replace access cover. 9 Install metal LH door stop by installing screw. 11 Remove lower RH door hinge by installing screw. Door Reversal...

Complete Owner's Guide (English)
Page 10
Place door on lower LH hinge bracket. Retighten screws. Reconnect door harness to bracket. 15 Install upper LH hinge bracket by installing four (4) screws. Retighten screws. Remove Button Plug From Left Side And Install On Right Side 16 Route door harness behind lower front panel. c) Remove door gasket, turn 180°, and reinstall. 17 Attach LH toe grille. 18 Reapply power. If door does not close properly after reversing, the following actions may be taken: a) Loosen lower hinge screws and align door. b) Loosen upper hinge screws and align door. 10 Door Reversal ...
Place door on lower LH hinge bracket. Retighten screws. Reconnect door harness to bracket. 15 Install upper LH hinge bracket by installing four (4) screws. Retighten screws. Remove Button Plug From Left Side And Install On Right Side 16 Route door harness behind lower front panel. c) Remove door gasket, turn 180°, and reinstall. 17 Attach LH toe grille. 18 Reapply power. If door does not close properly after reversing, the following actions may be taken: a) Loosen lower hinge screws and align door. b) Loosen upper hinge screws and align door. 10 Door Reversal ...
Complete Owner's Guide (English)
Page 11
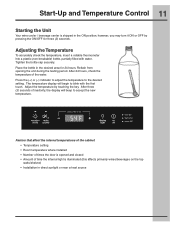
...check the temperature of inactivity, the display will begin to the desired setting. Adjust the temperature by pressing the ON/OFF for 24 hours. Refrain from opening the unit during the testing period. After three (3) seconds of the water. Factors that affect the ... to adjust the temperature to blink with water. Start-Up and Temperature Control 11 Starting the Unit Your wine cooler / beverage center is illuminated (this affects primarily wines/beverages on the top racks/shelves) • Installation in direct sunlight or near a heat source Adjusting the Temperature To accurately ...
...check the temperature of inactivity, the display will begin to the desired setting. Adjust the temperature by pressing the ON/OFF for 24 hours. Refrain from opening the unit during the testing period. After three (3) seconds of the water. Factors that affect the ... to adjust the temperature to blink with water. Start-Up and Temperature Control 11 Starting the Unit Your wine cooler / beverage center is illuminated (this affects primarily wines/beverages on the top racks/shelves) • Installation in direct sunlight or near a heat source Adjusting the Temperature To accurately ...
Complete Owner's Guide (English)
Page 12
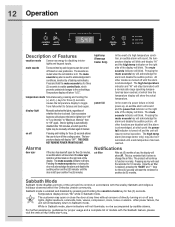
... keypress will reset the reminder for another five (5) minutes. THIS DOES NOT REMOVE POWER FROM THE UNIT. The high temp alarm (beverage center only) may be manually activated again if desired. The product will acknowledge the alarm and disable the audible portion. Once the air ...three (3) seconds allows the user to turn off any key will advance the interior lights from Fahrenheit to function normally. high temp (Beverage Center Only) In the event of a high temperature condition, an audible alarm will sound, the temperature display will blink and display "HI"...
... keypress will reset the reminder for another five (5) minutes. THIS DOES NOT REMOVE POWER FROM THE UNIT. The high temp alarm (beverage center only) may be manually activated again if desired. The product will acknowledge the alarm and disable the audible portion. Once the air ...three (3) seconds allows the user to turn off any key will advance the interior lights from Fahrenheit to function normally. high temp (Beverage Center Only) In the event of a high temperature condition, an audible alarm will sound, the temperature display will blink and display "HI"...
Complete Owner's Guide (English)
Page 13
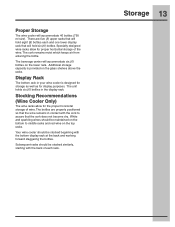
... bottom display rack at the back and working forward staggering the bottles. Subsequent racks should be stocked beginning with the back of the wine. The beverage center will accommodate six (6) bottles on the glass shelves above the racks.
... bottom display rack at the back and working forward staggering the bottles. Subsequent racks should be stocked beginning with the back of the wine. The beverage center will accommodate six (6) bottles on the glass shelves above the racks.
Complete Owner's Guide (English)
Page 14
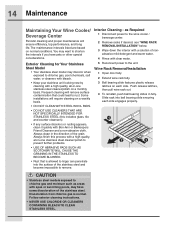
You may want to chlorine gas and moisture such as Required 1 Disconnect power to the wine cooler / beverage center. 2 Remove racks if desired, see "WINE RACK REMOVAL/INSTALLATION" below. 3 Wipe down the interior with clear water. 5 Reconnect power to ...model may have pets or other special considerations. Slide rack into the surface of the stainless steel. 14 Maintenance Maintaining Your Wine Cooler/ Beverage Center Periodic cleaning and proper maintenance will remove surface contamination that is normal. Some installations will require cleaning on a monthly basis. Always finish...
You may want to chlorine gas and moisture such as Required 1 Disconnect power to the wine cooler / beverage center. 2 Remove racks if desired, see "WINE RACK REMOVAL/INSTALLATION" below. 3 Wipe down the interior with clear water. 5 Reconnect power to ...model may have pets or other special considerations. Slide rack into the surface of the stainless steel. 14 Maintenance Maintaining Your Wine Cooler/ Beverage Center Periodic cleaning and proper maintenance will remove surface contamination that is normal. Some installations will require cleaning on a monthly basis. Always finish...

Complete Owner's Guide (English)
Page 15
b. Electrolux recommends that you order extra filters when you first install your wine cooler, and that you bought your filters at least once every six months. b. ..., or seeing the dealer where you replace your wine cooler. Cantilever brackets will disengage from ladder. glass shelf removal: a. c. Maintenance 15 Glass Shelf Removal/Installation (Beverage Center Only) 1 Open door fully. 2 Method 1 - removal of shelf. To reinstall, slide shelf into ball bearing slide ensuring each side. Air Filter Install the static air...
b. Electrolux recommends that you order extra filters when you first install your wine cooler, and that you bought your filters at least once every six months. b. ..., or seeing the dealer where you replace your wine cooler. Cantilever brackets will disengage from ladder. glass shelf removal: a. c. Maintenance 15 Glass Shelf Removal/Installation (Beverage Center Only) 1 Open door fully. 2 Method 1 - removal of shelf. To reinstall, slide shelf into ball bearing slide ensuring each side. Air Filter Install the static air...
Complete Owner's Guide (English)
Page 16
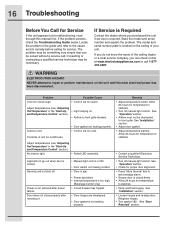
...The model and serial number plate is not sealing properly. • Contact a qualified Electrolux Service Technician. • Turn off manual light control. Adjust temperatures (see "Adjusting the...; Door is ajar. • Power has failed. • Internal temperature is too high. (Beverage Center only) • Circuit breaker has tripped. • Door hinges are misaligned. • Door ...section. • Airflow must not be solved without a service call 1-877435-3287. Allow 24 hours for proper door alignment. • Press "Mute Sounds" key to front grille ...
...The model and serial number plate is not sealing properly. • Contact a qualified Electrolux Service Technician. • Turn off manual light control. Adjust temperatures (see "Adjusting the...; Door is ajar. • Power has failed. • Internal temperature is too high. (Beverage Center only) • Circuit breaker has tripped. • Door hinges are misaligned. • Door ...section. • Airflow must not be solved without a service call 1-877435-3287. Allow 24 hours for proper door alignment. • Press "Mute Sounds" key to front grille ...
Complete Owner's Guide (English)
Page 17
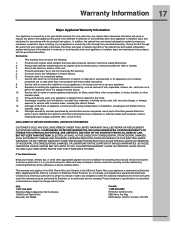
...to floors, cabinets, walls, etc. 14. Products used other than authorized service companies; Damages caused by: services performed by Electrolux Major Appliances North America, a division of this warranty. 5. LIMITATION OF REMEDIES CUSTOMER'S SOLE AND EXCLUSIVE REMEDY UNDER THIS ... inadequate power supply, accidents, fires, or acts of your appliance is warranted by a one year from persons other than genuine Electrolux parts or parts obtained from your appliance. 9. In addition, the cabinet liner and sealed refrigeration system (compressor, condenser, evaporator,...
...to floors, cabinets, walls, etc. 14. Products used other than authorized service companies; Damages caused by: services performed by Electrolux Major Appliances North America, a division of this warranty. 5. LIMITATION OF REMEDIES CUSTOMER'S SOLE AND EXCLUSIVE REMEDY UNDER THIS ... inadequate power supply, accidents, fires, or acts of your appliance is warranted by a one year from persons other than genuine Electrolux parts or parts obtained from your appliance. 9. In addition, the cabinet liner and sealed refrigeration system (compressor, condenser, evaporator,...
Wiring Diagram (All Languages)
Page 1
... removal, it will distort the plastic liner. Electrolux stainless steel models require a minimum 2⁷⁄₈ inch handle clearance when installed against a wall or cabinet that the cabinet rough opening dimensions be shielded from torch flame. When built-in installation. NOTE Your Electrolux wine cooler / beverage center has been designed for top, sides or rear...
... removal, it will distort the plastic liner. Electrolux stainless steel models require a minimum 2⁷⁄₈ inch handle clearance when installed against a wall or cabinet that the cabinet rough opening dimensions be shielded from torch flame. When built-in installation. NOTE Your Electrolux wine cooler / beverage center has been designed for top, sides or rear...
