Product Specifications Sheet (English)
Page 1
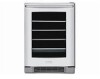
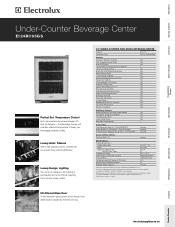
...; Replacement Air Filter - Wall Ovens Warmer Drawers Cooktops Built-In Ranges Freestanding Ranges Microwaves Under-Counter Beverage Center EI24BC65GS Perfect Set¤ Temperature Control Set a temperature anywhere between 35 and 45 degrees - Appliance must be grounded for Shelves - Height (Adjustable) 34-5/16" - 35" Width 23-13/16" Depth (to Product Installation Guide for detailed installation instructions on Racks Yes Luxury-Design® Lighting Yes Exhibit Lighting with Manual Control Yes Perfect Set® Controls Yes PureAdvantage® Air...
...; Replacement Air Filter - Wall Ovens Warmer Drawers Cooktops Built-In Ranges Freestanding Ranges Microwaves Under-Counter Beverage Center EI24BC65GS Perfect Set¤ Temperature Control Set a temperature anywhere between 35 and 45 degrees - Appliance must be grounded for Shelves - Height (Adjustable) 34-5/16" - 35" Width 23-13/16" Depth (to Product Installation Guide for detailed installation instructions on Racks Yes Luxury-Design® Lighting Yes Exhibit Lighting with Manual Control Yes Perfect Set® Controls Yes PureAdvantage® Air...
Product Specifications Sheet (English)
Page 2
... EI24BC65GS 12/10 © 2008 Electrolux Major Appliances, NA Printed in , under -counter installation does not require additional airspace for ease of Field-Reversible Door Kit - Appliance must be grounded for safe operation.) • Amps @ 120 Volts = 6 Amps • Electrical cable supplied. • Always consult local and national electric codes. • Unit is designed for either freestanding or built-in, under-counter installation...
... EI24BC65GS 12/10 © 2008 Electrolux Major Appliances, NA Printed in , under -counter installation does not require additional airspace for ease of Field-Reversible Door Kit - Appliance must be grounded for safe operation.) • Amps @ 120 Volts = 6 Amps • Electrical cable supplied. • Always consult local and national electric codes. • Unit is designed for either freestanding or built-in, under-counter installation...
Energy Guide (English)
Page 1
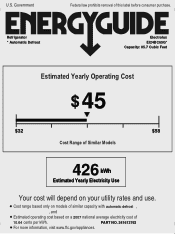
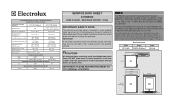
PART NO. 241613763 For more information, visit www.ftc.gov/appliances. Government Federal law prohibits removal of similar capacity with automatic defrost , , and Estimated operating cost based on your utility rates and use. Refrigerator * Automatic Defrost Electrolux EI24BC65G* Capacity: 05.7 Cubic Feet Estimated Yearly Operating Cost $ 45 $32 $58 Cost Range of Similar Models 426 kWh Estimated Yearly Electricity Use Your cost...
PART NO. 241613763 For more information, visit www.ftc.gov/appliances. Government Federal law prohibits removal of similar capacity with automatic defrost , , and Estimated operating cost based on your utility rates and use. Refrigerator * Automatic Defrost Electrolux EI24BC65G* Capacity: 05.7 Cubic Feet Estimated Yearly Operating Cost $ 45 $32 $58 Cost Range of Similar Models 426 kWh Estimated Yearly Electricity Use Your cost...

Complete Owner's Guide (English)
Page 2
... the service life of this manual and the sales receipt together in home appliances. Warranty coverage begins at www.electroluxappliances. Purchase Date Electrolux Model Number Electrolux Serial Number Dealer Name Dealer Address Dealer Telephone Keep this manual. and Canada: 1-877- 4ELECTROLUX (1-877-435-3287) For online support and Internet product information: www.electroluxappliances.com 2 Finding Information Please Read and Save This Guide Thank you purchased your unit. All wine coolers / beverage centers require...
... the service life of this manual and the sales receipt together in home appliances. Warranty coverage begins at www.electroluxappliances. Purchase Date Electrolux Model Number Electrolux Serial Number Dealer Name Dealer Address Dealer Telephone Keep this manual. and Canada: 1-877- 4ELECTROLUX (1-877-435-3287) For online support and Internet product information: www.electroluxappliances.com 2 Finding Information Please Read and Save This Guide Thank you purchased your unit. All wine coolers / beverage centers require...
Complete Owner's Guide (English)
Page 3
... and Temperature Control 11 Starting the Unit...11 Adjusting the Temperature 11 Operation 12 Description of Features...12 Alarms...12 Notifications...12 Sabbath Mode...12 Storage 13 Proper Storage...13 Display Rack (Wine Cooler Only 13 Stocking Recommendations (Wine Cooler Only 13 Maintenance 14 Maintaining Your Wine Cooler / Beverage Center 14 Exterior Cleaning for Your Stainless Steel Model 14 Interior Cleaning...14 Wine Rack Removal/Installation 14 Glass Shelf Removal/Installation (Beverage Center Only 15 Troubleshooting 16...
... and Temperature Control 11 Starting the Unit...11 Adjusting the Temperature 11 Operation 12 Description of Features...12 Alarms...12 Notifications...12 Sabbath Mode...12 Storage 13 Proper Storage...13 Display Rack (Wine Cooler Only 13 Stocking Recommendations (Wine Cooler Only 13 Maintenance 14 Maintaining Your Wine Cooler / Beverage Center 14 Exterior Cleaning for Your Stainless Steel Model 14 Interior Cleaning...14 Wine Rack Removal/Installation 14 Glass Shelf Removal/Installation (Beverage Center Only 15 Troubleshooting 16...
Complete Owner's Guide (English)
Page 4
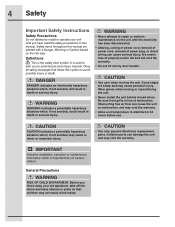
... Instructions Safety Precautions Do not attempt to install or operate your old appliance, take off the doors and leave shelves in place so that follow this symbol to avoid possible injury or death. Safety items throughout this manual. Obey all safety messages that children may void the warranty. • Allow unit temperature to stabilize for 24 hours before use. Obstructing free air...
... Instructions Safety Precautions Do not attempt to install or operate your old appliance, take off the doors and leave shelves in place so that follow this symbol to avoid possible injury or death. Safety items throughout this manual. Obey all safety messages that children may void the warranty. • Allow unit temperature to stabilize for 24 hours before use. Obstructing free air...
Complete Owner's Guide (English)
Page 5
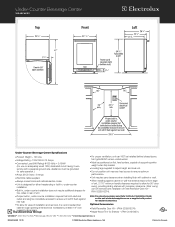
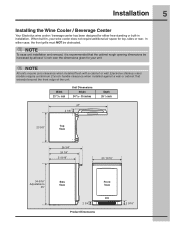
... 3/4 inch 47" 2 7/8" 23 5/8" Top View 26 3/4" 24 1/4" 21 9/16" 23 13/16" 34-5/16" Adjustable to 35" Side View Front View 2 3/4" Product Dimensions 3 5/16" When built-in installation. NOTE All units require zero clearance when installed flush with a cabinet or wall. NOTE To ease unit installation and removal, it is recommended that extends beyond the front edge of the unit. Installation 5 Installing the Wine Cooler / Beverage Center Your Electrolux wine cooler / beverage center...
... 3/4 inch 47" 2 7/8" 23 5/8" Top View 26 3/4" 24 1/4" 21 9/16" 23 13/16" 34-5/16" Adjustable to 35" Side View Front View 2 3/4" Product Dimensions 3 5/16" When built-in installation. NOTE All units require zero clearance when installed flush with a cabinet or wall. NOTE To ease unit installation and removal, it is recommended that extends beyond the front edge of the unit. Installation 5 Installing the Wine Cooler / Beverage Center Your Electrolux wine cooler / beverage center...
Complete Owner's Guide (English)
Page 6
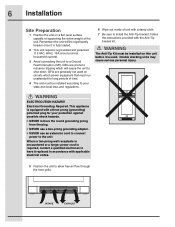
... supporting the entire weight of time. 4 The unit must be installed according to your protection against possible shock hazards. • NEVER remove the round grounding prong from the plug. • NEVER use a two-prong grounding adapter. • NEVER use an extension cord to connect power to allow free air flow through the front grille. GFIs are generally not used on circuits...
... supporting the entire weight of time. 4 The unit must be installed according to your protection against possible shock hazards. • NEVER remove the round grounding prong from the plug. • NEVER use a two-prong grounding adapter. • NEVER use an extension cord to connect power to allow free air flow through the front grille. GFIs are generally not used on circuits...

Complete Owner's Guide (English)
Page 7
Turn the legs clockwise to raise and counterclockwise to lower. Leveling 7 Leveling the Unit Position the unit on a flat, level surface capable of supporting the entire weight of the unit when full. This unit contains four (4) adjustable leveling legs.
Turn the legs clockwise to raise and counterclockwise to lower. Leveling 7 Leveling the Unit Position the unit on a flat, level surface capable of supporting the entire weight of the unit when full. This unit contains four (4) adjustable leveling legs.
Complete Owner's Guide (English)
Page 8
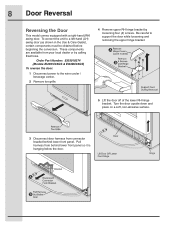
... Part Number: 5303918374 (Models EI24WC65GS & EI24BC65GS) To reverse the door: 1 Disconnect power to the wine cooler / beverage center. 2 Remove toe grille. 4 Remove upper RH hinge bracket by calling Electrolux. Be careful to a left-hand (LH) swing door (as shown in the Use & Care Guide), certain components must be obtained before beginning the conversion. Pull harness from behind lower front panel. To convert the unit to support the door while loosening and removing the upper hinge...
... Part Number: 5303918374 (Models EI24WC65GS & EI24BC65GS) To reverse the door: 1 Disconnect power to the wine cooler / beverage center. 2 Remove toe grille. 4 Remove upper RH hinge bracket by calling Electrolux. Be careful to a left-hand (LH) swing door (as shown in the Use & Care Guide), certain components must be obtained before beginning the conversion. Pull harness from behind lower front panel. To convert the unit to support the door while loosening and removing the upper hinge...

Complete Owner's Guide (English)
Page 9
... cover by installing two (2) screws. Apply petroleum jelly to the other. Do not overtighten. 10 Install plastic LH door stop by installing screw. Remove P-clamp and install in lower LH door hinge by installing screw. 13 Install lower LH door hinge by removing two (2) screws. 7 Shift door harness from one side to lower LH hinge pin. Replace access cover. 9 Install metal LH door stop by installing screw. 11 Remove lower RH door hinge by removing...
... cover by installing two (2) screws. Apply petroleum jelly to the other. Do not overtighten. 10 Install plastic LH door stop by installing screw. Remove P-clamp and install in lower LH door hinge by installing screw. 13 Install lower LH door hinge by removing two (2) screws. 7 Shift door harness from one side to lower LH hinge pin. Replace access cover. 9 Install metal LH door stop by installing screw. 11 Remove lower RH door hinge by removing...

Complete Owner's Guide (English)
Page 10
... lower hinge screws and align door. b) Loosen upper hinge screws and align door. Remove Button Plug From Left Side And Install On Right Side 16 Route door harness behind lower front panel. Place door on lower LH hinge bracket. Retighten screws. Reconnect door harness to bracket. 15 Install upper LH hinge bracket by installing four (4) screws. Retighten screws. c) Remove door gasket, turn 180°, and reinstall. 17 Attach LH toe grille. 18 Reapply power. 10 Door...
... lower hinge screws and align door. b) Loosen upper hinge screws and align door. Remove Button Plug From Left Side And Install On Right Side 16 Route door harness behind lower front panel. Place door on lower LH hinge bracket. Retighten screws. Reconnect door harness to bracket. 15 Install upper LH hinge bracket by installing four (4) screws. Retighten screws. c) Remove door gasket, turn 180°, and reinstall. 17 Attach LH toe grille. 18 Reapply power. 10 Door...
Complete Owner's Guide (English)
Page 11
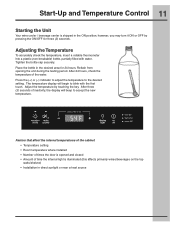
... the bottle cap securely. Refrain from opening the unit during the testing period. Factors that affect the internal temperatures of the cabinet • Temperature setting • Room temperature where installed • Number of times the door is opened and closed • Amount of the water. Start-Up and Temperature Control 11 Starting the Unit Your wine cooler / beverage center is illuminated (this affects primarily wines/beverages on the top racks...
... the bottle cap securely. Refrain from opening the unit during the testing period. Factors that affect the internal temperatures of the cabinet • Temperature setting • Room temperature where installed • Number of times the door is opened and closed • Amount of the water. Start-Up and Temperature Control 11 Starting the Unit Your wine cooler / beverage center is illuminated (this affects primarily wines/beverages on the top racks...
Complete Owner's Guide (English)
Page 12
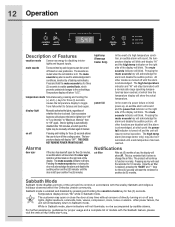
... NOT REMOVE POWER FROM THE UNIT. The mute sounds indicator will blink. The mute sounds indicator will blink. The high temperature indicator and "HI" will stay illuminated until a normal safe range operating temperature has been reached, at which point the lights may be illuminated until a safe temperature has been reached. Notifications air filter After six (6) months of use, the display will continue to turn off...
... NOT REMOVE POWER FROM THE UNIT. The mute sounds indicator will blink. The mute sounds indicator will blink. The high temperature indicator and "HI" will stay illuminated until a normal safe range operating temperature has been reached, at which point the lights may be illuminated until a safe temperature has been reached. Notifications air filter After six (6) months of use, the display will continue to turn off...
Complete Owner's Guide (English)
Page 13
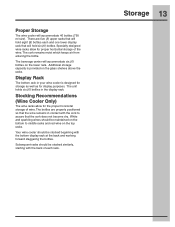
... the bottle. Stocking Recommendations (Wine Cooler Only) The wine racks allow for display purposes. Your wine cooler should be stocked beginning with the back of the wine. The beverage center will hold eight (8) bottles each rack. Subsequent racks should be stocked similarly, starting with the bottom display rack at the back and working forward staggering the bottles. Proper Storage The wine cooler will accommodate 46 bottles (750 ml size). The bottles are five (5) upper racks that...
... the bottle. Stocking Recommendations (Wine Cooler Only) The wine racks allow for display purposes. Your wine cooler should be stocked beginning with the back of the wine. The beverage center will hold eight (8) bottles each rack. Subsequent racks should be stocked similarly, starting with the bottom display rack at the back and working forward staggering the bottles. Proper Storage The wine cooler will accommodate 46 bottles (750 ml size). The bottles are five (5) upper racks that...
Complete Owner's Guide (English)
Page 14
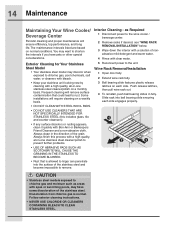
.... 14 Maintenance Maintaining Your Wine Cooler/ Beverage Center Periodic cleaning and proper maintenance will require cleaning on a weekly basis. • DO NOT CLEAN WITH STEEL WOOL PADS. • DO NOT USE CLEANERS THAT ARE NOT SPECIFICALLY INTENDED FOR STAINLESS STEEL (this process with clear water. 5 Reconnect power to rust. Push release latches, then pull wine rack out. 4 To reinstall, push...
.... 14 Maintenance Maintaining Your Wine Cooler/ Beverage Center Periodic cleaning and proper maintenance will require cleaning on a weekly basis. • DO NOT CLEAN WITH STEEL WOOL PADS. • DO NOT USE CLEANERS THAT ARE NOT SPECIFICALLY INTENDED FOR STAINLESS STEEL (this process with clear water. 5 Reconnect power to rust. Push release latches, then pull wine rack out. 4 To reinstall, push...

Complete Owner's Guide (English)
Page 15
... of shelf. Ordering replacement filters Order new filters by calling toll-free 1-877-8084195, visiting www.electroluxappliances.com, or seeing the dealer where you replace your wine cooler. Slide shelf rack into cabinet ensuring the cantilever brackets engage fully in the proper holes. Maintenance 15 Glass Shelf Removal/Installation (Beverage Center Only) 1 Open door fully. 2 Method 1 - It may help to request when ordering: PureAdvantageTM Air Filter, Part # EAFCBF...
... of shelf. Ordering replacement filters Order new filters by calling toll-free 1-877-8084195, visiting www.electroluxappliances.com, or seeing the dealer where you replace your wine cooler. Slide shelf rack into cabinet ensuring the cantilever brackets engage fully in the proper holes. Maintenance 15 Glass Shelf Removal/Installation (Beverage Center Only) 1 Open door fully. 2 Method 1 - It may help to request when ordering: PureAdvantageTM Air Filter, Part # EAFCBF...
Complete Owner's Guide (English)
Page 16
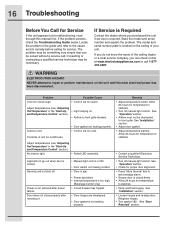
...; Adjust temperature colder. Adjust temperatures (see "Adjusting the Temperature" in the guide and refer to repair or perform maintenance on the ceiling of unit too cold/frozen. • Door gasket not sealing properly. • Control set too warm. Retighten hinges. • Turn gasket 180°. See "Installation" section. • Adjust door gasket. • Adjust temperature warmer. Power is closed firmly. • Allow 24 hours for temperature to stabilize. • Turn off manual light control. 16 Troubleshooting Before You Call for Service If the unit...
...; Adjust temperature colder. Adjust temperatures (see "Adjusting the Temperature" in the guide and refer to repair or perform maintenance on the ceiling of unit too cold/frozen. • Door gasket not sealing properly. • Control set too warm. Retighten hinges. • Turn gasket 180°. See "Installation" section. • Adjust door gasket. • Adjust temperature warmer. Power is closed firmly. • Allow 24 hours for temperature to stabilize. • Turn off manual light control. 16 Troubleshooting Before You Call for Service If the unit...
Complete Owner's Guide (English)
Page 17
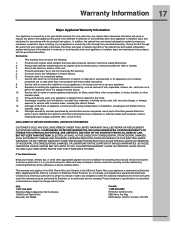
... year from its original owner to repair or replace appliance light bulbs, air filters, water filters, other consumables, or knobs, handles, or other than genuine Electrolux parts or parts obtained from the factory. 10. LIMITATION OF REMEDIES CUSTOMER'S SOLE AND EXCLUSIVE REMEDY UNDER THIS LIMITED WARRANTY SHALL BE REPAIR OR REPLACEMENT AS PROVIDED HEREIN. THIS WRITTEN WARRANTY GIVES YOU SPECIFIC LEGAL RIGHTS. If service is performed, it is...
... year from its original owner to repair or replace appliance light bulbs, air filters, water filters, other consumables, or knobs, handles, or other than genuine Electrolux parts or parts obtained from the factory. 10. LIMITATION OF REMEDIES CUSTOMER'S SOLE AND EXCLUSIVE REMEDY UNDER THIS LIMITED WARRANTY SHALL BE REPAIR OR REPLACEMENT AS PROVIDED HEREIN. THIS WRITTEN WARRANTY GIVES YOU SPECIFIC LEGAL RIGHTS. If service is performed, it is...
Wiring Diagram (All Languages)
Page 1
... unit. Caution All electrical parts and wiring must NOT be increased by at 500°F. Excessive heat will char at 200°F and flash ignite (burn) at least ¼ inch over the dimensions given for your wine cooler does not require additional air space for either case, the front grille must be returned to assist qualified repair personnel only. NOTE Your Electrolux wine cooler / beverage center...
... unit. Caution All electrical parts and wiring must NOT be increased by at 500°F. Excessive heat will char at 200°F and flash ignite (burn) at least ¼ inch over the dimensions given for your wine cooler does not require additional air space for either case, the front grille must be returned to assist qualified repair personnel only. NOTE Your Electrolux wine cooler / beverage center...


