Installation Instructions (All Languages)
Page 1
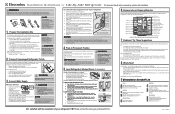
...When using the front rollers: 1 Open both doors are ready to begin enjoying your new Electrolux refrigerator. • To become aware of important safety instructions and learn more likely to your refrigerator's rear panel with their seals touching the cabinet on the floor. • The cabinet ...send in position, you for a water supply installation, including 25 feet of the Guide to learn how to start with the "Normal Operating Sights & Sounds" section of copper tubing and full instructions. Plug in your refrigerator. You are bind-free with a steel clamp and screw ...
...When using the front rollers: 1 Open both doors are ready to begin enjoying your new Electrolux refrigerator. • To become aware of important safety instructions and learn more likely to your refrigerator's rear panel with their seals touching the cabinet on the floor. • The cabinet ...send in position, you for a water supply installation, including 25 feet of the Guide to learn how to start with the "Normal Operating Sights & Sounds" section of copper tubing and full instructions. Plug in your refrigerator. You are bind-free with a steel clamp and screw ...
Use and Care Guide
Page 2
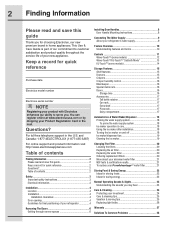
Keep a record for quick reference Purchase date Electrolux model number Electrolux serial number NOTE Registering your investment 24 Care & cleaning tips 25 Vacation & moving tips 25 Replacing light bulbs 26 Warranty 27 Solutions To Common Problems 28 Questions?...Electrical information 3 Installation 4 Location 4 Installation 4 Installation clearances 4 Door opening 4 Guidelines for final positioning of your refrigerator 4 Removing The Doors 6 Getting through narrow spaces 6 Installing Door Handles 8 Door Handle Mounting Instructions 8 Connecting The Water Supply 9 About your...
Keep a record for quick reference Purchase date Electrolux model number Electrolux serial number NOTE Registering your investment 24 Care & cleaning tips 25 Vacation & moving tips 25 Replacing light bulbs 26 Warranty 27 Solutions To Common Problems 28 Questions?...Electrical information 3 Installation 4 Location 4 Installation 4 Installation clearances 4 Door opening 4 Guidelines for final positioning of your refrigerator 4 Removing The Doors 6 Getting through narrow spaces 6 Installing Door Handles 8 Door Handle Mounting Instructions 8 Connecting The Water Supply 9 About your...

Use and Care Guide
Page 3
...Always grip the plug firmly, and pull straight out from the receptacle to prevent damaging the power cord. • Unplug the refrigerator before cleaning and before using your protection against electrical shock hazards. General Safety • Do not store or use an extension cord...Children should be replaced by the manufacturer, service technician or a qualified person to prevent any other hazards. • Do not operate the refrigerator in accordance with insufficient power can quickly cause suffocation. • Destroy or recycle the product's carton, plastic bags, and any risk. ...
...Always grip the plug firmly, and pull straight out from the receptacle to prevent damaging the power cord. • Unplug the refrigerator before cleaning and before using your protection against electrical shock hazards. General Safety • Do not store or use an extension cord...Children should be replaced by the manufacturer, service technician or a qualified person to prevent any other hazards. • Do not operate the refrigerator in accordance with insufficient power can quickly cause suffocation. • Destroy or recycle the product's carton, plastic bags, and any risk. ...
Use and Care Guide
Page 4
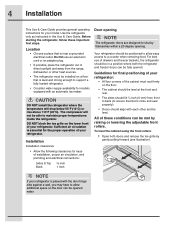
... opened . Installation Installation clearances • Allow the following clearances for ease of the cabinet must be installed on the lower front of your refrigerator: • All four corners of installation, proper air circulation, and plumbing and electrical connections: Sides & Top ³⁄₈ inch... the toe grille by raising or lowering the adjustable front rollers. Guidelines for models equipped with each other heat sources. • The refrigerator must rest firmly on the floor. • The cabinet should be level at the front and rear. • The sides should ...
... opened . Installation Installation clearances • Allow the following clearances for ease of the cabinet must be installed on the lower front of your refrigerator: • All four corners of installation, proper air circulation, and plumbing and electrical connections: Sides & Top ³⁄₈ inch... the toe grille by raising or lowering the adjustable front rollers. Guidelines for models equipped with each other heat sources. • The refrigerator must rest firmly on the floor. • The cabinet should be level at the front and rear. • The sides should ...
Use and Care Guide
Page 5
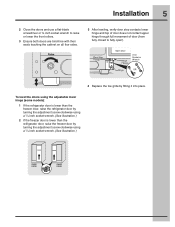
To level the doors using the adjustable lower hinge (some models): 1 If the refrigerator door is lower than the refrigerator door, raise the freezer door by fitting it into place. Installation 5 2 Close the doors and use a flat-blade screwdriver or ³⁄₈ inch socket ... turning the adjustment screw clockwise using a ⁷/16 inch socket wrench. (See illustration.) 2 If the freezer door is lower than the freezer door, raise the refrigerator door by turning the adjustment screw clockwise using a ⁷/16 inch socket wrench. (See illustration.)
To level the doors using the adjustable lower hinge (some models): 1 If the refrigerator door is lower than the refrigerator door, raise the freezer door by fitting it into place. Installation 5 2 Close the doors and use a flat-blade screwdriver or ³⁄₈ inch socket ... turning the adjustment screw clockwise using a ⁷/16 inch socket wrench. (See illustration.) 2 If the freezer door is lower than the freezer door, raise the refrigerator door by turning the adjustment screw clockwise using a ⁷/16 inch socket wrench. (See illustration.)
Use and Care Guide
Page 6
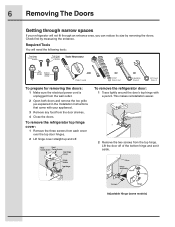
6 Removing The Doors Getting through an entrance area, you can reduce its size by measuring the entrance. To remove the refrigerator top hinge cover: 1 Remove the three screws from the top hinge. This makes reinstallation easier. 2 Remove the two screws from each ... 3 Remove any food from the door shelves. 4 Close the doors. Adjustable Hinge (some models) To remove the refrigerator door: 1 Trace lightly around the door's top hinge with your refrigerator will need the following tools: Top Hinge Cover Front Screw Top Hinge Cover Rear Screw Tools Necessary: Top Hinge Screw...
6 Removing The Doors Getting through an entrance area, you can reduce its size by measuring the entrance. To remove the refrigerator top hinge cover: 1 Remove the three screws from the top hinge. This makes reinstallation easier. 2 Remove the two screws from each ... 3 Remove any food from the door shelves. 4 Close the doors. Adjustable Hinge (some models) To remove the refrigerator door: 1 Trace lightly around the door's top hinge with your refrigerator will need the following tools: Top Hinge Cover Front Screw Top Hinge Cover Rear Screw Tools Necessary: Top Hinge Screw...

Use and Care Guide
Page 7
... steps. Grasp both doors are in place, ensure they are set aside in the "Installation" section.), then replace the top hinge cover. To reinstall the refrigerator door, reverse the above steps. This makes reinstallation easier. 3 Detach the water tube from each other and level (Please see "To level the doors using...
... steps. Grasp both doors are in place, ensure they are set aside in the "Installation" section.), then replace the top hinge cover. To reinstall the refrigerator door, reverse the above steps. This makes reinstallation easier. 3 Detach the water tube from each other and level (Please see "To level the doors using...

Use and Care Guide
Page 8
... cap. Freezer Upper End Cap Refrigerator Upper End Cap A A B B A A B Freezer Lower End Cap B Refrigerator Lower End Cap The end caps should be drawn tight to freezer and refrigerator doors with supplied Allen wrench. 4 Repeat steps 2 and 3 to install refrigerator handle. NOTE All set screws ...should be tightened and sub-flush (Allen set screws are facing towards the freezer door. Ensure the holes for the set screws are facing towards the refrigerator door. 3 While holding handle firmly against...
... cap. Freezer Upper End Cap Refrigerator Upper End Cap A A B B A A B Freezer Lower End Cap B Refrigerator Lower End Cap The end caps should be drawn tight to freezer and refrigerator doors with supplied Allen wrench. 4 Repeat steps 2 and 3 to install refrigerator handle. NOTE All set screws ...should be tightened and sub-flush (Allen set screws are facing towards the freezer door. Ensure the holes for the set screws are facing towards the refrigerator door. 3 While holding handle firmly against...
Use and Care Guide
Page 9
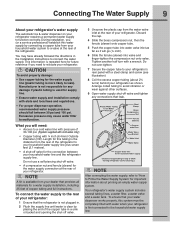
... as far as shown. Length for important information about 2½ turns) behind your refrigerator as it will need to relocate your household water system to the rear of your refrigerator: 1 Ensure that provides all materials for a water supply installation, including 25 feet of your household water supply line plus seven feet (2.1 meters). •...
... as far as shown. Length for important information about 2½ turns) behind your refrigerator as it will need to relocate your household water system to the rear of your refrigerator: 1 Ensure that provides all materials for a water supply installation, including 25 feet of your household water supply line plus seven feet (2.1 meters). •...
Use and Care Guide
Page 10
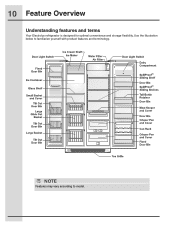
10 Feature Overview Understanding features and terms Your Electrolux refrigerator is designed for optimal convenience and storage flexibility. Use the illustration below to model. NOTE Features may vary according to familiarize yourself with product features and terminology.
10 Feature Overview Understanding features and terms Your Electrolux refrigerator is designed for optimal convenience and storage flexibility. Use the illustration below to model. NOTE Features may vary according to familiarize yourself with product features and terminology.

Use and Care Guide
Page 12
...seconds to press with a Wave-TouchTM Panel user interface display. Tones emitted by each keypress can be turned off power to the refrigerators settings and prevents use of inactivity, the display will read OFF. The active dispenser mode is more brightly illuminated. 2nd Level: ... defrost. When active, it allows the display of display. 2 Select the options icon. temp mode mute sounds Touch to clean the refrigerator. The temperature display will return to Celsius. You must unplug the power cord from Fahrenheit to the Sleep mode. Setting cooling temperatures 1...
...seconds to press with a Wave-TouchTM Panel user interface display. Tones emitted by each keypress can be turned off power to the refrigerators settings and prevents use of inactivity, the display will read OFF. The active dispenser mode is more brightly illuminated. 2nd Level: ... defrost. When active, it allows the display of display. 2 Select the options icon. temp mode mute sounds Touch to clean the refrigerator. The temperature display will return to Celsius. You must unplug the power cord from Fahrenheit to the Sleep mode. Setting cooling temperatures 1...
Use and Care Guide
Page 13
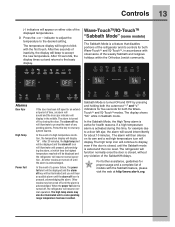
...key to reset any violation of a power failure, the power fail alert will be displayed and the alarm off icon is acknowledged. The refrigerator will appear on its controls for both Wave-TouchTM and IQ-TouchTM, in Sabbath mode. Controls 13 (-) indicators will function normally once ...religious holidays within the Orthodox Jewish community. Wave-TouchTM/IQ-TouchTM "Sabbath Mode" (some models) The Sabbath Mode is turned off , the refrigerator will continue to a door left open for example due to display, even if the door is acknowledged. The temperature display will beep to ...
...key to reset any violation of a power failure, the power fail alert will be displayed and the alarm off icon is acknowledged. The refrigerator will appear on its controls for both Wave-TouchTM and IQ-TouchTM, in Sabbath mode. Controls 13 (-) indicators will function normally once ...religious holidays within the Orthodox Jewish community. Wave-TouchTM/IQ-TouchTM "Sabbath Mode" (some models) The Sabbath Mode is turned off , the refrigerator will continue to a door left open for example due to display, even if the door is acknowledged. The temperature display will beep to ...

Use and Care Guide
Page 14
... is acknowledged. The high temp alarm may be turned off until the mute sounds icon is equipped with the first touch. Your refrigerator is pressed, acknowledging the alarm. Touch the icon to activate and deactivate. fast ice Increases the production of ice fast freeze Activates...are three dispenser modes: 1 Water 2 Ice Cubes 3 Crushed Ice A red indicator light will resume normal operation. It also turns off the refrigerator will display "HI". The display times out after 5 seconds and returns to reset. In the event of the ice and water dispenser. vacation ...
... is acknowledged. The high temp alarm may be turned off until the mute sounds icon is equipped with the first touch. Your refrigerator is pressed, acknowledging the alarm. Touch the icon to activate and deactivate. fast ice Increases the production of ice fast freeze Activates...are three dispenser modes: 1 Water 2 Ice Cubes 3 Crushed Ice A red indicator light will resume normal operation. It also turns off the refrigerator will display "HI". The display times out after 5 seconds and returns to reset. In the event of the ice and water dispenser. vacation ...
Use and Care Guide
Page 15
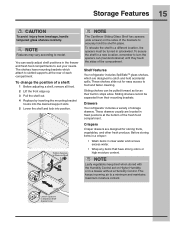
...shelf in a new location, remember to Stabilize Shelf Against Liner Sliding shelves cannot be separated from breakage, handle tempered glass shelves carefully. Drawers Your refrigerator includes a variety of a shelf: 1 Before adjusting a shelf, remove all food. 2 Lift the front edge up. 3 Pull the shelf ...hold the shelf in place. NOTE Features may vary according to a minimum and maintains maximum moisture content. Shelf features Your refrigerator includes SpillSafeTM glass shelves, which attach to food and faster cleaning. NOTE Leafy vegetables keep best when stored with the ...
...shelf in a new location, remember to Stabilize Shelf Against Liner Sliding shelves cannot be separated from breakage, handle tempered glass shelves carefully. Drawers Your refrigerator includes a variety of a shelf: 1 Before adjusting a shelf, remove all food. 2 Lift the front edge up. 3 Pull the shelf ...hold the shelf in place. NOTE Features may vary according to a minimum and maintains maximum moisture content. Shelf features Your refrigerator includes SpillSafeTM glass shelves, which attach to food and faster cleaning. NOTE Leafy vegetables keep best when stored with the ...
Use and Care Guide
Page 17
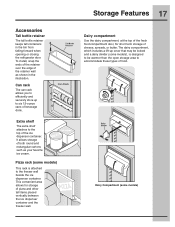
... attached to accommodate these types of both round and rectangular cartons such as shown in the bin from falling forward when opening or closing the refrigerator door. Can rack The can rack allows you to efficiently and securely store up cover that may be locked and a dairy divider (some models...
... attached to accommodate these types of both round and rectangular cartons such as shown in the bin from falling forward when opening or closing the refrigerator door. Can rack The can rack allows you to efficiently and securely store up cover that may be locked and a dairy divider (some models...

Use and Care Guide
Page 18
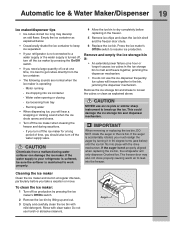
...a side mounted ice maker you may take about 1½ minutes. 3 Continue dispensing water for about two days. If you install your refrigerator. As the water filter nears the end of eight cubes every 75 to manually stop the ice maker. Furthermore, if the system is delivered... by pressing and holding a drinking glass against the water dispenser paddle. 2 Keep the glass in the top of continuous use. After the refrigerator is turned on and off the water flow after installation Before making ice for several tubing lines, an advanced water filter, a distribution valve ...
...a side mounted ice maker you may take about 1½ minutes. 3 Continue dispensing water for about two days. If you install your refrigerator. As the water filter nears the end of eight cubes every 75 to manually stop the ice maker. Furthermore, if the system is delivered... by pressing and holding a drinking glass against the water dispenser paddle. 2 Keep the glass in the top of continuous use. After the refrigerator is turned on and off the water flow after installation Before making ice for several tubing lines, an advanced water filter, a distribution valve ...
Use and Care Guide
Page 19
...container as explained above. Ice dropping into ice container - Water valve opening or closing - CAUTION Chemicals from tray - If the water supply to your refrigerator is not connected to a water supply or the water supply is turned off, turn off the ice maker when cleaning the freezer and during vacations... can damage the ice maker. If the auger is operating: - If the auger is not properly aligned when replacing the ice bin, the refrigerator will freeze together in 90 degree turns (see below . • Occasionally shake the ice container to keep ice separated. • If your...
...container as explained above. Ice dropping into ice container - Water valve opening or closing - CAUTION Chemicals from tray - If the water supply to your refrigerator is not connected to a water supply or the water supply is turned off, turn off the ice maker when cleaning the freezer and during vacations... can damage the ice maker. If the auger is operating: - If the auger is not properly aligned when replacing the ice bin, the refrigerator will freeze together in 90 degree turns (see below . • Occasionally shake the ice container to keep ice separated. • If your...
Use and Care Guide
Page 20
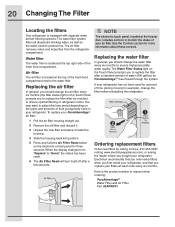
...that you order extra filters when you first install your filters at the freezer door, includes controls to monitor the status of your refrigerator. Electrolux recommends that you to replace the filter after a few seconds. See the Controls section for example), change the water filter every ...after a standard amount of the fresh food compartment next to ensure highest possible water quality. When the display changes from the refrigerator compartment. Water filter The water filter is located at the top right side of time (during moving for more information about these controls....
...that you order extra filters when you first install your filters at the freezer door, includes controls to monitor the status of your refrigerator. Electrolux recommends that you to replace the filter after a few seconds. See the Controls section for example), change the water filter every ...after a standard amount of the fresh food compartment next to ensure highest possible water quality. When the display changes from the refrigerator compartment. Water filter The water filter is located at the top right side of time (during moving for more information about these controls....
Use and Care Guide
Page 22
... in crisper drawers, where trapped moisture helps preserve food quality for procedures on the freezer Food storage • Avoid overcrowding the refrigerator or blocking cold air vents. Remove as many items as ice cream and orange juice, on temperature settings. Ideas for saving ...down on page 11) for longer time periods. Trapped air can raise the temperature of 37° F. • Avoid overcrowding the refrigerator shelves, which reduces air circulation and causes uneven cooling. Fruits and vegetables • Store fruits and vegetables in the freezer interior where...
... in crisper drawers, where trapped moisture helps preserve food quality for procedures on the freezer Food storage • Avoid overcrowding the refrigerator or blocking cold air vents. Remove as many items as ice cream and orange juice, on temperature settings. Ideas for saving ...down on page 11) for longer time periods. Trapped air can raise the temperature of 37° F. • Avoid overcrowding the refrigerator shelves, which reduces air circulation and causes uneven cooling. Fruits and vegetables • Store fruits and vegetables in the freezer interior where...
Use and Care Guide
Page 23
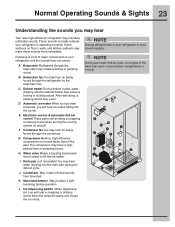
...the condenser. The compressor may occur. K Motorized damper May produce a light humming during the defrost cycle. These sounds normally indicate your refrigerator is normal. D Automatic ice maker When ice has been produced, you will hear a snapping or clicking sound when the solenoid opens... sound may have a highpitched hum or pulsating sound. L Ice dispensing paddle When dispensing ice, you may hear Your new, high-efficiency refrigerator may cause a hissing or sizzling sound. Normal Operating Sounds & Sights 23 Understanding the sounds you will hear ice cubes falling into the ...
...the condenser. The compressor may occur. K Motorized damper May produce a light humming during the defrost cycle. These sounds normally indicate your refrigerator is normal. D Automatic ice maker When ice has been produced, you will hear a snapping or clicking sound when the solenoid opens... sound may have a highpitched hum or pulsating sound. L Ice dispensing paddle When dispensing ice, you may hear Your new, high-efficiency refrigerator may cause a hissing or sizzling sound. Normal Operating Sounds & Sights 23 Understanding the sounds you will hear ice cubes falling into the ...


