Complete Owner s Guide English
Page 4
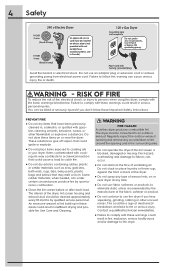
... FIRE HAZARD A clothes dryer produces combustible lint. You can under any accumulation of the dryer, lint screen housing and exhaust duct should be connected to use an adaptor plug or extension cord or remove grounding prong from electrical power cord. 4 Safety 240 v Electric Dryer 120 v Gas Dryer 10-30R 3-wire (fused 30 amp) 14-30R 4-wire (fused 30 amp) UL-approved service cord must be cleaned approximately every 18 months by spontaneous combustion. ● Clean the lint screen before or after...
... FIRE HAZARD A clothes dryer produces combustible lint. You can under any accumulation of the dryer, lint screen housing and exhaust duct should be connected to use an adaptor plug or extension cord or remove grounding prong from electrical power cord. 4 Safety 240 v Electric Dryer 120 v Gas Dryer 10-30R 3-wire (fused 30 amp) 14-30R 4-wire (fused 30 amp) UL-approved service cord must be cleaned approximately every 18 months by spontaneous combustion. ● Clean the lint screen before or after...
Complete Owner s Guide English
Page 5
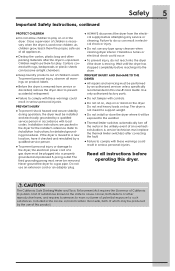
... install or store the dryer where it checked and reinstalled by an authorized servicer unless specifically recommended in the dryer. To prevent personal injury, observe all instructions before operating this Use & Care Guide. The third grounding prong must replace the thermal limiter switch(es) after the dryer is moving. Do not rest heavy loads on or in this dryer. A service technician must never be plugged into the drum...
... install or store the dryer where it checked and reinstalled by an authorized servicer unless specifically recommended in the dryer. To prevent personal injury, observe all instructions before operating this Use & Care Guide. The third grounding prong must replace the thermal limiter switch(es) after the dryer is moving. Do not rest heavy loads on or in this dryer. A service technician must never be plugged into the drum...
Complete Owner s Guide English
Page 9
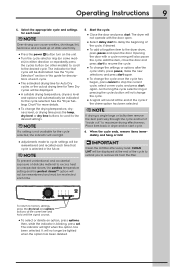
... the dryer drum, press pause and open the door. Place item back in this guide for descriptions of the cycle if the chime option has been selected. CLEAN LINT will be reselected each cycle. ● The estimated drying time for Auto Dry cycles or the actual drying time for that cycle is selected in either direction or repeatedly press the cycles button (on some mod- To return to remove lint from...
... the dryer drum, press pause and open the door. Place item back in this guide for descriptions of the cycle if the chime option has been selected. CLEAN LINT will be reselected each cycle. ● The estimated drying time for Auto Dry cycles or the actual drying time for that cycle is selected in either direction or repeatedly press the cycles button (on some mod- To return to remove lint from...
Complete Owner s Guide English
Page 11
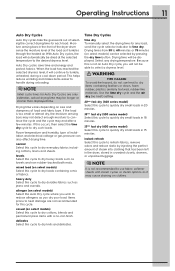
... clothes. delicates Select this cycle to dry knits and delicates. Time Dry Cycles time dry To manually select the drying time for this cycle to dry items containing feathers or down period. Because this cycle to refresh fabrics, remove odors and reduce static by pressing the dry time button. WARNING FIRE HAZARD To avoid fire hazard, do not use fabric softener sheets with a no heat) setting. 20min fast dry (400 series model) Select this cycle...
... clothes. delicates Select this cycle to dry knits and delicates. Time Dry Cycles time dry To manually select the drying time for this cycle to dry items containing feathers or down period. Because this cycle to refresh fabrics, remove odors and reduce static by pressing the dry time button. WARNING FIRE HAZARD To avoid fire hazard, do not use fabric softener sheets with a no heat) setting. 20min fast dry (400 series model) Select this cycle...

Complete Owner s Guide English
Page 13
... lock the controls between cycles, scroll to delete an option. In conjunction with automatic moisture sensors, cycle times will increase slightly, but overall energy usage will conflict with the cycle selector. NOTE To change the options once the cycle has begun, press the pause button, make the new selections and press start option, press set and then to scroll to remove the dried load...
... lock the controls between cycles, scroll to delete an option. In conjunction with automatic moisture sensors, cycle times will increase slightly, but overall energy usage will conflict with the cycle selector. NOTE To change the options once the cycle has begun, press the pause button, make the new selections and press start option, press set and then to scroll to remove the dried load...
Complete Owner s Guide English
Page 14
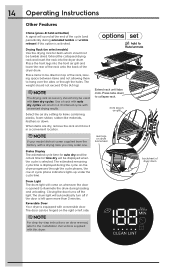
... the right or left open more than 3 minutes. NOTE The drying rack accessory should only be used with a reversible door. Press tabs down . Reversible Door Your dryer is equipped with time dry cycles. front legs in a convenient location. The drum light will automatically turn off if the door is left side. Extend rack until tabs click. The estimated remaining cycle time is displayed during extended tumble or wrinkle release) if this dryer. The door...
... the right or left open more than 3 minutes. NOTE The drying rack accessory should only be used with a reversible door. Press tabs down . Reversible Door Your dryer is equipped with time dry cycles. front legs in a convenient location. The drum light will automatically turn off if the door is left side. Extend rack until tabs click. The estimated remaining cycle time is displayed during extended tumble or wrinkle release) if this dryer. The door...
Complete Owner s Guide English
Page 18
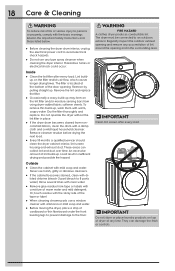
... or controls. Never use any time. IMPORTANT Clean lint screen after every load. Do not operate the dryer without the lint filter in place. ● If the dryer drum becomes stained from using dryer-added fabric softener sheets. Lint buildup on top of dryer at the bottom of the door opening and in the surrounding area. Remove the lint and replace the filter. ● Occasionally a waxy build-up . 18 Care & Cleaning WARNING...
... or controls. Never use any time. IMPORTANT Clean lint screen after every load. Do not operate the dryer without the lint filter in place. ● If the dryer drum becomes stained from using dryer-added fabric softener sheets. Lint buildup on top of dryer at the bottom of the door opening and in the surrounding area. Remove the lint and replace the filter. ● Occasionally a waxy build-up . 18 Care & Cleaning WARNING...
Complete Owner s Guide English
Page 19
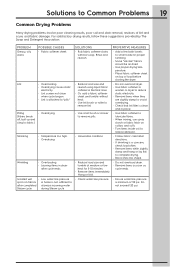
... as cycle ends. • Check water line pressure • Ensure water line pressure is minimum of load before starting the dryer. • Reduce load size and rewash using liquid fabric softener in the final rinse. • Or, add a fabric softener sheet and tumble without heat. • Use lint brush or roller to remove lint. • Do not overload dryer. • Use fabric softener in washer or dryer to reduce static electricity. • Remove...
... as cycle ends. • Check water line pressure • Ensure water line pressure is minimum of load before starting the dryer. • Reduce load size and rewash using liquid fabric softener in the final rinse. • Or, add a fabric softener sheet and tumble without heat. • Use lint brush or roller to remove lint. • Do not overload dryer. • Use fabric softener in washer or dryer to reduce static electricity. • Remove...
Complete Owner s Guide English
Page 20
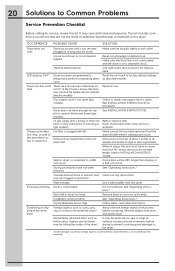
... SOLUTION Dryer does not start. Thermal limiter tripped. cycle. See INSTALLATION INSTRUCTIONS for service, review this dryer. See INSTALLATION INSTRUCTIONS. restored. Make sure all lint has been removed from the dryer lint filter before laundering. Electric dryer is open (gas models). See "Operating Instructions." Drying temperature too high. Foreign objects such as belt buckles, zippers and fasteners may be hitting the inside the dryer.* Always remove foreign objects from drum and restart dryer. Dryer has been programmed to Reset the...
... SOLUTION Dryer does not start. Thermal limiter tripped. cycle. See INSTALLATION INSTRUCTIONS for service, review this dryer. See INSTALLATION INSTRUCTIONS. restored. Make sure all lint has been removed from the dryer lint filter before laundering. Electric dryer is open (gas models). See "Operating Instructions." Drying temperature too high. Foreign objects such as belt buckles, zippers and fasteners may be hitting the inside the dryer.* Always remove foreign objects from drum and restart dryer. Dryer has been programmed to Reset the...
Complete Owner s Guide English
Page 21
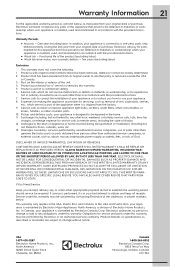
... cover the following: 1. Products purchased "as-is designed to another party or removed outside the USA or Canada. 3. Products used , and maintained in accordance with original serial numbers that has been transferred from its original owner to be repaired in a commercial setting. 6. Expenses for making the appliance accessible for service calls to any obligations under this warranty must be performed by Electrolux...
... cover the following: 1. Products purchased "as-is designed to another party or removed outside the USA or Canada. 3. Products used , and maintained in accordance with original serial numbers that has been transferred from its original owner to be repaired in a commercial setting. 6. Expenses for making the appliance accessible for service calls to any obligations under this warranty must be performed by Electrolux...

Installation Instructions English Spanish French
Page 2
.... Cartons covered with local codes and ordinances and the latest edition of contents Important Safety Instructions 2 Installation Requirements 3-9 Installation Instructions 10-17 Reversing Door 18-19 Options 20 ©2015 Electrolux Major Appliances All rights reserved. This dryer is unpacked. Do not stack washer on the risk type as restaurants, beauty salons, etc. • Do not install a clothes dryer with flexible plastic or flexible foil venting material...
.... Cartons covered with local codes and ordinances and the latest edition of contents Important Safety Instructions 2 Installation Requirements 3-9 Installation Instructions 10-17 Reversing Door 18-19 Options 20 ©2015 Electrolux Major Appliances All rights reserved. This dryer is unpacked. Do not stack washer on the risk type as restaurants, beauty salons, etc. • Do not install a clothes dryer with flexible plastic or flexible foil venting material...
Installation Instructions English Spanish French
Page 3
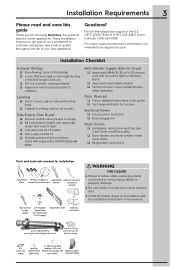
... on terminal block Approved strain relief installed Terminal access cover installed before initial operation Door Reversal Follow detailed instructions in this guide Thank you for choosing Electrolux, the premium brand in home appliances. Installation Requirements 3 Please read and save this guide Test hinge and latch for function Electrical Power House power turned on Dryer plugged in Final Checks Installation Instructions and Use and Care Guide read thoroughly Door latches and drum tumbles when cycle starts...
... on terminal block Approved strain relief installed Terminal access cover installed before initial operation Door Reversal Follow detailed instructions in this guide Thank you for choosing Electrolux, the premium brand in home appliances. Installation Requirements 3 Please read and save this guide Test hinge and latch for function Electrical Power House power turned on Dryer plugged in Final Checks Installation Instructions and Use and Care Guide read thoroughly Door latches and drum tumbles when cycle starts...
Installation Instructions English Spanish French
Page 4
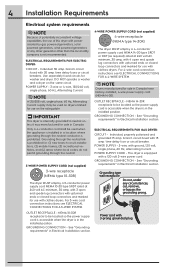
... local codes do not permit grounding through the neutral conductor is prohibited for use with 15 amp. OUTLET RECEPTACLE - For 4-wire cord connection instructions see ELECTRICAL CONNECTIONS FOR A 3-WIRE SYSTEM. 4-WIRE POWER SUPPLY CORD (not supplied) 4-wire receptacle (NEMA type 14-30R) The dryer MUST employ a 4-conductor power supply cord NEMA 14-30 type SRDT or DRT (as required) rated at 240 volt AC minimum, 30 amp, with 3 open end spade lug connectors...
... local codes do not permit grounding through the neutral conductor is prohibited for use with 15 amp. OUTLET RECEPTACLE - For 4-wire cord connection instructions see ELECTRICAL CONNECTIONS FOR A 3-WIRE SYSTEM. 4-WIRE POWER SUPPLY CORD (not supplied) 4-wire receptacle (NEMA type 14-30R) The dryer MUST employ a 4-conductor power supply cord NEMA 14-30 type SRDT or DRT (as required) rated at 240 volt AC minimum, 30 amp, with 3 open end spade lug connectors...
Installation Instructions English Spanish French
Page 5
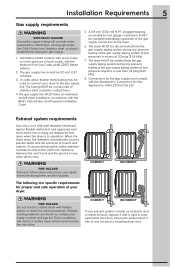
... open when the dryer is in accordance with local codes, or in excess of 1/2 psig (3.45 kPa). 7. Flexible venting materials are specific requirements for gas supply. 1. The tubing MUST be constructed of stainless steel or plastic-coated brass. 4.The gas supply line MUST have an individual shutoff valve installed in operation. The dryer MUST be easily crushed and trap lint. Connections for the gas...
... open when the dryer is in accordance with local codes, or in excess of 1/2 psig (3.45 kPa). 7. Flexible venting materials are specific requirements for gas supply. 1. The tubing MUST be constructed of stainless steel or plastic-coated brass. 4.The gas supply line MUST have an individual shutoff valve installed in operation. The dryer MUST be easily crushed and trap lint. Connections for the gas...
Installation Instructions English Spanish French
Page 6
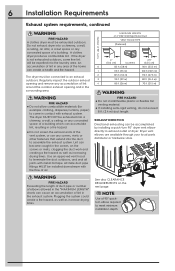
... (for example: clothing, draperies/curtains, paper) to terminate the duct outdoors, and seal all joints with metal foil tape. Number of 90° turns MAXIMUM LENGTH of elbows allowed in the "MAXIMUM LENGTH" charts can be accomplished by installing a quick-turn 90° dryer vent elbow directly to meet minimum installation depth. NOTE Use of 90° quickturn elbow required to exhaust outlet of lint in the surrounding...
... (for example: clothing, draperies/curtains, paper) to terminate the duct outdoors, and seal all joints with metal foil tape. Number of 90° turns MAXIMUM LENGTH of elbows allowed in the "MAXIMUM LENGTH" charts can be accomplished by installing a quick-turn 90° dryer vent elbow directly to meet minimum installation depth. NOTE Use of 90° quickturn elbow required to exhaust outlet of lint in the surrounding...
Installation Instructions English Spanish French
Page 7
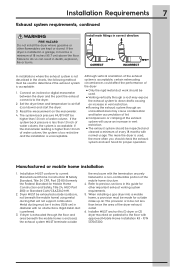
... of water column, the system is installed in diameter with normal usage. Metal ducting must be 4 inches (10.16 cm) in a garage, it must be exhausted outside make up air. Refer to down ) and start the dryer. 3. P/N 137067200. Set the dryer timer and temperature to the dryer. 2. If the manometer reading is used, the more often you should check the exhaust system and vent hood for...
... of water column, the system is installed in diameter with normal usage. Metal ducting must be 4 inches (10.16 cm) in a garage, it must be exhausted outside make up air. Refer to down ) and start the dryer. 3. P/N 137067200. Set the dryer timer and temperature to the dryer. 2. If the manometer reading is used, the more often you should check the exhaust system and vent hood for...
Installation Instructions English Spanish French
Page 20
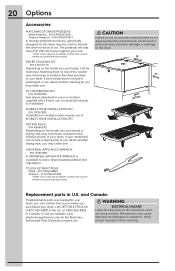
... MOBILE HOME INSTALLATION KIT. This pedestal will add about 15" (38 cm) to disconnection when servicing controls. If your dryer. UNIVERSAL APPLIANCE WRENCH P/N 137019200 A UNIVERSAL APPLIANCE WRENCH is available to the dryer. 27" (68.5 cm) (3815c"m) (6276c.5m") Replacement parts in a location supplied with LP must use a conversion kit prior to elevate the dryer for the Electrolux Authorized Parts Distributor nearest you may order one . Wiring errors can...
... MOBILE HOME INSTALLATION KIT. This pedestal will add about 15" (38 cm) to disconnection when servicing controls. If your dryer. UNIVERSAL APPLIANCE WRENCH P/N 137019200 A UNIVERSAL APPLIANCE WRENCH is available to the dryer. 27" (68.5 cm) (3815c"m) (6276c.5m") Replacement parts in a location supplied with LP must use a conversion kit prior to elevate the dryer for the Electrolux Authorized Parts Distributor nearest you may order one . Wiring errors can...

Product Specifications Sheet English
Page 1
.... See limited warranty for convenient placement in 10 minutes. Customizable options and cycles allow you to keep clothes looking their best. REVERSIBLE DOOR FITS MORE ROOMS Enjoy easy loading no matter how your units with steam in small spaces. Available in each load. GAS FRONT LOAD DRYERS 8.0 Cu. Or use the optional stacking kit for details. LARGEST CAPACITY DRYER Dry more with premium LED lighting that provide extra...
.... See limited warranty for convenient placement in 10 minutes. Customizable options and cycles allow you to keep clothes looking their best. REVERSIBLE DOOR FITS MORE ROOMS Enjoy easy loading no matter how your units with steam in small spaces. Available in each load. GAS FRONT LOAD DRYERS 8.0 Cu. Or use the optional stacking kit for details. LARGEST CAPACITY DRYER Dry more with premium LED lighting that provide extra...
Product Specifications Sheet English
Page 2
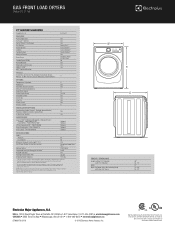
... Installation Guide on the web at Electrolux Home Products, Inc. GAS FRONT LOAD DRYERS EFMG617S TT / IW 27" GAS FRONT LOAD DRYER Capacity D.O.E. 8.0 Cu. FEATURES Pull-to improve our products. PN # EPWD157STT Island White - PN # EPWD157SIW LP Gas Conversion Kit - mean we are constantly working to -Open Door IQ-Touch™ Controls Perfect Steam™ Dry System Dry System Sound System Lighting Tumble System Moisture Sensor Dryer Drum Tumble Speed (RPM) Reversible Door Adjustable Leveling Legs ENERGY...
... Installation Guide on the web at Electrolux Home Products, Inc. GAS FRONT LOAD DRYERS EFMG617S TT / IW 27" GAS FRONT LOAD DRYER Capacity D.O.E. 8.0 Cu. FEATURES Pull-to improve our products. PN # EPWD157STT Island White - PN # EPWD157SIW LP Gas Conversion Kit - mean we are constantly working to -Open Door IQ-Touch™ Controls Perfect Steam™ Dry System Dry System Sound System Lighting Tumble System Moisture Sensor Dryer Drum Tumble Speed (RPM) Reversible Door Adjustable Leveling Legs ENERGY...

Product Specifications Sheet English
Page 3
... the right to change specifications or discontinue models without optional 15" pedestal drawer, or stacked above matching Electrolux Washer, which requires installation of building, NOT into any concealed space. • Dryer equipped for 4-way venting and approved for additional information). for stacked units) Reversible Door Swing 22" 8 1/2" 120V Power cord 3 3/4" 1 7/16" 15" Pedestal Drawer Installation Elevates dryer height to instructions included with optional pedestal or stacking kit or on carpeted surface. • Dryer MUST exhaust to...
... the right to change specifications or discontinue models without optional 15" pedestal drawer, or stacked above matching Electrolux Washer, which requires installation of building, NOT into any concealed space. • Dryer equipped for 4-way venting and approved for additional information). for stacked units) Reversible Door Swing 22" 8 1/2" 120V Power cord 3 3/4" 1 7/16" 15" Pedestal Drawer Installation Elevates dryer height to instructions included with optional pedestal or stacking kit or on carpeted surface. • Dryer MUST exhaust to...


