
Complete Owners Guide English
Page 4
... dryer exhaust system is clean and free of lint and debris prior to the installation of dryer. DO NOT stack washer on pedestal. Children might use any mesh size is allowed to cover the outdoor exhaust opening. • Install the clothes dryer according to assemble the exhaust system. Flexible venting materials are not meant to cover every possible condition and situation that extend into the duct to the manufacturer's instructions and local codes. • Clothes dryer installation and service...
... dryer exhaust system is clean and free of lint and debris prior to the installation of dryer. DO NOT stack washer on pedestal. Children might use any mesh size is allowed to cover the outdoor exhaust opening. • Install the clothes dryer according to assemble the exhaust system. Flexible venting materials are not meant to cover every possible condition and situation that extend into the duct to the manufacturer's instructions and local codes. • Clothes dryer installation and service...
Complete Owners Guide English
Page 6
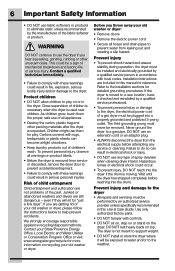
... washer or dryer: • Remove doors • Remove the electric power cord • Secure all appliances. • Destroy the carton, plastic bag and other unusual noises. Contact your State/Provence Energy Office, Local Electric and Water Utilities or Conservation Program Office or visit www.energystar.gov/recycle for reference. Installation instructions are getting rid of all hoses and drain pipes to prevent water from service or discarded, remove...
... washer or dryer: • Remove doors • Remove the electric power cord • Secure all appliances. • Destroy the carton, plastic bag and other unusual noises. Contact your State/Provence Energy Office, Local Electric and Water Utilities or Conservation Program Office or visit www.energystar.gov/recycle for reference. Installation instructions are getting rid of all hoses and drain pipes to prevent water from service or discarded, remove...
Complete Owners Guide English
Page 8
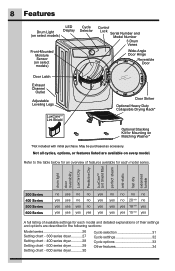
... models) Cycle Selector Control Lock Serial Number and Model Number 3 Drum Vanes Wide-Angle Door Hinge Reversible Door Door Latch Exhaust Channel Outlet Adjustable Leveling Legs LuxCareTM Lint Shield Door Striker Optional Heavy Duty Collapsible Drying Rack* Optional Stacking Kit for an overview of their settings and options are available on Matching Washer* *Not included with initial purchase. Not all cycles, options, or features listed are described in the following sections: Model series 26 Setting chart - 300 series dryer 27 Setting...
... models) Cycle Selector Control Lock Serial Number and Model Number 3 Drum Vanes Wide-Angle Door Hinge Reversible Door Door Latch Exhaust Channel Outlet Adjustable Leveling Legs LuxCareTM Lint Shield Door Striker Optional Heavy Duty Collapsible Drying Rack* Optional Stacking Kit for an overview of their settings and options are available on Matching Washer* *Not included with initial purchase. Not all cycles, options, or features listed are described in the following sections: Model series 26 Setting chart - 300 series dryer 27 Setting...
Complete Owners Guide English
Page 9
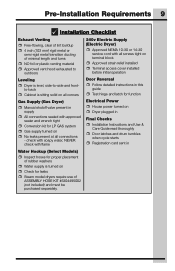
... installed ˆˆ Terminal access cover installed before initial operation Door Reversal ˆˆ Follow detailed instructions in this guide ˆˆ Test hinge and latch for function Electrical Power ˆˆ House power turned on ˆˆ Dryer plugged in Final Checks ˆˆ Installation Instructions and Use & Care Guide read thoroughly ˆˆ Door latches and drum tumbles when cycle starts ˆˆ Registration card sent in Water Hookup (Select Models) ˆˆ Inspect hoses for leaks ˆˆ Steam model dryers require use...
... installed ˆˆ Terminal access cover installed before initial operation Door Reversal ˆˆ Follow detailed instructions in this guide ˆˆ Test hinge and latch for function Electrical Power ˆˆ House power turned on ˆˆ Dryer plugged in Final Checks ˆˆ Installation Instructions and Use & Care Guide read thoroughly ˆˆ Door latches and drum tumbles when cycle starts ˆˆ Registration card sent in Water Hookup (Select Models) ˆˆ Inspect hoses for leaks ˆˆ Steam model dryers require use...
Complete Owners Guide English
Page 11
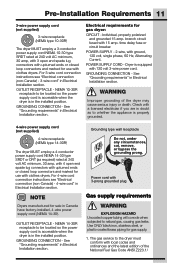
GROUNDING CONNECTION - time delay fuse or circuit breaker. WARNING Improper grounding of the National Fuel Gas Code ANSI Z223.1/ Check with a licensed electrician if you are in doubt as to whether the appliance is in Canada have factory-installed, 4-wire power supply cord (NEMA 14-30). NOTE Dryers manufactured for gas supply. 1. GROUNDING CONNECTION - See "Grounding requirements" in Electrical Installation section. Use ONLY black iron, stainless steel, or plastic-coated...
GROUNDING CONNECTION - time delay fuse or circuit breaker. WARNING Improper grounding of the National Fuel Gas Code ANSI Z223.1/ Check with a licensed electrician if you are in doubt as to whether the appliance is in Canada have factory-installed, 4-wire power supply cord (NEMA 14-30). NOTE Dryers manufactured for gas supply. 1. GROUNDING CONNECTION - See "Grounding requirements" in Electrical Installation section. Use ONLY black iron, stainless steel, or plastic-coated...
Complete Owners Guide English
Page 12
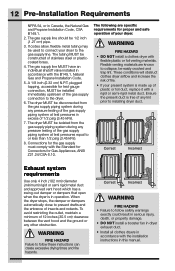
... or any pressure testing of stainless steel or plasticcoated brass. 4. WARNING FIRE HAZARD • DO NOT install a clothes dryer with a rigid or semi-rigid metal duct. Flexible venting materials are specific requirements for the gas supply must comply with the B149.1, Natural Gas and Propane Installation Code. 5. The tubing MUST be installed immediately upstream of fire. • If your dryer. Correct Incorrect Exhaust system requirements Use only 4 inch (102...
... or any pressure testing of stainless steel or plasticcoated brass. 4. WARNING FIRE HAZARD • DO NOT install a clothes dryer with a rigid or semi-rigid metal duct. Flexible venting materials are specific requirements for the gas supply must comply with the B149.1, Natural Gas and Propane Installation Code. 5. The tubing MUST be installed immediately upstream of fire. • If your dryer. Correct Incorrect Exhaust system requirements Use only 4 inch (102...
Complete Owners Guide English
Page 13
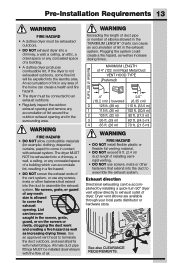
.... • The dryer must be accomplished by installing a quick-turn 90° dryer vent elbow directly to exhaust outlet of the home can be exhausted outdoors. • DO NOT exhaust dryer into a chimney, a wall, a ceiling, an attic, a crawl space or any mesh size is not exhausted outdoors, some fine lint will be connected to assemble the exhaust system. If the dryer is allowed to cover the exhaust opening and remove any screws...
.... • The dryer must be accomplished by installing a quick-turn 90° dryer vent elbow directly to exhaust outlet of the home can be exhausted outdoors. • DO NOT exhaust dryer into a chimney, a wall, a ceiling, an attic, a crawl space or any mesh size is not exhausted outdoors, some fine lint will be connected to assemble the exhaust system. If the dryer is allowed to cover the exhaust opening and remove any screws...
Complete Owners Guide English
Page 14
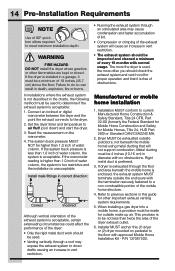
... terminate outside make up air. Installation MUST conform to do so can result in vent restriction. • The exhaust system should check the exhaust system and vent hood for outside the enclosure with normal usage. Metal ducting must be a minimum of obstructions. Installer MUST anchor this guide for Mobile Homes, Title 24, HUD Part 280) or Standard CAN/CSAZ240 MH. 2. If the dryer...
... terminate outside make up air. Installation MUST conform to do so can result in vent restriction. • The exhaust system should check the exhaust system and vent hood for outside the enclosure with normal usage. Metal ducting must be a minimum of obstructions. Installer MUST anchor this guide for Mobile Homes, Title 24, HUD Part 280) or Standard CAN/CSAZ240 MH. 2. If the dryer...

Complete Owners Guide English
Page 17
... the instructions in this manual for proper grounding. • DO NOT use an aluminum wired receptacle with a copper wired power cord and plug (or vice versa). Locate the dryer within reach of the receptacle for the length power cord to be connected to a grounded metal, permanent wiring system; The dryer, when installed, must be electrically grounded in accordance with this manual for the proper power cord to be installed onto power cord. Check with a copper wired...
... the instructions in this manual for proper grounding. • DO NOT use an aluminum wired receptacle with a copper wired power cord and plug (or vice versa). Locate the dryer within reach of the receptacle for the length power cord to be connected to a grounded metal, permanent wiring system; The dryer, when installed, must be electrically grounded in accordance with this manual for the proper power cord to be installed onto power cord. Check with a copper wired...
Complete Owners Guide English
Page 31
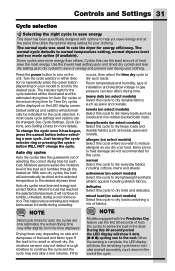
... be changed. mixed load (on select models) Select this cycle. See Cycle Settings, Cycle Options, and Setting Charts for this cycle to sense the load in min- NOTE Initial cycle times for auto dry cycles are not recommended for more energy than others. Controls and Settings 31 Cycle selection Selecting the right cycle to save energy This dryer has been specifically designed with the Predictive Dry feature use the least amount of heat save time and energy and...
... be changed. mixed load (on select models) Select this cycle. See Cycle Settings, Cycle Options, and Setting Charts for this cycle to sense the load in min- NOTE Initial cycle times for auto dry cycles are not recommended for more energy than others. Controls and Settings 31 Cycle selection Selecting the right cycle to save energy This dryer has been specifically designed with the Predictive Dry feature use the least amount of heat save time and energy and...
Complete Owners Guide English
Page 32
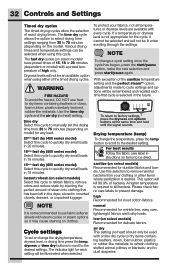
... this cycle to quickly dry small loads in 20 minutes. 18min fast dry (500 series model) Select this cycle to quickly dry small loads in 15 minutes. Use this cycle to dry items containing feathers, down , foam rubber, plastics similarly textured, rubber-like materials; Use the time dry cycle and the air dry (no heat) should only be lit when scrolling through the settings. Drying temperature (temp) To change the temperature, press the temp button...
... this cycle to quickly dry small loads in 20 minutes. 18min fast dry (500 series model) Select this cycle to quickly dry small loads in 15 minutes. Use this cycle to dry items containing feathers, down , foam rubber, plastics similarly textured, rubber-like materials; Use the time dry cycle and the air dry (no heat) should only be lit when scrolling through the settings. Drying temperature (temp) To change the temperature, press the temp button...
Complete Owners Guide English
Page 34
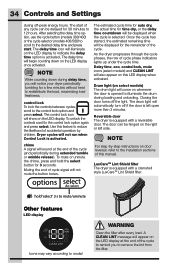
... drum during loading and unloading. The drum light will show on whenever the door is left side. Reversible door The dryer is selected. The control lock icon will automatically turn off the light. Dryer cycles will also appear on the LED display once activated. Delay time, eco, control lock, mute icons (select models) and CLEAN LINT will not run when Control Lock is equipped with a reversible door. Closing the door turns off if the door is opened to remove the lint...
... drum during loading and unloading. The drum light will show on whenever the door is left side. Reversible door The dryer is selected. The control lock icon will automatically turn off the light. Dryer cycles will also appear on the LED display once activated. Delay time, eco, control lock, mute icons (select models) and CLEAN LINT will not run when Control Lock is equipped with a reversible door. Closing the door turns off if the door is opened to remove the lint...
Complete Owners Guide English
Page 42
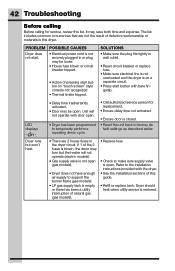
... pressing start button on a separate circuit. • Press start . Dryer should heat when utility service is open . 42 Troubleshooting Before calling Before calling for replacement. • Ensure delay time not activated. • Ensure door is closed. • Reset the unit back to factory de- The list includes common occurrences that are 2 house fuses in this list. PROBLEM Dryer does not start button with bare fingertip. Unit will not operate (electric models). • Gas supply valve...
... pressing start button on a separate circuit. • Press start . Dryer should heat when utility service is open . 42 Troubleshooting Before calling Before calling for replacement. • Ensure delay time not activated. • Ensure door is closed. • Reset the unit back to factory de- The list includes common occurrences that are 2 house fuses in this list. PROBLEM Dryer does not start button with bare fingertip. Unit will not operate (electric models). • Gas supply valve...
Complete Owners Guide English
Page 43
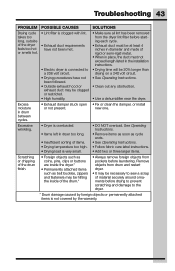
... duct must not exceed length listed in the installation instructions. • Drying time will be 20% longer than drying on a 240 volt circuit. • See Operating Instructions. • Clean out any obstruction. • Use a dehumidifier near the dryer. Excessive wrinkling. • Dryer is overloaded. • Items left in drum between cycles. • Exhaust damper stuck open • Fix or clean the damper, or install or not present. See Operating Instructions. • Remove items as soon as cycle...
... duct must not exceed length listed in the installation instructions. • Drying time will be 20% longer than drying on a 240 volt circuit. • See Operating Instructions. • Clean out any obstruction. • Use a dehumidifier near the dryer. Excessive wrinkling. • Dryer is overloaded. • Items left in drum between cycles. • Exhaust damper stuck open • Fix or clean the damper, or install or not present. See Operating Instructions. • Remove items as soon as cycle...
Complete Owners Guide English
Page 44
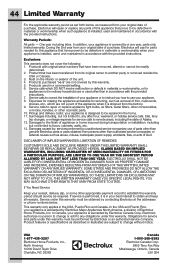
... 3E4 One year including labor. LIMITATION OF REMEDIES CUSTOMER'S SOLE AND EXCLUSIVE REMEDY UNDER THIS LIMITED WARRANTY SHALL BE REPAIR OR REPLACEMENT AS PROVIDED HEREIN. your appliance is designed to repair or replace appliance light bulbs, air filters, water filters, other consumables, or knobs, handles, or other appropriate payment record to establish the warranty period should service be required. THIS WRITTEN WARRANTY GIVES YOU SPECIFIC LEGAL RIGHTS.
... 3E4 One year including labor. LIMITATION OF REMEDIES CUSTOMER'S SOLE AND EXCLUSIVE REMEDY UNDER THIS LIMITED WARRANTY SHALL BE REPAIR OR REPLACEMENT AS PROVIDED HEREIN. your appliance is designed to repair or replace appliance light bulbs, air filters, water filters, other consumables, or knobs, handles, or other appropriate payment record to establish the warranty period should service be required. THIS WRITTEN WARRANTY GIVES YOU SPECIFIC LEGAL RIGHTS.
Wiring Diagram English
Page 3
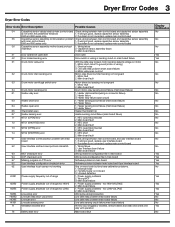
... error Heater open error Thermostat open circuit) 1. Main board fault Check wiring between main control board and capacitive sensor assembly is good, replace capacitive sensor assembly (500 and 600 series only) 2. Main board fault 1. NTC short 2. Power supply problems - Main board failure Wrong line wiring/connection Line safe relay problem (main board failure) Line safe relay problem (main board failure) Line safe sensing circuit failure (main board failure) Air flow duct clogged or blocked, remove debris and clean and check one way vent operation Safety reset error...
... error Heater open error Thermostat open circuit) 1. Main board fault Check wiring between main control board and capacitive sensor assembly is good, replace capacitive sensor assembly (500 and 600 series only) 2. Main board fault 1. NTC short 2. Power supply problems - Main board failure Wrong line wiring/connection Line safe relay problem (main board failure) Line safe relay problem (main board failure) Line safe sensing circuit failure (main board failure) Air flow duct clogged or blocked, remove debris and clean and check one way vent operation Safety reset error...
Installation Instructions English
Page 1
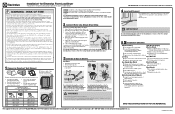
... appliance. 1 Connect or Construct Vent Exhaust NO screen or grate of ASSEMBLY HOSE KIT #5304495002 (not included) and must be performed by qualified technician. WARNING - For detailed information, refer to assemble the exhaust system. Open gas valve and check for leaks ˆˆ Steam model dryers require use conversion kit installed by a qualified installer, service agency or the gas supplier. • The electrical service to the dryer must be inspected and cleaned a minimum of the National Fuel Gas Code ANSI...
... appliance. 1 Connect or Construct Vent Exhaust NO screen or grate of ASSEMBLY HOSE KIT #5304495002 (not included) and must be performed by qualified technician. WARNING - For detailed information, refer to assemble the exhaust system. Open gas valve and check for leaks ˆˆ Steam model dryers require use conversion kit installed by a qualified installer, service agency or the gas supplier. • The electrical service to the dryer must be inspected and cleaned a minimum of the National Fuel Gas Code ANSI...
Product Specifications Sheet English
Page 1
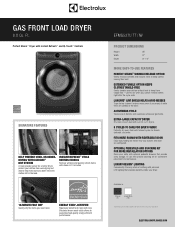
... HELP PREVENT OVER- LUXCARE® LINT SHIELD HELPS AVOID MESSES Traps lint so it doesn't make sure you cannot remove clothes right after the cycle ends. Or use the optional stacking kit for various load compositions. ELECTROLUXAPPLIANCES.COM GAS FRONT LOAD DRYER 8.0 Cu. EXTRA-LARGE CAPACITY DRYER Dry more . Available in: Titanium Island White ( TT ) ( IW ) 1Fastest time based on smallest load/Fast Dry cycle selected for convenient placement in 10...
... HELP PREVENT OVER- LUXCARE® LINT SHIELD HELPS AVOID MESSES Traps lint so it doesn't make sure you cannot remove clothes right after the cycle ends. Or use the optional stacking kit for various load compositions. ELECTROLUXAPPLIANCES.COM GAS FRONT LOAD DRYER 8.0 Cu. EXTRA-LARGE CAPACITY DRYER Dry more . Available in: Titanium Island White ( TT ) ( IW ) 1Fastest time based on smallest load/Fast Dry cycle selected for convenient placement in 10...

Product Specifications Sheet English
Page 2
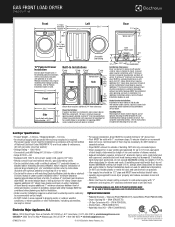
... Arc Not Including Hose) (with Door 90° Open) 38" 53-1/4" 27" 31-1/2" 50-5/8" Electrolux Major Appliances, N.A. PN # STACKIT7X Drying Rack - PN # A04840701 Assembly Hose Kit - NOTE: Always consult local and national electric, gas and plumbing codes. mean we are constantly working to -Open Door IQ-Touch™ Controls Perfect Steam™ Dry System Dry System Sound System Lighting Tumble System Moisture Sensor Dryer Drum Tumble Speed (RPM) Reversible Door Adjustable Leveling Legs ENERGY STAR®...
... Arc Not Including Hose) (with Door 90° Open) 38" 53-1/4" 27" 31-1/2" 50-5/8" Electrolux Major Appliances, N.A. PN # STACKIT7X Drying Rack - PN # A04840701 Assembly Hose Kit - NOTE: Always consult local and national electric, gas and plumbing codes. mean we are constantly working to -Open Door IQ-Touch™ Controls Perfect Steam™ Dry System Dry System Sound System Lighting Tumble System Moisture Sensor Dryer Drum Tumble Speed (RPM) Reversible Door Adjustable Leveling Legs ENERGY STAR®...
Product Specifications Sheet English
Page 3
... Gas Conversion Kit - (PN # PCK4200). • Drying Rack - (PN # A04840701). • Assembly Hose Kit - (PN # 5304495002). min. 3" *Steam dryer requires additional 3/4" hose clearance. 15 1/4" Closet Installation: If washer and dryer are installed in same closet, door(s) MUST be considered when planning any built-in accordance with current edition of National Electrical Code (ANSI/NFPA 70) and local codes & ordinances. (Do not use of plumbing, exhaust and utility hookups MUST be vented with quick-turn 90...
... Gas Conversion Kit - (PN # PCK4200). • Drying Rack - (PN # A04840701). • Assembly Hose Kit - (PN # 5304495002). min. 3" *Steam dryer requires additional 3/4" hose clearance. 15 1/4" Closet Installation: If washer and dryer are installed in same closet, door(s) MUST be considered when planning any built-in accordance with current edition of National Electrical Code (ANSI/NFPA 70) and local codes & ordinances. (Do not use of plumbing, exhaust and utility hookups MUST be vented with quick-turn 90...


