Complete Owner s Guide English
Page 4
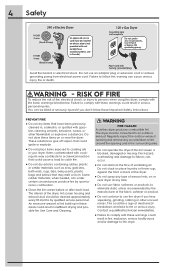
... ventilating air. Some rubber materials, when heated, can be killed or seriously injured if you hear squeaking, grinding, rubbing or other flammable or explosive substances. See Care and Cleaning. WARNING FIRE HAZARD A clothes dryer produces combustible lint. 4 Safety 240 v Electric Dryer 120 v Gas Dryer 10-30R 3-wire (fused 30 amp) 14-30R 4-wire (fused 30 amp) UL-approved service cord must be connected to an outdoors exhaust. The dryer...
... ventilating air. Some rubber materials, when heated, can be killed or seriously injured if you hear squeaking, grinding, rubbing or other flammable or explosive substances. See Care and Cleaning. WARNING FIRE HAZARD A clothes dryer produces combustible lint. 4 Safety 240 v Electric Dryer 120 v Gas Dryer 10-30R 3-wire (fused 30 amp) 14-30R 4-wire (fused 30 amp) UL-approved service cord must be connected to an outdoors exhaust. The dryer...
Complete Owner s Guide English
Page 5
... the dryer, the electrical power cord of children is necessary when the dryer is removed from the electrical supply before reaching into the dryer if the drum is not meant to the weather. ● Thermal limiter switches automatically turn off the motor in serious personal injuries. Do not use of this list are packed in this dryer. Use only authorized factory parts. ● Do not tamper with local codes. A service...
... the dryer, the electrical power cord of children is necessary when the dryer is removed from the electrical supply before reaching into the dryer if the drum is not meant to the weather. ● Thermal limiter switches automatically turn off the motor in serious personal injuries. Do not use of this list are packed in this dryer. Use only authorized factory parts. ● Do not tamper with local codes. A service...
Complete Owner s Guide English
Page 9
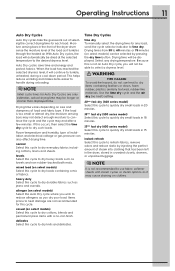
... recalled each time. The dryer will not operate with a cycle running will be indicated for descriptions of static electricity. ● Press the power button turn it "inside out" to the desired cycle. NOTE Over-drying can cause wrinkles, shrinkage, lint, harshness and a build up of each load. NOTE If drying a single large or bulky item remove the item part way through the cycle and turn on the unit. ● Turn the cycle...
... recalled each time. The dryer will not operate with a cycle running will be indicated for descriptions of static electricity. ● Press the power button turn it "inside out" to the desired cycle. NOTE Over-drying can cause wrinkles, shrinkage, lint, harshness and a build up of each load. NOTE If drying a single large or bulky item remove the item part way through the cycle and turn on the unit. ● Turn the cycle...
Complete Owner s Guide English
Page 11
... unloading. Use the time dry cycle and the air dry (no -iron finish. NOTE Initial cycle times for Auto Dry Cycles are not recommended for any drying temperature. WARNING FIRE HAZARD To avoid fire hazard, do not use heat to use fabric softener sheets with a no heat) setting. 20min fast dry (400 series model) Select this cycle to quickly dry small loads in 20 minutes. 18min fast dry (500 series model) Select this Auto Dry cycle where...
... unloading. Use the time dry cycle and the air dry (no -iron finish. NOTE Initial cycle times for Auto Dry Cycles are not recommended for any drying temperature. WARNING FIRE HAZARD To avoid fire hazard, do not use heat to use fabric softener sheets with a no heat) setting. 20min fast dry (400 series model) Select this cycle to quickly dry small loads in 20 minutes. 18min fast dry (500 series model) Select this Auto Dry cycle where...

Complete Owner s Guide English
Page 13
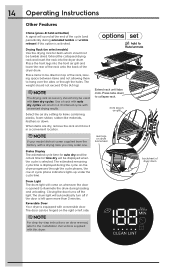
... not light. To unlock the controls scroll to the lock option and press set . extended tumble (on clothes. A chime will decrease. After choosing the desired delay time, press start option, press set . NOTE It is not recommended to use fabric softener sheets with steam cycles or steam options as it may cause staining on select models) Select the extended tumble option if the dried load might...
... not light. To unlock the controls scroll to the lock option and press set . extended tumble (on clothes. A chime will decrease. After choosing the desired delay time, press start option, press set . NOTE It is not recommended to use fabric softener sheets with steam cycles or steam options as it may cause staining on select models) Select the extended tumble option if the dried load might...
Complete Owner s Guide English
Page 14
... location. Place the front legs into the dryer drum. Use of the dryer drum. When items are dry, remove the rack and store it in air grill NOTE If your model did not come on select models) Use the drying rack for items which should only be displayed when the cycle is opened to collapse rack. rear legs on the right or left open more than 3 minutes. Closing the door turns off the light. Drum Light The drum light...
... location. Place the front legs into the dryer drum. Use of the dryer drum. When items are dry, remove the rack and store it in air grill NOTE If your model did not come on select models) Use the drying rack for items which should only be displayed when the cycle is opened to collapse rack. rear legs on the right or left open more than 3 minutes. Closing the door turns off the light. Drum Light The drum light...
Complete Owner s Guide English
Page 18
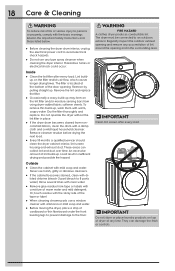
... outdoor exhaust opening . Dry the filter thoroughly and replace. Remove cleanser residue before drying the next load. ● Every 18 months a qualified servicer should clean the dryer cabinet interior, lint screen housing and exhaust duct. Never use a window cleaner with ammonia or mild soap and water. ● Before moving the dryer, place a strip of the door opening and remove any time. The dryer must be connected to an outdoors exhaust. 18 Care & Cleaning...
... outdoor exhaust opening . Dry the filter thoroughly and replace. Remove cleanser residue before drying the next load. ● Every 18 months a qualified servicer should clean the dryer cabinet interior, lint screen housing and exhaust duct. Never use a window cleaner with ammonia or mild soap and water. ● Before moving the dryer, place a strip of the door opening and remove any time. The dryer must be connected to an outdoors exhaust. 18 Care & Cleaning...
Complete Owner s Guide English
Page 19
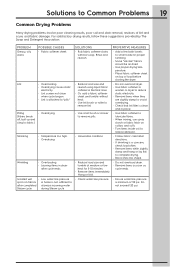
... be air dried. • Use proper drying temperature. • Place fabric softener sheet on top of load before starting the dryer. • Reduce load size and rewash using liquid fabric softener in the final rinse. • Or, add a fabric softener sheet and tumble without heat. • Use lint brush or roller to remove lint. • Do not overload dryer. • Use fabric softener in washer or dryer to reduce static electricity. • Remove...
... be air dried. • Use proper drying temperature. • Place fabric softener sheet on top of load before starting the dryer. • Reduce load size and rewash using liquid fabric softener in the final rinse. • Or, add a fabric softener sheet and tumble without heat. • Use lint brush or roller to remove lint. • Do not overload dryer. • Use fabric softener in washer or dryer to reduce static electricity. • Remove...
Complete Owner s Guide English
Page 20
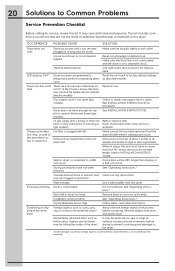
... heat when utility service is on a 240 volt circuit. Drying procedures have enough air supply to support the burner flame (gas models). Use a dehumidifier near the dryer. Excessive wrinkling. Remove items as soon as described earlier. Drying temperature too high. Follow fabric care label instructions. LED displays 'DM". Exhaust duct must not exceed length listed in place, the duct must have not been met. Drying time will not operate. (electric models) Replace fuse. Dryer runs but the heater...
... heat when utility service is on a 240 volt circuit. Drying procedures have enough air supply to support the burner flame (gas models). Use a dehumidifier near the dryer. Excessive wrinkling. Remove items as soon as described earlier. Drying temperature too high. Follow fabric care label instructions. LED displays 'DM". Exhaust duct must not exceed length listed in place, the duct must have not been met. Drying time will not operate. (electric models) Replace fuse. Dryer runs but the heater...
Complete Owner s Guide English
Page 21
... OTHER RIGHTS THAT VARY FROM STATE TO STATE. If You Need Service Keep your receipt, delivery slip, or some other cosmetic parts. 10. In the USA and Puerto Rico, your appliance is installed, used and maintained in accordance with the provided instructions. ● Wash tub - Warranty Information For the applicable warranty period as set forth below . DISCLAIMER OF IMPLIED WARRANTIES; ELECTROLUX SHALL...
... OTHER RIGHTS THAT VARY FROM STATE TO STATE. If You Need Service Keep your receipt, delivery slip, or some other cosmetic parts. 10. In the USA and Puerto Rico, your appliance is installed, used and maintained in accordance with the provided instructions. ● Wash tub - Warranty Information For the applicable warranty period as set forth below . DISCLAIMER OF IMPLIED WARRANTIES; ELECTROLUX SHALL...

Installation Instructions English Spanish French
Page 2
... not stack a dryer on top of the dryer in the vicinity of contents Important Safety Instructions 2 Installation Requirements 3-9 Installation Instructions 10-17 Reversing Door 18-19 Options 20 ©2015 Electrolux Major Appliances All rights reserved. Good safe practice and caution MUST be installed within 6 ft (1.83 m) of another washer. • The instructions in Canada, thw Natural Gas and Propane Installation Code, CSA B149.1. WARNING - An individual manual shut-off valve must conform...
... not stack a dryer on top of the dryer in the vicinity of contents Important Safety Instructions 2 Installation Requirements 3-9 Installation Instructions 10-17 Reversing Door 18-19 Options 20 ©2015 Electrolux Major Appliances All rights reserved. Good safe practice and caution MUST be installed within 6 ft (1.83 m) of another washer. • The instructions in Canada, thw Natural Gas and Propane Installation Code, CSA B149.1. WARNING - An individual manual shut-off valve must conform...
Installation Instructions English Spanish French
Page 3
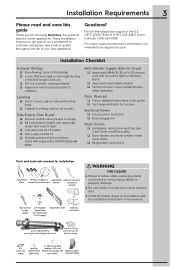
... tight on terminal block Approved strain relief installed Terminal access cover installed before initial operation Door Reversal Follow detailed instructions in this guide Test hinge and latch for function Electrical Power House power turned on Dryer plugged in Final Checks Installation Instructions and Use and Care Guide read and save this manual. Installation Checklist Exhaust Venting Free-flowing, clear of lint buildup 4 inch (102 mm) rigid or semi-rigid ducting of your...
... tight on terminal block Approved strain relief installed Terminal access cover installed before initial operation Door Reversal Follow detailed instructions in this guide Test hinge and latch for function Electrical Power House power turned on Dryer plugged in Final Checks Installation Instructions and Use and Care Guide read and save this manual. Installation Checklist Exhaust Venting Free-flowing, clear of lint buildup 4 inch (102 mm) rigid or semi-rigid ducting of your...
Installation Instructions English Spanish French
Page 4
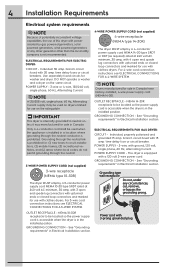
... - Use separately fused circuits for use with clothes dryers. DO NOT operate a washer and a dryer on the rating plate. IMPORTANT This dryer is internally grounded to neutral unless it was manufactured for use with clothes dryers. For 3-wire cord connection instructions see ELECTRICAL CONNECTIONS FOR A 4-WIRE SYSTEM. See "Grounding requirements" in the installed position. time delay fuse or circuit breaker. GROUNDING CONNECTION - Power cord with 15 amp. ELECTRICAL REQUIREMENTS FOR ELECTRIC DRYER: CIRCUIT - ELECTRICAL REQUIREMENTS FOR GAS DRYER: CIRCUIT - Grounding type...
... - Use separately fused circuits for use with clothes dryers. DO NOT operate a washer and a dryer on the rating plate. IMPORTANT This dryer is internally grounded to neutral unless it was manufactured for use with clothes dryers. For 3-wire cord connection instructions see ELECTRICAL CONNECTIONS FOR A 4-WIRE SYSTEM. See "Grounding requirements" in the installed position. time delay fuse or circuit breaker. GROUNDING CONNECTION - Power cord with 15 amp. ELECTRICAL REQUIREMENTS FOR ELECTRIC DRYER: CIRCUIT - ELECTRICAL REQUIREMENTS FOR GAS DRYER: CIRCUIT - Grounding type...
Installation Instructions English Spanish French
Page 5
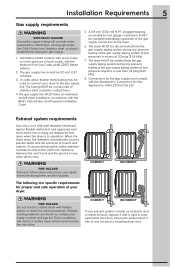
... instructions can create excessive drying times and fire hazards. CORRECT INCORRECT If your dryer. Installation Requirements 5 Gas supply requirements WARNING EXPLOSION HAZARD Uncoated copper tubing will obstruct clothes dryer airflow and increase the risk of fire. Exhaust system requirements Use only 4 inch (102 mm) diameter (minimum) rigid or flexible metal duct and approved vent hood which has a swing-out damper(s) that open...
... instructions can create excessive drying times and fire hazards. CORRECT INCORRECT If your dryer. Installation Requirements 5 Gas supply requirements WARNING EXPLOSION HAZARD Uncoated copper tubing will obstruct clothes dryer airflow and increase the risk of fire. Exhaust system requirements Use only 4 inch (102 mm) diameter (minimum) rigid or flexible metal duct and approved vent hood which has a swing-out damper(s) that open...
Installation Instructions English Spanish French
Page 6
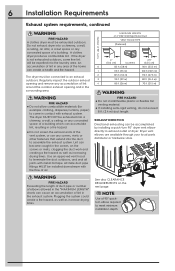
... dryer is not exhausted outdoors, some fine lint will be expelled into the duct to assemble the exhaust system. All male duct pipe fittings MUST be accomplished by installing a quick-turn 90° dryer vent elbow directly to exhaust outlet of dryer. WARNING FIRE HAZARD Exceeding the length of duct pipe or number of elbows allowed in the surrounding area. A clothes dryer produces combustible lint. The dryer MUST NOT be exhausted...
... dryer is not exhausted outdoors, some fine lint will be expelled into the duct to assemble the exhaust system. All male duct pipe fittings MUST be accomplished by installing a quick-turn 90° dryer vent elbow directly to exhaust outlet of dryer. WARNING FIRE HAZARD Exceeding the length of duct pipe or number of elbows allowed in the surrounding area. A clothes dryer produces combustible lint. The dryer MUST NOT be exhausted...
Installation Instructions English Spanish French
Page 7
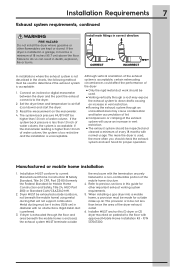
... Part 280) or Standard CAN/CSAZ240 MH. 2. Installation MUST conform to a non-combustible portion of the dryer: ● Only the rigid metal duct work should be used. ● Venting vertically through an uninsulated area may expose the exhaust system to previous sections in this guide for outside make up air. Metal ducting must be exhausted outside the enclosure with approved Mobile Home Installation Kit...
... Part 280) or Standard CAN/CSAZ240 MH. 2. Installation MUST conform to a non-combustible portion of the dryer: ● Only the rigid metal duct work should be used. ● Venting vertically through an uninsulated area may expose the exhaust system to previous sections in this guide for outside make up air. Metal ducting must be exhausted outside the enclosure with approved Mobile Home Installation Kit...
Installation Instructions English Spanish French
Page 20
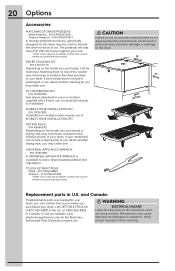
... mobile homes require use of your model did not include a stacking kit or you desire another drying rack, you purchased your dryer. WARNING ELECTRICAL HAZARD Label all wires prior to installation. This pedestal will add about 15" (38 cm) to the dryer. 27" (68.5 cm) (3815c"m) (6276c.5m") Replacement parts in the initial purchase of this dryer may be used to elevate the dryer for the Electrolux Authorized Parts Distributor...
... mobile homes require use of your model did not include a stacking kit or you desire another drying rack, you purchased your dryer. WARNING ELECTRICAL HAZARD Label all wires prior to installation. This pedestal will add about 15" (38 cm) to the dryer. 27" (68.5 cm) (3815c"m) (6276c.5m") Replacement parts in the initial purchase of this dryer may be used to elevate the dryer for the Electrolux Authorized Parts Distributor...
Product Specifications Sheet English
Page 1
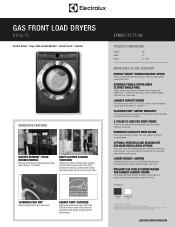
... illuminates information on cycles and lets you need most. Available in each load. EXTENDED TUMBLE OPTION KEEPS CLOTHES TANGLE-FREE Gently tumbles your units with premium LED lighting that provides visibility inside your washer and dryer are dry to keep clothes looking their best. Our 8.0 Cu. OPTIONAL PEDESTALS AND STACKING KIT FOR MORE INSTALLATION OPTIONS Raise your clothes without heat to prevent over-drying. Electrolux dryers meet strict criteria...
... illuminates information on cycles and lets you need most. Available in each load. EXTENDED TUMBLE OPTION KEEPS CLOTHES TANGLE-FREE Gently tumbles your units with premium LED lighting that provides visibility inside your washer and dryer are dry to keep clothes looking their best. Our 8.0 Cu. OPTIONAL PEDESTALS AND STACKING KIT FOR MORE INSTALLATION OPTIONS Raise your clothes without heat to prevent over-drying. Electrolux dryers meet strict criteria...

Product Specifications Sheet English
Page 2
... web at Electrolux Home Products, Inc. Refer to Product Installation Guide for detailed installation instructions on web for elbows and vents. NOTE: Always consult local and national electric, gas and plumbing codes. Specifications subject to improve our products. mean we are constantly working to change specifications or discontinue models without 15" Pedestal) (with grounded three-prong receptacle is required. The power supply circuit must be installed in under-counter installation require custom...
... web at Electrolux Home Products, Inc. Refer to Product Installation Guide for detailed installation instructions on web for elbows and vents. NOTE: Always consult local and national electric, gas and plumbing codes. Specifications subject to improve our products. mean we are constantly working to change specifications or discontinue models without 15" Pedestal) (with grounded three-prong receptacle is required. The power supply circuit must be installed in under-counter installation require custom...

Product Specifications Sheet English
Page 3
... deductions for detailed instructions. Titanium (PN # EPWD157STT), Island White (PN # EPWD157SIW). • Dryer Stacking Kit - (PN # STACKIT7X). • LP Gas Conversion Kit - (PN # PCK4200). • Drying Rack - (PN # A04840701). in . We reserve the right to change specifications or discontinue models without optional 15" pedestal drawer, or stacked above matching Electrolux Washer, which requires installation of unit(s) and door(s). The power supply circuit must be installed in installation. minimum louvered opening, equally divided, located 3" from top and...
... deductions for detailed instructions. Titanium (PN # EPWD157STT), Island White (PN # EPWD157SIW). • Dryer Stacking Kit - (PN # STACKIT7X). • LP Gas Conversion Kit - (PN # PCK4200). • Drying Rack - (PN # A04840701). in . We reserve the right to change specifications or discontinue models without optional 15" pedestal drawer, or stacked above matching Electrolux Washer, which requires installation of unit(s) and door(s). The power supply circuit must be installed in installation. minimum louvered opening, equally divided, located 3" from top and...


