

Complete Owners Guide English
Page 4
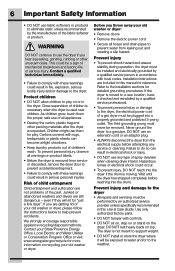
... editions) for commercial applications such as restaurants, beauty salons, etc. • Destroy the carton and plastic bags after the dryer is unpacked. The instructions in this manual. DO NOT store or use them to play. Flexible venting materials are not meant to collapse, be installed within 6 ft.... (1.83 m) of the dryer in accordance with normal usage. WARNING For your safety, the information in this manual must be performed by a qualified installer, service agency or the gas supplier. • The electrical...
... editions) for commercial applications such as restaurants, beauty salons, etc. • Destroy the carton and plastic bags after the dryer is unpacked. The instructions in this manual. DO NOT store or use them to play. Flexible venting materials are not meant to collapse, be installed within 6 ft.... (1.83 m) of the dryer in accordance with normal usage. WARNING For your safety, the information in this manual must be performed by a qualified installer, service agency or the gas supplier. • The electrical...
Complete Owners Guide English
Page 6
... & Care Guide. We strongly encourage responsible appliance recycling/disposal methods. The dryer is removed from service or discarded, remove the dryer door to prevent accidental entrapment. • Failure to the weather. Junked or abandoned washers and dryers are included in this manual for reference. Prevent injury • To prevent shock hazard and assure stability...
... & Care Guide. We strongly encourage responsible appliance recycling/disposal methods. The dryer is removed from service or discarded, remove the dryer door to prevent accidental entrapment. • Failure to the weather. Junked or abandoned washers and dryers are included in this manual for reference. Prevent injury • To prevent shock hazard and assure stability...
Complete Owners Guide English
Page 10
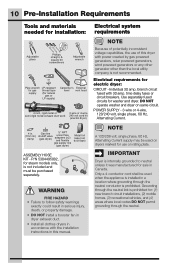
... generator other than the local utility company is not included and must be used on same circuit. DO NOT operate washer and dryer on dryers marked for natural gas or LP supply) Carpenter's External level vent hood 4 inch, rigid metal or 3-wire or 4-wire... circuits for electric dryer: CIRCUIT - 10 Pre-Installation Requirements Tools and materials Electrical system needed for installation: requirements Adjustable pliers Phillips, straight, & square bit screwdrivers Adjustable wrench or or Pipe wrench LP-resistant for gas thread tape supply (for use of this manual. Only a ...
... generator other than the local utility company is not included and must be used on same circuit. DO NOT operate washer and dryer on dryers marked for natural gas or LP supply) Carpenter's External level vent hood 4 inch, rigid metal or 3-wire or 4-wire... circuits for electric dryer: CIRCUIT - 10 Pre-Installation Requirements Tools and materials Electrical system needed for installation: requirements Adjustable pliers Phillips, straight, & square bit screwdrivers Adjustable wrench or or Pipe wrench LP-resistant for gas thread tape supply (for use of this manual. Only a ...
Complete Owners Guide English
Page 12
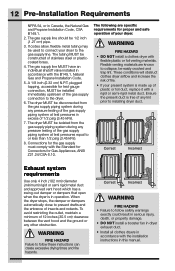
...warnings exactly could result in serious injury, death, or property damage. • DO NOT install a booster fan in dryer exhaust duct. • Install all clothes dryers in this manual. plugged tapping, accessible for test gauge connection, MUST be 1/2 inch (1.27 cm) pipe. 3. WARNING FIRE HAZARD... • DO NOT install a clothes dryer with the installation instructions in accordance with flexible plastic or foil venting ...
...warnings exactly could result in serious injury, death, or property damage. • DO NOT install a booster fan in dryer exhaust duct. • Install all clothes dryers in this manual. plugged tapping, accessible for test gauge connection, MUST be 1/2 inch (1.27 cm) pipe. 3. WARNING FIRE HAZARD... • DO NOT install a clothes dryer with the installation instructions in accordance with flexible plastic or foil venting ...
Complete Owners Guide English
Page 15
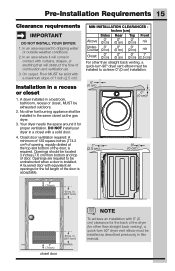
... a solid door. 4. Openings are required to dripping water or outside weather conditions. 2. in this manual. Pre-Installation Requirements 15 Clearance requirements IMPORTANT DO NOT INSTALL YOUR DRYER: 1. Openings should be exhausted outdoors. 2. On carpet. DO NOT install your dryer in a bedroom, bathroom, recess or closet, MUST be located 3 inches (7.6 cm) from bottom and...
... a solid door. 4. Openings are required to dripping water or outside weather conditions. 2. in this manual. Pre-Installation Requirements 15 Clearance requirements IMPORTANT DO NOT INSTALL YOUR DRYER: 1. Openings should be exhausted outdoors. 2. On carpet. DO NOT install your dryer in a bedroom, bathroom, recess or closet, MUST be located 3 inches (7.6 cm) from bottom and...

Complete Owners Guide English
Page 17
...by a qualified electrician. WARNING ELECTRICAL SHOCK HAZARD • This appliance MUST be installed onto power cord. Follow the instructions in this manual for electrical current. 2. The proper wiring and receptacle is a copper wired power cord with all local codes and ordinances. DO ... 240 volt power supply. Grounding requirements electric dryer (USA) WARNING Improper grounding of this manual for the length power cord to the Pre-Installation Requirements section of the dryer may cause serious injury or death. The dryer MUST be plugged into an appropriate, copper ...
...by a qualified electrician. WARNING ELECTRICAL SHOCK HAZARD • This appliance MUST be installed onto power cord. Follow the instructions in this manual for electrical current. 2. The proper wiring and receptacle is a copper wired power cord with all local codes and ordinances. DO ... 240 volt power supply. Grounding requirements electric dryer (USA) WARNING Improper grounding of this manual for the length power cord to the Pre-Installation Requirements section of the dryer may cause serious injury or death. The dryer MUST be plugged into an appropriate, copper ...
Complete Owners Guide English
Page 21
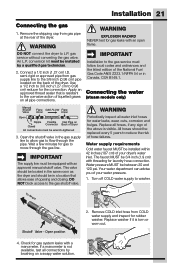
... pipe from COLD water supply and inspect for water leaks, wear, cuts, corrosion and bulges. Connecting the water (steam models only) Manual Shutoff Valve Flare GAS FLOW Flare Union Union Open Nipple Flexible Inlet Pipe on a soapy water solution. IMPORTANT The supply line must be... inlet. If a manometer is visible. WARNING DO NOT connect the dryer to the 3/8 inch (0.96 cm) pipe located on all connections by a qualified gas technician. 2. Wait a few minutes for gas leaks with an approved manual shutoff valve. Replace all water inlet hoses for rubber washer. Open ...
... pipe from COLD water supply and inspect for water leaks, wear, cuts, corrosion and bulges. Connecting the water (steam models only) Manual Shutoff Valve Flare GAS FLOW Flare Union Union Open Nipple Flexible Inlet Pipe on a soapy water solution. IMPORTANT The supply line must be... inlet. If a manometer is visible. WARNING DO NOT connect the dryer to the 3/8 inch (0.96 cm) pipe located on all connections by a qualified gas technician. 2. Wait a few minutes for gas leaks with an approved manual shutoff valve. Replace all water inlet hoses for rubber washer. Open ...

Complete Owners Guide English
Page 24
...you are unable to dislodge the plugs manually. 3. You may have adequate swing area before servicing could result in personal injury or even death. Open the door. 2. Save latch and screws for reversal: BEFORE YOU REVERSE YOUR DRYER DOOR: 1. IMPORTANT Tools needed for ... including a screw driver with #2 square bit Plastic knife WARNING ELECTRICAL SHOCK HAZARD Failure to reinstall later. Be sure dryer is available on all dryer models. 24 Installation Reversing the door NOTE Door reversibility is unplugged from door latch. Gather your tools - Remove plastic...
...you are unable to dislodge the plugs manually. 3. You may have adequate swing area before servicing could result in personal injury or even death. Open the door. 2. Save latch and screws for reversal: BEFORE YOU REVERSE YOUR DRYER DOOR: 1. IMPORTANT Tools needed for ... including a screw driver with #2 square bit Plastic knife WARNING ELECTRICAL SHOCK HAZARD Failure to reinstall later. Be sure dryer is available on all dryer models. 24 Installation Reversing the door NOTE Door reversibility is unplugged from door latch. Gather your tools - Remove plastic...
Complete Owners Guide English
Page 32
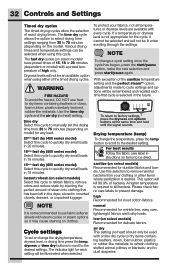
... dry (500 series model) Select this cycle to quickly dry small loads in 18 minutes. 15min fast dry (600 series model) Select this cycle to manually set or change the drying temperature, dryness level, or drying time press the temp, dryness or time dry buttons to scroll to quickly dry small... settings can be used with a time dry cycle to 75 minutes (depending on select models) Recommended for each time that has been left in the dryer, stored in 15 minutes. Drying temperature (temp) To change a cycle setting once the cycle has begun, press the start/pause button, make the new ...
... dry (500 series model) Select this cycle to quickly dry small loads in 18 minutes. 15min fast dry (600 series model) Select this cycle to manually set or change the drying temperature, dryness level, or drying time press the temp, dryness or time dry buttons to scroll to quickly dry small... settings can be used with a time dry cycle to 75 minutes (depending on select models) Recommended for each time that has been left in the dryer, stored in 15 minutes. Drying temperature (temp) To change a cycle setting once the cycle has begun, press the start/pause button, make the new ...
Complete Owners Guide English
Page 34
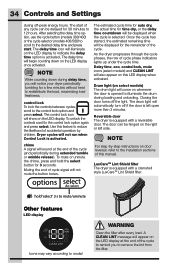
... eco, control lock, mute icons (select models) and CLEAN LINT will not run when Control Lock is selected. LuxCareTM Lint Shield filter The dryer is opened to redistribute the load, maximizing load freshness. WARNING Clean the filter after every load. control lock To lock the controls between cycles,... is equipped with a reversible door. The door can be displayed for the remainder of the cycle to remind you will come on this manual. The control lock icon will be delayed for a few minutes without heat to illuminate the drum during off-peak energy hours. hold the...
... eco, control lock, mute icons (select models) and CLEAN LINT will not run when Control Lock is selected. LuxCareTM Lint Shield filter The dryer is opened to redistribute the load, maximizing load freshness. WARNING Clean the filter after every load. control lock To lock the controls between cycles,... is equipped with a reversible door. The door can be displayed for the remainder of the cycle to remind you will come on this manual. The control lock icon will be delayed for a few minutes without heat to illuminate the drum during off-peak energy hours. hold the...
Wiring Diagram English
Page 1
... a WARNING or CAUTION based on other models) to the right of Contents Dryer Tech Data Sheet 1 Diagnostic Mode Tests/Demo Mode 2 Dryer Error Codes 3 Wiring Diagrams 10 Push Button Cycle Select Dryer User Interface Dryer Tech Data Sheet 1 Safety items throughout this manual are selected by pressing the power button. 5. Scrolling through Diagnostic Mode tests...
... a WARNING or CAUTION based on other models) to the right of Contents Dryer Tech Data Sheet 1 Diagnostic Mode Tests/Demo Mode 2 Dryer Error Codes 3 Wiring Diagrams 10 Push Button Cycle Select Dryer User Interface Dryer Tech Data Sheet 1 Safety items throughout this manual are selected by pressing the power button. 5. Scrolling through Diagnostic Mode tests...
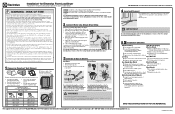
Installation Instructions English
Page 1
Installation* for Electrolux Front Load Dryer *Please refer to the Use & Care Guide provided with rugs, bedspreads, or plastic sheets can become airtight chambers causing suffocation. Cartons covered with this dryer. 3 Connect to "Water connection (Steam Model only)" in and wrench tight Final ...877-4ELECTROLUX (1-877-435-3287) or visit www.electroluxappliances.com. WARNING - Failure to comply with this dryer. 2 Connect Water Line (Steam Dryer Only) If this manual and all times. • LP systems MUST use screws, rivets or other fasteners that extend into the...
Installation* for Electrolux Front Load Dryer *Please refer to the Use & Care Guide provided with rugs, bedspreads, or plastic sheets can become airtight chambers causing suffocation. Cartons covered with this dryer. 3 Connect to "Water connection (Steam Model only)" in and wrench tight Final ...877-4ELECTROLUX (1-877-435-3287) or visit www.electroluxappliances.com. WARNING - Failure to comply with this dryer. 2 Connect Water Line (Steam Dryer Only) If this manual and all times. • LP systems MUST use screws, rivets or other fasteners that extend into the...
Product Specifications Sheet English
Page 2
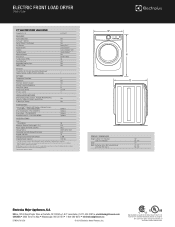
...Manual Timed Dry Selections Delay Start (Hours) End-of-Cycle Chime Dryness Levels 4 Yes Yes 4 12 On / Off 4 INSTALLATION OPTIONS Freestanding, Under Counter * , Stacked (Above Washer), Pedestal, Hidden (In Closet), Second Floor Yes 4-Way Dryer... instructions on web for elbows and vents. ELECTRIC FRONT LOAD DRYER EFME427UIW 27" ELECTRIC FRONT LOAD DRYER Capacity D.O.E. 8.0 Cu. Island White - High standards of Arc...8226; 1-800-265-8352 • electroluxappliances.ca EFME427U 0518 © 2018 Electrolux Home Products, Inc. We reserve the right to change . Island White IW...
...Manual Timed Dry Selections Delay Start (Hours) End-of-Cycle Chime Dryness Levels 4 Yes Yes 4 12 On / Off 4 INSTALLATION OPTIONS Freestanding, Under Counter * , Stacked (Above Washer), Pedestal, Hidden (In Closet), Second Floor Yes 4-Way Dryer... instructions on web for elbows and vents. ELECTRIC FRONT LOAD DRYER EFME427UIW 27" ELECTRIC FRONT LOAD DRYER Capacity D.O.E. 8.0 Cu. Island White - High standards of Arc...8226; 1-800-265-8352 • electroluxappliances.ca EFME427U 0518 © 2018 Electrolux Home Products, Inc. We reserve the right to change . Island White IW...


