Complete Owner s Guide English
Page 5
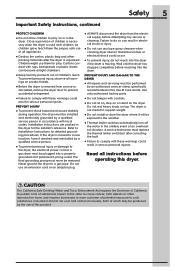
...9679;Do not use them the proper, safe use an extension cord or an adaptor plug. ●●ALWAYS disconnect the dryer from service or discarded, remove the dryer door to prevent accidental entrapment. ●●Failure to comply with controls. ●●Do not sit on, step ...on or stand on top. Refer to Installation Instructions for play on product labels. ●●Before the dryer is unpacked. Use only authorized factory parts. ●●Do not tamper with these warnings could occur. ●●To prevent injury, do so can become airtight...
...9679;Do not use them the proper, safe use an extension cord or an adaptor plug. ●●ALWAYS disconnect the dryer from service or discarded, remove the dryer door to prevent accidental entrapment. ●●Failure to comply with controls. ●●Do not sit on, step ...on or stand on top. Refer to Installation Instructions for play on product labels. ●●Before the dryer is unpacked. Use only authorized factory parts. ●●Do not tamper with these warnings could occur. ●●To prevent injury, do so can become airtight...

Complete Owner s Guide English
Page 8
... or small items in place. 3. Check that attract lint. ●●Check for high temperatures into the dryer. 2. Place a wet load of your dryer for the first time, internal dryer parts must be conditioned to using the sanitize feature (if available) on top of the load at a time. ...or very small loads, add two or three larger items to repeat internal dryer part conditioning. Set the dryer for drying. ●●Dry items of fire, electric shock or injury to sanitize. 3. Operating Your Dryer 1. Prepare load for the 75 minute time dry cycle and adjust the temperature...
... or small items in place. 3. Check that attract lint. ●●Check for high temperatures into the dryer. 2. Place a wet load of your dryer for the first time, internal dryer parts must be conditioned to using the sanitize feature (if available) on top of the load at a time. ...or very small loads, add two or three larger items to repeat internal dryer part conditioning. Set the dryer for drying. ●●Dry items of fire, electric shock or injury to sanitize. 3. Operating Your Dryer 1. Prepare load for the 75 minute time dry cycle and adjust the temperature...

Complete Owner s Guide English
Page 9
...start again. ●●To change the settings or options after every load. When the cycle ends, remove items immediately and hang or fold. The dryer will not operate with a cycle running will light when the option has been selected. Select the appropriate cycle and settings for each cycle. ●●..." section in either direction or repeatedly press the cycles button (on some mod- NOTE If drying a single large or bulky item remove the item part way through the cycle and turn to on the unit. ●●Turn the cycle selector ring (on other models) to scroll to the...
...start again. ●●To change the settings or options after every load. When the cycle ends, remove items immediately and hang or fold. The dryer will not operate with a cycle running will light when the option has been selected. Select the appropriate cycle and settings for each cycle. ●●..." section in either direction or repeatedly press the cycles button (on some mod- NOTE If drying a single large or bulky item remove the item part way through the cycle and turn to on the unit. ●●Turn the cycle selector ring (on other models) to scroll to the...

Complete Owner s Guide English
Page 19
...sheets. Lint buildup on a pedestal. 19 These areas can damage the finish or controls. WARNING FIRE HAZARD A clothes dryer produces combustible lint. The dryer must be connected to 8 parts water). Inside ●● Clean the lint filter after every load. Remove by pulling straight up , wash them... ●● If the cabinet becomes stained, clean with diluted chlorine bleach (1 part bleach to an outdoors exhaust. It is best to use only a damp cloth. ●● Before moving the dryer, place a strip of cardboard or thin fiberboard under the front leveling legs to ...
...sheets. Lint buildup on a pedestal. 19 These areas can damage the finish or controls. WARNING FIRE HAZARD A clothes dryer produces combustible lint. The dryer must be connected to 8 parts water). Inside ●● Clean the lint filter after every load. Remove by pulling straight up , wash them... ●● If the cabinet becomes stained, clean with diluted chlorine bleach (1 part bleach to an outdoors exhaust. It is best to use only a damp cloth. ●● Before moving the dryer, place a strip of cardboard or thin fiberboard under the front leveling legs to ...

Installation Instructions English Spanish French
Page 2
...codes. • The electrical service to the dryer must conform with local codes and ordinances and the latest edition of the National Electrical Code, ANSI/NFPA 70, or in Canada, the Canadian electrical code C22.1 part 1. • The gas service to situations that... Do not stack a dryer on pedestal. Save these instructions for HOME USE only. Table of washer already installed on top of contents Important Safety Instructions 2 Installation Requirements 3-9 Installation Instructions 10-17 Reversing Door 18-19 Options 20 ©2016 Electrolux Major Appliances All rights ...
...codes. • The electrical service to the dryer must conform with local codes and ordinances and the latest edition of the National Electrical Code, ANSI/NFPA 70, or in Canada, the Canadian electrical code C22.1 part 1. • The gas service to situations that... Do not stack a dryer on pedestal. Save these instructions for HOME USE only. Table of washer already installed on top of contents Important Safety Instructions 2 Installation Requirements 3-9 Installation Instructions 10-17 Reversing Door 18-19 Options 20 ©2016 Electrolux Major Appliances All rights ...
Installation Instructions English Spanish French
Page 3
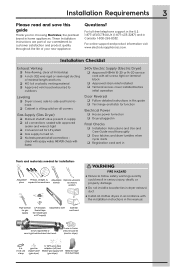
... initial operation Door Reversal Follow detailed instructions in this guide Thank you for choosing Electrolux, the premium brand in home appliances. These Installation Instructions are part of our commitment to customer satisfaction and product quality throughout the life of minimal length and turns... Please read and save this guide Test hinge and latch for function Electrical Power House power turned on Dryer plugged in Final Checks Installation Instructions and Use and Care Guide read thoroughly Door latches and drum tumbles when cycle ...
... initial operation Door Reversal Follow detailed instructions in this guide Thank you for choosing Electrolux, the premium brand in home appliances. These Installation Instructions are part of our commitment to customer satisfaction and product quality throughout the life of minimal length and turns... Please read and save this guide Test hinge and latch for function Electrical Power House power turned on Dryer plugged in Final Checks Installation Instructions and Use and Care Guide read thoroughly Door latches and drum tumbles when cycle ...

Installation Instructions English Spanish French
Page 6
... a fire hazard. ● Do not screen the exhaust ends of the vent system, or use any concealed space of air. Dryer vent elbows are available through your local parts distributor or hardware store. NOTE Use of 90° quickturn elbow required to terminate the duct outdoors, and seal all joints with...
... a fire hazard. ● Do not screen the exhaust ends of the vent system, or use any concealed space of air. Dryer vent elbows are available through your local parts distributor or hardware store. NOTE Use of 90° quickturn elbow required to terminate the duct outdoors, and seal all joints with...

Installation Instructions English Spanish French
Page 7
... system through the floor and area beneath the mobile home is unacceptable. Although vertical orientation of the dryer exhaust outlet. 6. Dryer MUST be made for Mobile Home Construction and Safety, Title 24, HUD Part 280) or Standard CAN/CSAZ240 MH. 2. Read the measurement on pedestal to current Manufactured Home Construction & Safety Standard...
... system through the floor and area beneath the mobile home is unacceptable. Although vertical orientation of the dryer exhaust outlet. 6. Dryer MUST be made for Mobile Home Construction and Safety, Title 24, HUD Part 280) or Standard CAN/CSAZ240 MH. 2. Read the measurement on pedestal to current Manufactured Home Construction & Safety Standard...
Installation Instructions English Spanish French
Page 20
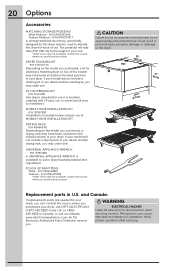
... will add about 15" (38 cm) to the height of use a conversion kit prior to elevate the dryer for the Electrolux Authorized Parts Distributor nearest you purchased your dryer. DRYER STACKING KIT P/N STACKIT7X Depending on top of your dryer, call 1-877-4ELECTROLUX (1-877-435-3287) in a location supplied with LP must use . 20 Options Accessories MATCHING...
... will add about 15" (38 cm) to the height of use a conversion kit prior to elevate the dryer for the Electrolux Authorized Parts Distributor nearest you purchased your dryer. DRYER STACKING KIT P/N STACKIT7X Depending on top of your dryer, call 1-877-4ELECTROLUX (1-877-435-3287) in a location supplied with LP must use . 20 Options Accessories MATCHING...
Product Specifications Sheet English
Page 1
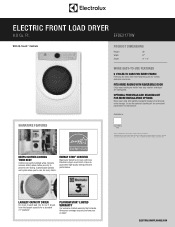
.... ENERGY STAR® CERTIFIED Rigorously tested to guarantee high-quality energy efficient performance. Electrolux dryers meet strict criteria to do more with less. dryers have been purchased on or after July 1, 2013. ELECTRIC FRONT LOAD DRYER 8.0 Cu. EFDE317TIW With IQ-Touch™ Controls PRODUCT DIMENSIONS Height Width Depth 38" 27" 31-1/2"... WITH REVERSIBLE DOOR Enjoy easy loading no matter how your units with optional pedestal drawers that includes three year coverage on parts and one year on product registration with tailored cycles for convenient placement in small spaces.
.... ENERGY STAR® CERTIFIED Rigorously tested to guarantee high-quality energy efficient performance. Electrolux dryers meet strict criteria to do more with less. dryers have been purchased on or after July 1, 2013. ELECTRIC FRONT LOAD DRYER 8.0 Cu. EFDE317TIW With IQ-Touch™ Controls PRODUCT DIMENSIONS Height Width Depth 38" 27" 31-1/2"... WITH REVERSIBLE DOOR Enjoy easy loading no matter how your units with optional pedestal drawers that includes three year coverage on parts and one year on product registration with tailored cycles for convenient placement in small spaces.


