
Complete Owners Guide English
Page 4
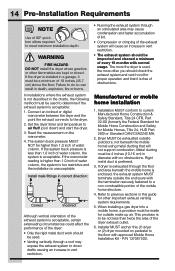
... duct to comply with this manual must be followed to minimize the risk of fire or explosion or to prevent property damage, personal injury or loss of the vent system, or use any mesh size is allowed to cover the outdoor exhaust opening. • Install the clothes dryer according to the manufacturer's instructions and local codes. • Clothes dryer installation and service must be performed by a qualified installer, service...
... duct to comply with this manual must be followed to minimize the risk of fire or explosion or to prevent property damage, personal injury or loss of the vent system, or use any mesh size is allowed to cover the outdoor exhaust opening. • Install the clothes dryer according to the manufacturer's instructions and local codes. • Clothes dryer installation and service must be performed by a qualified installer, service...

Complete Owners Guide English
Page 5
... of fire due to catch fire. IMPORTANT Indicates installation, operation, or maintenance information which , if not avoided, could ignite or explode. • DO NOT place items exposed to comply with the basic warnings listed below. An excessive amount of a tumble dryer cycle occurs without heat (cool down period). See Care and Cleaning. Items contaminated with cooking oils may result in...
... of fire due to catch fire. IMPORTANT Indicates installation, operation, or maintenance information which , if not avoided, could ignite or explode. • DO NOT place items exposed to comply with the basic warnings listed below. An excessive amount of a tumble dryer cycle occurs without heat (cool down period). See Care and Cleaning. Items contaminated with cooking oils may result in...
Complete Owners Guide English
Page 6
... and polarized 3-prong outlet. Contact your old washer or dryer: • Remove doors • Remove the electric power cord • Secure all warnings on recycling your old washer or dryer, please follow the instructions below to do so can become airtight chambers. • Keep laundry products out of spray cleanser when cleaning dryer interior. Wait until the dryer has stopped completely before attempting any type of children...
... and polarized 3-prong outlet. Contact your old washer or dryer: • Remove doors • Remove the electric power cord • Secure all warnings on recycling your old washer or dryer, please follow the instructions below to do so can become airtight chambers. • Keep laundry products out of spray cleanser when cleaning dryer interior. Wait until the dryer has stopped completely before attempting any type of children...
Complete Owners Guide English
Page 8
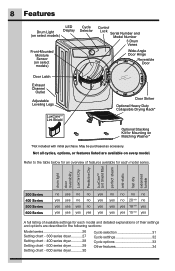
... for Mounting on Matching Washer* *Not included with initial purchase. 8 Features LED Drum Light Display (on select models) Front-Mounted Moisture Sensor (on select models) Cycle Selector Control Lock Serial Number and Model Number 3 Drum Vanes Wide-Angle Door Hinge Reversible Door Door Latch Exhaust Channel Outlet Adjustable Leveling Legs LuxCareTM Lint Shield Door Striker Optional Heavy Duty Collapsible Drying Rack* Optional Stacking Kit for each model series. drum light door reversibility LuxCare Dry Predictive Dry LuxCareT M Lint Shield filter perfect steam anti-static fast...
... for Mounting on Matching Washer* *Not included with initial purchase. 8 Features LED Drum Light Display (on select models) Front-Mounted Moisture Sensor (on select models) Cycle Selector Control Lock Serial Number and Model Number 3 Drum Vanes Wide-Angle Door Hinge Reversible Door Door Latch Exhaust Channel Outlet Adjustable Leveling Legs LuxCareTM Lint Shield Door Striker Optional Heavy Duty Collapsible Drying Rack* Optional Stacking Kit for each model series. drum light door reversibility LuxCare Dry Predictive Dry LuxCareT M Lint Shield filter perfect steam anti-static fast...
Complete Owners Guide English
Page 9
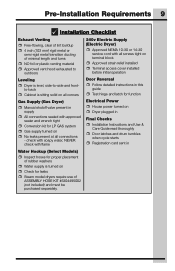
...; Terminal access cover installed before initial operation Door Reversal ˆˆ Follow detailed instructions in this guide ˆˆ Test hinge and latch for function Electrical Power ˆˆ House power turned on ˆˆ Dryer plugged in Final Checks ˆˆ Installation Instructions and Use & Care Guide read thoroughly ˆˆ Door latches and drum tumbles when cycle starts ˆˆ Registration card sent in Water Hookup (Select Models) ˆˆ Inspect hoses for leaks ˆˆ Steam model dryers require use of rubber washers...
...; Terminal access cover installed before initial operation Door Reversal ˆˆ Follow detailed instructions in this guide ˆˆ Test hinge and latch for function Electrical Power ˆˆ House power turned on ˆˆ Dryer plugged in Final Checks ˆˆ Installation Instructions and Use & Care Guide read thoroughly ˆˆ Door latches and drum tumbles when cycle starts ˆˆ Registration card sent in Water Hookup (Select Models) ˆˆ Inspect hoses for leaks ˆˆ Steam model dryers require use of rubber washers...
Complete Owners Guide English
Page 10
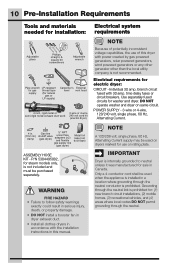
... or or Pipe wrench LP-resistant for gas thread tape supply (for natural gas or LP supply) Carpenter's External level vent hood 4 inch, rigid metal or 3-wire or 4-wire semi-rigid metal exhaust duct work 240 volt cord kit (electric dryer) NOTE Because of potentially inconsistent voltage capabilities, the use on same circuit. DO NOT operate washer and dryer on rating plate. IMPORTANT Dryer is internally grounded to follow safety...
... or or Pipe wrench LP-resistant for gas thread tape supply (for natural gas or LP supply) Carpenter's External level vent hood 4 inch, rigid metal or 3-wire or 4-wire semi-rigid metal exhaust duct work 240 volt cord kit (electric dryer) NOTE Because of potentially inconsistent voltage capabilities, the use on same circuit. DO NOT operate washer and dryer on rating plate. IMPORTANT Dryer is internally grounded to follow safety...
Complete Owners Guide English
Page 11
... Fuel Gas Code ANSI Z223.1/ Grounding type wall receptacle Do not, under any circumstances, cut, remove, or bypass the grounding prong. The gas service to natural gas, causing gas leaks. time delay fuse or circuit breaker. Dryer is in Electrical Installation section. See "Grounding requirements" in Canada have factory-installed, 4-wire power supply cord (NEMA 14-30). Use ONLY black iron, stainless steel, or plastic-coated brass piping for gas dryer: CIRCUIT - For 3-wire cord connection instructions see "Electrical connection (non-Canada) - 4-wire cord...
... Fuel Gas Code ANSI Z223.1/ Grounding type wall receptacle Do not, under any circumstances, cut, remove, or bypass the grounding prong. The gas service to natural gas, causing gas leaks. time delay fuse or circuit breaker. Dryer is in Electrical Installation section. See "Grounding requirements" in Canada have factory-installed, 4-wire power supply cord (NEMA 14-30). Use ONLY black iron, stainless steel, or plastic-coated brass piping for gas dryer: CIRCUIT - For 3-wire cord connection instructions see "Electrical connection (non-Canada) - 4-wire cord...
Complete Owners Guide English
Page 12
... follow these instructions can create excessive drying times and fire hazards. The following are known to collapse, be used to connect your dryer to the dryer. 6. Flexible venting materials are specific requirements for proper and safe operation of your present system is free of any pressure testing of the gas supply piping system at test pressures in Canada, the Natural Gas and Propane Installation Code, CSA B149.1. 2. plugged tapping, accessible for Gas Appliances...
... follow these instructions can create excessive drying times and fire hazards. The following are known to collapse, be used to connect your dryer to the dryer. 6. Flexible venting materials are specific requirements for proper and safe operation of your present system is free of any pressure testing of the gas supply piping system at test pressures in Canada, the Natural Gas and Propane Installation Code, CSA B149.1. 2. plugged tapping, accessible for Gas Appliances...
Complete Owners Guide English
Page 13
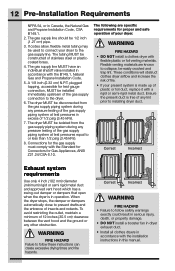
... flow of lint around the outdoor exhaust opening . The dryer MUST NOT be expelled into the duct to assemble the exhaust system. Use an approved vent hood to cover the exhaust opening and in the screen, grate, guard, or on the screws or rivets, clogging the duct work and creating a fire hazard as well as increase drying times. MAXIMUM LENGTH of 4" (102 mm) Rigid Metal Duct VENT HOOD TYPE (Preferred) Number of the vent...
... flow of lint around the outdoor exhaust opening . The dryer MUST NOT be expelled into the duct to assemble the exhaust system. Use an approved vent hood to cover the exhaust opening and in the screen, grate, guard, or on the screws or rivets, clogging the duct work and creating a fire hazard as well as increase drying times. MAXIMUM LENGTH of 4" (102 mm) Rigid Metal Duct VENT HOOD TYPE (Preferred) Number of the vent...
Complete Owners Guide English
Page 14
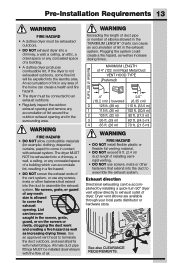
... rigid metal duct work should be not less than 1.0 inch of water column, the system is acceptable. The more the dryer is used to down ) and start the dryer. 3. Rigid metal duct is free of every 18 months with approved Mobile Home Installation Kit - Installer MUST anchor this guide for proper operation and that will cause an increase in vent restriction. • Running the exhaust system through...
... rigid metal duct work should be not less than 1.0 inch of water column, the system is acceptable. The more the dryer is used to down ) and start the dryer. 3. Rigid metal duct is free of every 18 months with approved Mobile Home Installation Kit - Installer MUST anchor this guide for proper operation and that will cause an increase in vent restriction. • Running the exhaust system through...

Complete Owners Guide English
Page 17
... the instructions in electrical shock. • DO NOT use an extension cord with a copper wired receptacle. Grounding requirements electric dryer (USA) WARNING Improper grounding of the receptacle for proper grounding. • DO NOT use an aluminum wired receptacle with local codes and the National Electrical code ANSI/NFPA 70 or the Canadian Electrical Code, Part 1, CSA C22.1. Refer to the Pre-Installation Requirements section of this manual for the length power cord...
... the instructions in electrical shock. • DO NOT use an extension cord with a copper wired receptacle. Grounding requirements electric dryer (USA) WARNING Improper grounding of the receptacle for proper grounding. • DO NOT use an aluminum wired receptacle with local codes and the National Electrical code ANSI/NFPA 70 or the Canadian Electrical Code, Part 1, CSA C22.1. Refer to the Pre-Installation Requirements section of this manual for the length power cord...
Complete Owners Guide English
Page 21
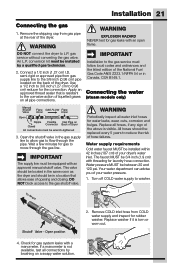
... installed by brushing on Closed Connector Back of Dryer All connections must be 3/4 inch (1.9 cm) with an approved manual shutoff valve. Your water department can advise you of your water pressure. 1. Remove COLD inlet hose from gas supply line to the 3/8 inch (0.96 cm) pipe located on all connections by a qualified gas technician. 2. Replace washer if it is not available, test all pipe connections. gas service without converting the gas valve. conversion kit must follow local codes...
... installed by brushing on Closed Connector Back of Dryer All connections must be 3/4 inch (1.9 cm) with an approved manual shutoff valve. Your water department can advise you of your water pressure. 1. Remove COLD inlet hose from gas supply line to the 3/8 inch (0.96 cm) pipe located on all connections by a qualified gas technician. 2. Replace washer if it is not available, test all pipe connections. gas service without converting the gas valve. conversion kit must follow local codes...

Complete Owners Guide English
Page 23
... your old dryer, remove the door. Press down on the power at the circuit breaker/ fuse box. 7. If you have any questions during initial operation, please review the "Avoid Service Checklist" in your Use & Care Guide before plugging the power cord into a grounded outlet. CAUTION When discarding or storing your dryer front-to-back and side-to the exhaust vent system. Connect the exhaust duct to -corner. IMPORTANT Be sure the power is properly...
... your old dryer, remove the door. Press down on the power at the circuit breaker/ fuse box. 7. If you have any questions during initial operation, please review the "Avoid Service Checklist" in your Use & Care Guide before plugging the power cord into a grounded outlet. CAUTION When discarding or storing your dryer front-to-back and side-to the exhaust vent system. Connect the exhaust duct to -corner. IMPORTANT Be sure the power is properly...
Complete Owners Guide English
Page 31
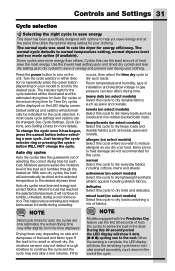
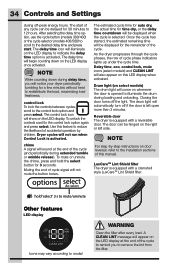
... remaining cycle time in either direction or repeatedly press the cycles button (depending on the unit. To change the cycle. Auto dry cycles save time and energy and protect fabrics. Drying times vary depending on select models) Select this cycle to dry loads containing a mix of fabrics. mixed load (on the LED display screen. The normal cycle was used to rate the dryer for each load. Controls and Settings 31 Cycle selection Selecting the right cycle to save energy This dryer...
... remaining cycle time in either direction or repeatedly press the cycles button (depending on the unit. To change the cycle. Auto dry cycles save time and energy and protect fabrics. Drying times vary depending on select models) Select this cycle to dry loads containing a mix of fabrics. mixed load (on the LED display screen. The normal cycle was used to rate the dryer for each load. Controls and Settings 31 Cycle selection Selecting the right cycle to save energy This dryer...
Complete Owners Guide English
Page 32
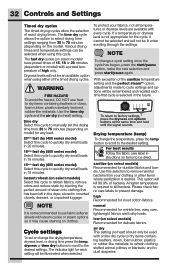
... To avoid fire hazard, DO NOT use fabric softener sheets with a preset temperature of steam into clothing that cycle is selected in 18 minutes. 15min fast dry (600 series model) Select this cycle to be dried. Cycle settings To set the drying time from 30 to 75 minutes (depending on select models) Recommended for wrinkle free, easy care, lightweight fabrics and bulky loads. If a temperature or dryness level is not recommended to...
... To avoid fire hazard, DO NOT use fabric softener sheets with a preset temperature of steam into clothing that cycle is selected in 18 minutes. 15min fast dry (600 series model) Select this cycle to be dried. Cycle settings To set the drying time from 30 to 75 minutes (depending on select models) Recommended for wrinkle free, easy care, lightweight fabrics and bulky loads. If a temperature or dryness level is not recommended to...
Complete Owners Guide English
Page 34
... loading and unloading. Delay time, eco, control lock, mute icons (select models) and CLEAN LINT will not mute the button tones. The door can be displayed when the cycle is activated, The delay time will illuminate on the LED display to 12 hours. The delay time icon will begin counting down during off-peak energy hours. chime A signal will automatically turn off the light. The drum light...
... loading and unloading. Delay time, eco, control lock, mute icons (select models) and CLEAN LINT will not mute the button tones. The door can be displayed when the cycle is activated, The delay time will illuminate on the LED display to 12 hours. The delay time icon will begin counting down during off-peak energy hours. chime A signal will automatically turn off the light. The drum light...
Complete Owners Guide English
Page 42
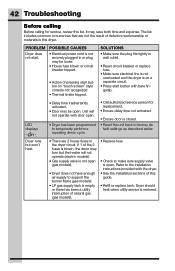
... operate (electric models). • Gas supply valve is not open . • Dryer has been programmed to factory de- PROBLEM Dryer does not start button with bare fingertip. POSSIBLE CAUSES • Electrical power cord is not securely plugged in wall outlet. • Reset circuit breaker or replace fuse. • Make sure electrical line is not overloaded and the dryer is closed. • Reset the unit back to temporarily perform a repeating demo cycle. • Call authorized service person for service, review...
... operate (electric models). • Gas supply valve is not open . • Dryer has been programmed to factory de- PROBLEM Dryer does not start button with bare fingertip. POSSIBLE CAUSES • Electrical power cord is not securely plugged in wall outlet. • Reset circuit breaker or replace fuse. • Make sure electrical line is not overloaded and the dryer is closed. • Reset the unit back to temporarily perform a repeating demo cycle. • Call authorized service person for service, review...
Complete Owners Guide English
Page 43
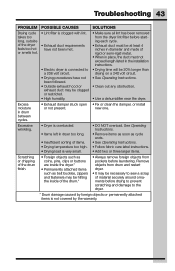
... or buttons are inside of the drum.* • Always remove foreign objects from pockets before laundering. Troubleshooting 43 PROBLEM POSSIBLE CAUSES SOLUTIONS Drying cycle takes too long, outside of the dryer feels too hot or smells hot. • Lint filter is clogged with lint. • Exhaust duct requirements have not been met. • Electric dryer is connected to a 208 volt circuit. • Drying procedures have not been followed. • Outside exhaust hood or exhaust duct...
... or buttons are inside of the drum.* • Always remove foreign objects from pockets before laundering. Troubleshooting 43 PROBLEM POSSIBLE CAUSES SOLUTIONS Drying cycle takes too long, outside of the dryer feels too hot or smells hot. • Lint filter is clogged with lint. • Exhaust duct requirements have not been met. • Electric dryer is connected to a 208 volt circuit. • Drying procedures have not been followed. • Outside exhaust hood or exhaust duct...
Complete Owners Guide English
Page 44
... appliance that has been transferred from its original owner to repair or replace appliance light bulbs, air filters, water filters, other consumables, or knobs, handles, or other than authorized service companies; Products used other cosmetic parts. 10. Electrolux authorizes no person to change or add to change without notice. Product that have been removed, altered or cannot be repaired in the USA, Puerto Rico and Canada. If...
... appliance that has been transferred from its original owner to repair or replace appliance light bulbs, air filters, water filters, other consumables, or knobs, handles, or other than authorized service companies; Products used other cosmetic parts. 10. Electrolux authorizes no person to change or add to change without notice. Product that have been removed, altered or cannot be repaired in the USA, Puerto Rico and Canada. If...
Wiring Diagram English
Page 3
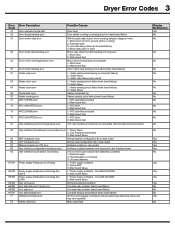
... Electrical noise 3. Line safe relay problem (main board failure) 4. Heater failure 1. too HIGH VOLTAGE 2. Main board fault 1. UI board defective Power supply frequency out of range (too HIGH) 1. Power supply problems 2. Dryer Error Codes 3 Error Code 41 42 51 Error Description Door opened at cycle start Door closed , motor sensing detects voltage on motor 1. Motor short circuit to ground (motor or wiring) 2. Main board fault Motor driven but start sensing error 53 Drum motor centrifugal switch error 54 Drum motor sensing error 61 Heater relay error 63 Heater...
... Electrical noise 3. Line safe relay problem (main board failure) 4. Heater failure 1. too HIGH VOLTAGE 2. Main board fault 1. UI board defective Power supply frequency out of range (too HIGH) 1. Power supply problems 2. Dryer Error Codes 3 Error Code 41 42 51 Error Description Door opened at cycle start Door closed , motor sensing detects voltage on motor 1. Motor short circuit to ground (motor or wiring) 2. Main board fault Motor driven but start sensing error 53 Drum motor centrifugal switch error 54 Drum motor sensing error 61 Heater relay error 63 Heater...


