
Specification sheet
Page 1
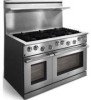
... with a centered easy-grip handle make access to perfection has never been easier. 48" DUAL-FUEL FREESTANDING RANGE CONTROL PANEL FEATURES Electronic Oven Control Yes Professional-Style Stainless Steel Console Yes Large Professional Skirted Knobs with Bezel 10 RANGETOP FEATURES Sealed Power... 4.6 Cu. NOTE: Always consult local and national electric and gas codes. PN # 318313302 Black Oven Temperature Knob - Height Width Depth Small Oven Cavity Dimensions - Dual-Fuel Freestanding Range E48DF76EPS professional series Smooth-Glide™ Oven Racks Fully extending oven racks...
... with a centered easy-grip handle make access to perfection has never been easier. 48" DUAL-FUEL FREESTANDING RANGE CONTROL PANEL FEATURES Electronic Oven Control Yes Professional-Style Stainless Steel Console Yes Large Professional Skirted Knobs with Bezel 10 RANGETOP FEATURES Sealed Power... 4.6 Cu. NOTE: Always consult local and national electric and gas codes. PN # 318313302 Black Oven Temperature Knob - Height Width Depth Small Oven Cavity Dimensions - Dual-Fuel Freestanding Range E48DF76EPS professional series Smooth-Glide™ Oven Racks Fully extending oven racks...
Specification sheet
Page 2
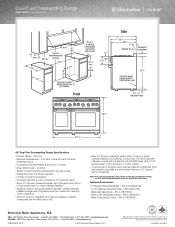
...; 1-800-265-8352 • electroluxicon.ca E48DF76EPS 03/10 © 2010 Electrolux Home Products, Inc. We reserve the right to improve our products. Front Side 31" 295/16" 281/8" 3" Optional 9" Standard 3" backsplash Gas inlet / power supply location (right bottom rear) 325/8" 27/8"- 6" adjustable legs 355/8" 4715/16" 48" Dual-Fuel Freestanding Range Specifications • Product Weight - 540...
...; 1-800-265-8352 • electroluxicon.ca E48DF76EPS 03/10 © 2010 Electrolux Home Products, Inc. We reserve the right to improve our products. Front Side 31" 295/16" 281/8" 3" Optional 9" Standard 3" backsplash Gas inlet / power supply location (right bottom rear) 325/8" 27/8"- 6" adjustable legs 355/8" 4715/16" 48" Dual-Fuel Freestanding Range Specifications • Product Weight - 540...
Owners Guide
Page 6
...Ensure that a burner flame goes out and gas escapes, open a window or door. Select utensils that you are able to applying heat. Avoid using pans that will stay cool while cooking. Foods with easily grasped handles that are suitable for use the range. • Select utensils of the proper ... listed. • Use only dry potholders to avoid steam burns when removing hot cookware. • In the event that the range is off the gas supply by a qualified technician according to turn pan handles to lift safely. Choose pans with high water content may cause spattering or...
...Ensure that a burner flame goes out and gas escapes, open a window or door. Select utensils that you are able to applying heat. Avoid using pans that will stay cool while cooking. Foods with easily grasped handles that are suitable for use the range. • Select utensils of the proper ... listed. • Use only dry potholders to avoid steam burns when removing hot cookware. • In the event that the range is off the gas supply by a qualified technician according to turn pan handles to lift safely. Choose pans with high water content may cause spattering or...
Owners Guide
Page 8
...or unattended in the area where the range is near a window, do not...let children play with the range. • Do not store items of the range unless specifically recommended in ... to children above the range. Pressure buildup may stain. • Do not touch the range top or backguard with ..., as these may result in the event of the range. Decorative covers should be used. • Do not...• When using the range. • Do not store combustible, flammable or explosive materials in the range or in adjacent cabinets. &#... If the range is in the oven during all cooking and self cleaning...
...or unattended in the area where the range is near a window, do not...let children play with the range. • Do not store items of the range unless specifically recommended in ... to children above the range. Pressure buildup may stain. • Do not touch the range top or backguard with ..., as these may result in the event of the range. Decorative covers should be used. • Do not...• When using the range. • Do not store combustible, flammable or explosive materials in the range or in adjacent cabinets. &#... If the range is in the oven during all cooking and self cleaning...
Owners Guide
Page 9
... performing this work assumes responsibility for the conversion. The qualified agency performing this work assumes responsibility for use with your range. Failure to follow the instructions could result in accordance with the manufacturer's instructions and all local codes and requirements.... from the factory for the conversion. Failure to the range may occur if the range is supplied with natural gas. CAUTION Any additions, changes or conversions required in accordance with Natural Gas and Propane Gas. The conversion must be performed by a qualified service ...
... performing this work assumes responsibility for the conversion. The qualified agency performing this work assumes responsibility for use with your range. Failure to follow the instructions could result in accordance with the manufacturer's instructions and all local codes and requirements.... from the factory for the conversion. Failure to the range may occur if the range is supplied with natural gas. CAUTION Any additions, changes or conversions required in accordance with Natural Gas and Propane Gas. The conversion must be performed by a qualified service ...
Owners Guide
Page 12
...17,000 BTU/HR, two burners rated at a maximum of 15,000 BTU/HR and two burners rated at a maximum output of each gas burner base. To ensure proper seating, positioning tabs have been placed on each burner head to slide into corresponding notches in twos. Burner ... Flame™, the automatic reignition feature, the igniters will result in the burner bases to correspond with the burner layout. On E36DF76EPS and E48DF76EPS ranges, there are attached to function properly. The knobs are grouped in the fixed burner base. The knobs are positioned to enable proper cooktop ...
...17,000 BTU/HR, two burners rated at a maximum of 15,000 BTU/HR and two burners rated at a maximum output of each gas burner base. To ensure proper seating, positioning tabs have been placed on each burner head to slide into corresponding notches in twos. Burner ... Flame™, the automatic reignition feature, the igniters will result in the burner bases to correspond with the burner layout. On E36DF76EPS and E48DF76EPS ranges, there are attached to function properly. The knobs are grouped in the fixed burner base. The knobs are positioned to enable proper cooktop ...
Owners Guide
Page 18
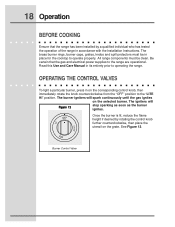
...burner igniters will Figure 12 stop sparking as soon as the burner ignites. 18 Operation BEFORE COOKING Ensure that the gas and electrical power supplies to the range are operational. The brass burner rings, burner caps, grates, knobs and spill protectors must be in on the grate...will spark continuously until the gas ignites on the selected burner. Once the burner is lit, reduce the flame height if desired by a qualified individual who has tested the operation of the range in its entirety prior to operate properly. All range components must be clean. OPERATING...
...burner igniters will Figure 12 stop sparking as soon as the burner ignites. 18 Operation BEFORE COOKING Ensure that the gas and electrical power supplies to the range are operational. The brass burner rings, burner caps, grates, knobs and spill protectors must be in on the grate...will spark continuously until the gas ignites on the selected burner. Once the burner is lit, reduce the flame height if desired by a qualified individual who has tested the operation of the range in its entirety prior to operate properly. All range components must be clean. OPERATING...
Owners Guide
Page 44
...limited warranties above . (Applicable to obtain and keep all receipts. obtained from original Pay all local plumbing, electrical and/or gas codes. 3.Proper connection to products in ordinary household use of our obligations under this warranty must be defective in accordance with ...determined. Keep your bill of the U.S.A., Puerto Rico, and Canada. 44 Warranty Information RANGE WARRANTY Y our range is protected by this warranty In the U.S.A., your appliance is warranted by Electrolux Canada Corp. We authorize no person to change or add to change without notice. ...
...limited warranties above . (Applicable to obtain and keep all receipts. obtained from original Pay all local plumbing, electrical and/or gas codes. 3.Proper connection to products in ordinary household use of our obligations under this warranty must be defective in accordance with ...determined. Keep your bill of the U.S.A., Puerto Rico, and Canada. 44 Warranty Information RANGE WARRANTY Y our range is protected by this warranty In the U.S.A., your appliance is warranted by Electrolux Canada Corp. We authorize no person to change or add to change without notice. ...
Installation Instructions
Page 6
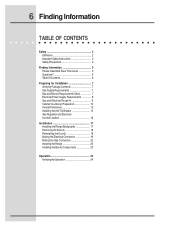
...Table 7 Electrical Power Supply Requirements 8 Gas and Electrical Rough-In 9 Cabinet/Counterop Preparation 10 Overal Dimensions 12 Installing the Anti-Tip Bracket 13 Gas Regulator and Electrical Conduit Location 16 Installation 17 Installing the Range Backguards 17 Removing the Door(s 18 Reinstalling... the Door(s 18 Making the Electrical Connection 19 Making the Gas Connection 22 Installing the Range 23 Installing the Burner...
...Table 7 Electrical Power Supply Requirements 8 Gas and Electrical Rough-In 9 Cabinet/Counterop Preparation 10 Overal Dimensions 12 Installing the Anti-Tip Bracket 13 Gas Regulator and Electrical Conduit Location 16 Installation 17 Installing the Range Backguards 17 Removing the Door(s 18 Reinstalling... the Door(s 18 Making the Electrical Connection 19 Making the Gas Connection 22 Installing the Range 23 Installing the Burner...
Installation Instructions
Page 7
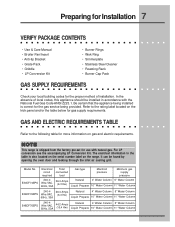
...information on the kick panel and/or the table below for gas supply requirements. NOTE This range is correct for use with the National Fuel Gas Code ANSI Z223.1. Electrical Total circuit connected required load Gas type Manifold pressure Minimum gas supply pressure E30DF74EPS 240-4 Wire VAC, 60Hz, 30A 26...E48DF76EPS Wire VAC, 44.2 Amps Natural 4" Water Column 5" Water Column 60Hz, 50A (10.4 Kw) Liquid Propane 10" Water Column 11" Water Column In the absence of installation. Model No. It can be installed in the table is also located on the serial number label on the range...
...information on the kick panel and/or the table below for gas supply requirements. NOTE This range is correct for use with the National Fuel Gas Code ANSI Z223.1. Electrical Total circuit connected required load Gas type Manifold pressure Minimum gas supply pressure E30DF74EPS 240-4 Wire VAC, 60Hz, 30A 26...E48DF76EPS Wire VAC, 44.2 Amps Natural 4" Water Column 5" Water Column 60Hz, 50A (10.4 Kw) Liquid Propane 10" Water Column 11" Water Column In the absence of installation. Model No. It can be installed in the table is also located on the serial number label on the range...
Installation Instructions
Page 9
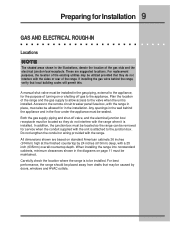
...not lengthen the conduit or wiring provided with the unit is attached to the junction box. For replacement purposes, the location of the range and the gas supply to allow access to be allowed for in the installation. Plan the location of the existing utilities may be sealed. Carefully check ...valve must be installed in place, must be caused by 24 inches (610mm) deep, with the range in the gas piping, external to the appliance, for service when the conduit supplied with the range. Any openings in the diagrams on standard American cabinets 36 inches (914mm) high at the finished ...
...not lengthen the conduit or wiring provided with the unit is attached to the junction box. For replacement purposes, the location of the range and the gas supply to allow access to be allowed for in the installation. Plan the location of the existing utilities may be sealed. Carefully check ...valve must be installed in place, must be caused by 24 inches (610mm) deep, with the range in the gas piping, external to the appliance, for service when the conduit supplied with the range. Any openings in the diagrams on standard American cabinets 36 inches (914mm) high at the finished ...
Installation Instructions
Page 17
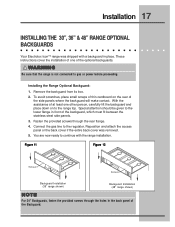
..., fasten the provided screws through the rear flange. 4. Installation 17 INSTALLING THE 30", 36" & 48" RANGE OPTIONAL BACKGUARDS Your Electrolux IconTM range was removed. 5. Installing the Range Optional Backguard: 1. Special attention should be given to gas or power before proceeding. Connect the gas line to continue with a backguard in front of the optional backguards. You are now...
..., fasten the provided screws through the rear flange. 4. Installation 17 INSTALLING THE 30", 36" & 48" RANGE OPTIONAL BACKGUARDS Your Electrolux IconTM range was removed. 5. Installing the Range Optional Backguard: 1. Special attention should be given to gas or power before proceeding. Connect the gas line to continue with a backguard in front of the optional backguards. You are now...
Installation Instructions
Page 21
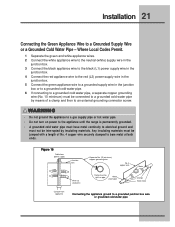
WARNING • Do not ground the appliance to a gas supply pipe or hot water pipe. • Do not turn on pipe Metal water pipe Clamps Bare metal Conduit from power supply RED RED GREEN ... Wire nut (4 places) Separate No. 10 (minimum) copper grounding wire No. 4 copper wire Meter Clamp must be tight on power to the appliance until the range is permanently grounded. • A grounded cold water pipe must not be interrupted by means of No. 4 copper wire securely clamped to a Grounded Supply Wire or...
WARNING • Do not ground the appliance to a gas supply pipe or hot water pipe. • Do not turn on pipe Metal water pipe Clamps Bare metal Conduit from power supply RED RED GREEN ... Wire nut (4 places) Separate No. 10 (minimum) copper grounding wire No. 4 copper wire Meter Clamp must be tight on power to the appliance until the range is permanently grounded. • A grounded cold water pipe must not be interrupted by means of No. 4 copper wire securely clamped to a Grounded Supply Wire or...
Installation Instructions
Page 22
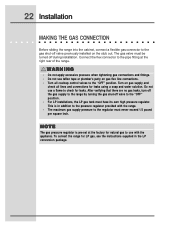
...and water solution. After verifying that there are no gas leaks, turn off the gas supply to the range by turning the gas shut-off valve previously installed on gas flex line connections. • Turn all lines and connections for LP gas, see the instructions supplied in addition to the pressure...the factory for leaks. WARNING • Do not apply excessive pressure when tightening gas connections and fittings. • Do not use a flame to check for natural gas to use with the range. • The maximum gas supply pressure to the regulator must never exceed 1/2 pound per square inch. ...
...and water solution. After verifying that there are no gas leaks, turn off the gas supply to the range by turning the gas shut-off valve previously installed on gas flex line connections. • Turn all lines and connections for LP gas, see the instructions supplied in addition to the pressure...the factory for leaks. WARNING • Do not apply excessive pressure when tightening gas connections and fittings. • Do not use a flame to check for natural gas to use with the range. • The maximum gas supply pressure to the regulator must never exceed 1/2 pound per square inch. ...
Installation Instructions
Page 24
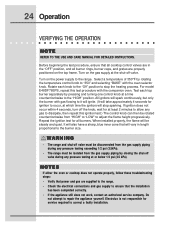
...1/2 psi (3.5 kPa). For model E48DF76EPS, repeat this ignition test.) The control knob can then be isolated from the gas supply piping by pressing and turning one control knob at least 2 minutes to allow any pressure testing exceeding 1/2 psi (3.5kPa). • The range must be steady and quiet. Test.... Turn on the gas supply at which time the ignitors will vary in the "OFF" position, and all burners. Turn on the top frame. Do not attempt to correct a faulty installation. If ignition does not occur within 4 seconds, turn off valve. Electrolux is not responsible for...
...1/2 psi (3.5 kPa). For model E48DF76EPS, repeat this ignition test.) The control knob can then be isolated from the gas supply piping by pressing and turning one control knob at least 2 minutes to allow any pressure testing exceeding 1/2 psi (3.5kPa). • The range must be steady and quiet. Test.... Turn on the gas supply at which time the ignitors will vary in the "OFF" position, and all burners. Turn on the top frame. Do not attempt to correct a faulty installation. If ignition does not occur within 4 seconds, turn off valve. Electrolux is not responsible for...
Installation Instructions
Page 25
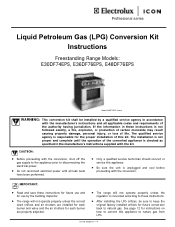
... Liquid Petroleum Gas (LPG) Conversion Kit Instructions Freestanding Range Models: E30DF74EPS, E36DF76EPS, E48DF76EPS Model E30DF74EPS shown WARNING: This conversion kit shall be sure to keep the original factory installed orifices for instructions on how to convert this appliance to nature gas from LPG... in the manufacture's instructions supplied with the conversion, shut off the gas supply to the appliance prior to these instructions is checked as specified in these instructions. The range will not operate properly unless the correct sized orifices and air shutters ...
... Liquid Petroleum Gas (LPG) Conversion Kit Instructions Freestanding Range Models: E30DF74EPS, E36DF76EPS, E48DF76EPS Model E30DF74EPS shown WARNING: This conversion kit shall be sure to keep the original factory installed orifices for instructions on how to convert this appliance to nature gas from LPG... in the manufacture's instructions supplied with the conversion, shut off the gas supply to the appliance prior to these instructions is checked as specified in these instructions. The range will not operate properly unless the correct sized orifices and air shutters ...
Installation Instructions
Page 28
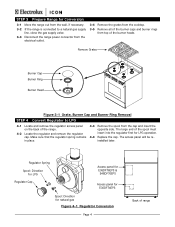
...E48DF76EPS Access panel for E30DF74EPS Spool: Direction for LPG operation. 4-4 Replace the cap. The access panel will be reinstalled later. The large end of the spool must insert into the regulator first for natural gas Figure 4-1 Regulator Conversion Page 4 Back of range STEP 3 Prepare Range for Conversion 3-1 Move the range... out from the wall, if necessary. 3-2 If the range is connected to LPG 4-1 Locate and remove the...
...E48DF76EPS Access panel for E30DF74EPS Spool: Direction for LPG operation. 4-4 Replace the cap. The access panel will be reinstalled later. The large end of the spool must insert into the regulator first for natural gas Figure 4-1 Regulator Conversion Page 4 Back of range STEP 3 Prepare Range for Conversion 3-1 Move the range... out from the wall, if necessary. 3-2 If the range is connected to LPG 4-1 Locate and remove the...

Installation Instructions
Page 32
Consult the burner. pressure does not meet specifications. 8-4 Close the LPG supply valve. Connect the range to the LPG supply line. 8-8 Turn off position. 8-2 With electrical power to the range disconnected, 8-6 Connect the U-tube manometer to the left rear open the LPG supply valve. Place end of the shutter ...Pressure Tests 8-1 Connect the U-tube manometer to the LPG supply line. 8-5 Make sure all knobs on the front of the range are in the off the burner and the gas supply valve. The shutter part number appears on its side. 9-2 Thread the air shutter onto the left rear column (WC...
Consult the burner. pressure does not meet specifications. 8-4 Close the LPG supply valve. Connect the range to the LPG supply line. 8-8 Turn off position. 8-2 With electrical power to the range disconnected, 8-6 Connect the U-tube manometer to the left rear open the LPG supply valve. Place end of the shutter ...Pressure Tests 8-1 Connect the U-tube manometer to the LPG supply line. 8-5 Make sure all knobs on the front of the range are in the off the burner and the gas supply valve. The shutter part number appears on its side. 9-2 Thread the air shutter onto the left rear column (WC...

Installation Instructions
Page 34
... between the igniter and the burner head (see STEP 9). Be sure the igniter wire is connected to each burner head. 10-5 Connect the range to the electrical outlet. 10-6 Turn each burner on HIGH and then off position. 10-2 With electrical power to the... range disconnected, open the LPG supply valve. 10-3 Using a gas leak detector or bubble forming leak detection fluid, check the following for leaks: • LPG gas supply connection • All manifold connections • All valve connections • Bypass...
... between the igniter and the burner head (see STEP 9). Be sure the igniter wire is connected to each burner head. 10-5 Connect the range to the electrical outlet. 10-6 Turn each burner on HIGH and then off position. 10-2 With electrical power to the... range disconnected, open the LPG supply valve. 10-3 Using a gas leak detector or bubble forming leak detection fluid, check the following for leaks: • LPG gas supply connection • All manifold connections • All valve connections • Bypass...

Installation Instructions
Page 36
...the parts that have been removed. Conversion Back to Natural Gas If it is necessary to return the range to determine the orifice sizes, shutter gaps, and the air shutter part numbers. Natural Gas Conversion Specifications Burner Location Left Rear Left Front Right Rear Right... HN A-0053-E 81 196 HN A-0053-E 81 196 HN A-0053-E Model E48DF76EPS (48-Inch) Air Shutter Gap .38/9.6 .35/8.8 .30/7.7 .39/9.9 .38/9.7 .37/9.5 The Electrolux Group USA • 250 Bobby Jones Expressway • Augusta, GA 30907 1-877-4electrolux (1-877-453-3287) • www.electroluxusa.com CANADA •...
...the parts that have been removed. Conversion Back to Natural Gas If it is necessary to return the range to determine the orifice sizes, shutter gaps, and the air shutter part numbers. Natural Gas Conversion Specifications Burner Location Left Rear Left Front Right Rear Right... HN A-0053-E 81 196 HN A-0053-E 81 196 HN A-0053-E Model E48DF76EPS (48-Inch) Air Shutter Gap .38/9.6 .35/8.8 .30/7.7 .39/9.9 .38/9.7 .37/9.5 The Electrolux Group USA • 250 Bobby Jones Expressway • Augusta, GA 30907 1-877-4electrolux (1-877-453-3287) • www.electroluxusa.com CANADA •...


