Owners Guide
Page 2
... ©2010 Electrolux Home Products, Inc. Table of Contents Finding Information 2 Make a Record for Future use 2 Questions 2 Safety 3 Important Safety Instructions 3 Getting Start 6 Grounding Instructions 6 Liquefied Petroleum (Propane) Gas Conversion 6 Surface Cooking 7 Surface Cooking Utensils 7 Using the Griddle 7 Using the...Burner Caps, Burner Heads 14 Cooktop Cleaning and Maintenance 16 Cleaning Recommendations for Future use Brand Purchase Date Model Number Serial Number Note: The serial plate is Orange 18 Scratches or Abrasions on Ceramic Glass Cooktop Surface ...
... ©2010 Electrolux Home Products, Inc. Table of Contents Finding Information 2 Make a Record for Future use 2 Questions 2 Safety 3 Important Safety Instructions 3 Getting Start 6 Grounding Instructions 6 Liquefied Petroleum (Propane) Gas Conversion 6 Surface Cooking 7 Surface Cooking Utensils 7 Using the Griddle 7 Using the...Burner Caps, Burner Heads 14 Cooktop Cleaning and Maintenance 16 Cleaning Recommendations for Future use Brand Purchase Date Model Number Serial Number Note: The serial plate is Orange 18 Scratches or Abrasions on Ceramic Glass Cooktop Surface ...
Owners Guide
Page 3
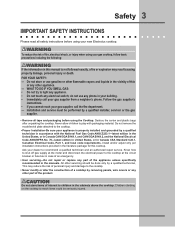
... Safety 3 Important Safety Instructions Please read all tape and packaging before using your new Electrolux cooktop. ! Installation and service must be seriously injured. Never allow children to the cooktop... Code, Part 1, and local code requirements. FOR YOUR SAFETY: - Do not remove the model/serial plate attached to children in the literature package for this manual is not followed exactly, ...appliance. • Do not touch any other appliance. - WHAT TO DO IF YOU SMELL GAS: • Do not try to reach items could be performed by a qualified technician in...
... Safety 3 Important Safety Instructions Please read all tape and packaging before using your new Electrolux cooktop. ! Installation and service must be seriously injured. Never allow children to the cooktop... Code, Part 1, and local code requirements. FOR YOUR SAFETY: - Do not remove the model/serial plate attached to children in the literature package for this manual is not followed exactly, ...appliance. • Do not touch any other appliance. - WHAT TO DO IF YOU SMELL GAS: • Do not try to reach items could be performed by a qualified technician in...
Owners Guide
Page 15
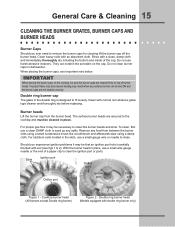
...like a toothbrush and afterwards wipe using a damp cloth. The surface burner heads are seated firmly on top of burner heads. Double ring burner head (Models equipped with normal non abrasive glass type cleaner and thoroughly dry before replacing. They can scratch the porcelain on the cooktop, be sure the burner...cooktop and must be cleaned in place. IMPORTANT When placing the burner caps on the cap. Clean with double ring burner only) For proper gas flow it may be that an ignition port hole is designed to fit loosely. For stubborn soils located in the double ring is partially ...
...like a toothbrush and afterwards wipe using a damp cloth. The surface burner heads are seated firmly on top of burner heads. Double ring burner head (Models equipped with normal non abrasive glass type cleaner and thoroughly dry before replacing. They can scratch the porcelain on the cooktop, be sure the burner...cooktop and must be cleaned in place. IMPORTANT When placing the burner caps on the cap. Clean with double ring burner only) For proper gas flow it may be that an ignition port hole is designed to fit loosely. For stubborn soils located in the double ring is partially ...
Owners Guide
Page 18
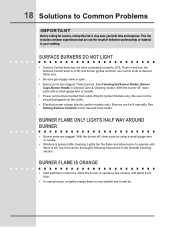
... off , clean ports with a small-gauge wire or needle. • Power cord is unavoidable due to desired flame size. • Be sure gas supply valve is open. • Burner ports are clogged. Allow the burner to operate until flame turns blue. • In coastal areas, a ...ports by using a small-gauge wire or needle. • Moisture is securely plugged into the outlet. • Electrical power outage (electric ignition models only). surface burners do not light • Surface Control knob has not been completely turned to Common Problems Important Before calling for service, review...
... off , clean ports with a small-gauge wire or needle. • Power cord is unavoidable due to desired flame size. • Be sure gas supply valve is open. • Burner ports are clogged. Allow the burner to operate until flame turns blue. • In coastal areas, a ...ports by using a small-gauge wire or needle. • Moisture is securely plugged into the outlet. • Electrical power outage (electric ignition models only). surface burners do not light • Surface Control knob has not been completely turned to Common Problems Important Before calling for service, review...
Owners Guide
Page 20
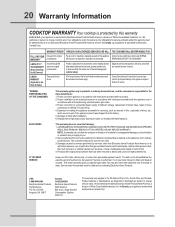
... material, or for the items listed below apply. You may not apply to state. Box 212378 Augusta, GA 30917 Canada 1•866•294•9911 Electrolux Home Products North America 802, boul. LIMITED WARRANTY (Applicable to change without notice. CONSEQUENTIAL OR INCIDENTAL DAMAGES... warranty. Costs of the technician's travel to the home and any defective surface heating element, deteriorated rubberized-silicone seal (upswept models only), or glass smoothtop that vary from persons other appropriate payment record. Damages to any transportation and labor costs which are subject...
... material, or for the items listed below apply. You may not apply to state. Box 212378 Augusta, GA 30917 Canada 1•866•294•9911 Electrolux Home Products North America 802, boul. LIMITED WARRANTY (Applicable to change without notice. CONSEQUENTIAL OR INCIDENTAL DAMAGES... warranty. Costs of the technician's travel to the home and any defective surface heating element, deteriorated rubberized-silicone seal (upswept models only), or glass smoothtop that vary from persons other appropriate payment record. Damages to any transportation and labor costs which are subject...
Installation Instructions
Page 1
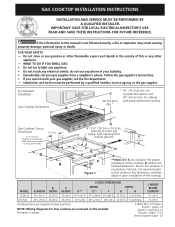
..., service agency or the gas supplier. Opening to the proper installation of the cooktop. WIDTH MODEL A. páginas 9-16 Français - pages 17-23 Wiring Diagram page - 24 If the information in inches and (cm). WHAT TO DO IF YOU SMELL GAS: • Do not ... power cable. 3"(7.6cm) 21/2" (6.4cm) G H C 4" X 4" (10.2cm x 10.2cm) opening after routing gas line J 71/4" (18.4cm) 2"(5.1cm) 1" (2.5cm) E D F Figure 1 **Note: D & E are critical to route power cable. HEIGHT BELOW COOKTOP 36 (91.4) 357/8 (91.1) 25 (63.5) 7¾ (19.7) 3515/16 (91.3) 353/16 (89.4) 351/8 (89...
..., service agency or the gas supplier. Opening to the proper installation of the cooktop. WIDTH MODEL A. páginas 9-16 Français - pages 17-23 Wiring Diagram page - 24 If the information in inches and (cm). WHAT TO DO IF YOU SMELL GAS: • Do not ... power cable. 3"(7.6cm) 21/2" (6.4cm) G H C 4" X 4" (10.2cm x 10.2cm) opening after routing gas line J 71/4" (18.4cm) 2"(5.1cm) 1" (2.5cm) E D F Figure 1 **Note: D & E are critical to route power cable. HEIGHT BELOW COOKTOP 36 (91.4) 357/8 (91.1) 25 (63.5) 7¾ (19.7) 3515/16 (91.3) 353/16 (89.4) 351/8 (89...
Installation Instructions
Page 2
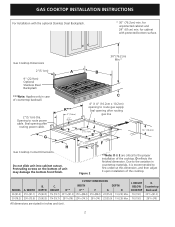
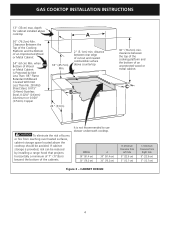
...Steel Backsplash ***Note: Applies only in case of unit may damage the bottom front finish. Opening to route gas supply. C 4" X 4" (10.2cm x 10.2cm) opening to route power cable. MODEL 36 (91.4) 30 (76.2) A. HEIGHT D** CUTOUT DIMENSIONS WIDTH E** F G DEPTH H J. BELOW Countertop COOKTOP... cabinet cutout. Seal opening after routing power cable. Protruding screws on the bottom of countertop backwall. 2"(5.1cm) Dia. Seal opening after routing gas line J 2"(5.1cm) ED 1" (2.5cm) F 7¼" (18.4cm) Figure 2 **Note: D & E are stated in countertop ...
...Steel Backsplash ***Note: Applies only in case of unit may damage the bottom front finish. Opening to route gas supply. C 4" X 4" (10.2cm x 10.2cm) opening to route power cable. MODEL 36 (91.4) 30 (76.2) A. HEIGHT D** CUTOUT DIMENSIONS WIDTH E** F G DEPTH H J. BELOW Countertop COOKTOP... cabinet cutout. Seal opening after routing power cable. Protruding screws on the bottom of countertop backwall. 2"(5.1cm) Dia. Seal opening after routing gas line J 2"(5.1cm) ED 1" (2.5cm) F 7¼" (18.4cm) Figure 2 **Note: D & E are stated in countertop ...
Installation Instructions
Page 3
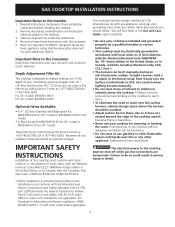
....9cm) Stainless Steel Backsplash Kit #903048-9010 for 36" model or #903048-9100 for 30" model. • A Black Knobs Kit #903049-9120 for 36" model or #903049-9110 for future reference. However all governing codes and ordinances. 4. IMPORTANT SAFETY INSTRUCTIONS Installation of this or any appliance using gas and generating heat, there are being made. As...
....9cm) Stainless Steel Backsplash Kit #903048-9010 for 36" model or #903048-9100 for 30" model. • A Black Knobs Kit #903049-9120 for 36" model or #903049-9110 for future reference. However all governing codes and ordinances. 4. IMPORTANT SAFETY INSTRUCTIONS Installation of this or any appliance using gas and generating heat, there are being made. As...
Installation Instructions
Page 4
..." (0.5mm) Copper A 18" (45.7cm) Min. 2" (5.1cm) min. depth for cabinet installed above countertop B 24" (61cm) 30" (76.2cm) min. MODEL 36" (91.4 cm) 30" (76.2 cm) A 36" (91.4 cm) 30" (76.2 cm) B. GAS COOKTOP INSTALLATION INSTRUCTIONS 13" (33cm) max. when Bottom of an unprotected wood or metal cabinet. distance between the top of...
..." (0.5mm) Copper A 18" (45.7cm) Min. 2" (5.1cm) min. depth for cabinet installed above countertop B 24" (61cm) 30" (76.2cm) min. MODEL 36" (91.4 cm) 30" (76.2 cm) A 36" (91.4 cm) 30" (76.2 cm) B. GAS COOKTOP INSTALLATION INSTRUCTIONS 13" (33cm) max. when Bottom of an unprotected wood or metal cabinet. distance between the top of...

