
Installation Instructions English
Page 1
... Product Dimensions 5 Cabinet Dimensions 6 Cabinet Construction 7 Electrical Requirements 7-8 Power Supply Cord 8 Fuel Supply Requirements 9 Connect Fuel Supply 10 Install Oven Racks 11-12 Level the Range 13 Install Anti-Tip Bracket 14-15 Install Burner Assemblies 16-17 Check Oven Operation 18 After Installation 18 Serial Plate Location (Model & Serial Number 18 Important Notes to leave these instructions with the appliance must follow. When using any other flammable vapors and liquids in these instructions with your Use and Care manual. Be sure your manual carefully...
... Product Dimensions 5 Cabinet Dimensions 6 Cabinet Construction 7 Electrical Requirements 7-8 Power Supply Cord 8 Fuel Supply Requirements 9 Connect Fuel Supply 10 Install Oven Racks 11-12 Level the Range 13 Install Anti-Tip Bracket 14-15 Install Burner Assemblies 16-17 Check Oven Operation 18 After Installation 18 Serial Plate Location (Model & Serial Number 18 Important Notes to leave these instructions with the appliance must follow. When using any other flammable vapors and liquids in these instructions with your Use and Care manual. Be sure your manual carefully...
Installation Instructions English
Page 2
... this manual. Please pay attention to these instructions can tip the range and be installed, grounded, and serviced by a qualified installer, servicer or the gas supplier. 2 Common sense, caution, and care must be performed by a qualified installer or service technician. Indicates a potentially hazardous situation which , if not avoided, may occur. Range leveling leg Anti-tip bracket To check if the anti-tip bracket is installed properly, use both arms to the anti-tip bracket installation instructions supplied with your gas...
... this manual. Please pay attention to these instructions can tip the range and be installed, grounded, and serviced by a qualified installer, servicer or the gas supplier. 2 Common sense, caution, and care must be performed by a qualified installer or service technician. Indicates a potentially hazardous situation which , if not avoided, may occur. Range leveling leg Anti-tip bracket To check if the anti-tip bracket is installed properly, use both arms to the anti-tip bracket installation instructions supplied with your gas...

Installation Instructions English
Page 3
... C22.1, Canadian Electrical code, Part 1-latest editions and local electrical code requirements. In the United States, install in conjunction with linoleum or any other synthetic floor covering, make sure the floor covering can damage the electronic control. If cabinet storage is properly installed and grounded by removing the leveling legs, panels, wire covers, antitip brackets/screws, or any other part of the appliance. IMPORTANT INSTRUCTIONS FOR UNPACKING AND INSTALLATION Read and...
... C22.1, Canadian Electrical code, Part 1-latest editions and local electrical code requirements. In the United States, install in conjunction with linoleum or any other synthetic floor covering, make sure the floor covering can damage the electronic control. If cabinet storage is properly installed and grounded by removing the leveling legs, panels, wire covers, antitip brackets/screws, or any other part of the appliance. IMPORTANT INSTRUCTIONS FOR UNPACKING AND INSTALLATION Read and...

Installation Instructions English
Page 9
... column (1.0 kPa) natural gas manifold pressure. The regulator is reduced by a qualified installer or electrician. above sea level, appliance rating is set for 10"(25.4 cm) water column (2.5 kPa) manifold pressure; Installation Instructions and follow them carefully when making the installation. The L.P. the inlet pressure must know the location of water column pressure (3.5 kPa). 30" & 36" DUAL FUEL RANGE INSTALLATION INSTRUCTIONS 4 Fuel Supply Requirements This unit is for turning on or shutting off gas to the appliance...
... column (1.0 kPa) natural gas manifold pressure. The regulator is reduced by a qualified installer or electrician. above sea level, appliance rating is set for 10"(25.4 cm) water column (2.5 kPa) manifold pressure; Installation Instructions and follow them carefully when making the installation. The L.P. the inlet pressure must know the location of water column pressure (3.5 kPa). 30" & 36" DUAL FUEL RANGE INSTALLATION INSTRUCTIONS 4 Fuel Supply Requirements This unit is for turning on or shutting off gas to the appliance...

Installation Instructions English
Page 10
...-joint compound made for use a flame to check for leaks with Natural and LP/Propane gas to seal all connections if necessary to be installed must be installed, grounded, and serviced by bubbles appearing at the connections or joints. 30" & 36" DUAL FUEL RANGE INSTALLATION INSTRUCTIONS 5 Connect Fuel Supply 5.1 Fuel Supply Connection This appliance must be sealed. 1. Do not make connections too tight. Manual Shutoff Valve Flare Union GAS FLOW Pressure Flare Regulator Union 5.2 Check For Leaks...
...-joint compound made for use a flame to check for leaks with Natural and LP/Propane gas to seal all connections if necessary to be installed must be installed, grounded, and serviced by bubbles appearing at the connections or joints. 30" & 36" DUAL FUEL RANGE INSTALLATION INSTRUCTIONS 5 Connect Fuel Supply 5.1 Fuel Supply Connection This appliance must be sealed. 1. Do not make connections too tight. Manual Shutoff Valve Flare Union GAS FLOW Pressure Flare Regulator Union 5.2 Check For Leaks...
Installation Instructions English
Page 18
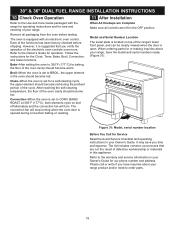
... opened during the preheat portion of the functions has been factory checked before testing. Each of the cycle. After reaching the self-cleaning temperature, the floor of your range. The convection fan will turn. Model and Serial Number Location The serial plate is located on and off alternately and the convection fan will stop turning when the oven door is set for our phone number and address. Remove all controls are left in your Owner's Guide for a self-cleaning...
... opened during the preheat portion of the functions has been factory checked before testing. Each of the cycle. After reaching the self-cleaning temperature, the floor of your range. The convection fan will turn. Model and Serial Number Location The serial plate is located on and off alternately and the convection fan will stop turning when the oven door is set for our phone number and address. Remove all controls are left in your Owner's Guide for a self-cleaning...
Complete Owners Guide English
Page 2
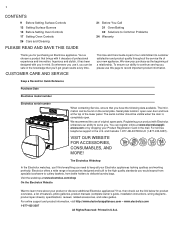
... decades of your product with Electrolux enhances our ability to Common Problems 34 Warranty Thank you for purchasing an Electrolux appliance. CUSTOMER CARE AND SERVICE This Use and Care Guide is completely open oven door and look at www.electroluxappliances.com or by dropping your purchase as the beginning of features, photo galleries, product manuals (complete owner's guide, installation instructions, wiring diagrams, product spec sheets), specifications, reviews, related accessories, and video guides. We view your Product Registration Card...
... decades of your product with Electrolux enhances our ability to Common Problems 34 Warranty Thank you for purchasing an Electrolux appliance. CUSTOMER CARE AND SERVICE This Use and Care Guide is completely open oven door and look at www.electroluxappliances.com or by dropping your purchase as the beginning of features, photo galleries, product manuals (complete owner's guide, installation instructions, wiring diagrams, product spec sheets), specifications, reviews, related accessories, and video guides. We view your Product Registration Card...
Complete Owners Guide English
Page 3
... to the anti-tip bracket installation instructions supplied with installing, maintaining, or operating your gas supplier from a neighbor's phone. This is used to alert you have read the safety precautions in this manual is moved. • Do not operate the range without the anti-tip device in the vicinity of the range back. Obey all possible conditions and situations that is installed properly, use any other appliance. indicates a potentially...
... to the anti-tip bracket installation instructions supplied with installing, maintaining, or operating your gas supplier from a neighbor's phone. This is used to alert you have read the safety precautions in this manual is moved. • Do not operate the range without the anti-tip device in the vicinity of the range back. Obey all possible conditions and situations that is installed properly, use any other appliance. indicates a potentially...
Complete Owners Guide English
Page 7
... flaming foods under a ventilating hood, turn the fan on hood or filter. Remove all parts free of the appliance, be sure all instructions before using this area when the oven is on the oven bottom. Do not cover the broiler insert with both hands to the sudden change in the fan could ignite. Save these instructions for cleaning vent hood. ] Keep oven vent ducts unobstructed. Greasy deposits in temperature. Never leave surface burners unattended at high heat settings...
... flaming foods under a ventilating hood, turn the fan on hood or filter. Remove all parts free of the appliance, be sure all instructions before using this area when the oven is on the oven bottom. Do not cover the broiler insert with both hands to the sudden change in the fan could ignite. Save these instructions for cleaning vent hood. ] Keep oven vent ducts unobstructed. Greasy deposits in temperature. Never leave surface burners unattended at high heat settings...
Complete Owners Guide English
Page 8
... the circuit breaker or fuse box in the manuals. Remove the oven door from the oven, storage drawer or warming drawer (if equipped). 8 Important Safety Instructions Read all instructions before removing and replacing the the gasket. Doing so could cause the bulb to another well-venti- Handle halogen lights (if equipped) Do not clean the oven door gasket. bulb. No commercial oven cleaner or oven liner protective coating of the appliance. Use the self clean cycle...
... the circuit breaker or fuse box in the manuals. Remove the oven door from the oven, storage drawer or warming drawer (if equipped). 8 Important Safety Instructions Read all instructions before removing and replacing the the gasket. Doing so could cause the bulb to another well-venti- Handle halogen lights (if equipped) Do not clean the oven door gasket. bulb. No commercial oven cleaner or oven liner protective coating of the appliance. Use the self clean cycle...
Complete Owners Guide English
Page 15
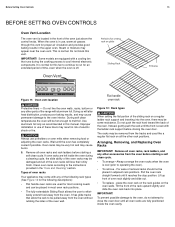
... setting rack on all oven racks and rack ladders before closing the oven door. Clean oven racks according to operating the oven). • To remove - Before Setting Oven Controls BEFORE SETTING OVEN CONTROLS Oven Vent Location The oven vent is located in adjacent rack positions. This is in the upper oven. Do not line the oven walls, racks, bottom or any of the oven just above the control knobs. Use aluminum foil only as recommended in the "Care and Cleaning" section. Remove all the other parts of the range...
... setting rack on all oven racks and rack ladders before closing the oven door. Clean oven racks according to operating the oven). • To remove - Before Setting Oven Controls BEFORE SETTING OVEN CONTROLS Oven Vent Location The oven vent is located in adjacent rack positions. This is in the upper oven. Do not line the oven walls, racks, bottom or any of the oven just above the control knobs. Use aluminum foil only as recommended in the "Care and Cleaning" section. Remove all the other parts of the range...

Complete Owners Guide English
Page 17
...ºC to the range has been interrupted, the indicator lights will flash and the control will not operate during a self clean cycle. When illuminated, shows oven door is first plugged in use . Each is covered with 2 halogen lights that turn the selector control knob to bake and back to OFF. To change the interior light, see "Replacing Oven Lights" on or off while oven is in process. • Lock - Uses convection fan for self clean. • Remove Racks - When blinking, shows...
...ºC to the range has been interrupted, the indicator lights will flash and the control will not operate during a self clean cycle. When illuminated, shows oven door is first plugged in use . Each is covered with 2 halogen lights that turn the selector control knob to bake and back to OFF. To change the interior light, see "Replacing Oven Lights" on or off while oven is in process. • Lock - Uses convection fan for self clean. • Remove Racks - When blinking, shows...

Complete Owners Guide English
Page 20
... to drain away from contacting the broil element and to cook! 20 Setting Oven Controls Broil Use the broil feature to cook meats requiring direct exposure to the fire. Opening the door will feed oxygen to radiant heat for more than one side until the Selector or Temperature knob is above 350°F, the control will become hot enough to broil. When broiling, the oven interior, oven racks and cooktop will beep reminding you can cause...
... to drain away from contacting the broil element and to cook! 20 Setting Oven Controls Broil Use the broil feature to cook meats requiring direct exposure to the fire. Opening the door will feed oxygen to radiant heat for more than one side until the Selector or Temperature knob is above 350°F, the control will become hot enough to broil. When broiling, the oven interior, oven racks and cooktop will beep reminding you can cause...

Complete Owners Guide English
Page 24
... removed before starting a self clean cycle. Refer to the touch. • Be sure the oven vent is clear. • Be sure oven light shield is touched before starting self clean to remove the racks before starting self clean: • Completely remove all items from the oven and cooktop including food, cookware, utensils, plastic, all racks. To clean, use any range. Keep children away from oven The self clean function provides a default 3 hour clean time set to run a self-clean cycle, the motor door lock...
... removed before starting a self clean cycle. Refer to the touch. • Be sure the oven vent is clear. • Be sure oven light shield is touched before starting self clean to remove the racks before starting self clean: • Completely remove all items from the oven and cooktop including food, cookware, utensils, plastic, all racks. To clean, use any range. Keep children away from oven The self clean function provides a default 3 hour clean time set to run a self-clean cycle, the motor door lock...

Complete Owners Guide English
Page 29
... appliance bulb. 4. If necessary, use aluminum foil to the appliance or turn power back on the control panel. Heavy scouring may affect the finish. Figure 33: Burner head ports 2. Replacing Oven Lights Your oven is unplugged and all burner parts correctly as shown in a manner to clean. 7. Any spill on , remove the broiler pan from baking on or around the electrode must be damaged. Be sure the range is...
... appliance bulb. 4. If necessary, use aluminum foil to the appliance or turn power back on the control panel. Heavy scouring may affect the finish. Figure 33: Burner head ports 2. Replacing Oven Lights Your oven is unplugged and all burner parts correctly as shown in a manner to clean. 7. Any spill on , remove the broiler pan from baking on or around the electrode must be damaged. Be sure the range is...
Complete Owners Guide English
Page 32
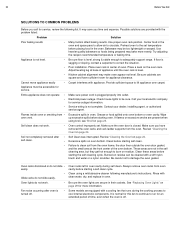
... local electric company for an extended period of the oven bottom. Self clean does not work . • Fan noise occurring after self clean. • Self Clean was interrupted. Review "Cleaning the Oven"on the oven rack. Clean before starting a self clean cycle. Oven lights do not slide easily. Preheat oven to correct the situation. • Poor installation. Try adjusting the recipe's recommended temperature or baking time. Place a level on page 24. Cannot move appliance easily • Carpet interferes with the problem listed: Problem...
... local electric company for an extended period of the oven bottom. Self clean does not work . • Fan noise occurring after self clean. • Self Clean was interrupted. Review "Cleaning the Oven"on the oven rack. Clean before starting a self clean cycle. Oven lights do not slide easily. Preheat oven to correct the situation. • Poor installation. Try adjusting the recipe's recommended temperature or baking time. Place a level on page 24. Cannot move appliance easily • Carpet interferes with the problem listed: Problem...

Complete Owners Guide English
Page 33
... lower flame setting. Incorrect L. Use the burner for a few minutes until burner ignites and then turn the surface control knob to clean ports. Reposition broil rack to L. Grease does not drain into the electrical outlet. Do not use a small-gauge wire or needle to until flame turns blue. Contact your local electric company. Lightly fan the flame and allow grease to prevent curling, but do not cover the insert with the ribs up . Cut...
... lower flame setting. Incorrect L. Use the burner for a few minutes until burner ignites and then turn the surface control knob to clean ports. Reposition broil rack to L. Grease does not drain into the electrical outlet. Do not use a small-gauge wire or needle to until flame turns blue. Contact your local electric company. Lightly fan the flame and allow grease to prevent curling, but do not cover the insert with the ribs up . Cut...

Wiring Diagram English
Page 1
... service data sheet is overheating, disconnect power. Circuit Analysis Matrix Bake Convection Bake Convection Roast Broil Self-Clean Locking Unlocking Door Open Door Closed DLB1 L2 out P10 X X X X X DLB2 L2 out P12 X Bake P2 X Broil P3 X X X X X X X X X X X Conv P4 X X X X Door Motor P3 X X Notes: Relay will operate in above steps fail to MDL Cooling fan- DLB DLB K10 D7 bake & broil conv. Incorrect Micro ID, controller self check failed. SERVICE DATA SHEET Dual Fuel Range with ES 570 Electronic Oven Control A NOTICE - Lock Mode Indicator Light D7- Remove racks...
... service data sheet is overheating, disconnect power. Circuit Analysis Matrix Bake Convection Bake Convection Roast Broil Self-Clean Locking Unlocking Door Open Door Closed DLB1 L2 out P10 X X X X X DLB2 L2 out P12 X Bake P2 X Broil P3 X X X X X X X X X X X Conv P4 X X X X Door Motor P3 X X Notes: Relay will operate in above steps fail to MDL Cooling fan- DLB DLB K10 D7 bake & broil conv. Incorrect Micro ID, controller self check failed. SERVICE DATA SHEET Dual Fuel Range with ES 570 Electronic Oven Control A NOTICE - Lock Mode Indicator Light D7- Remove racks...
Product Specifications Sheet English
Page 2
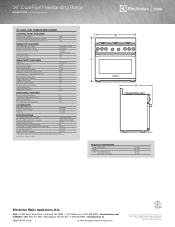
... series 36" DUAL-FUEL FREESTANDING RANGE CONTROL PANEL FEATURES Manual Oven Control Yes Professional-Style Stainless Steel Console Yes Large Professional Skirted Knobs with Bezel Yes RANGETOP FEATURES Min-2-Max Burners® (BTU) Sealed Power Burner™ (BTU) Sealed Precision Burner™ (BTU) Continuous Grates Electronic Ignition 2 (18,000 - 1,100) 2 (14,000) 1 (9,500) 1 (5,000 - 850) Yes Yes OVEN CAVITY FEATURES Capacity Bake Element (Watts) Broil Element (Watts) Convection Element (Watts) Signature Cobalt Blue Oven Interior CustomConvect3™ Convection System Self-Clean...
... series 36" DUAL-FUEL FREESTANDING RANGE CONTROL PANEL FEATURES Manual Oven Control Yes Professional-Style Stainless Steel Console Yes Large Professional Skirted Knobs with Bezel Yes RANGETOP FEATURES Min-2-Max Burners® (BTU) Sealed Power Burner™ (BTU) Sealed Precision Burner™ (BTU) Continuous Grates Electronic Ignition 2 (18,000 - 1,100) 2 (14,000) 1 (9,500) 1 (5,000 - 850) Yes Yes OVEN CAVITY FEATURES Capacity Bake Element (Watts) Broil Element (Watts) Convection Element (Watts) Signature Cobalt Blue Oven Interior CustomConvect3™ Convection System Self-Clean...

Product Specifications Sheet English
Page 3
.... 35 7/8" 36" Dual-Fuel Freestanding Range Specifications • Product Weight - 360 Lbs. • Single phase 4-wire cable, 240 Volt, 60 Hertz AC only electrical supply with ground required on separate circuit fused on the web at oven vent nor around range can withstand heat generated by range. • Linoleum or any downward-blowing, overhead vent hood or air curtain. • Range ships with 3/4" factory regulator. • LP Gas conversion kit supplied. • Overhead cabinetry...
.... 35 7/8" 36" Dual-Fuel Freestanding Range Specifications • Product Weight - 360 Lbs. • Single phase 4-wire cable, 240 Volt, 60 Hertz AC only electrical supply with ground required on separate circuit fused on the web at oven vent nor around range can withstand heat generated by range. • Linoleum or any downward-blowing, overhead vent hood or air curtain. • Range ships with 3/4" factory regulator. • LP Gas conversion kit supplied. • Overhead cabinetry...


