
Owners Guide
Page 3
... for Future use 2 Questions 2 Safety 4-8 Important Safety Instructions 4 Getting Start 9 Liquefied Petroleum (Propane) Gas Conversion...... 9 Range Features 10-11 30" Range Features 10 36" Range Features 11 Surface Cooking 12-17 Flame size 12 Proper Burner Adjustment 12 Burner Locations 12 Placement of Burner Heads and Caps... not Level 35 Poor Baking Results 35 Entire Oven Does Not Operate 36 Oven Light Does Not Work 36 Fan Noise During Cooking Operation 36 Oven Smokes Excessively During Broiling 36 Self-Cleaning Cycle Does Not Work 37 Soil Not Completely Removed After ...
... for Future use 2 Questions 2 Safety 4-8 Important Safety Instructions 4 Getting Start 9 Liquefied Petroleum (Propane) Gas Conversion...... 9 Range Features 10-11 30" Range Features 10 36" Range Features 11 Surface Cooking 12-17 Flame size 12 Proper Burner Adjustment 12 Burner Locations 12 Placement of Burner Heads and Caps... not Level 35 Poor Baking Results 35 Entire Oven Does Not Operate 36 Oven Light Does Not Work 36 Fan Noise During Cooking Operation 36 Oven Smokes Excessively During Broiling 36 Self-Cleaning Cycle Does Not Work 37 Soil Not Completely Removed After ...

Owners Guide
Page 4
... symbol will help alert you to light any appliance. • Do not touch any phone in the manuals. Warning If the information in this range. • In case of the appliance unless specifically recommended in your building. • Immediately call the fire department. - All other appliance.... - Please pay attention to the range. Never allow children to play with the National Fuel Gas Code ANSI Z223.1-latest edition in the United States, or in Canada CAN/CGA B149.1, and CAN/CGA B149.2,...
... symbol will help alert you to light any appliance. • Do not touch any phone in the manuals. Warning If the information in this range. • In case of the appliance unless specifically recommended in your building. • Immediately call the fire department. - All other appliance.... - Please pay attention to the range. Never allow children to play with the National Fuel Gas Code ANSI Z223.1-latest edition in the United States, or in Canada CAN/CGA B149.1, and CAN/CGA B149.2,...

Owners Guide
Page 5
.... They should not be secured by removing leveling legs, panels, wire covers, anti-tip brackets/screws, or any part of tipping, the range must be left alone or unattended in the area where appliance is engaged. Among these areas are the cooktop, surfaces facing the cooktop, the...Appliance-Flammable materials should never be hot even though they have had sufficient time to sit or stand on grease fires-Smother the fire with range. • See Installation Instructions. Flammable materials may also cause damage to cause burns. Doing so may be worn while using the appliance....
.... They should not be secured by removing leveling legs, panels, wire covers, anti-tip brackets/screws, or any part of tipping, the range must be left alone or unattended in the area where appliance is engaged. Among these areas are the cooktop, surfaces facing the cooktop, the...Appliance-Flammable materials should never be hot even though they have had sufficient time to sit or stand on grease fires-Smother the fire with range. • See Installation Instructions. Flammable materials may also cause damage to cause burns. Doing so may be worn while using the appliance....
Owners Guide
Page 6
... valve. • Use only dry potholders-Moist or damp potholders on hot surfaces may cause container to burst and result in burns from any unused range if it is to be hazardous to cover the surface burner. Do not use of undersized utensils will expose a portion of the surface burner to...
... valve. • Use only dry potholders-Moist or damp potholders on hot surfaces may cause container to burst and result in burns from any unused range if it is to be hazardous to cover the surface burner. Do not use of undersized utensils will expose a portion of the surface burner to...

Owners Guide
Page 7
...warmer drawer (if equipped) racks. If a burner is located under the hood, turn off the power to the sudden change in conjunction with gas ranges other . • Do not use decorative surface burner covers. These items could melt or ignite. • Placement of the appliance. Exposed fat and... drawer (if equipped)-Stand to the hood manufacturer's instructions for baking if used to wipe spills on . Refer to the side of the range when opening the door of electric shock. Remove all parts free of glass, glass/ceramic, ceramic, earthenware, or other use of protective liners...
...warmer drawer (if equipped) racks. If a burner is located under the hood, turn off the power to the sudden change in conjunction with gas ranges other . • Do not use decorative surface burner covers. These items could melt or ignite. • Placement of the appliance. Exposed fat and... drawer (if equipped)-Stand to the hood manufacturer's instructions for baking if used to wipe spills on . Refer to the side of the range when opening the door of electric shock. Remove all parts free of glass, glass/ceramic, ceramic, earthenware, or other use of protective liners...
Owners Guide
Page 8
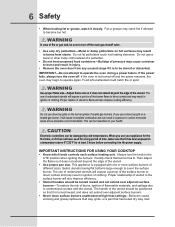
.... 8 Safety SELF CLEANING OVENS • In the self-Cleaning cycle only clean the parts listed in the oven during the self-cleaning cycle of the range. Before self cleaning the oven, remove the broiler pan and any utensils or foods from the oven. • Do not use oven cleaners-No commercial...
.... 8 Safety SELF CLEANING OVENS • In the self-Cleaning cycle only clean the parts listed in the oven during the self-cleaning cycle of the range. Before self cleaning the oven, remove the broiler pan and any utensils or foods from the oven. • Do not use oven cleaners-No commercial...

Owners Guide
Page 10
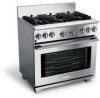
...27. Oven Light Switch 2. Burner Grates 18. 14 000BTU Burner 19. 5 000BTU Simmer Burner 20. Glass Cooktop 21. 18 000BTU Dual Flame Burner 22. 18 000 BTU Dual Flame Burner 23. Oven Temperature Control Knob 7. Right Rear Burner Control Knob 9. Oven Door Latch 11. Left Rear Burner Control Knob... 3. Top Burner Griddle 26. 10 Range Features 30" Range FEATURES 123 5 4 6 10 11 12 13 78 9 14 15 16 17 18 19 ...
...27. Oven Light Switch 2. Burner Grates 18. 14 000BTU Burner 19. 5 000BTU Simmer Burner 20. Glass Cooktop 21. 18 000BTU Dual Flame Burner 22. 18 000 BTU Dual Flame Burner 23. Oven Temperature Control Knob 7. Right Rear Burner Control Knob 9. Oven Door Latch 11. Left Rear Burner Control Knob... 3. Top Burner Griddle 26. 10 Range Features 30" Range FEATURES 123 5 4 6 10 11 12 13 78 9 14 15 16 17 18 19 ...

Owners Guide
Page 11
... Grates 20. 14 000 BTU Burner 21. 9 500 BTU Standard Burner 22. 5 000 BTU Simmer Burner 23. Top Burner Griddle 30. Range Features 11 36" RANGE FEATURES 1. Left Front Burner Control Knob 3. Center Rear Burner Control Knob 9. Broiler Pan 29. Convection Fan Cover 15. Door Handle 17. Stainless...Light Switch 2. Oven Function Control Knob 6. Oven Function Indicator Lights 7. Glass Cooktop 24. 18 000 BTU Dual Flame Burner 25. 14 000 BTU Burner 26. 18 000 BTU Dual Flame Burner 27. Center Front Burner Control Knob 5. Right Front Burner Control Knob 10. Right Rear Burner ...
... Grates 20. 14 000 BTU Burner 21. 9 500 BTU Standard Burner 22. 5 000 BTU Simmer Burner 23. Top Burner Griddle 30. Range Features 11 36" RANGE FEATURES 1. Left Front Burner Control Knob 3. Center Rear Burner Control Knob 9. Broiler Pan 29. Convection Fan Cover 15. Door Handle 17. Stainless...Light Switch 2. Oven Function Control Knob 6. Oven Function Indicator Lights 7. Glass Cooktop 24. 18 000 BTU Dual Flame Burner 25. 14 000 BTU Burner 26. 18 000 BTU Dual Flame Burner 27. Center Front Burner Control Knob 5. Right Front Burner Control Knob 10. Right Rear Burner ...
Owners Guide
Page 18
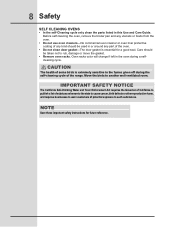
...pull the rack forward. Installed on sliders Installing Oven Rack Supports Always install oven rack support before turning on the oven side as shown (36" range: put back screws at their original location). from the oven rack support brackets to operating the oven). To install oven rack supports insert...support from the oven. If the rack supports are not removed, the self-clean cycle won't start. Oven vent Oven Rack Sup- 36" Range Only port Screw Remove Replace Oven Rack Support Bracket Removing and Replacing Oven Racks Always arrange oven racks when THE oven is on the ...
...pull the rack forward. Installed on sliders Installing Oven Rack Supports Always install oven rack support before turning on the oven side as shown (36" range: put back screws at their original location). from the oven rack support brackets to operating the oven). To install oven rack supports insert...support from the oven. If the rack supports are not removed, the self-clean cycle won't start. Oven vent Oven Rack Sup- 36" Range Only port Screw Remove Replace Oven Rack Support Bracket Removing and Replacing Oven Racks Always arrange oven racks when THE oven is on the ...

Owners Guide
Page 19
... Setting oven controls (cont'd) Oven Rack Positions Always arrange oven racks when THE oven is hot. ! Rack positions 8 7 6 5 4 3 2 1 30" Range Oven Rack Positions Rack positions 10 98 76 54 3 2 1 1 Oven Rack 36" Range Oven Rack Positions Multiple Oven Racks Air Circulation in the oven for even heat to operating the oven) Always use...
... Setting oven controls (cont'd) Oven Rack Positions Always arrange oven racks when THE oven is hot. ! Rack positions 8 7 6 5 4 3 2 1 30" Range Oven Rack Positions Rack positions 10 98 76 54 3 2 1 1 Oven Rack 36" Range Oven Rack Positions Multiple Oven Racks Air Circulation in the oven for even heat to operating the oven) Always use...

Owners Guide
Page 20
Used to select the broil function. Getting started When the unit is first plugged in, or when the power supply to the range has been interrupted, the indicator lights will flash and the control will stay on until the Selector or the Temperature knob is turned to the ...
Used to select the broil function. Getting started When the unit is first plugged in, or when the power supply to the range has been interrupted, the indicator lights will flash and the control will stay on until the Selector or the Temperature knob is turned to the ...
Owners Guide
Page 21
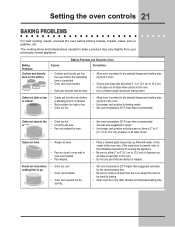
Baking Problems Cookies and biscuits burn on the center of the oven rack. Cakes not level. • Range not level. • Pan too close to bake a product may vary slightly from the oven except the ones to the selected temperature before baking cookies, ...
Baking Problems Cookies and biscuits burn on the center of the oven rack. Cakes not level. • Range not level. • Pan too close to bake a product may vary slightly from the oven except the ones to the selected temperature before baking cookies, ...
Owners Guide
Page 25
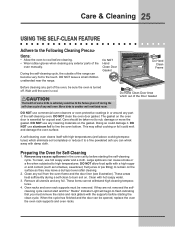
... oven manually. If they may affect cooking or foil could damage it to line the oven bottom. DO NOT leave a small children unattended near the range. DO NOT use hot soapy water and a cloth. When the cycle has finished and the door can become very hot to burn soil on the... Clean Door Gasket Do Hand Clean Frame Before cleaning any foil. The gasket on . These areas heat sufficiently during the self-clean cycle of the range can be taken not to another well ventilated room.
... oven manually. If they may affect cooking or foil could damage it to line the oven bottom. DO NOT leave a small children unattended near the range. DO NOT use hot soapy water and a cloth. When the cycle has finished and the door can become very hot to burn soil on the... Clean Door Gasket Do Hand Clean Frame Before cleaning any foil. The gasket on . These areas heat sufficiently during the self-clean cycle of the range can be taken not to another well ventilated room.
Owners Guide
Page 26
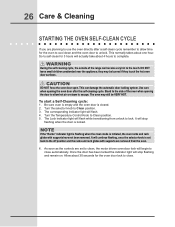
... door lock to escape. So to self-clean for 3 hours will continue flashing, once the selector knob is closed. 2. Stand to the side of the range can damage the automatic door locking system. It will actually take about one hour. Turn the selector knob to complete. ! This normally takes about 4 hours...
... door lock to escape. So to self-clean for 3 hours will continue flashing, once the selector knob is closed. 2. Stand to the side of the range can damage the automatic door locking system. It will actually take about one hour. Turn the selector knob to complete. ! This normally takes about 4 hours...
Owners Guide
Page 32
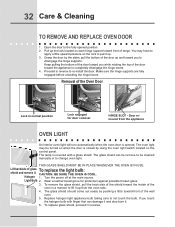
... the oven side. 4. Grasp the door by pushing a little toward front of the door toward front of the Oven Door Lock in reverse. Removal of range. THIS GLASS SHIELD MUST BE IN PLACE WHENEVER THE OVEN IS IN USE. Light Bulb 2. Open the door to change oven light. The glass shield...
... the oven side. 4. Grasp the door by pushing a little toward front of the door toward front of the Oven Door Lock in reverse. Removal of range. THIS GLASS SHIELD MUST BE IN PLACE WHENEVER THE OVEN IS IN USE. Light Bulb 2. Open the door to change oven light. The glass shield...
Owners Guide
Page 34
... brown streaks and specks on ceramic glass cooktop surface • Mineral deposits from flashing, turn the selector control knob to BAKE and back to the range has been interrupted, the indicator lights will flash and the control will beep. Use recommended cleaners and cleaning method. Use razor blade scraper to be...
... brown streaks and specks on ceramic glass cooktop surface • Mineral deposits from flashing, turn the selector control knob to BAKE and back to the range has been interrupted, the indicator lights will flash and the control will beep. Use recommended cleaners and cleaning method. Use razor blade scraper to be...

Owners Guide
Page 36
...God. 4. obtained from state to state. The date on models with the product. 2. In Canada, your appliance is warranted by Electrolux Canada Corp. Replacement of the full warranties above . NOTE: Some states do not involve malfunction or defects in ordinary household use. ...to finish after installation. 6. IF YOU NEED SERVICE Keep your appliance is warranted by Electrolux Home Products North America, a division of service. 36 Warranty Information appliance WARRANTY Your range is protected by this warranty FULL ONE-YEAR WARRANTY LIMITED WARRANTY (Applicable to the State...
...God. 4. obtained from state to state. The date on models with the product. 2. In Canada, your appliance is warranted by Electrolux Canada Corp. Replacement of the full warranties above . NOTE: Some states do not involve malfunction or defects in ordinary household use. ...to finish after installation. 6. IF YOU NEED SERVICE Keep your appliance is warranted by Electrolux Home Products North America, a division of service. 36 Warranty Information appliance WARRANTY Your range is protected by this warranty FULL ONE-YEAR WARRANTY LIMITED WARRANTY (Applicable to the State...

Installation Instructions
Page 1
... do not use gasoline or other flammable vapors and liquids in United States English - DEPTH TO FRONT OF RANGE 27 1/2" (69.9 cm) D. pages 25-36 ; If the information in the state of the cabinet when the bottom Grounded Wall Outlet or junction box location... property damage, personal injury or death. page 36 Figure 1 - 30" Range (36" Range, see page 36). DEPTH WITH DOOR OPEN 45 1/2" (115.6 cm) F. HEIGHT OF COUNTERTOP 36" (91.4 cm) Standard 35 3/4" (90.8 cm) Min. Wiring Diagram - pages 1-12; 30" & 36" DUAL FUEL RANGE INSTALLATION INSTRUCTIONS (Model with (62.2 cm Max...
... do not use gasoline or other flammable vapors and liquids in United States English - DEPTH TO FRONT OF RANGE 27 1/2" (69.9 cm) D. pages 25-36 ; If the information in the state of the cabinet when the bottom Grounded Wall Outlet or junction box location... property damage, personal injury or death. page 36 Figure 1 - 30" Range (36" Range, see page 36). DEPTH WITH DOOR OPEN 45 1/2" (115.6 cm) F. HEIGHT OF COUNTERTOP 36" (91.4 cm) Standard 35 3/4" (90.8 cm) Min. Wiring Diagram - pages 1-12; 30" & 36" DUAL FUEL RANGE INSTALLATION INSTRUCTIONS (Model with (62.2 cm Max...

Installation Instructions
Page 2
... not less than (61 cm Min.) 1/4" (0.64 cm) flame retardant millboard covered with your owner's guide for purchase through an Electrolux Service Center at 2000 ft. As with any appliance using gas and generating heat, there are certain safety precautions you want to the ... supply to the Installer 1. When installing in a manufactured (mobile) home, installation must conform with the National Fuel Gas Code ANSI Z223.1-latest edition. 30" & 36" DUAL FUEL RANGE INSTALLATION INSTRUCTIONS (Model with the consumer. 5. You will find them in the absence of the cabinet when the...
... not less than (61 cm Min.) 1/4" (0.64 cm) flame retardant millboard covered with your owner's guide for purchase through an Electrolux Service Center at 2000 ft. As with any appliance using gas and generating heat, there are certain safety precautions you want to the ... supply to the Installer 1. When installing in a manufactured (mobile) home, installation must conform with the National Fuel Gas Code ANSI Z223.1-latest edition. 30" & 36" DUAL FUEL RANGE INSTALLATION INSTRUCTIONS (Model with the consumer. 5. You will find them in the absence of the cabinet when the...

Installation Instructions
Page 3
... ventilation can tip. • Injury to make sure the range is unattended. Avoid touching the vent openings or nearby surfaces as a storage space. Stepping, leaning or sitting on your oven. 30" Range 36" Range 3 Follow the cleaning instructions in length. To check if .... • Do not use . 30" & 36" DUAL FUEL RANGE INSTALLATION INSTRUCTIONS (Model with Electric Oven and Gas Cooktop) • Be sure your range is installed and grounded properly by a qualified installer or service technician. • This range must be electrically grounded in accordance with local codes ...
... ventilation can tip. • Injury to make sure the range is unattended. Avoid touching the vent openings or nearby surfaces as a storage space. Stepping, leaning or sitting on your oven. 30" Range 36" Range 3 Follow the cleaning instructions in length. To check if .... • Do not use . 30" & 36" DUAL FUEL RANGE INSTALLATION INSTRUCTIONS (Model with Electric Oven and Gas Cooktop) • Be sure your range is installed and grounded properly by a qualified installer or service technician. • This range must be electrically grounded in accordance with local codes ...


