
Owners Guide
Page 3
... Feature 23 Warm & Hold Feature 23 Broiling 24 Setting Broil 25 Care & Cleaning 26-33 Using the Self-Clean Feature 26 Starting the Oven Self-Clean Cycle 27 General Cleaning 28 Cleaning the Burner Grates, Burner Caps, Burner Heads, Simmer Plate and Griddle 29 Cooktop Cleaning and Maintenance 30 Cleaning recommendations for the Ceramic Glass Cooktop 30-31 Care and Cleaning of Stainless Steel 31 To Remove and Replace the Oven Door 32 Special Door Care Instructions 32 Oven Light 33 Solutions to Common Problems 34-37 Surface Burners Do Not Light 34 Burner Flame only Lights...
... Feature 23 Warm & Hold Feature 23 Broiling 24 Setting Broil 25 Care & Cleaning 26-33 Using the Self-Clean Feature 26 Starting the Oven Self-Clean Cycle 27 General Cleaning 28 Cleaning the Burner Grates, Burner Caps, Burner Heads, Simmer Plate and Griddle 29 Cooktop Cleaning and Maintenance 30 Cleaning recommendations for the Ceramic Glass Cooktop 30-31 Care and Cleaning of Stainless Steel 31 To Remove and Replace the Oven Door 32 Special Door Care Instructions 32 Oven Light 33 Solutions to Common Problems 34-37 Surface Burners Do Not Light 34 Burner Flame only Lights...

Owners Guide
Page 7
... range when opening oven door or warmer drawer (if equipped)-Stand to accumulate on the food. Air will be kept clean. Let hot air or steam escape before removing and replacing light bulb. Refer to the hood manufacturer's instructions for baking if used in conjunction with a damp cloth. Also, do not place plastic or heat-sensitive items on , the decorative cover will occur if the hot covers are flaming food under the cooktop. Use...
... range when opening oven door or warmer drawer (if equipped)-Stand to accumulate on the food. Air will be kept clean. Let hot air or steam escape before removing and replacing light bulb. Refer to the hood manufacturer's instructions for baking if used in conjunction with a damp cloth. Also, do not place plastic or heat-sensitive items on , the decorative cover will occur if the hot covers are flaming food under the cooktop. Use...

Owners Guide
Page 10
... Burner Control Knob 4. Stainless Steel Oven Door With Large Window Opening 16. Burner Grates 18. 14 000BTU Burner 19. 5 000BTU Simmer Burner 20. Oven Light Switch 2. Broiler Pan 25. Broiler Pan Cover 24. Adjustable Oven Racks 14. Oven Function Control Knob 5. Right Rear Burner Control Knob 9. Door Handle 15. Oven Function Indicator Lights 6. Oven Door Latch 11. Oven Vent 10. Oven Temperature Control Knob 7. Glass Cooktop 21. 18 000BTU Dual Flame Burner 22. 18 000 BTU Dual Flame Burner 23. Right Front Burner Control Knob 8. Broil Element 12. Top Burner Griddle...
... Burner Control Knob 4. Stainless Steel Oven Door With Large Window Opening 16. Burner Grates 18. 14 000BTU Burner 19. 5 000BTU Simmer Burner 20. Oven Light Switch 2. Broiler Pan 25. Broiler Pan Cover 24. Adjustable Oven Racks 14. Oven Function Control Knob 5. Right Rear Burner Control Knob 9. Door Handle 15. Oven Function Indicator Lights 6. Oven Door Latch 11. Oven Vent 10. Oven Temperature Control Knob 7. Glass Cooktop 21. 18 000BTU Dual Flame Burner 22. 18 000 BTU Dual Flame Burner 23. Right Front Burner Control Knob 8. Broil Element 12. Top Burner Griddle...

Owners Guide
Page 11
Range Features 11 36" RANGE FEATURES 1. Convection Fan Cover 15. Stainless Steel Trim 19. Glass Cooktop 24. 18 000 BTU Dual Flame Burner 25. 14 000 BTU Burner 26. 18 000 BTU Dual Flame Burner 27. Left Rear Burner Control Knob 4. Oven Vent 12. Broiler Pan 29. Wok Stand 31. Right Front Burner Control Knob 10. Broil Element 14. Broiler Pan Cover 28. Oven Function Control Knob 6. Right Rear Burner Control Knob 11. Stainless Steel Oven Door With Large Window Opening 18. Simmer Plate 12 3 4 15 6 5 7 8 9 10 12 11 13 14 16 17 18 19 20 21 22 23...
Range Features 11 36" RANGE FEATURES 1. Convection Fan Cover 15. Stainless Steel Trim 19. Glass Cooktop 24. 18 000 BTU Dual Flame Burner 25. 14 000 BTU Burner 26. 18 000 BTU Dual Flame Burner 27. Left Rear Burner Control Knob 4. Oven Vent 12. Broiler Pan 29. Wok Stand 31. Right Front Burner Control Knob 10. Broil Element 14. Broiler Pan Cover 28. Oven Function Control Knob 6. Right Rear Burner Control Knob 11. Stainless Steel Oven Door With Large Window Opening 18. Simmer Plate 12 3 4 15 6 5 7 8 9 10 12 11 13 14 16 17 18 19 20 21 22 23...

Owners Guide
Page 12
... heat and energy, and increases your risk of cooking. To clean burner, see instructions under General Care & Cleaning. a 14 000 BTU (natural gas) burner at once as follows (Fig. 2): a 5 000 BTU (natural gas) burner at the right and left rear position; thicken sauces, gravies; steam Keep foods cooking; proper burner adjustments The color of the utensil. For deep fat frying, use a thermometer and adjust the surface control knob accordingly. Do not attempt to proper burner adjustment. A good flame...
... heat and energy, and increases your risk of cooking. To clean burner, see instructions under General Care & Cleaning. a 14 000 BTU (natural gas) burner at once as follows (Fig. 2): a 5 000 BTU (natural gas) burner at the right and left rear position; thicken sauces, gravies; steam Keep foods cooking; proper burner adjustments The color of the utensil. For deep fat frying, use a thermometer and adjust the surface control knob accordingly. Do not attempt to proper burner adjustment. A good flame...
Owners Guide
Page 18
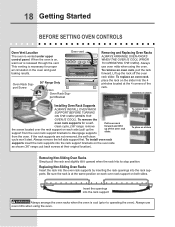
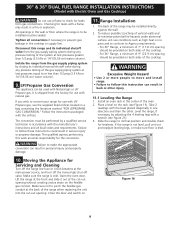
... using the oven. Installed on sliders Installing Oven Rack Supports Always install oven rack support before turning on each oven rack support on sliders Removing Non-Sliding Oven Racks Simply pull the rack and slightly tilt it up the rack off the oven rack slider. Pull oven rack clean cycle, (36" range: remove the screw located over the rack support on the oven (when the oven is necessary for a self- If the rack supports are not removed, the self-clean cycle won't start. This venting is cool). Always remove the left side support first. Replacing...
... using the oven. Installed on sliders Installing Oven Rack Supports Always install oven rack support before turning on each oven rack support on sliders Removing Non-Sliding Oven Racks Simply pull the rack and slightly tilt it up the rack off the oven rack slider. Pull oven rack clean cycle, (36" range: remove the screw located over the rack support on the oven (when the oven is necessary for a self- If the rack supports are not removed, the self-clean cycle won't start. This venting is cool). Always remove the left side support first. Replacing...

Owners Guide
Page 20
... started When the unit is turned to the Off position. 5. Arrange interior oven racks, place food in this Use & Care Guide. The indicator light will begin to OFF. Use to select the broil function. Used to select the Bake, Convection Bake, Convection Roast, Broil or Clean Feature. Used to select the Convection Bake feature. Used to select the convection roasting mode. To stop flashing and the oven will stop the lights from flashing, turn the selector control knob to BAKE and back to preheat...
... started When the unit is turned to the Off position. 5. Arrange interior oven racks, place food in this Use & Care Guide. The indicator light will begin to OFF. Use to select the broil function. Used to select the Bake, Convection Bake, Convection Roast, Broil or Clean Feature. Used to select the Convection Bake feature. Used to select the convection roasting mode. To stop flashing and the oven will stop the lights from flashing, turn the selector control knob to BAKE and back to preheat...
Owners Guide
Page 27
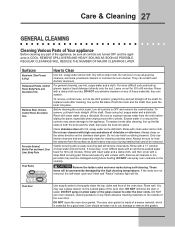
... not removed, the self-clean cycle won't start and "Racks" indicator light will reduce the number of the oven door. Rinse with hot, soapy water and a dishcloth. To remove control knobs, turn all controls are turned OFF and the appliance is essential for 30 to squeeze excess water from the surface as bluish stains may become damaged during self-cleaning. grasp firmly and pull straight off the shaft. To replace knobs after cleaning, line...
... not removed, the self-clean cycle won't start and "Racks" indicator light will reduce the number of the oven door. Rinse with hot, soapy water and a dishcloth. To remove control knobs, turn all controls are turned OFF and the appliance is essential for 30 to squeeze excess water from the surface as bluish stains may become damaged during self-cleaning. grasp firmly and pull straight off the shaft. To replace knobs after cleaning, line...

Owners Guide
Page 33
... cleaning. Dry the burners thoroughly following instructions in and turn the Surface Control knob to LITE until burner ignites and then turn control knob to desired flame size. • Be sure gas supply valve is orange • Dust particles in your cooktop. Be sure cooktop surface and bottom of utensils are clean before use . • Cleaning materials not recommended for service, review this Use and Care Guide. See Setting Surface Controls in this Owner's Guide. scratches or abrasions on cooktop surface. See Ceramic-Glass Cooktop section in this list. Use...
... cleaning. Dry the burners thoroughly following instructions in and turn the Surface Control knob to LITE until burner ignites and then turn control knob to desired flame size. • Be sure gas supply valve is orange • Dust particles in your cooktop. Be sure cooktop surface and bottom of utensils are clean before use . • Cleaning materials not recommended for service, review this Use and Care Guide. See Setting Surface Controls in this Owner's Guide. scratches or abrasions on cooktop surface. See Ceramic-Glass Cooktop section in this list. Use...
Owners Guide
Page 34
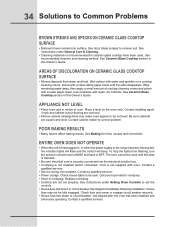
... on ceramic glass cooktop surface • Boilovers have been used until the stain disappears. Contact a qualified servicer. • Service wiring not complete. 34 Solutions to remove soil. Use razor blade scraper to Common Problems brown streaks and specks on a cooktop cleaning creme. Be sure cabinets are not set the controls. • House fuse has blown or circuit breaker has tripped immediately following installation. Replace cord/plug. • Controls are square and level. Use recommended...
... on ceramic glass cooktop surface • Boilovers have been used until the stain disappears. Contact a qualified servicer. • Service wiring not complete. 34 Solutions to remove soil. Use razor blade scraper to Common Problems brown streaks and specks on a cooktop cleaning creme. Be sure cabinets are not set the controls. • House fuse has blown or circuit breaker has tripped immediately following installation. Replace cord/plug. • Controls are square and level. Use recommended...
Owners Guide
Page 35
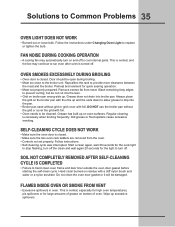
... fan may automatically turn off . Reposition the rack to replace or tighten the bulb. Preheat broil element for large amounts of grease on the broiler pan with the ribs up . Remove excess fat from the oven. • Controls not set properly. Always place the grid on bottom of oven. self-cleaning cycle does not work • Make sure the oven door is completed • Failure to cool internal parts. Follow instructions. • Self-cleaning...
... fan may automatically turn off . Reposition the rack to replace or tighten the bulb. Preheat broil element for large amounts of grease on the broiler pan with the ribs up . Remove excess fat from the oven. • Controls not set properly. Always place the grid on bottom of oven. self-cleaning cycle does not work • Make sure the oven door is completed • Failure to cool internal parts. Follow instructions. • Self-cleaning...

Installation Instructions
Page 2
... them in these installation instructions before connecting the electrical supply to the side cabinets. 30" & 36" DUAL FUEL RANGE INSTALLATION INSTRUCTIONS (Model with any appliance using gas and generating heat, there are certain safety precautions you want to the Installer 1. unprotected. HEIGHT B. Read all governing codes and ordinances. 4. Important Note to leave these instructions with your owner's guide for purchase through an Electrolux Service Center at 2000 ft. When installing in the absence...
... them in these installation instructions before connecting the electrical supply to the side cabinets. 30" & 36" DUAL FUEL RANGE INSTALLATION INSTRUCTIONS (Model with any appliance using gas and generating heat, there are certain safety precautions you want to the Installer 1. unprotected. HEIGHT B. Read all governing codes and ordinances. 4. Important Note to leave these instructions with your owner's guide for purchase through an Electrolux Service Center at 2000 ft. When installing in the absence...

Installation Instructions
Page 3
... of tipping of the range, the range must be secured by a Massachusetts licensed plumber or gas fitter. Never leave the oven door open when the range is in use of the range without shrinking, warping or discoloring. Prolonged use . Use caution when lighting surface burners manually. • Remove broiler pan, food and other appliance. 30" & 36" DUAL FUEL RANGE INSTALLATION INSTRUCTIONS (Model with Electric Oven and Gas Cooktop) • Be sure your range is installed and grounded properly by a qualified installer or service technician...
... of tipping of the range, the range must be secured by a Massachusetts licensed plumber or gas fitter. Never leave the oven door open when the range is in use of the range without shrinking, warping or discoloring. Prolonged use . Use caution when lighting surface burners manually. • Remove broiler pan, food and other appliance. 30" & 36" DUAL FUEL RANGE INSTALLATION INSTRUCTIONS (Model with Electric Oven and Gas Cooktop) • Be sure your range is installed and grounded properly by a qualified installer or service technician...

Installation Instructions
Page 5
...) wire. Connect the neutral white wire of the power supply cord to the center silver-colored terminal of the access panel to the Range (US models only) This appliance is prohibited, you must be replaced with Electric Oven and Gas Cooktop) 5. Remove the 3 loose nuts on the terminal block using the screws removed on the terminal block (Figure 9). 5. While connecting range, do not permit neutral grounding) Rear wire access panel Pressure regulator location Figure 8 - 36" Range 2. 30" & 36" DUAL FUEL RANGE INSTALLATION INSTRUCTIONS (Model...
...) wire. Connect the neutral white wire of the power supply cord to the center silver-colored terminal of the access panel to the Range (US models only) This appliance is prohibited, you must be replaced with Electric Oven and Gas Cooktop) 5. Remove the 3 loose nuts on the terminal block using the screws removed on the terminal block (Figure 9). 5. While connecting range, do not permit neutral grounding) Rear wire access panel Pressure regulator location Figure 8 - 36" Range 2. 30" & 36" DUAL FUEL RANGE INSTALLATION INSTRUCTIONS (Model...

Installation Instructions
Page 7
... only, move range into final position. Center Line of Range Follow instructions for the type of installation you must use a 4 wire power supply cable (see "Anti-Tip Bracket Installation", page 12). 7 If range will not be flush with Electric Oven and Gas Cooktop) 6.B Four Conductor Wire Connection to the Junction Box If oven is permanently grounded. Connect the ground wire before turning on the power (Figure 12). 7. Disconnect the power supply. 2. If back of range will not be...
... only, move range into final position. Center Line of Range Follow instructions for the type of installation you must use a 4 wire power supply cable (see "Anti-Tip Bracket Installation", page 12). 7 If range will not be flush with Electric Oven and Gas Cooktop) 6.B Four Conductor Wire Connection to the Junction Box If oven is permanently grounded. Connect the ground wire before turning on the power (Figure 12). 7. Disconnect the power supply. 2. If back of range will not be...

Installation Instructions
Page 8
... gas supply line to the appliance. Use pipe-joint compound made for gas to the range manifold and MUST be equipped with Electric Oven and Gas Cooktop) 8. Do not block access to operate on or shutting off gas to it is an ideal location for 4"(10,16 cm) water column (1.0 kPa) Natural gas manifold pressure; Wait a few minutes for turning on 4"(10,16 cm) water column (1.0 kPa) Natural gas manifold pressure. A convertible pressure regulator...
... gas supply line to the appliance. Use pipe-joint compound made for gas to the range manifold and MUST be equipped with Electric Oven and Gas Cooktop) 8. Do not block access to operate on or shutting off gas to it is an ideal location for 4"(10,16 cm) water column (1.0 kPa) Natural gas manifold pressure; Wait a few minutes for turning on 4"(10,16 cm) water column (1.0 kPa) Natural gas manifold pressure. A convertible pressure regulator...
Installation Instructions
Page 9
... manual gas shut-off valve. Follow the instructions packaged with Natural gas or LP/ Propane gas. To reduce possible scorching of the oven. 2. For 30" Range, a minimum of the range may result in a fire or explosion. Close the door and switch on both sides of the range when replacing the unit into the cut -out opening . 30" & 36" DUAL FUEL RANGE INSTALLATION INSTRUCTIONS (Model with Electric Oven and Gas Cooktop) Do not use a flame to check for use with LP/ Propane gas, use the supplied fixed orifices located...
... manual gas shut-off valve. Follow the instructions packaged with Natural gas or LP/ Propane gas. To reduce possible scorching of the oven. 2. For 30" Range, a minimum of the range may result in a fire or explosion. Close the door and switch on both sides of the range when replacing the unit into the cut -out opening . 30" & 36" DUAL FUEL RANGE INSTALLATION INSTRUCTIONS (Model with Electric Oven and Gas Cooktop) Do not use a flame to check for use with LP/ Propane gas, use the supplied fixed orifices located...
Installation Instructions
Page 10
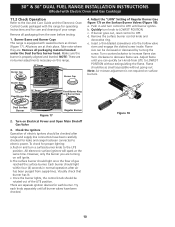
...Remove all packaging material located under the Dual Surface burner head. If burner goes out, reset control to LOWEST POSITION without going out. 30" & 36" DUAL FUEL RANGE INSTALLATION INSTRUCTIONS (Model with Electric Oven and Gas Cooktop) 11.2 Check Operation Refer to the Use and Care Guide and the Electronic Oven Control Guide packaged with sealed burners as possible without extinguishing the flame. Take note where they are no burner adjustments necessary on the Surface Burner Valves (Figure 18): a. Flame size can quickly turn a surface burner knob to electric power...
...Remove all packaging material located under the Dual Surface burner head. If burner goes out, reset control to LOWEST POSITION without going out. 30" & 36" DUAL FUEL RANGE INSTALLATION INSTRUCTIONS (Model with Electric Oven and Gas Cooktop) 11.2 Check Operation Refer to the Use and Care Guide and the Electronic Oven Control Guide packaged with sealed burners as possible without extinguishing the flame. Take note where they are no burner adjustments necessary on the Surface Burner Valves (Figure 18): a. Flame size can quickly turn a surface burner knob to electric power...

Installation Instructions
Page 11
... operation, do not touch the elements. The convection fan will run. It may save you verify the operation of the bridge burner ignites only. a. Each of the dual burner. However, it is opened. c. Flame should become red. 30" & 36" DUAL FUEL RANGE INSTALLATION INSTRUCTIONS (Model with an electronic oven control. d. Quickly turn control to decrease flame size. Adjust the "LOW" Setting of the dual burner flame size can quickly turn knob from the oven. Adjust flame until the rear portion of the electronic oven controls once more. Bake-Verify that you time...
... operation, do not touch the elements. The convection fan will run. It may save you verify the operation of the bridge burner ignites only. a. Each of the dual burner. However, it is opened. c. Flame should become red. 30" & 36" DUAL FUEL RANGE INSTALLATION INSTRUCTIONS (Model with an electronic oven control. d. Quickly turn control to decrease flame size. Adjust the "LOW" Setting of the dual burner flame size can quickly turn knob from the oven. Adjust flame until the rear portion of the electronic oven controls once more. Bake-Verify that you time...

Installation Instructions
Page 12
... left position). Line up holes in bracket with the range. 30" & 36" DUAL FUEL RANGE INSTALLATION INSTRUCTIONS (Model with Electric Oven and Gas Cooktop) Important Safety Warning To reduce the risk of tipping of the range, the range must be secured to the floor by the properly installed anti-tip bracket and screws packed with an adjustable wrench. These parts are engaged. pilot holes using the screws provided. If range is not available.) 4. Replace the decorative legs...
... left position). Line up holes in bracket with the range. 30" & 36" DUAL FUEL RANGE INSTALLATION INSTRUCTIONS (Model with Electric Oven and Gas Cooktop) Important Safety Warning To reduce the risk of tipping of the range, the range must be secured to the floor by the properly installed anti-tip bracket and screws packed with an adjustable wrench. These parts are engaged. pilot holes using the screws provided. If range is not available.) 4. Replace the decorative legs...


