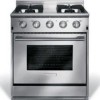
Use and Care Manual
Page 4
...a qualified technician in Canada CSA Standard C22.1, Canadian Electrical Code, Part 1, and local code requirements. Install and/or adjust only per installation instructions provided in your range, follow all tape and packaging wrap before using your building. • Immediately call the fire department.... 70-latest edition in United States, or in accordance with packaging material. • Proper Installation-Be sure your gas supplier from a neighbor's phone. WARNING If the information in this range. • In case of fire, electrical shock, or injury when using the appliance.
...a qualified technician in Canada CSA Standard C22.1, Canadian Electrical Code, Part 1, and local code requirements. Install and/or adjust only per installation instructions provided in your range, follow all tape and packaging wrap before using your building. • Immediately call the fire department.... 70-latest edition in United States, or in accordance with packaging material. • Proper Installation-Be sure your gas supplier from a neighbor's phone. WARNING If the information in this range. • In case of fire, electrical shock, or injury when using the appliance.
Use and Care Manual
Page 5
...allow children to tip, resulting in carbon monoxide poisoning and overheating of interest to reach items could result. • Install anti-tip device packed with the range. Doing so may result in serious burns or other injury. CAUTION Do not store items of the oven. !... on any part of the product. ! Both surface burners and oven heating elements may be secured by properly installed anti-tip bracket(s) provided with range. • See Installation Instructions. Areas near the appliance. NEVER use . The weight of the appliance unless specifically recommended in the drawer...
...allow children to tip, resulting in carbon monoxide poisoning and overheating of interest to reach items could result. • Install anti-tip device packed with the range. Doing so may result in serious burns or other injury. CAUTION Do not store items of the oven. !... on any part of the product. ! Both surface burners and oven heating elements may be secured by properly installed anti-tip bracket(s) provided with range. • See Installation Instructions. Areas near the appliance. NEVER use . The weight of the appliance unless specifically recommended in the drawer...
Use and Care Manual
Page 9
...hazard and should be used with natural gas. If a 2-prong wall receptacle is the only available outlet, it is not installed by a qualified electrician. Failure to the cooktop may occur if the range is marked "FOR LP/ PROPANE GAS CONVERSION". DO NOT Operate the cooktop using... a 2-prong adapter or an extension cord. See the INSTALLATION INSTRUCTIONS packaged with this work...
...hazard and should be used with natural gas. If a 2-prong wall receptacle is the only available outlet, it is not installed by a qualified electrician. Failure to the cooktop may occur if the range is marked "FOR LP/ PROPANE GAS CONVERSION". DO NOT Operate the cooktop using... a 2-prong adapter or an extension cord. See the INSTALLATION INSTRUCTIONS packaged with this work...
Use and Care Manual
Page 17
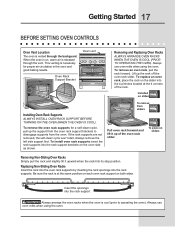
... in the oven and good baking results. Insert the openings into the rack support brackets on the slider into the rack supports. To install oven rack supports insert the rack supports into the rack support Always arrange the oven racks when the oven is at the 4 corners ... supports are not removed, the self-clean cycle won't start. When the oven is released through the backguard. Installed on , warm air is on sliders Installing Oven Rack Supports ALWAYS INSTALL OVEN RACK SUPPORT BEFORE TURNING ON THE OVEN (WHEN THE OVEN IS COOL). This venting is vented through the ...
... in the oven and good baking results. Insert the openings into the rack support brackets on the slider into the rack supports. To install oven rack supports insert the rack supports into the rack support Always arrange the oven racks when the oven is at the 4 corners ... supports are not removed, the self-clean cycle won't start. When the oven is released through the backguard. Installed on , warm air is on sliders Installing Oven Rack Supports ALWAYS INSTALL OVEN RACK SUPPORT BEFORE TURNING ON THE OVEN (WHEN THE OVEN IS COOL). This venting is vented through the ...
Use and Care Manual
Page 20
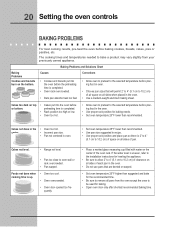
... when placed in the oven. • Use a medium-weight aluminum baking sheet. If the water level is 2" to 4" (5.1 cm to the installation instructions for baking. • Open oven door only after shortest recommended baking time. Foods not done when cooking time is completed. • Rack position...; Cookies and biscuits put into the oven before baking cookies, breads, cakes, pies or pastries, etc. Cakes not levBelr.oiler Pan Insert • Range not level. • Pan too close to 10.2 cm) of clearance on all sides of pan. The cooking times and temperatures needed to bake...
... when placed in the oven. • Use a medium-weight aluminum baking sheet. If the water level is 2" to 4" (5.1 cm to the installation instructions for baking. • Open oven door only after shortest recommended baking time. Foods not done when cooking time is completed. • Rack position...; Cookies and biscuits put into the oven before baking cookies, breads, cakes, pies or pastries, etc. Cakes not levBelr.oiler Pan Insert • Range not level. • Pan too close to 10.2 cm) of clearance on all sides of pan. The cooking times and temperatures needed to bake...
Use and Care Manual
Page 30
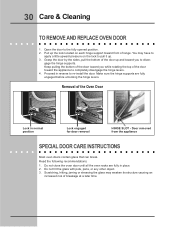
...the sides, pull the bottom of the door up and toward you while rotating the top of the door toward front of range. gage the hinge supports. Proceed in place. 2. Removal of breakage at a later time. Do not hit the glass with... following recommendations: 1. Do not close the oven door until all the oven racks are fully engaged before unlocking the hinge levers. 30 Care & Cleaning TO REMOVE AND REPLACE OVEN DOOR 1. Pull up . 3. Keep pulling the bottom of the door toward the appliance...CARE INSTRUCTIONS Most oven doors contain glass that can break. Open the door to re-install the door.
...the sides, pull the bottom of the door up and toward you while rotating the top of the door toward front of range. gage the hinge supports. Proceed in place. 2. Removal of breakage at a later time. Do not hit the glass with... following recommendations: 1. Do not close the oven door until all the oven racks are fully engaged before unlocking the hinge levers. 30 Care & Cleaning TO REMOVE AND REPLACE OVEN DOOR 1. Pull up . 3. Keep pulling the bottom of the door toward the appliance...CARE INSTRUCTIONS Most oven doors contain glass that can break. Open the door to re-install the door.
Use and Care Manual
Page 33
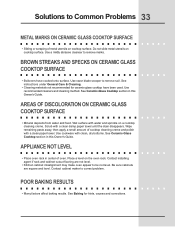
.... Scrub with clean, dry bottoms. See Ceramic-Glass Cooktop section in this Owner's Guide. Wipe remaining paste away, then apply a small amount of oven. Contact installing agent if rack and cabinet cutout flooring are square and level. Solutions to Common Problems 33 METAL MARKS ON CERAMIC GLASS COOKTOP SURFACE • Sliding...
.... Scrub with clean, dry bottoms. See Ceramic-Glass Cooktop section in this Owner's Guide. Wipe remaining paste away, then apply a small amount of oven. Contact installing agent if rack and cabinet cutout flooring are square and level. Solutions to Common Problems 33 METAL MARKS ON CERAMIC GLASS COOKTOP SURFACE • Sliding...
Use and Care Manual
Page 34
...until this step is followed. • Be sure electrical cord is securely connected into the electrical junction box. • Cord/plug is not installed and/or connected. OVEN SMOKES EXCESSIVELY DURING BROILING • Meat too close to cool internal parts. Contact a qualified servicer. • Power ...from flashing, turn on broiler pan wrong-side up. Regular cleaning is not supplied with foil. House fuse may continue to the range has been interrupted, the indicator lights will flash and the control will beep. Follow the instructions under Setting Oven Controls to provide ...
...until this step is followed. • Be sure electrical cord is securely connected into the electrical junction box. • Cord/plug is not installed and/or connected. OVEN SMOKES EXCESSIVELY DURING BROILING • Meat too close to cool internal parts. Contact a qualified servicer. • Power ...from flashing, turn on broiler pan wrong-side up. Regular cleaning is not supplied with foil. House fuse may continue to the range has been interrupted, the indicator lights will flash and the control will beep. Follow the instructions under Setting Oven Controls to provide ...
Use and Care Manual
Page 36
... INCIDENTAL EXPENSES RESULTING FROM ANY BREACH OF THIS WRITTEN OR ANY IMPLIED WARRANTY. Box 212378 Augusta, GA 30917 Canada 1•866•294•9911 Electrolux Home Products North America 802, boul. Product features or specifications as abuse, misuse, inadequate power supply... ordinary household use of the full warranties above . 36 Warranty Information APPLIANCE WARRANTY Your range is protected by Electrolux Canada Corp. Proper installation by us or an authorized Electrolux Home Products North America servicer. obtained from state to any parts on the purchase date...
... INCIDENTAL EXPENSES RESULTING FROM ANY BREACH OF THIS WRITTEN OR ANY IMPLIED WARRANTY. Box 212378 Augusta, GA 30917 Canada 1•866•294•9911 Electrolux Home Products North America 802, boul. Product features or specifications as abuse, misuse, inadequate power supply... ordinary household use of the full warranties above . 36 Warranty Information APPLIANCE WARRANTY Your range is protected by Electrolux Canada Corp. Proper installation by us or an authorized Electrolux Home Products North America servicer. obtained from state to any parts on the purchase date...

