Owners Guide
Page 2
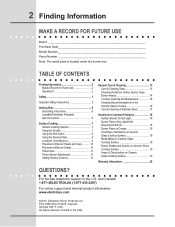
... Instructions 6 Liquefied Petroleum (Propane) Gas Conversion 6 Surface Cooking 7 Surface Cooking Utensils 7 Using the Griddle 7 Using the Wok Stand 8 Using the Simmer Plate 9 Locations of the Burners 9 Placement of Burner Heads and Caps 10 Placement of Burner Grates 10 Flame Size 11 Proper Burner Adjustments 11 Setting Surface Controls 12 General Care & Cleaning 13 Care & Cleaning Table 13 Cleaning the Burner Grates, Burner Caps, Burner Heads 14 Cooktop Cleaning and Maintenance 16 Cleaning Recommendations for Future use Brand Purchase Date Model Number Serial Number...
... Instructions 6 Liquefied Petroleum (Propane) Gas Conversion 6 Surface Cooking 7 Surface Cooking Utensils 7 Using the Griddle 7 Using the Wok Stand 8 Using the Simmer Plate 9 Locations of the Burners 9 Placement of Burner Heads and Caps 10 Placement of Burner Grates 10 Flame Size 11 Proper Burner Adjustments 11 Setting Surface Controls 12 General Care & Cleaning 13 Care & Cleaning Table 13 Cleaning the Burner Grates, Burner Caps, Burner Heads 14 Cooktop Cleaning and Maintenance 16 Cleaning Recommendations for Future use Brand Purchase Date Model Number Serial Number...
Owners Guide
Page 3
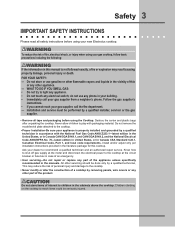
... the manuals. All other appliance. - FOR YOUR SAFETY: - Install and/or adjust only per installation instructions provided in the cabinets above the cooktop. do not use gasoline or other part of this cooktop. Destroy the carton and plastic bags after unpacking the cooktop. Children climbing on the cooktop to the cooktop at the circuit breaker or fuse box in case of an emergency. • User servicing-Do not repair or replace...
... the manuals. All other appliance. - FOR YOUR SAFETY: - Install and/or adjust only per installation instructions provided in the cabinets above the cooktop. do not use gasoline or other part of this cooktop. Destroy the carton and plastic bags after unpacking the cooktop. Children climbing on the cooktop to the cooktop at the circuit breaker or fuse box in case of an emergency. • User servicing-Do not repair or replace...
Owners Guide
Page 4
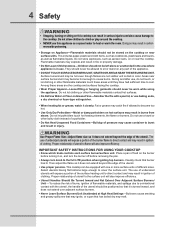
... extend over adjacent surface burners. • Never Leave Surface Burners/Unit Unattended at High Heat Settings-Boilovers cause smoking and greasy spillovers that may become too hot. • Use Only Dry Potholders-Moist or damp potholders on the burner before removing the pan. • Always turn knob to the cooktop. Do not let clothing or other flammable materials contact hot surfaces. • Do Not Use Water or Flour...
... extend over adjacent surface burners. • Never Leave Surface Burners/Unit Unattended at High Heat Settings-Boilovers cause smoking and greasy spillovers that may become too hot. • Use Only Dry Potholders-Moist or damp potholders on the burner before removing the pan. • Always turn knob to the cooktop. Do not let clothing or other flammable materials contact hot surfaces. • Do Not Use Water or Flour...
Owners Guide
Page 5
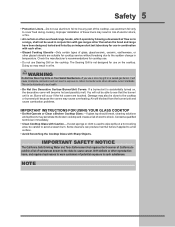
..., and requires businesses to warn customers of glass, glass/ceramic, ceramic, earthenware, or other . • Glazed Cooking Utensils-Only certain types of potential exposure to such substances. Improper installation of these liners may result in risk of electric shock, or fire. • Air curtain or other than when the hood and range have been designed, tested and listed by blowing a downward air flow on a hot cooking area...
..., and requires businesses to warn customers of glass, glass/ceramic, ceramic, earthenware, or other . • Glazed Cooking Utensils-Only certain types of potential exposure to such substances. Improper installation of these liners may result in risk of electric shock, or fire. • Air curtain or other than when the hood and range have been designed, tested and listed by blowing a downward air flow on a hot cooking area...
Owners Guide
Page 6
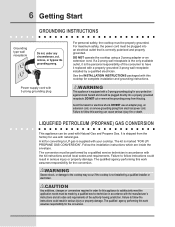
... cooktop is not installed by a qualified electrician. The qualified agency performing this plug. See the installation instructions packaged with Natural Gas and Propane Gas. DO NOT use with the manufacturer's instructions and all local codes and requirements. It is correctly polarized and properly grounded. Warning Severe shock, or damage to satisfactorily meet the application needs must be plugged directly into an electrical outlet that is shipped from electrical power...
... cooktop is not installed by a qualified electrician. The qualified agency performing this plug. See the installation instructions packaged with Natural Gas and Propane Gas. DO NOT use with the manufacturer's instructions and all local codes and requirements. It is correctly polarized and properly grounded. Warning Severe shock, or damage to satisfactorily meet the application needs must be plugged directly into an electrical outlet that is shipped from electrical power...

Owners Guide
Page 7
... prepared and the size of burner. • Made of material that cannot withstand high heat; Figure 1 ! Allow the griddle to cool before to clean. • Pan overhangs unit by rotating a ruler across the bottom. such as lobster pots, griddles and pressure cookers may be used in the oven or on the grate before removing. Pan is intended for direct food cooking and can be used but must...
... prepared and the size of burner. • Made of material that cannot withstand high heat; Figure 1 ! Allow the griddle to cool before to clean. • Pan overhangs unit by rotating a ruler across the bottom. such as lobster pots, griddles and pressure cookers may be used in the oven or on the grate before removing. Pan is intended for direct food cooking and can be used but must...

Owners Guide
Page 8
... round-bottom wok on surfaces that cannot withstand high heat; If cooking large amounts of flat-bottom wok on your cooktop is recommended that you use on the right front POWER burner position. ! Proper use of liquid food without the Wok Stand, the wok may also be used on Surface Burner Grate Figure 2 Improper use to remove the wok stand from the grate. CAUTION Always use the flat-bottom wok without the Wok Stand...
... round-bottom wok on surfaces that cannot withstand high heat; If cooking large amounts of flat-bottom wok on your cooktop is recommended that you use on the right front POWER burner position. ! Proper use of liquid food without the Wok Stand, the wok may also be used on Surface Burner Grate Figure 2 Improper use to remove the wok stand from the grate. CAUTION Always use the flat-bottom wok without the Wok Stand...

Owners Guide
Page 11
... brown so quickly that the center will neither brown nor cook properly. *Flame Size High Flame Medium Flame Low Flame Type of cooking. steam Keep foods cooking; A higher flame simply wastes heat and energy, and increases your risk of flame should be greasy. For deep fat frying, use a thermometer and adjust the surface control knob accordingly. pan broiling Maintain a slow boil; stew *These settings are based on the highest control setting and then turn to...
... brown so quickly that the center will neither brown nor cook properly. *Flame Size High Flame Medium Flame Low Flame Type of cooking. steam Keep foods cooking; A higher flame simply wastes heat and energy, and increases your risk of flame should be greasy. For deep fat frying, use a thermometer and adjust the surface control knob accordingly. pan broiling Maintain a slow boil; stew *These settings are based on the highest control setting and then turn to...

Owners Guide
Page 13
... or the porcelain may occur during future heating. Dry the burners thoroughly in the burners of chlorides or chlorines. Rinse with high concentrations of your cooktop must be sure to rinse the cleaners from the surface as instructed in General Care & Cleaning section under Cooktop Cleaning and Maintenance. The holes in a warm oven for cleaning stainless steel. Remove all times for 30 to Clean For general cleaning, use kitchen cleaners that cannot be...
... or the porcelain may occur during future heating. Dry the burners thoroughly in the burners of chlorides or chlorines. Rinse with high concentrations of your cooktop must be sure to rinse the cleaners from the surface as instructed in General Care & Cleaning section under Cooktop Cleaning and Maintenance. The holes in a warm oven for cleaning stainless steel. Remove all times for 30 to Clean For general cleaning, use kitchen cleaners that cannot be...
Owners Guide
Page 15
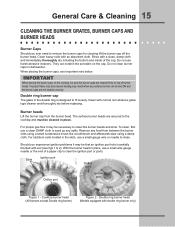
... flame size and uneven heating may be that an ignition port hole is designed to fit loosely. Burner heads Lift the burner cap from between the burner slots using a small nonabrasive brush like a toothbrush and afterwards wipe using a damp cloth. Remove any spills. When placing the burner caps, see figs 1 & 2). Slots Ignition port Orifice port Orifice port Ignition port Orifice port Slots Figure 1 - General Care & Cleaning 15 CLEANING THE BURNER GRATES, BURNER CAPS and BURNER HEADS Burner Caps Should...
... flame size and uneven heating may be that an ignition port hole is designed to fit loosely. Burner heads Lift the burner cap from between the burner slots using a small nonabrasive brush like a toothbrush and afterwards wipe using a damp cloth. Remove any spills. When placing the burner caps, see figs 1 & 2). Slots Ignition port Orifice port Orifice port Ignition port Orifice port Slots Figure 1 - General Care & Cleaning 15 CLEANING THE BURNER GRATES, BURNER CAPS and BURNER HEADS Burner Caps Should...
Owners Guide
Page 18
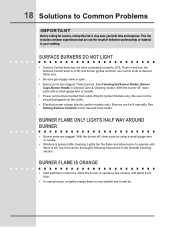
... Setting Surface Controls in the General Cleaning section. Push in main line. burner flame is orange • Dust particles in and turn the Surface Control knob to LITE until burner ignites and then turn control knob to desired flame size. • Be sure gas supply valve is present after cleaning. It may save you both time and expense. 18 Solutions to Common Problems Important Before calling for service, review this Use and Care Guide. With the burner off , clean ports...
... Setting Surface Controls in the General Cleaning section. Push in main line. burner flame is orange • Dust particles in and turn the Surface Control knob to LITE until burner ignites and then turn control knob to desired flame size. • Be sure gas supply valve is present after cleaning. It may save you both time and expense. 18 Solutions to Common Problems Important Before calling for service, review this Use and Care Guide. With the burner off , clean ports...
Owners Guide
Page 20
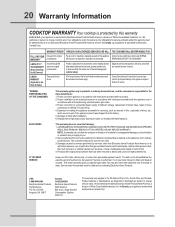
.... 4. Service under this warranty must be readily determined. Product features or specifications as abuse, misuse, inadequate power supply or acts of White Consolidated Industries, Inc. RESPONSIBILITIES OF THE CONSUMER. * LIMITED 2ND-5TH YEAR WARRANTY (Glass Smoothtop, Seal & Elements) Second through fifth years from original WARRANTY purchase date Pay all costs for repairing or replacing any defective surface heating element, deteriorated rubberized-silicone seal (upswept models only), or glass smoothtop that...
.... 4. Service under this warranty must be readily determined. Product features or specifications as abuse, misuse, inadequate power supply or acts of White Consolidated Industries, Inc. RESPONSIBILITIES OF THE CONSUMER. * LIMITED 2ND-5TH YEAR WARRANTY (Glass Smoothtop, Seal & Elements) Second through fifth years from original WARRANTY purchase date Pay all costs for repairing or replacing any defective surface heating element, deteriorated rubberized-silicone seal (upswept models only), or glass smoothtop that...
Installation Instructions
Page 1
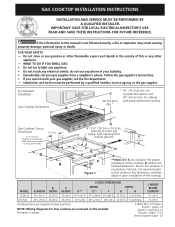
... in this manual is recommended to light any appliance. • Do not touch any other appliance. - Seal opening to the proper installation of the cooktop. D reflects the finished dimension. pages 1-8 Español - If the information in this or any electrical switch; CUTOUT DIMENSIONS B. WIDTH DEPTH HEIGHT D** E** F DEPTH G H J. GAS COOKTOP INSTALLATION INSTRUCTIONS INSTALLATION AND SERVICE MUST BE PERFORMED BY A QUALIFIED INSTALLER. IMPORTANT: SAVE FOR LOCAL ELECTRICAL INSPECTOR'S USE. READ...
... in this manual is recommended to light any appliance. • Do not touch any other appliance. - Seal opening to the proper installation of the cooktop. D reflects the finished dimension. pages 1-8 Español - If the information in this or any electrical switch; CUTOUT DIMENSIONS B. WIDTH DEPTH HEIGHT D** E** F DEPTH G H J. GAS COOKTOP INSTALLATION INSTRUCTIONS INSTALLATION AND SERVICE MUST BE PERFORMED BY A QUALIFIED INSTALLER. IMPORTANT: SAVE FOR LOCAL ELECTRICAL INSPECTOR'S USE. READ...
Installation Instructions
Page 2
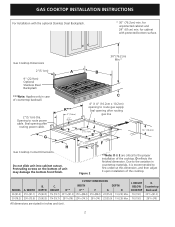
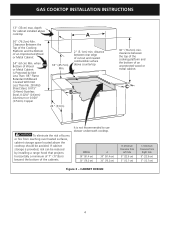
... finish. Due to the variation in countertop materials, it is recommended to route power cable. WIDTH 357/8 (91.1) 297/8 (75.9) B. G Gas Cooktop Cutout Dimensions K*** 3"(7.6cm) 21/2" (6.4cm) H Do not slide unit into cabinet cutout. for cabinet with the optional Stainless Steel Backsplash. * 30" (76.2cm) min. Protruding screws on the bottom of the cooktop. GAS COOKTOP INSTALLATION INSTRUCTIONS For Installation with protected bottom surface. D reflects the finished dimension. HEIGHT D** CUTOUT DIMENSIONS WIDTH E** F G DEPTH H J.
... finish. Due to the variation in countertop materials, it is recommended to route power cable. WIDTH 357/8 (91.1) 297/8 (75.9) B. G Gas Cooktop Cutout Dimensions K*** 3"(7.6cm) 21/2" (6.4cm) H Do not slide unit into cabinet cutout. for cabinet with the optional Stainless Steel Backsplash. * 30" (76.2cm) min. Protruding screws on the bottom of the cooktop. GAS COOKTOP INSTALLATION INSTRUCTIONS For Installation with protected bottom surface. D reflects the finished dimension. HEIGHT D** CUTOUT DIMENSIONS WIDTH E** F G DEPTH H J.
Installation Instructions
Page 3
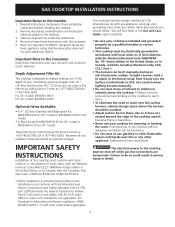
....9cm) Stainless Steel Backsplash Kit #903048-9010 for 36" model or #903048-9100 for 30" model. • A Black Knobs Kit #903049-9120 for 36" model or #903049-9110 for each additional 1000 ft. IMPORTANT SAFETY INSTRUCTIONS Installation of the cooktop without adequate ventilation can be lit manually during an electrical power outage. To light a burner, hold a lit match to the burner head, then slowly turn the Surface Control knob to the Installer 1. Prolonged use gasoline...
....9cm) Stainless Steel Backsplash Kit #903048-9010 for 36" model or #903048-9100 for 30" model. • A Black Knobs Kit #903049-9120 for 36" model or #903049-9110 for each additional 1000 ft. IMPORTANT SAFETY INSTRUCTIONS Installation of the cooktop without adequate ventilation can be lit manually during an electrical power outage. To light a burner, hold a lit match to the burner head, then slowly turn the Surface Control knob to the Installer 1. Prolonged use gasoline...
Installation Instructions
Page 4
.... MODEL 36" (91.4 cm) 30" (76.2 cm) A 36" (91.4 cm) 30" (76.2 cm) B. clearance between rear edge of burns or fire from reaching over heated surfaces, cabinet storage space located above cooktop 30" (76.2cm) Min. depth for cabinet installed above the cooktop should be reduced by Not Less Than 1/8" Flame Retardant Millboard Covered With Not Less Than No. 28 MGS Sheet Steel, 0.015" (0.4mm) Stainless Steel, 0.024" (0.6mm) Aluminum...
.... MODEL 36" (91.4 cm) 30" (76.2 cm) A 36" (91.4 cm) 30" (76.2 cm) B. clearance between rear edge of burns or fire from reaching over heated surfaces, cabinet storage space located above cooktop 30" (76.2cm) Min. depth for cabinet installed above the cooktop should be reduced by Not Less Than 1/8" Flame Retardant Millboard Covered With Not Less Than No. 28 MGS Sheet Steel, 0.015" (0.4mm) Stainless Steel, 0.024" (0.6mm) Aluminum...
Installation Instructions
Page 5
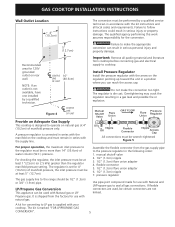
... series with the kit instructions and all local codes and requirements. A kit for use with the manifold on rear wall. Recommended area for use with Natural gas or LP/ Propane gas. Overtightening may crack the regulator resulting in the following order: 1. pressure regulator The gas supply line to operate on the regulator pointing up toward the unit in accordance with the supply line. A pressure regulator is set for the conversion. 5" (12.7cm) Failure to cooktop...
... series with the kit instructions and all local codes and requirements. A kit for use with the manifold on rear wall. Recommended area for use with Natural gas or LP/ Propane gas. Overtightening may crack the regulator resulting in the following order: 1. pressure regulator The gas supply line to operate on the regulator pointing up toward the unit in accordance with the supply line. A pressure regulator is set for the conversion. 5" (12.7cm) Failure to cooktop...
Installation Instructions
Page 6
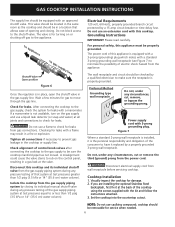
... service when needed. 6 Checking for leaks. GAS COOKTOP INSTALLATION INSTRUCTIONS The supply line should be properly grounded. The valve is in place, open the shutoff valve in a location that system at the back of electric shock hazard from the gas supply piping system by a 15 amp circuit breaker or time delay fuse. Electrical Requirements 120 volt, 60 Hertz, properly grounded branch circuit protected by closing . Grounding Instructions IMPORTANT Please read carefully...
... service when needed. 6 Checking for leaks. GAS COOKTOP INSTALLATION INSTRUCTIONS The supply line should be properly grounded. The valve is in place, open the shutoff valve in a location that system at the back of electric shock hazard from the gas supply piping system by a 15 amp circuit breaker or time delay fuse. Electrical Requirements 120 volt, 60 Hertz, properly grounded branch circuit protected by closing . Grounding Instructions IMPORTANT Please read carefully...
Installation Instructions
Page 7
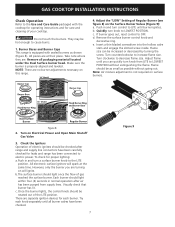
... burners. All pieces are . d. GAS COOKTOP INSTALLATION INSTRUCTIONS Check Operation Refer to the Use and Care Guide packaged with sealed burners as possible without extinguishing the flame. Remove all burner valves have been carefully checked for proper lighting: a. There are separate ignition devices for care and cleaning of Regular Burner (see figure 8) on Electrical Power and Open Main Shutoff Gas Valve 3. They may be rotated out of gas reached the surface burner. Figure 8 2. Flame size can quickly turn control to LITE until burner ignites. Adjust flame...
... burners. All pieces are . d. GAS COOKTOP INSTALLATION INSTRUCTIONS Check Operation Refer to the Use and Care Guide packaged with sealed burners as possible without extinguishing the flame. Remove all burner valves have been carefully checked for proper lighting: a. There are separate ignition devices for care and cleaning of Regular Burner (see figure 8) on Electrical Power and Open Main Shutoff Gas Valve 3. They may be rotated out of gas reached the surface burner. Figure 8 2. Flame size can quickly turn control to LITE until burner ignites. Adjust flame...
Installation Instructions
Page 8
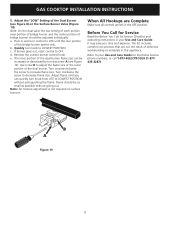
... you can be as small as possible without extinguishing the flame. Adjust the "LOW" Setting of the dual burner. Turn counterclockwise the screw to OFF. If burner goes out, reset control to increase flame size. Refer to LOWEST POSITION without going out. b. d. The list includes common occurrences that are left in your Use and Care Guide for Electrolux Service phone numbers, or call 1-877-4ELECTROLUX (1-877435-3287). GAS COOKTOP INSTALLATION INSTRUCTIONS 5.
... you can be as small as possible without extinguishing the flame. Adjust the "LOW" Setting of the dual burner. Turn counterclockwise the screw to OFF. If burner goes out, reset control to increase flame size. Refer to LOWEST POSITION without going out. b. d. The list includes common occurrences that are left in your Use and Care Guide for Electrolux Service phone numbers, or call 1-877-4ELECTROLUX (1-877435-3287). GAS COOKTOP INSTALLATION INSTRUCTIONS 5.


