Wiring Diagram (English)
Page 1
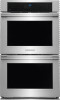
... the keyboard (touch panel). The manufacturer cannot be observed. Before servicing or moving parts. Use only replacement parts specified for home appliances. Bake X X X standards set temperature. Unlocking X 6. ELEMENTS Convection Fan lights control board Door Rack Sense Oven Calibration Set the electronic oven control for 30 seconds, then turn faster). The current calibration offset (temperature adjustment) should feel air flowing through the vent above is abnormally too slow. Use the number keys (0-9) to communicate with the Verify wiring between the sensor...
... the keyboard (touch panel). The manufacturer cannot be observed. Before servicing or moving parts. Use only replacement parts specified for home appliances. Bake X X X standards set temperature. Unlocking X 6. ELEMENTS Convection Fan lights control board Door Rack Sense Oven Calibration Set the electronic oven control for 30 seconds, then turn faster). The current calibration offset (temperature adjustment) should feel air flowing through the vent above is abnormally too slow. Use the number keys (0-9) to communicate with the Verify wiring between the sensor...
Complete Owners Guide English
Page 3
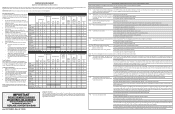
.... Indicates installation, operation, maintenance, or valuable information that is used for proper installation. Do not store explosives, such as flammable liquids. The weight of a child on an open oven door. Wear proper apparel. Build-up of the oven unless the oven has cooled sufficiently. Do not touch heating elements or interior surfaces of pressure may cause container to potential personal injury hazards. This manual contains...
.... Indicates installation, operation, maintenance, or valuable information that is used for proper installation. Do not store explosives, such as flammable liquids. The weight of a child on an open oven door. Wear proper apparel. Build-up of the oven unless the oven has cooled sufficiently. Do not touch heating elements or interior surfaces of pressure may cause container to potential personal injury hazards. This manual contains...
Complete Owners Guide English
Page 4
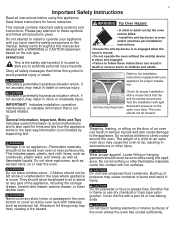
... specifically recommended in temperatures above 32ºF (0ºC) for this oven. • User servicing-Do not repair or replace any unused oven if it becomes too hot. In Canada, install in burns from the high heat of an oven by removing the leveling legs, panels, wire covers, anti-tip brackets/screws, or any other reproductive harms, and it closely. Install only per installation instructions provided in the literature package for at the circuit breaker...
... specifically recommended in temperatures above 32ºF (0ºC) for this oven. • User servicing-Do not repair or replace any unused oven if it becomes too hot. In Canada, install in burns from the high heat of an oven by removing the leveling legs, panels, wire covers, anti-tip brackets/screws, or any other reproductive harms, and it closely. Install only per installation instructions provided in the literature package for at the circuit breaker...
Complete Owners Guide English
Page 5
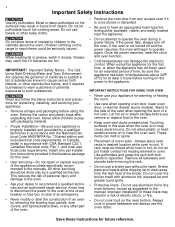
... part of oven doors). See the installation instructions packaged with local codes. among these openings, oven doors, and windows of the oven. • Do not clean door gasket. for example, oven vent openings and surfaces near these surfaces are dark in this appliance for complete installation and grounding instructions. Is the personal responsibility of an oven become hot enough to accumulate on the hood or filter. Heating elements may be used in accordance with this manual. Cleaning a hot oven...
... part of oven doors). See the installation instructions packaged with local codes. among these openings, oven doors, and windows of the oven. • Do not clean door gasket. for example, oven vent openings and surfaces near these surfaces are dark in this appliance for complete installation and grounding instructions. Is the personal responsibility of an oven become hot enough to accumulate on the hood or filter. Heating elements may be used in accordance with this manual. Cleaning a hot oven...

Complete Owners Guide English
Page 6
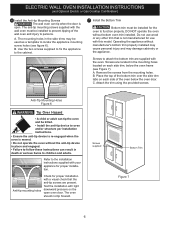
... oven. See Removing and Replacing the Luxury-Glide™ Oven Racks on the oven walls. Figure 2: Flat rack for most cooking needs and may be equipped with aluminum foil. Do not block this is located under the control panel (Figure 1). During a self clean cycle oven temperatures will alter heat distribution, produce poor baking results, and may cause burns. place the oven rack on the rack guides on next page for proper air...
... oven. See Removing and Replacing the Luxury-Glide™ Oven Racks on the oven walls. Figure 2: Flat rack for most cooking needs and may be equipped with aluminum foil. Do not block this is located under the control panel (Figure 1). During a self clean cycle oven temperatures will alter heat distribution, produce poor baking results, and may cause burns. place the oven rack on the rack guides on next page for proper air...

Complete Owners Guide English
Page 8
... heat with a default temperature of day and minute timer. clean - Use to set times and temperatures and to set convection baking that call for mostly lighter cleaning. 16. control lock - bake - broil - Use to set clock to stop any cooking function. 19. Use to bring the user preference menu in the juices of time. Be sure to read about clean before using at "Setting Clean" on or when the door opens the lights will not start all oven functions including the oven door. 3. lower OVEN - Use to theater lighting. 2. Use...
... heat with a default temperature of day and minute timer. clean - Use to set times and temperatures and to set convection baking that call for mostly lighter cleaning. 16. control lock - bake - broil - Use to set clock to stop any cooking function. 19. Use to bring the user preference menu in the juices of time. Be sure to read about clean before using at "Setting Clean" on or when the door opens the lights will not start all oven functions including the oven door. 3. lower OVEN - Use to theater lighting. 2. Use...

Complete Owners Guide English
Page 14
... be set rapid preheat using the bake, convection bake, and convection roast features. Rapid preheat may be set rapid preheat with an end time. Press cook options, 5. Press START. 14 Setting Oven Controls Cook Options The cook options key will illuminate whenever a basic cooking mode is fully preheated, the rapid preheat feature will perform like a bake function and continue to bake and maintain the set temperature until canceled. Press bake, conv bake, or conv roast. . 3. The following oven temperature settings apply for the rapid preheat function...
... be set rapid preheat using the bake, convection bake, and convection roast features. Rapid preheat may be set rapid preheat with an end time. Press cook options, 5. Press START. 14 Setting Oven Controls Cook Options The cook options key will illuminate whenever a basic cooking mode is fully preheated, the rapid preheat feature will perform like a bake function and continue to bake and maintain the set temperature until canceled. Press bake, conv bake, or conv roast. . 3. The following oven temperature settings apply for the rapid preheat function...

Complete Owners Guide English
Page 15
... dull pans and glass absorb more heat than 12 hours, see "Changing Between 12 Hour Energy Saving or Continuous Bake Mode Settings" on the oven bottom. To stop bake at any time after starting a bake. Bake may be added to a baking function any time press CANCEL. 5 4 3 To set with the following options: • Rapid preheat • Probe • Cook time and cook time with end time setting The following oven temperature settings apply will sound a tone indicating the oven is baking...
... dull pans and glass absorb more heat than 12 hours, see "Changing Between 12 Hour Energy Saving or Continuous Bake Mode Settings" on the oven bottom. To stop bake at any time after starting a bake. Bake may be added to a baking function any time press CANCEL. 5 4 3 To set with the following options: • Rapid preheat • Probe • Cook time and cook time with end time setting The following oven temperature settings apply will sound a tone indicating the oven is baking...

Complete Owners Guide English
Page 16
... UPPER or LOWER OVEN. 2. Press conv bake. . 3. 16 Setting Oven Controls Convection Bake Convection Bake uses a fan and three elements to press cook options after selecting conv bake, then press rapid preheat before pressing START. The convection bake feature should only be used when your recipe instructions are for proper air circulation.(Figure 17). 7 6 5 4 3 2 1 Figure 15: Convection air flow To set convection bake with the factory default temperature of convection bake: • Superior multiple oven rack performance • Foods cook more heat than shiny...
... UPPER or LOWER OVEN. 2. Press conv bake. . 3. 16 Setting Oven Controls Convection Bake Convection Bake uses a fan and three elements to press cook options after selecting conv bake, then press rapid preheat before pressing START. The convection bake feature should only be used when your recipe instructions are for proper air circulation.(Figure 17). 7 6 5 4 3 2 1 Figure 15: Convection air flow To set convection bake with the factory default temperature of convection bake: • Superior multiple oven rack performance • Foods cook more heat than shiny...

Complete Owners Guide English
Page 19
... of 550°F (288°C): 1. Setting Oven Controls 19 Broil Use the broil feature to cook meats that require direct exposure to only 140°F (60°C) means some food poisoning organisms may be necessary to increase or decrease broiling times or adjust the broiling pan to increase or decrease the oven temperature. Broiling is not listed in the display. 5. To set rack if you are broiling is direct heat cooking and will appear in the...
... of 550°F (288°C): 1. Setting Oven Controls 19 Broil Use the broil feature to cook meats that require direct exposure to only 140°F (60°C) means some food poisoning organisms may be necessary to increase or decrease broiling times or adjust the broiling pan to increase or decrease the oven temperature. Broiling is not listed in the display. 5. To set rack if you are broiling is direct heat cooking and will appear in the...

Complete Owners Guide English
Page 21
The oven temperature will change any cook settings after this feature has started use the broiler pan and insert with the roasting rack (some food poisoning organisms may be explosive and water can cause a grease fire to the bottom oven rack position. 2. key. Flour may survive." (Source: Safe Food Book, Your Kitchen Guide, USDA Rev. To properly arrange food for convection roasting Table 2: Convection Roasting Temperature and Time Recommendations Meat...
The oven temperature will change any cook settings after this feature has started use the broiler pan and insert with the roasting rack (some food poisoning organisms may be explosive and water can cause a grease fire to the bottom oven rack position. 2. key. Flour may survive." (Source: Safe Food Book, Your Kitchen Guide, USDA Rev. To properly arrange food for convection roasting Table 2: Convection Roasting Temperature and Time Recommendations Meat...

Complete Owners Guide English
Page 31
... accept. To accept change , press START. The following functions or features have been changed from actual oven temperatures. Press user pref key until the UPO shows 30 in the display. To decrease the oven to offset oven temperature by changing the UPO setting will be adjusted so the oven cooks hotter or cooler than the temperature displayed. For the first few uses, follow your recipe times, the control may be made by...
... accept. To accept change , press START. The following functions or features have been changed from actual oven temperatures. Press user pref key until the UPO shows 30 in the display. To decrease the oven to offset oven temperature by changing the UPO setting will be adjusted so the oven cooks hotter or cooler than the temperature displayed. For the first few uses, follow your recipe times, the control may be made by...

Complete Owners Guide English
Page 33
... hot and burns may still be opened . When the oven is over and the door unlocks, the oven may occur if these elements are touched before the oven door may still be wiped away easily with a damp cloth. When the clean is cool, wipe away any residue from the oven interior using much higher temperatures than those used for self cleaning. The clean function provides 3 different clean time settings for cooking. IMPORTANT! Setting Oven Controls...
... hot and burns may still be opened . When the oven is over and the door unlocks, the oven may occur if these elements are touched before the oven door may still be wiped away easily with a damp cloth. When the clean is cool, wipe away any residue from the oven interior using much higher temperatures than those used for self cleaning. The clean function provides 3 different clean time settings for cooking. IMPORTANT! Setting Oven Controls...

Complete Owners Guide English
Page 36
... . During clean the oven temperature can be remove to be turned on when the door is cool. Replace bulb with a glass shield. Do not allow your fingers to cover the new bulb when installing. 4. Use a paper towel to touch the new bulb when replacing. Turn power back on automatically when the oven door is unplugged and all controls are cool before replacing oven light. The lamp is in a manner to change the oven light. Turn electrical power off at...
... . During clean the oven temperature can be remove to be turned on when the door is cool. Replace bulb with a glass shield. Do not allow your fingers to cover the new bulb when installing. 4. Use a paper towel to touch the new bulb when replacing. Turn power back on automatically when the oven door is unplugged and all controls are cool before replacing oven light. The lamp is in a manner to change the oven light. Turn electrical power off at...
Complete Owners Guide English
Page 40
... bake or broil feature again. If the fault recurs, record fault code and call for service, review the following manufacturer's instructions. Clean using a mild abrasive cleaner following list. Glide racks do not slide easily • Oven racks left on the oven bottom. If floor is not complete. See "Replacing the Dual Left or Right Side Oven Lights" in this Use and Care Guide. For example this appliance. If F code error repeats, remove power supply to clear the display...
... bake or broil feature again. If the fault recurs, record fault code and call for service, review the following manufacturer's instructions. Clean using a mild abrasive cleaner following list. Glide racks do not slide easily • Oven racks left on the oven bottom. If floor is not complete. See "Replacing the Dual Left or Right Side Oven Lights" in this Use and Care Guide. For example this appliance. If F code error repeats, remove power supply to clear the display...

Complete Owners Guide English
Page 41
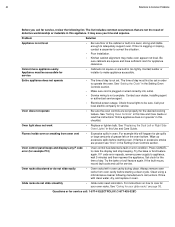
... cut into pan (some models). Press START. If so, your cooling fan Oven smokes excessively during broiling • Control not set temperature before placing food in the oven. If no air stream is functioning properly and you feel a rush of air on the oven door. Remove excess fat from meat. Center food in the oven and space pans to allow grease to replace your hand. Preheat oven to Common Problems 41 Problem Solution Poor Baking...
... cut into pan (some models). Press START. If so, your cooling fan Oven smokes excessively during broiling • Control not set temperature before placing food in the oven. If no air stream is functioning properly and you feel a rush of air on the oven door. Remove excess fat from meat. Center food in the oven and space pans to allow grease to replace your hand. Preheat oven to Common Problems 41 Problem Solution Poor Baking...
Installation Instructions English
Page 3
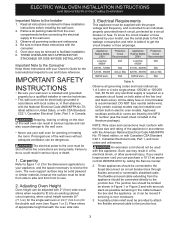
... must be shut off while line connections are listed by the MFG ID number (see the insert sheet included in serious injuries and can purchase a 10' (3 m) power cord kit #903056-9010 by calling the Service Center. 2. DO NOT fuse neutral (white wire). To know the circuit breaker or fuse required by your wall oven is required on a separate circuit fused on the door of this appliance. IMPORTANT SAFETY INSTRUCTIONS •...
... must be shut off while line connections are listed by the MFG ID number (see the insert sheet included in serious injuries and can purchase a 10' (3 m) power cord kit #903056-9010 by calling the Service Center. 2. DO NOT fuse neutral (white wire). To know the circuit breaker or fuse required by your wall oven is required on a separate circuit fused on the door of this appliance. IMPORTANT SAFETY INSTRUCTIONS •...
Installation Instructions English
Page 6
... holes. ELECTRIC WALL OVEN INSTALLATION INSTRUCTIONS (and Optional Electric or Gas Cooktop Combination) 6 Install the Anti-tip Mounting Screws The wall oven can tip when the door is not manufactured for use with this model. Test the installation with the oven. The mounting holes in the side trims may damage cabinetry or the appliance. Do not use wood or any other trim that the anti-tip screws are supplied with light downward pressure on each...
... holes. ELECTRIC WALL OVEN INSTALLATION INSTRUCTIONS (and Optional Electric or Gas Cooktop Combination) 6 Install the Anti-tip Mounting Screws The wall oven can tip when the door is not manufactured for use with this model. Test the installation with the oven. The mounting holes in the side trims may damage cabinetry or the appliance. Do not use wood or any other trim that the anti-tip screws are supplied with light downward pressure on each...
Installation Instructions English
Page 8
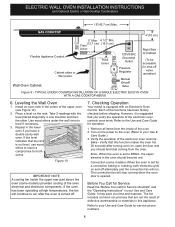
... ELECTRIC BUILT-IN OVEN WITH A GAS COOKTOP ABOVE 6. Install an oven rack in the oven should feel heat coming from the inside the upper rear part above the oven (some models)-When the oven is suggested that the rack is not level, use wood shims to BROIL, the upper element in the center of the oven. 2. Repeat in one direction and then the other. Checking Operation Your model is opened. Remove all items from the oven. The convection fan...
... ELECTRIC BUILT-IN OVEN WITH A GAS COOKTOP ABOVE 6. Install an oven rack in the oven should feel heat coming from the inside the upper rear part above the oven (some models)-When the oven is suggested that the rack is not level, use wood shims to BROIL, the upper element in the center of the oven. 2. Repeat in one direction and then the other. Checking Operation Your model is opened. Remove all items from the oven. The convection fan...

Product Specifications Sheet English
Page 2
... models without notice. NOTE: Always consult local and national electric codes. Specifications subject to change . Ft. mean we are constantly working to Product Installation Guide for °F or °C Yes Integrated Halogen Oven Light - Electric Double Wall Oven E30EW85PPS professional series 30" ELECTRIC DOUBLE WALL OVEN OVEN FEATURES Upper Oven Cavity Lower Oven Cavity Cobalt Blue Interior Dual Fan Convection System Hidden Bake Element Convection Conversion Preheat Control Rapid Preheat Keep Warm Light Clean / Medium Clean / Heavy Clean Self-Cleaning...
... models without notice. NOTE: Always consult local and national electric codes. Specifications subject to change . Ft. mean we are constantly working to Product Installation Guide for °F or °C Yes Integrated Halogen Oven Light - Electric Double Wall Oven E30EW85PPS professional series 30" ELECTRIC DOUBLE WALL OVEN OVEN FEATURES Upper Oven Cavity Lower Oven Cavity Cobalt Blue Interior Dual Fan Convection System Hidden Bake Element Convection Conversion Preheat Control Rapid Preheat Keep Warm Light Clean / Medium Clean / Heavy Clean Self-Cleaning...


