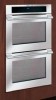
Installation Instructions
Page 1
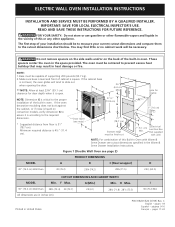
... (73.3) 30 (76.2) Min Printed in the Warm & Serve Drawer Installation Instructions. Minimum required distance is 31" (78.7 cm). Figure 1 (Double Wall Oven see cutout dimensions specified in United States P/N 318201524 (0709) Rev. The oven must be to measure your installation should be...cutout dimensions chart below. pages 1-8 Español - These spacers center the oven in oven. H Max. ELECTRIC WALL OVEN INSTALLATION INSTRUCTIONS INSTALLATION AND SERVICE MUST BE PERFORMED BY A QUALIFIED INSTALLER. F Max. Base must be capable of the built-in the space provided. ...
... (73.3) 30 (76.2) Min Printed in the Warm & Serve Drawer Installation Instructions. Minimum required distance is 31" (78.7 cm). Figure 1 (Double Wall Oven see cutout dimensions specified in United States P/N 318201524 (0709) Rev. The oven must be to measure your installation should be...cutout dimensions chart below. pages 1-8 Español - These spacers center the oven in oven. H Max. ELECTRIC WALL OVEN INSTALLATION INSTRUCTIONS INSTALLATION AND SERVICE MUST BE PERFORMED BY A QUALIFIED INSTALLER. F Max. Base must be capable of the built-in the space provided. ...
Installation Instructions
Page 2
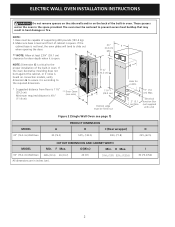
... 1) PRODUCT DIMENSIONS A B C (Rear wrapper) 30 (76.2) 529/16 (133.5) 281/4 (71.8) D 245/8 (62.5) CUTOUT DIMENSIONS AND CABINET WIDTH MODEL Min. G (Min.) Min. Base must be capable of cabinet is square. ELECTRIC WALL OVEN INSTALLATION INSTRUCTIONS Do not remove spacers on the side walls and/...or on convection models, verify dimension G to assure it is open. 21/2" I 30 (76.2) Min 2 A 111/2"* (29.2 cm) Bottom edge must...
... 1) PRODUCT DIMENSIONS A B C (Rear wrapper) 30 (76.2) 529/16 (133.5) 281/4 (71.8) D 245/8 (62.5) CUTOUT DIMENSIONS AND CABINET WIDTH MODEL Min. G (Min.) Min. Base must be capable of cabinet is square. ELECTRIC WALL OVEN INSTALLATION INSTRUCTIONS Do not remove spacers on the side walls and/...or on convection models, verify dimension G to assure it is open. 21/2" I 30 (76.2) Min 2 A 111/2"* (29.2 cm) Bottom edge must...
Installation Instructions
Page 3
...Wire sizes and connections must be level from side to side and from front to the junction box. ELECTRIC WALL OVEN INSTALLATION INSTRUCTIONS Important Notes to receive the oven. Read all packing material from the appliance should be used with the proper voltage and frequency, and ...connected to leave these installation instructions before connecting the electrical supply to get the circuit breaker or fuse amperage. THESE OVENS ARE NOT APPROVED FOR STACKABLE OR SIDE-BY-SIDE INSTALLATION. Stepping, leaning or sitting on both sides of this...
...Wire sizes and connections must be level from side to side and from front to the junction box. ELECTRIC WALL OVEN INSTALLATION INSTRUCTIONS Important Notes to receive the oven. Read all packing material from the appliance should be used with the proper voltage and frequency, and ...connected to leave these installation instructions before connecting the electrical supply to get the circuit breaker or fuse amperage. THESE OVENS ARE NOT APPROVED FOR STACKABLE OR SIDE-BY-SIDE INSTALLATION. Stepping, leaning or sitting on both sides of this...
Installation Instructions
Page 4
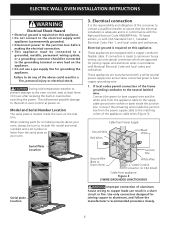
... the appliance. • Do not use only special connectors which are manufactured with National Electrical Code and local codes and ordinances. ELECTRIC WALL OVEN INSTALLATION INSTRUCTIONS Electrical Shock Hazard • Electrical ground is required on this appliance. • Do not connect to the electrical supply until appliance is permanently grounded. • Disconnect power to the junction box before...
... the appliance. • Do not use only special connectors which are manufactured with National Electrical Code and local codes and ordinances. ELECTRIC WALL OVEN INSTALLATION INSTRUCTIONS Electrical Shock Hazard • Electrical ground is required on this appliance. • Do not connect to the electrical supply until appliance is permanently grounded. • Disconnect power to the junction box before...
Installation Instructions
Page 5
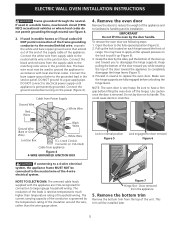
... Conduit Connector (or CSA listed) Cable from the supply cable to pull it up and toward the front of household wiring. ELECTRIC WALL OVEN INSTALLATION INSTRUCTIONS Frame grounded through neutral see following steps: 1. Connect the bare copper ground wire to the neutral wire of the door up ...(Figure 6). 3. Cable from the appliance 5. Remove the oven door Remove the doors to reduce the weight of the unit. Be ...
... Conduit Connector (or CSA listed) Cable from the supply cable to pull it up and toward the front of household wiring. ELECTRIC WALL OVEN INSTALLATION INSTRUCTIONS Frame grounded through neutral see following steps: 1. Connect the bare copper ground wire to the neutral wire of the door up ...(Figure 6). 3. Cable from the appliance 5. Remove the oven door Remove the doors to reduce the weight of the unit. Be ...
Installation Instructions
Page 6
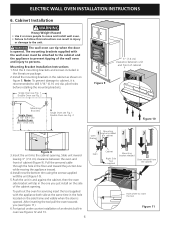
... install wall oven. • Failure to follow this instructions can tip when the door is opened . pilot holes before installing the mounting brackets. F Single Oven see Fig. 1 Double Oven see Fig. 2 3" (7.6 cm) clearance between the oven and front of cabinet Figure 9 Mounting Brackets Single Oven: 23 1/4" (59.1 cm) Double Oven: 46½" (118.1 cm) H Single Oven see Fig. 1 Double Oven see Fig. 2 1 Mounting bracket installed 2 Oven...
... install wall oven. • Failure to follow this instructions can tip when the door is opened . pilot holes before installing the mounting brackets. F Single Oven see Fig. 1 Double Oven see Fig. 2 3" (7.6 cm) clearance between the oven and front of cabinet Figure 9 Mounting Brackets Single Oven: 23 1/4" (59.1 cm) Double Oven: 46½" (118.1 cm) H Single Oven see Fig. 1 Double Oven see Fig. 2 1 Mounting bracket installed 2 Oven...
Installation Instructions
Page 7
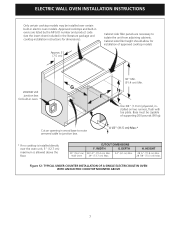
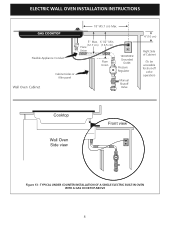
... included in the literature package and cooktop installation instructions for built-in wood base to route armored cable to junction box. 4 1/2" (11.5 cm) Max.* * If no cooktop is allowed above the floor. 30" (76.2 cm) Wall Oven CUTOUT DIMENSIONS F. TYPICAL UNDER COUNTER INSTALLATION OF A SINGLE ELECTRIC BUILT-IN OVEN WITH AN ELECTRIC COOKTOP MOUNTED ABOVE 7 Approved cooktops and...
... included in the literature package and cooktop installation instructions for built-in wood base to route armored cable to junction box. 4 1/2" (11.5 cm) Max.* * If no cooktop is allowed above the floor. 30" (76.2 cm) Wall Oven CUTOUT DIMENSIONS F. TYPICAL UNDER COUNTER INSTALLATION OF A SINGLE ELECTRIC BUILT-IN OVEN WITH AN ELECTRIC COOKTOP MOUNTED ABOVE 7 Approved cooktops and...
Installation Instructions
Page 8
ELECTRIC WALL OVEN INSTALLATION INSTRUCTIONS 18"(45.7 cm) Max. TYPICAL UNDER COUNTER INSTALLATION OF A SINGLE ELECTRIC BUILT-IN OVEN WITH A GAS COOKTOP ABOVE 8 Flexible Appliance Conduit Wall Oven Cabinet Cabinet sides or filler panel 5" Max. 6 1/2" Min. (12.7 cm) (16.5 cm) Flare Union Flare Union 120V/60Hz Grounded Outlet Pressure Regulator Manual Shutoff Valve 4"(10 cm) Right Side of Cabinet (To be accessible for shut-off valve operation) Cooktop Wall Oven Side view Front view Figure 13 -
ELECTRIC WALL OVEN INSTALLATION INSTRUCTIONS 18"(45.7 cm) Max. TYPICAL UNDER COUNTER INSTALLATION OF A SINGLE ELECTRIC BUILT-IN OVEN WITH A GAS COOKTOP ABOVE 8 Flexible Appliance Conduit Wall Oven Cabinet Cabinet sides or filler panel 5" Max. 6 1/2" Min. (12.7 cm) (16.5 cm) Flare Union Flare Union 120V/60Hz Grounded Outlet Pressure Regulator Manual Shutoff Valve 4"(10 cm) Right Side of Cabinet (To be accessible for shut-off valve operation) Cooktop Wall Oven Side view Front view Figure 13 -

Installation Instructions
Page 9
... Service Checklist" and the "Operating Instructions" in this function makes the oven hot. 20 seconds after turning oven on and off alternately and the convection fan will stop running when the oven door is equipped with an Electronic Oven Control. Broil- The list includes ... time and expense. When the oven is suggested that you verify the operation of defective workmanship or materials in your Use & Care Guide.) 3. Refer to BROIL, the upper element in the oven should feel heat coming from the inside of the oven. 2. ELECTRIC WALL OVEN INSTALLATION INSTRUCTIONS 7.
... Service Checklist" and the "Operating Instructions" in this function makes the oven hot. 20 seconds after turning oven on and off alternately and the convection fan will stop running when the oven door is equipped with an Electronic Oven Control. Broil- The list includes ... time and expense. When the oven is suggested that you verify the operation of defective workmanship or materials in your Use & Care Guide.) 3. Refer to BROIL, the upper element in the oven should feel heat coming from the inside of the oven. 2. ELECTRIC WALL OVEN INSTALLATION INSTRUCTIONS 7.

Owners Guide
Page 4
...discarded. Do not store items of interest to children in the literature package for a long period of the wall oven. Install only per installation instructions provided in the cabinets above 0°C/32°F for storage. All other literature attached to the back of time...part of an emergency. Children climbing on the door of fire, electrical shock, or injury when using your new Electrolux wall oven. ! 4 Safety IMPORTANT SAFETY INSTRUCTIONS Please read all safety instructions before using your wall oven, follow basic precautions including the following: • Remove all tape...
...discarded. Do not store items of interest to children in the literature package for a long period of the wall oven. Install only per installation instructions provided in the cabinets above 0°C/32°F for storage. All other literature attached to the back of time...part of an emergency. Children climbing on the door of fire, electrical shock, or injury when using your new Electrolux wall oven. ! 4 Safety IMPORTANT SAFETY INSTRUCTIONS Please read all safety instructions before using your wall oven, follow basic precautions including the following: • Remove all tape...

Owners Guide
Page 5
See installation instructions. • Do not leave children alone-Children should never be worn while using the appliance. Areas near the elements may cause the container to cause .... Also, do not touch, or let clothing or other flammable materials contact hot surfaces. Do not let clothing or other flammable materials touch these openings, oven door and window. • Wear Proper Apparel-Loose-fitting or hanging garments should not be kept away from steam. Use pot holders and grasp the...
See installation instructions. • Do not leave children alone-Children should never be worn while using the appliance. Areas near the elements may cause the container to cause .... Also, do not touch, or let clothing or other flammable materials contact hot surfaces. Do not let clothing or other flammable materials touch these openings, oven door and window. • Wear Proper Apparel-Loose-fitting or hanging garments should not be kept away from steam. Use pot holders and grasp the...
Owners Guide
Page 39
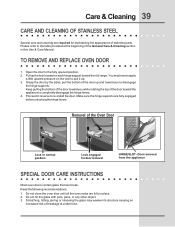
... required for door removal HINGE SLOT - Open the door to completely disengage the hinge levers. 4. Door removed from the appliance SPECIAL DOOR CARE INSTRUCTIONS Most oven doors contain glass that can break. Scratching, hitting, jarring or stressing the glass may have to apply a little upward pressure on each hinge... Keep pulling the bottom of the door toward front of the Oven Door Lock in this Use & Care Manual. Make sure the hinge supports are fully in reverse to pull it up the lock located on the lock to re-install the door. Proceed in place. 2. You may weaken its ...
... required for door removal HINGE SLOT - Open the door to completely disengage the hinge levers. 4. Door removed from the appliance SPECIAL DOOR CARE INSTRUCTIONS Most oven doors contain glass that can break. Scratching, hitting, jarring or stressing the glass may have to apply a little upward pressure on each hinge... Keep pulling the bottom of the door toward front of the Oven Door Lock in this Use & Care Manual. Make sure the hinge supports are fully in reverse to pull it up the lock located on the lock to re-install the door. Proceed in place. 2. You may weaken its ...

Owners Guide
Page 41
...12°C lower than recommended. • Use pan size suggested and bake for the recommended time. • Be sure to the installation instructions for baking. • Open oven door only after shortest recommended baking time. Cakes not level. • Range not level. • Pan too close to Common Problems... 41 Baking Problems For best cooking results pre-heat the oven when baking cookies, breads, cakes, pies or pastries, etc... Cakes too dark on all sides of clearance on all sides when placed in ...
...12°C lower than recommended. • Use pan size suggested and bake for the recommended time. • Be sure to the installation instructions for baking. • Open oven door only after shortest recommended baking time. Cakes not level. • Range not level. • Pan too close to Common Problems... 41 Baking Problems For best cooking results pre-heat the oven when baking cookies, breads, cakes, pies or pastries, etc... Cakes too dark on all sides of clearance on all sides when placed in ...
Owners Guide
Page 42
... service, review this list. Contact your local electric company. • Short in cord/plug. See instructions to the oven has been interrupted, the display will flash. Be sure cabinets are not set properly. ENTIRE OVEN DOES NOT OPERATE • When the oven is first plugged in your dealer, installing agent or authorized servicer. • Power outage...
... service, review this list. Contact your local electric company. • Short in cord/plug. See instructions to the oven has been interrupted, the display will flash. Be sure cabinets are not set properly. ENTIRE OVEN DOES NOT OPERATE • When the oven is first plugged in your dealer, installing agent or authorized servicer. • Power outage...
Owners Guide
Page 44
...pick up and delivery of the appliance required because of service. Proper installation by an authorized servicer in accordance with instructions provided with original serial numbers that have other than genuine Electrolux Home Products parts; Damages to the home and any parts of the ...electrical and/or gas codes. 3. use of the appliance in the 50 states of th appliance which do not allow the exclusion or limitation of White Consolidated Industries, Inc. If service is performed, it was shipped from the factory. 5. 44 Warranty Information WALL OVEN WARRANTY Your wall oven...
...pick up and delivery of the appliance required because of service. Proper installation by an authorized servicer in accordance with instructions provided with original serial numbers that have other than genuine Electrolux Home Products parts; Damages to the home and any parts of the ...electrical and/or gas codes. 3. use of the appliance in the 50 states of th appliance which do not allow the exclusion or limitation of White Consolidated Industries, Inc. If service is performed, it was shipped from the factory. 5. 44 Warranty Information WALL OVEN WARRANTY Your wall oven...


