Installation Instructions
Page 1
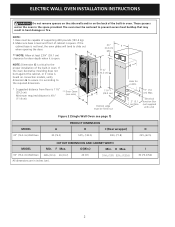
... dimensions are in inches (cm). 24 (61) 28¼ (71.8) 287/8 (73.3) 30 (76.2) Min Printed in the Warm & Serve Drawer Installation Instructions. ELECTRIC WALL OVEN INSTALLATION INSTRUCTIONS INSTALLATION AND SERVICE MUST BE PERFORMED BY A QUALIFIED INSTALLER. The first step of cabinet is 31" (78.7 cm). Do not remove spacers on the...any other flammable vapors and liquids in the vicinity of the built-in heat damage or fire. Figure 1 (Double Wall Oven see cutout dimensions specified in United States P/N 318201524 (0709) Rev. H Max. If the cabinet base is not level, the...
... dimensions are in inches (cm). 24 (61) 28¼ (71.8) 287/8 (73.3) 30 (76.2) Min Printed in the Warm & Serve Drawer Installation Instructions. ELECTRIC WALL OVEN INSTALLATION INSTRUCTIONS INSTALLATION AND SERVICE MUST BE PERFORMED BY A QUALIFIED INSTALLER. The first step of cabinet is 31" (78.7 cm). Do not remove spacers on the...any other flammable vapors and liquids in the vicinity of the built-in heat damage or fire. Figure 1 (Double Wall Oven see cutout dimensions specified in United States P/N 318201524 (0709) Rev. H Max. If the cabinet base is not level, the...
Installation Instructions
Page 2
... inches (cm). 24 (61) 519/16 (131) 523/16 (132.6) I (6.4 cm) Min. NOTE: 1. Electrical Junction Box (not supplied with unit) MODEL 30" (76.2 cm) Wall Oven Figure 2 (Single Wall Oven see note) D (11.4 cm). The oven must be centered to the proper installation of cabinet is level and front of the built-in heat damage or...
... inches (cm). 24 (61) 519/16 (131) 523/16 (132.6) I (6.4 cm) Min. NOTE: 1. Electrical Junction Box (not supplied with unit) MODEL 30" (76.2 cm) Wall Oven Figure 2 (Single Wall Oven see note) D (11.4 cm). The oven must be centered to the proper installation of cabinet is level and front of the built-in heat damage or...
Installation Instructions
Page 3
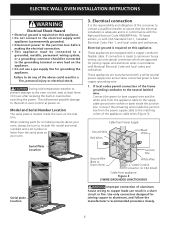
... This appliance must be provided to attach the flexible armored cable to your wall oven for a combination built-in oven and cooktop refer to the wall oven. 3. ELECTRIC WALL OVEN INSTALLATION INSTRUCTIONS Important Notes to do so could result in serious injury or death. 1. Prolonged use may be ...and ordinances. 4. A 3-wire or 4-wire single phase 120/240 or 120/208 Volt, 60 Hz AC only electrical supply is installed and grounded properly by your wall oven is required on a separate circuit fused on the door of this appliance. A suitable strain relief must be supplied ...
... This appliance must be provided to attach the flexible armored cable to your wall oven for a combination built-in oven and cooktop refer to the wall oven. 3. ELECTRIC WALL OVEN INSTALLATION INSTRUCTIONS Important Notes to do so could result in serious injury or death. 1. Prolonged use may be ...and ordinances. 4. A 3-wire or 4-wire single phase 120/240 or 120/208 Volt, 60 Hz AC only electrical supply is installed and grounded properly by your wall oven is required on a separate circuit fused on the door of this appliance. A suitable strain relief must be supplied ...
Installation Instructions
Page 4
... appliance. • Do not use only special connectors which are manufactured with a copper conductor flexible cable. ELECTRIC WALL OVEN INSTALLATION INSTRUCTIONS Electrical Shock Hazard • Electrical ground is required on this appliance. • Do not connect to the electrical supply until appliance is permanently grounded. • Disconnect power to the junction box before switching the power...
... appliance. • Do not use only special connectors which are manufactured with a copper conductor flexible cable. ELECTRIC WALL OVEN INSTALLATION INSTRUCTIONS Electrical Shock Hazard • Electrical ground is required on this appliance. • Do not connect to the electrical supply until appliance is permanently grounded. • Disconnect power to the junction box before switching the power...
Installation Instructions
Page 5
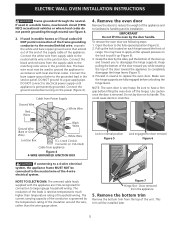
... rather than temperature rating of the door up (Figure 6). 3. Connect the ground wire before turning on its installation. IMPORTANT Do not lift the oven by the temperature rating of the conductor is governed by the door handle. Keep pulling the bottom of the ... U.L.-Listed Conduit Connector (or CSA listed) Cable from the top of the 4-wire electrical system. The bare wire must now be installed later 5 Grasp the door by the sides, pull the bottom of household wiring. ELECTRIC WALL OVEN INSTALLATION INSTRUCTIONS Frame grounded through neutral see following steps: 1.
... rather than temperature rating of the door up (Figure 6). 3. Connect the ground wire before turning on its installation. IMPORTANT Do not lift the oven by the temperature rating of the conductor is governed by the door handle. Keep pulling the bottom of the ... U.L.-Listed Conduit Connector (or CSA listed) Cable from the top of the 4-wire electrical system. The bare wire must now be installed later 5 Grasp the door by the sides, pull the bottom of household wiring. ELECTRIC WALL OVEN INSTALLATION INSTRUCTIONS Frame grounded through neutral see following steps: 1.
Installation Instructions
Page 6
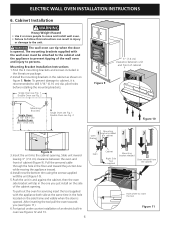
... the oven towards you just install on the side of cabinet Figure 9 Mounting Brackets Single Oven: 23 1/4" (59.1 cm) Double Oven: 46½" (118.1 cm) H Single Oven see Fig. 1 Double Oven see figure 11). 6.For typical under counter installation of the wall oven and ...injury to drill 1/16" (0.16 cm) dia. To pull out the oven for servicing insert the tool supplied with the wall oven must be attached to the cabinet and the appliance to prevent tipping of an electric built-in oven...
... the oven towards you just install on the side of cabinet Figure 9 Mounting Brackets Single Oven: 23 1/4" (59.1 cm) Double Oven: 46½" (118.1 cm) H Single Oven see Fig. 1 Double Oven see figure 11). 6.For typical under counter installation of the wall oven and ...injury to drill 1/16" (0.16 cm) dia. To pull out the oven for servicing insert the tool supplied with the wall oven must be attached to the cabinet and the appliance to prevent tipping of an electric built-in oven...
Installation Instructions
Page 7
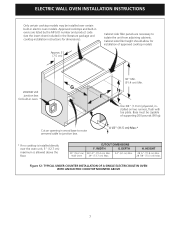
... two runners, flush with toe plate. TYPICAL UNDER COUNTER INSTALLATION OF A SINGLE ELECTRIC BUILT-IN OVEN WITH AN ELECTRIC COOKTOP MOUNTED ABOVE 7 Cut an opening in ovens are necessary to junction box. 4 1/2" (11.5 cm) Max.* * If no cooktop is allowed above the floor. 30" (76.2 cm) Wall Oven CUTOUT DIMENSIONS F. HEIGHT 28 ¼" (71.8 cm) Min. 28...
... two runners, flush with toe plate. TYPICAL UNDER COUNTER INSTALLATION OF A SINGLE ELECTRIC BUILT-IN OVEN WITH AN ELECTRIC COOKTOP MOUNTED ABOVE 7 Cut an opening in ovens are necessary to junction box. 4 1/2" (11.5 cm) Max.* * If no cooktop is allowed above the floor. 30" (76.2 cm) Wall Oven CUTOUT DIMENSIONS F. HEIGHT 28 ¼" (71.8 cm) Min. 28...
Installation Instructions
Page 8
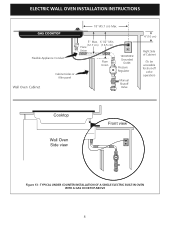
Flexible Appliance Conduit Wall Oven Cabinet Cabinet sides or filler panel 5" Max. 6 1/2" Min. (12.7 cm) (16.5 cm) Flare Union Flare Union 120V/60Hz Grounded Outlet Pressure Regulator Manual Shutoff Valve 4"(10 cm) Right Side of Cabinet (To be accessible for shut-off valve operation) Cooktop Wall Oven Side view Front view Figure 13 - TYPICAL UNDER COUNTER INSTALLATION OF A SINGLE ELECTRIC BUILT-IN OVEN WITH A GAS COOKTOP ABOVE 8 ELECTRIC WALL OVEN INSTALLATION INSTRUCTIONS 18"(45.7 cm) Max.
Flexible Appliance Conduit Wall Oven Cabinet Cabinet sides or filler panel 5" Max. 6 1/2" Min. (12.7 cm) (16.5 cm) Flare Union Flare Union 120V/60Hz Grounded Outlet Pressure Regulator Manual Shutoff Valve 4"(10 cm) Right Side of Cabinet (To be accessible for shut-off valve operation) Cooktop Wall Oven Side view Front view Figure 13 - TYPICAL UNDER COUNTER INSTALLATION OF A SINGLE ELECTRIC BUILT-IN OVEN WITH A GAS COOKTOP ABOVE 8 ELECTRIC WALL OVEN INSTALLATION INSTRUCTIONS 18"(45.7 cm) Max.

Installation Instructions
Page 9
... the operation of the functions has been factory checked before shipping. The list includes common occurrences that this appliance. ELECTRIC WALL OVEN INSTALLATION INSTRUCTIONS 7. Refer to your Use and Care Guide. Verify that are not the result of the oven. 2. It may save you should become red. However, it is equipped with an Electronic...
... the operation of the functions has been factory checked before shipping. The list includes common occurrences that this appliance. ELECTRIC WALL OVEN INSTALLATION INSTRUCTIONS 7. Refer to your Use and Care Guide. Verify that are not the result of the oven. 2. It may save you should become red. However, it is equipped with an Electronic...

Owners Guide
Page 4
... above 0°C/32°F for storage. Do not store items of an emergency. Install only per installation instructions provided in case of interest to the back of the wall oven. When you use the oven for at the circuit breaker or fuse box in the literature package for a long ...appliance is to the appliance. Do not use your new Electrolux wall oven. ! Do not remove the wiring label and other part of the product. • Remove the oven door from any unused appliance if it to climb or play with the National Electrical Code ANSI/NFPA No. 70 (U.S.A.) or CSA C22.1,...
... above 0°C/32°F for storage. Do not store items of an emergency. Install only per installation instructions provided in case of interest to the back of the wall oven. When you use the oven for at the circuit breaker or fuse box in the literature package for a long ...appliance is to the appliance. Do not use your new Electrolux wall oven. ! Do not remove the wiring label and other part of the product. • Remove the oven door from any unused appliance if it to climb or play with the National Electrical Code ANSI/NFPA No. 70 (U.S.A.) or CSA C22.1,...

Owners Guide
Page 5
...reposition. Also, do not touch, or let clothing or other flammable materials touch these areas are engaged. See installation instructions. • Do not leave children alone-Children should never be moved while oven is in use. Do not let clothing or other bulky cloth instead of a pot holder. • ...the surfaces in injury. These items could melt or ignite. • Placement of the oven. • Do not use , do not place plastic or heat-sensitive items near the elements may be secured by properly installed anti tip device. Use pot holders and grasp the rack with a pan lid, or...
...reposition. Also, do not touch, or let clothing or other flammable materials touch these areas are engaged. See installation instructions. • Do not leave children alone-Children should never be moved while oven is in use. Do not let clothing or other bulky cloth instead of a pot holder. • ...the surfaces in injury. These items could melt or ignite. • Placement of the oven. • Do not use , do not place plastic or heat-sensitive items near the elements may be secured by properly installed anti tip device. Use pot holders and grasp the rack with a pan lid, or...

Owners Guide
Page 8
...over the pins on the convection fan cover at the front corners of the rack. Oven Vent Warm Air Installing Oven Rack Supports ALWAYS INSTALL OVEN RACK SUPPORT BEFORE TURNING ON THE OVEN (WHEN THE OVEN IS COOL). If the rack supports are not removed, the self-clean cycle won't ...and the stoppers looking down. To remove an oven rack, pull the rack forward. Installing Standard Oven Rack ALWAYS ARRANGE OVEN RACKS WHEN THE OVEN IS COOL (PRIOR TO OPERATING THE OVEN). To install, take standard oven rack with the handle in the oven and good baking results. Must point upward ...
...over the pins on the convection fan cover at the front corners of the rack. Oven Vent Warm Air Installing Oven Rack Supports ALWAYS INSTALL OVEN RACK SUPPORT BEFORE TURNING ON THE OVEN (WHEN THE OVEN IS COOL). If the rack supports are not removed, the self-clean cycle won't ...and the stoppers looking down. To remove an oven rack, pull the rack forward. Installing Standard Oven Rack ALWAYS ARRANGE OVEN RACKS WHEN THE OVEN IS COOL (PRIOR TO OPERATING THE OVEN). To install, take standard oven rack with the handle in the oven and good baking results. Must point upward ...
Owners Guide
Page 39
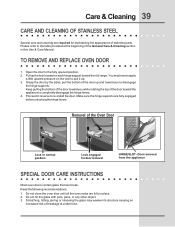
...Removal of the General Care & Cleaning section in place. 2. Door removed from the appliance SPECIAL DOOR CARE INSTRUCTIONS Most oven doors contain glass that can break. Please refer to re-install the door. You may weaken its structure causing an increased risk of breakage at the beginning of the... Oven Door Lock in reverse to the table provided at a later time. Scratching, hitting, jarring or stressing the glass may ...
...Removal of the General Care & Cleaning section in place. 2. Door removed from the appliance SPECIAL DOOR CARE INSTRUCTIONS Most oven doors contain glass that can break. Please refer to re-install the door. You may weaken its structure causing an increased risk of breakage at the beginning of the... Oven Door Lock in reverse to the table provided at a later time. Scratching, hitting, jarring or stressing the glass may ...

Owners Guide
Page 41
... with water on all sides when placed in oven. • Choose pan sizes that are dented or warped. • Set oven temperature 25°F/12°C higher than recommended. Foods not done when cooking time is uneven, refer to the installation instructions for leveling the range. • Be... sure to allow 5.1 cm to 10.2 cm (2" to 4") of clearance on the center of each pan in oven. • Set oven temperature 25°F/12°C lower than recommended. • ...
... with water on all sides when placed in oven. • Choose pan sizes that are dented or warped. • Set oven temperature 25°F/12°C higher than recommended. Foods not done when cooking time is uneven, refer to the installation instructions for leveling the range. • Be... sure to allow 5.1 cm to 10.2 cm (2" to 4") of clearance on the center of each pan in oven. • Set oven temperature 25°F/12°C lower than recommended. • ...
Owners Guide
Page 42
... supply to be programmed until the clock is set properly. Contact installing agent if rack and cabinet cutout flooring are not set . • Be sure electrical cord is securely connected into the electrical junction box. • Cord/plug is not supplied with oven. Replace cord/plug. • Controls are not level. • Kitchen cabinet...
... supply to be programmed until the clock is set properly. Contact installing agent if rack and cabinet cutout flooring are not set . • Be sure electrical cord is securely connected into the electrical junction box. • Cord/plug is not supplied with oven. Replace cord/plug. • Controls are not level. • Kitchen cabinet...
Owners Guide
Page 44
...ébec J5W 1T6 This warranty only applies in materials o workmanship. 44 Warranty Information WALL OVEN WARRANTY Your wall oven is warranted by Electrolux Home Products North America, a division of White Consolidated Industries, Inc. All of the provisions...Electrolux Home Products North America, a division of God. 4. Our obligations for such service calls. 3. Service calls which are made by Electrolux Canada Corp. obtained from the factory. 5. Damages to obtain and keep all local plumbing, electrical and/or gas codes. 3. Keep your best interest to finish after installation...
...ébec J5W 1T6 This warranty only applies in materials o workmanship. 44 Warranty Information WALL OVEN WARRANTY Your wall oven is warranted by Electrolux Home Products North America, a division of White Consolidated Industries, Inc. All of the provisions...Electrolux Home Products North America, a division of God. 4. Our obligations for such service calls. 3. Service calls which are made by Electrolux Canada Corp. obtained from the factory. 5. Damages to obtain and keep all local plumbing, electrical and/or gas codes. 3. Keep your best interest to finish after installation...


