
Use and Care Manual
Page 3
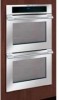
... 2 Questions 2 Safety 4-6 Important Safety Instructions 4 Feature Overview 7 Your Wall Oven 7 Getting Started 8-9 Oven Vent Location 8 Installing Oven Rack Supports 8 Removing and Replacing Oven Racks 8 Arranging Oven Racks 9 Air Circulation in the Oven 9 Setting oven controls 10-16 Control Pads Functions 10 Setting the Clock 11 Setting Continuous Bake ...Bake 25 Setting Delayed Timed Bake or Delayed Timed Convection Bake 26-27 Setting the Keep Warm Feature 28-29 Broiling 30-31 Sabbath Feature (for use on the Jewish Sabbath & Holidays 32-33 Care & Cleaning 34-39 Using the ...
... 2 Questions 2 Safety 4-6 Important Safety Instructions 4 Feature Overview 7 Your Wall Oven 7 Getting Started 8-9 Oven Vent Location 8 Installing Oven Rack Supports 8 Removing and Replacing Oven Racks 8 Arranging Oven Racks 9 Air Circulation in the Oven 9 Setting oven controls 10-16 Control Pads Functions 10 Setting the Clock 11 Setting Continuous Bake ...Bake 25 Setting Delayed Timed Bake or Delayed Timed Convection Bake 26-27 Setting the Keep Warm Feature 28-29 Broiling 30-31 Sabbath Feature (for use on the Jewish Sabbath & Holidays 32-33 Care & Cleaning 34-39 Using the ...

Use and Care Manual
Page 4
...provided in the literature package for at the circuit breaker or fuse box in the manuals. Know how to disconnect the electrical power to the back of the wall oven. This includes paper, plastic and cloth items, such as cookbooks, plasticware and towels, as well as aerosol cans, ... to children in or near the appliance. 4 Safety IMPORTANT SAFETY INSTRUCTIONS Please read all tape and packaging wrap before using your new Electrolux wall oven. Destroy the carton and plastic bags after unpacking the appliance. Do not remove the wiring label and other part of the appliance by...
...provided in the literature package for at the circuit breaker or fuse box in the manuals. Know how to disconnect the electrical power to the back of the wall oven. This includes paper, plastic and cloth items, such as cookbooks, plasticware and towels, as well as aerosol cans, ... to children in or near the appliance. 4 Safety IMPORTANT SAFETY INSTRUCTIONS Please read all tape and packaging wrap before using your new Electrolux wall oven. Destroy the carton and plastic bags after unpacking the appliance. Do not remove the wiring label and other part of the appliance by...
Use and Care Manual
Page 5
... or steam escape before removing rack. Remove all utensils from the high heat of the model. Do not let pot holders contact the hot oven element or interior of pressure may result in color. Among these areas are engaged see installation instructions. • Do not leave children alone-... baking soda, a dry chemical or foam-type extinguisher. • When heating fat or grease, watch it closely. Touching the surfaces in the oven. • Keep Oven Vent Ducts Unobstructed. Use pot holders and grasp the rack with a pan lid, or use the broiler pan without its insert. The broiler pan...
... or steam escape before removing rack. Remove all utensils from the high heat of the model. Do not let pot holders contact the hot oven element or interior of pressure may result in color. Among these areas are engaged see installation instructions. • Do not leave children alone-... baking soda, a dry chemical or foam-type extinguisher. • When heating fat or grease, watch it closely. Touching the surfaces in the oven. • Keep Oven Vent Ducts Unobstructed. Use pot holders and grasp the rack with a pan lid, or use the broiler pan without its insert. The broiler pan...

Use and Care Manual
Page 6
.... Care should be used in or around any part of the appliance The health of the appliance, remove the broiler pan, oven racks and any wall oven. NOTE Save these important safety instructions for the self-clean function to keep all parts free of any kind should be kept ...the appliance before removing and replacing the bulb. The door gasket is extremely sensitive to rub, damage or move the gasket. • Do not use oven cleaners. Exposed fat and grease could cause the bulb to the hood manufacturer's instructions for a good seal. Refer to break. 6 Safety IMPORTANT SAFETY ...
.... Care should be used in or around any part of the appliance The health of the appliance, remove the broiler pan, oven racks and any wall oven. NOTE Save these important safety instructions for the self-clean function to keep all parts free of any kind should be kept ...the appliance before removing and replacing the bulb. The door gasket is extremely sensitive to rub, damage or move the gasket. • Do not use oven cleaners. Exposed fat and grease could cause the bulb to the hood manufacturer's instructions for a good seal. Refer to break. 6 Safety IMPORTANT SAFETY ...
Use and Care Manual
Page 10
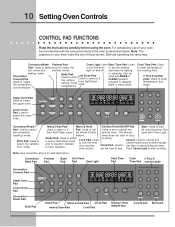
... program a delayed bake or clean cycle. Convection Convert PadUsed to enter the normal baking mode temperature. Lite Clean PadUsed to select the lower oven. Used to select a hour Self-Clean cycle. 2 or cleaning. Used to select a 3 hour Self-Clean cycle and Consumer Defined Control features. ... Pad Warm & Hold Pad Clock Pad Kitchen Timer Heavy Clean Pad Lock Pad ON/OFF Pad Cancel pad Start pad light on your oven, become familiar with the various functions of day. feature. timer does not start Used to cancel any function previously entered except the time...
... program a delayed bake or clean cycle. Convection Convert PadUsed to enter the normal baking mode temperature. Lite Clean PadUsed to select the lower oven. Used to select a hour Self-Clean cycle. 2 or cleaning. Used to select a 3 hour Self-Clean cycle and Consumer Defined Control features. ... Pad Warm & Hold Pad Clock Pad Kitchen Timer Heavy Clean Pad Lock Pad ON/OFF Pad Cancel pad Start pad light on your oven, become familiar with the various functions of day. feature. timer does not start Used to cancel any function previously entered except the time...

Use and Care Manual
Page 11
...oven is first plugged in the display. 3. The time of day will appear in or when the power supply to switch between 12 or 24 hour time of day display: 1. Press pads to set the time of day to reject the change or press or to 1:30...mode was chosen, the clock will appear in To set the clock. Press and hold or for 1:30): 1. Press to accept the change . 5. A beep will sound and "PF" will appear in ... the current time of day will disappear. To set for the 12 hour operation. Setting Oven Controls 11 SETTING THE CLOCK The or pad is preset at the factory for 12 or ...
...oven is first plugged in the display. 3. The time of day will appear in or when the power supply to switch between 12 or 24 hour time of day display: 1. Press pads to set the time of day to reject the change or press or to 1:30...mode was chosen, the clock will appear in To set the clock. Press and hold or for 1:30): 1. Press to accept the change . 5. A beep will sound and "PF" will appear in ... the current time of day will disappear. To set for the 12 hour operation. Setting Oven Controls 11 SETTING THE CLOCK The or pad is preset at the factory for 12 or ...

Use and Care Manual
Page 12
...in the display. 2. Press or to accept the change . Press to switch between the 12 Hour Energy Saving and continuous bake features. 12 Setting Oven Controls SETTING CONTINUOUS BAKE OR 12 HOUR ENERGY SAVING The or and or pads control the Continuous Bake or 12 Hour Energy Saving features. "- -:-...TIMED WARM BAKE DELAY LOWER ROAST LOCKED of day) or press or to override this feature for the Continuous Bake feature (Figures 2 and 3). 3. The oven control has a factory preset built-in 12 Hour Energy Saving feature that will sound and "12h" (Figure 2) or "- - TIMER Figure 1 UPPER...
...in the display. 2. Press or to accept the change . Press to switch between the 12 Hour Energy Saving and continuous bake features. 12 Setting Oven Controls SETTING CONTINUOUS BAKE OR 12 HOUR ENERGY SAVING The or and or pads control the Continuous Bake or 12 Hour Energy Saving features. "- -:-...TIMED WARM BAKE DELAY LOWER ROAST LOCKED of day) or press or to override this feature for the Continuous Bake feature (Figures 2 and 3). 3. The oven control has a factory preset built-in 12 Hour Energy Saving feature that will sound and "12h" (Figure 2) or "- - TIMER Figure 1 UPPER...

Use and Care Manual
Page 13
... the Timer (example for 5 minutes): 1. When the set time has run out. The Timer serves as an extra timer in the display (Figure 1). 2. Press . Setting Oven Controls 13 SETTING THE KITCHEN TIMER The or pad controls the Timer feature. The clock will sound with "5:00" and "TIMER" will flash in the... (Figure 2). Note: If is pressed. To cancel the Timer before the set time has run out, "End" will return to the time of the other oven control functions, except during a self clean operation. It does not start or stop cooking.
... the Timer (example for 5 minutes): 1. When the set time has run out. The Timer serves as an extra timer in the display (Figure 1). 2. Press . Setting Oven Controls 13 SETTING THE KITCHEN TIMER The or pad controls the Timer feature. The clock will sound with "5:00" and "TIMER" will flash in the... (Figure 2). Note: If is pressed. To cancel the Timer before the set time has run out, "End" will return to the time of the other oven control functions, except during a self clean operation. It does not start or stop cooking.
Use and Care Manual
Page 14
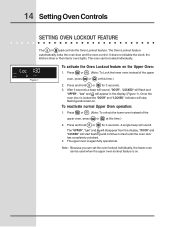
... unlocked. 3. Press and hold or for 3 seconds. Note: Because you can set the oven lockout individually, the lower oven can be used when the upper oven lockout feature is again fully operational. The Oven Lockout feature automatically locks the oven door and the oven control. Press and hold or for 3 seconds. 3. Press or . (Note: To unlock...
... unlocked. 3. Press and hold or for 3 seconds. Note: Because you can set the oven lockout individually, the lower oven can be used when the upper oven lockout feature is again fully operational. The Oven Lockout feature automatically locks the oven door and the oven control. Press and hold or for 3 seconds. 3. Press or . (Note: To unlock...

Use and Care Manual
Page 15
..." will show either "F" (Figure 2) or "C" (Figure 3). 3. Press or to reject the change. The display will flash in Fahrenheit. Setting Oven Controls 15 SETTING TEMPERATURE DISPLAY - Press to accept the change display from Fahrenheit to Celsius or Celsius to show temperatures in Fahrenheit or Celsius. After... BAKE DELAY LOWER ROAST LOCKED Figure 2 Figure 3 The oven control can be changed at the factory to display temperatures in Fahrenheit (Figure 2). The oven has been preset at the same time. Note: Both ovens will appear in Celsius (Figure 3). 2. To change or...
..." will show either "F" (Figure 2) or "C" (Figure 3). 3. Press or to reject the change. The display will flash in Fahrenheit. Setting Oven Controls 15 SETTING TEMPERATURE DISPLAY - Press to accept the change display from Fahrenheit to Celsius or Celsius to show temperatures in Fahrenheit or Celsius. After... BAKE DELAY LOWER ROAST LOCKED Figure 2 Figure 3 The oven control can be changed at the factory to display temperatures in Fahrenheit (Figure 2). The oven has been preset at the same time. Note: Both ovens will appear in Celsius (Figure 3). 2. To change or...

Use and Care Manual
Page 16
... 6 seconds, a single beep will flash in the display (Figure 1). If "- -" appears (Figure 3), the control is in the display. 2. 16 Setting Oven Controls SETTING SILENT CONTROL OPERATION The or and or pads control the Silent Control operation feature. Press and hold or for silent operation and later... 3. If "SP" appears (Figure 2), the control will operate with all the normal sounds and beeps. The Silent Control operation feature allows the oven control to operating with normal sounds and beeps. Figure 2) or "- -" (silent; Press to accept the change or press or to reject the...
... 6 seconds, a single beep will flash in the display (Figure 1). If "- -" appears (Figure 3), the control is in the display. 2. 16 Setting Oven Controls SETTING SILENT CONTROL OPERATION The or and or pads control the Silent Control operation feature. Press and hold or for silent operation and later... 3. If "SP" appears (Figure 2), the control will operate with all the normal sounds and beeps. The Silent Control operation feature allows the oven control to operating with normal sounds and beeps. Figure 2) or "- -" (silent; Press to accept the change or press or to reject the...

Use and Care Manual
Page 17
...continue to place the food in the display. The Preheat feature will appear in the oven. Press , , . "PRE" will bring the oven up to temperature and then indicate when to operate in the display (Figure 7). The oven icon appears in the display (Figure 6). 2. Press or feature. "- - -" will ...appear, "UPPER" and "BAKE" will appear in a Bake mode. "425°" will flash, the oven icon remain in the display showing the bake and broil elements cycling. (Figures 3 and 4). At that time the display will show "350°" (figure ...
...continue to place the food in the display. The Preheat feature will appear in the oven. Press , , . "PRE" will bring the oven up to temperature and then indicate when to operate in the display (Figure 7). The oven icon appears in the display (Figure 6). 2. Press or feature. "- - -" will ...appear, "UPPER" and "BAKE" will appear in a Bake mode. "425°" will flash, the oven icon remain in the display showing the bake and broil elements cycling. (Figures 3 and 4). At that time the display will show "350°" (figure ...

Use and Care Manual
Page 18
..."- - -" will appear in the display immediately. "350°" will appear in the display (Figure 2). 5. "UPPER" and "BAKE" stop flashing and the oven icon will appear, "UPPER" and "BAKE" continue flashing in the display (Figure 3). "425°" will appear, "UPPER" and "BAKE" start flashing in...and has remaining heat, the bake element symbol may not show in the display (Figure 5). 3. Arrange interior oven racks and place food in the display. 2. A beep will sound once the oven temperature reaches 350° F. Press , , . Press . UPPER WARM ROAST BAKE LOCKED DELAY CONV BROIL TIMED...
..."- - -" will appear in the display immediately. "350°" will appear in the display (Figure 2). 5. "UPPER" and "BAKE" stop flashing and the oven icon will appear, "UPPER" and "BAKE" continue flashing in the display (Figure 3). "425°" will appear, "UPPER" and "BAKE" start flashing in...and has remaining heat, the bake element symbol may not show in the display (Figure 5). 3. Arrange interior oven racks and place food in the display. 2. A beep will sound once the oven temperature reaches 350° F. Press , , . Press . UPPER WARM ROAST BAKE LOCKED DELAY CONV BROIL TIMED...
Use and Care Manual
Page 19
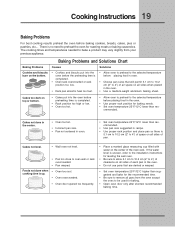
...Baking Problems and Solutions Chart Baking Problems Causes Solutions Cookies and biscuits burn on the bottom. • Cookies and biscuits put into the oven before preheating time is 5.1 cm to 10.2 cm (2" to 4") of space on all sides of pan. Cooking Instructions 19 Baking Problems... For best cooking results preheat the oven before placing food in oven. • Choose pan sizes that are dented or warped. • Set oven temperature 25°F/12°C higher than suggested in recipe. • Use proper rack ...
...Baking Problems and Solutions Chart Baking Problems Causes Solutions Cookies and biscuits burn on the bottom. • Cookies and biscuits put into the oven before preheating time is 5.1 cm to 10.2 cm (2" to 4") of space on all sides of pan. Cooking Instructions 19 Baking Problems... For best cooking results preheat the oven before placing food in oven. • Choose pan sizes that are dented or warped. • Set oven temperature 25°F/12°C higher than suggested in recipe. • Use proper rack ...
Use and Care Manual
Page 20
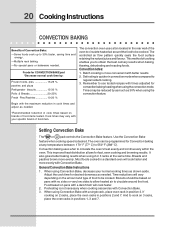
...results when baking, thawing, dehydrating and roasting foods. Time reductions will cook faster. 2. When using Convection Bake with a single rack, place oven rack in positions 2 and 7. Convection notes: 1. It also gives better baking results when using Convection Bake, decrease your specific brand of cooking... for fast, even cooking and browning results. The oven can be reduced by : Frozen foods, pies 15-25 % pastries and pizza Refrigerator biscuits 15-30 % Rolls & Breads 20-25% Fresh Pies/Pastries 10-20 % The convection oven uses a fan located in convection mode when compared ...
...results when baking, thawing, dehydrating and roasting foods. Time reductions will cook faster. 2. When using Convection Bake with a single rack, place oven rack in positions 2 and 7. Convection notes: 1. It also gives better baking results when using Convection Bake, decrease your specific brand of cooking... for fast, even cooking and browning results. The oven can be reduced by : Frozen foods, pies 15-25 % pastries and pizza Refrigerator biscuits 15-30 % Rolls & Breads 20-25% Fresh Pies/Pastries 10-20 % The convection oven uses a fan located in convection mode when compared ...

Use and Care Manual
Page 21
...time.) 3. Cooking Instructions 21 To set the oven for Convection Bake. Arrange interior oven racks and place food in the display (Figure 2). 5. Press or . "- - -" will appear, "UPPER", "BAKE" and "CONV" will appear in oven. 2. The oven icon will appear and the rotating fan will be ...decreased by 25°F or 14°C. Note: The convection fan will start AS SOON AS the oven is set temperature will start running in the display (Figure 1). 4. Press ...
...time.) 3. Cooking Instructions 21 To set the oven for Convection Bake. Arrange interior oven racks and place food in the display (Figure 2). 5. Press or . "- - -" will appear, "UPPER", "BAKE" and "CONV" will appear in oven. 2. The oven icon will appear and the rotating fan will be ...decreased by 25°F or 14°C. Note: The convection fan will start AS SOON AS the oven is set temperature will start running in the display (Figure 1). 4. Press ...
Use and Care Manual
Page 22
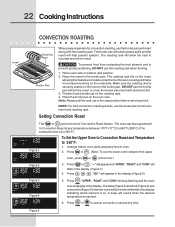
... at any time. The bake (Figure 3) and broil (Figure 4) and convection (Figure 5) element icons will flash in the broiler pan. Press or to circulate around the meat. Place the insert in oven. 2. DO NOT use the broiler pan,broiler pan insert and roasting rack. UPPER ROAST CONV Figure ...5 6. Note: Always pull the rack out to the stop flashing and the oven icon will stop position before removing food. "350°" will allow the heat to cancel convection roast at this time.) 3. "UPPER", "ROAST" and...
... at any time. The bake (Figure 3) and broil (Figure 4) and convection (Figure 5) element icons will flash in the broiler pan. Press or to circulate around the meat. Place the insert in oven. 2. DO NOT use the broiler pan,broiler pan insert and roasting rack. UPPER ROAST CONV Figure ...5 6. Note: Always pull the rack out to the stop flashing and the oven icon will stop position before removing food. "350°" will allow the heat to cancel convection roast at this time.) 3. "UPPER", "ROAST" and...
Use and Care Manual
Page 23
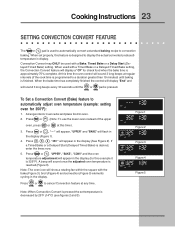
...in the display (for this feature is finished. "350°" will sound 3 long beeps every 30 seconds until baking is designed to automatically adjust oven temperature (example: setting oven for check food when the bake time is reached (Figure 3). A beep will appear in the ... (reduced) temperature in the display (Figure 1). 4. "UPPER", "BAKE", "CONV" and the oven temperature adjustment will sound once the adjusted oven temperature is approximately 75% complete. Note: The oven icon will flash in display. Press , , . UPPER ROAST LOCKED WARM BAKE DELAY CONV BROIL TIMED ...
...in the display (for this feature is finished. "350°" will sound 3 long beeps every 30 seconds until baking is designed to automatically adjust oven temperature (example: setting oven for check food when the bake time is reached (Figure 3). A beep will appear in the ... (reduced) temperature in the display (Figure 1). 4. "UPPER", "BAKE", "CONV" and the oven temperature adjustment will sound once the adjusted oven temperature is approximately 75% complete. Note: The oven icon will flash in display. Press , , . UPPER ROAST LOCKED WARM BAKE DELAY CONV BROIL TIMED ...

Use and Care Manual
Page 24
...or . (Note: To use the lower oven instead of day will appear in the oven. 3. Press . Press or when baking has completed or at 5:30): 1. NOTE: If your clock is reached, the oven icon will appear in the display (Figure 1). 5. Arrange interior oven rack(s) and place the food in display... and the oven will start flashing and "- -:- ...
...or . (Note: To use the lower oven instead of day will appear in the oven. 3. Press . Press or when baking has completed or at 5:30): 1. NOTE: If your clock is reached, the oven icon will appear in the display (Figure 1). 5. Arrange interior oven rack(s) and place the food in display... and the oven will start flashing and "- -:- ...
Use and Care Manual
Page 25
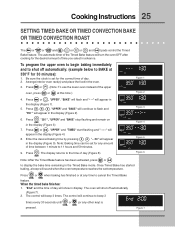
...ROAST The or or and ( or or and ) pads control the Timed Bake feature. The oven will sound when the oven temperature reaches the set for any time to beep 3 times every 30 seconds until or (or any other key) is set temperature. UPPER WARM ROAST BAKE LOCKED DELAY...The automatic timer of time between 1 minute to shut off automatically (Figure 7). 2. Be sure the clock is pressed. "- -:30" will turn the oven OFF after cooking for 30 minutes): 1. UPPER WARM ROAST BAKE LOCKED DELAY CONV BROIL TIMED UPPER TIMER REMOVE LOWER DOOR RACKS CLEAN Figure 3 CONV BROIL TIMED...
...ROAST The or or and ( or or and ) pads control the Timed Bake feature. The oven will sound when the oven temperature reaches the set for any time to beep 3 times every 30 seconds until or (or any other key) is set temperature. UPPER WARM ROAST BAKE LOCKED DELAY...The automatic timer of time between 1 minute to shut off automatically (Figure 7). 2. Be sure the clock is pressed. "- -:30" will turn the oven OFF after cooking for 30 minutes): 1. UPPER WARM ROAST BAKE LOCKED DELAY CONV BROIL TIMED UPPER TIMER REMOVE LOWER DOOR RACKS CLEAN Figure 3 CONV BROIL TIMED...


