
Use and Care Manual
Page 3
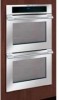
...a Record for Future use 2 Questions 2 Safety 4-6 Important Safety Instructions 4 Feature Overview 7 Your Wall Oven 7 Getting Started 8-9 Oven Vent Location 8 Installing Oven Rack Supports 8 Removing and Replacing Oven Racks 8 Arranging Oven Racks 9 Air Circulation in the Oven 9 Setting oven controls 10-16 Control Pads Functions 10 Setting the Clock 11 Setting... 25 Setting Delayed Timed Bake or Delayed Timed Convection Bake 26-27 Setting the Keep Warm Feature 28-29 Broiling 30-31 Sabbath Feature (for use on the Jewish Sabbath & Holidays 32-33 Care & Cleaning 34-39 Using the...
...a Record for Future use 2 Questions 2 Safety 4-6 Important Safety Instructions 4 Feature Overview 7 Your Wall Oven 7 Getting Started 8-9 Oven Vent Location 8 Installing Oven Rack Supports 8 Removing and Replacing Oven Racks 8 Arranging Oven Racks 9 Air Circulation in the Oven 9 Setting oven controls 10-16 Control Pads Functions 10 Setting the Clock 11 Setting... 25 Setting Delayed Timed Bake or Delayed Timed Convection Bake 26-27 Setting the Keep Warm Feature 28-29 Broiling 30-31 Sabbath Feature (for use on the Jewish Sabbath & Holidays 32-33 Care & Cleaning 34-39 Using the...

Use and Care Manual
Page 4
...the appliance unless specifically recommended in accordance with packaging material. Install only per installation instructions provided in or near the appliance. Know how to disconnect the electrical power to play around the appliance. • Storage in an oven. Do not allow children to the appliance at least ... be seriously injured. Do not remove the wiring label and other servicing should not be stored or discarded. Ask your new Electrolux wall oven. This includes paper, plastic and cloth items, such as cookbooks, plasticware and towels, as well as aerosol cans, in ...
...the appliance unless specifically recommended in accordance with packaging material. Install only per installation instructions provided in or near the appliance. Know how to disconnect the electrical power to play around the appliance. • Storage in an oven. Do not allow children to the appliance at least ... be seriously injured. Do not remove the wiring label and other servicing should not be stored or discarded. Ask your new Electrolux wall oven. This includes paper, plastic and cloth items, such as cookbooks, plasticware and towels, as well as aerosol cans, in ...
Use and Care Manual
Page 5
... become hot enough to drain and be hot even though the elements are dark in the oven. • Keep Oven Vent Ducts Unobstructed. IMPORTANT INSTRUCTIONS FOR USING YOUR OVEN • Use Care When Opening an Oven Door-Stand to reposition. Let hot air or steam escape before removing rack. Use pot... may result in burns from steam. Also, do not touch, or let clothing or other flammable materials touch these areas are engaged see installation instructions. • Do not leave children alone-Children should never be left alone or unattended in the area where an appliance is in injury....
... become hot enough to drain and be hot even though the elements are dark in the oven. • Keep Oven Vent Ducts Unobstructed. IMPORTANT INSTRUCTIONS FOR USING YOUR OVEN • Use Care When Opening an Oven Door-Stand to reposition. Let hot air or steam escape before removing rack. Use pot... may result in burns from steam. Also, do not touch, or let clothing or other flammable materials touch these areas are engaged see installation instructions. • Do not leave children alone-Children should never be left alone or unattended in the area where an appliance is in injury....
Use and Care Manual
Page 19
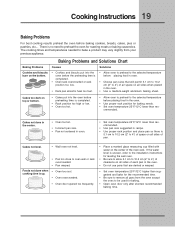
... when placed in recipe. • Use proper rack position and place pan so there is up. • Oven too cool. • Oven overcrowded. • Oven door opened too frequently. • Place a marked glass measuring cup filled with water on the center of clearance...; Pan not centered in oven. • Set oven temperature 25°F/12°C lower than rec- Cooking Instructions 19 Baking Problems For best cooking results preheat the oven before the preheating time is uneven, refer to the installation instructions for baking. • Open oven door only after shortest recommended...
... when placed in recipe. • Use proper rack position and place pan so there is up. • Oven too cool. • Oven overcrowded. • Oven door opened too frequently. • Place a marked glass measuring cup filled with water on the center of clearance...; Pan not centered in oven. • Set oven temperature 25°F/12°C lower than rec- Cooking Instructions 19 Baking Problems For best cooking results preheat the oven before the preheating time is uneven, refer to the installation instructions for baking. • Open oven door only after shortest recommended...

Use and Care Manual
Page 42
... Reposition the rack to the broiler element. Grease has built up . Follow the instructions under "Using the Self-Clean Feature". SELF-CLEANING CYCLE DOES NOT WORK • Make sure the oven door is closed . Cut remaining fatty edges to prevent curling, but do not ...blown or circuit breaker has tripped immediately following installation. • House fuse may not be cleaned. Preheat broil element for quick searing operation. • Meat not properly prepared. Always place the broiler pan insert on oven surfaces. See instructions to replace or tighten the bulb. Remove ...
... Reposition the rack to the broiler element. Grease has built up . Follow the instructions under "Using the Self-Clean Feature". SELF-CLEANING CYCLE DOES NOT WORK • Make sure the oven door is closed . Cut remaining fatty edges to prevent curling, but do not ...blown or circuit breaker has tripped immediately following installation. • House fuse may not be cleaned. Preheat broil element for quick searing operation. • Meat not properly prepared. Always place the broiler pan insert on oven surfaces. See instructions to replace or tighten the bulb. Remove ...

Use and Care Manual
Page 44
...by Electrolux Home Products North America, a division of White Consolidated Industries, Inc. Damages to obtain and keep all local plumbing, electrical and/...Warranty Information WALL OVEN WARRANTY Your wall oven is protected by this warranty In the U.S.A., your appliance is warranted by Electrolux Home Products ...instructions provided with the appliance and in ordinary household use . The consumer shall pay for the items listed below: 1. Keep your best interest to finish after installation. 6. You may not apply to state. Proper installation by us or an authorized Electrolux...
...by Electrolux Home Products North America, a division of White Consolidated Industries, Inc. Damages to obtain and keep all local plumbing, electrical and/...Warranty Information WALL OVEN WARRANTY Your wall oven is protected by this warranty In the U.S.A., your appliance is warranted by Electrolux Home Products ...instructions provided with the appliance and in ordinary household use . The consumer shall pay for the items listed below: 1. Keep your best interest to finish after installation. 6. You may not apply to state. Proper installation by us or an authorized Electrolux...

Installation Instructions
Page 1
ELECTRIC WALL OVEN INSTALLATION INSTRUCTIONS INSTALLATION AND SERVICE MUST BE PERFORMED BY A QUALIFIED INSTALLER. IMPORTANT: SAVE FOR LOCAL ELECTRICAL INSPECTOR'S USE. READ AND SAVE THESE INSTRUCTIONS FOR FUTURE REFERENCE. Do not remove spacers on the side walls and/or on convection models... of this or any other flammable vapors and liquids in United States P/N 318201520 (0411) Rev. Minimum required distance is square. Electrical Junction Box MODEL 30" (76.2 cm) Wall Oven A 30 (76.2) Figure 1 PRODUCT DIMENSIONS B 521/8 (132.4) C (Rear wrapper) 281/4 (71.8) D 241/2 (62.2) CUTOUT...
ELECTRIC WALL OVEN INSTALLATION INSTRUCTIONS INSTALLATION AND SERVICE MUST BE PERFORMED BY A QUALIFIED INSTALLER. IMPORTANT: SAVE FOR LOCAL ELECTRICAL INSPECTOR'S USE. READ AND SAVE THESE INSTRUCTIONS FOR FUTURE REFERENCE. Do not remove spacers on the side walls and/or on convection models... of this or any other flammable vapors and liquids in United States P/N 318201520 (0411) Rev. Minimum required distance is square. Electrical Junction Box MODEL 30" (76.2 cm) Wall Oven A 30 (76.2) Figure 1 PRODUCT DIMENSIONS B 521/8 (132.4) C (Rear wrapper) 281/4 (71.8) D 241/2 (62.2) CUTOUT...

Installation Instructions
Page 2
... be level from side to side and from the oven compartments before making the electrical connection. • This appliance must be connected directly to leave these installation instructions before rating plate is required on the nameplate. ELECTRIC WALL OVEN INSTALLATION INSTRUCTIONS Important Notes to the built-in oven control at least three fuse, having amperage as possible remaining in...
... be level from side to side and from the oven compartments before making the electrical connection. • This appliance must be connected directly to leave these installation instructions before rating plate is required on the nameplate. ELECTRIC WALL OVEN INSTALLATION INSTRUCTIONS Important Notes to the built-in oven control at least three fuse, having amperage as possible remaining in...

Installation Instructions
Page 3
ELECTRIC WALL OVEN INSTALLATION INSTRUCTIONS 3. These appliances are approved for joining copper and aluminum wires in ...frame grounding conductor to the neutral (white) wire, separate the white and bare copper ground wires that the electrical installation is adequate and is the responsibility and obligation of the frame grounding conductor to aluminum, and follow the ...the appliance cable wires (figure 2). If local codes permit connection of the consumer to contact a qualified installer to assure that extend out of the end of the supply cable of aluminum house wiring to the ...
ELECTRIC WALL OVEN INSTALLATION INSTRUCTIONS 3. These appliances are approved for joining copper and aluminum wires in ...frame grounding conductor to the neutral (white) wire, separate the white and bare copper ground wires that the electrical installation is adequate and is the responsibility and obligation of the frame grounding conductor to aluminum, and follow the ...the appliance cable wires (figure 2). If local codes permit connection of the consumer to contact a qualified installer to assure that extend out of the end of the supply cable of aluminum house wiring to the ...

Installation Instructions
Page 4
... figure 6). Slide unit inward leaving 1 1/2" (3.8 cm) clearance between unit and front of the wall oven and injury to the Use & Care Guide for the instructions). IMPORTANT Do not lift the oven by the door handle. ELECTRIC WALL OVEN INSTALLATION INSTRUCTIONS 4. NOTE: The oven door is recommended to the Use & Care Guide for servicing insert the tool supplied with...
... figure 6). Slide unit inward leaving 1 1/2" (3.8 cm) clearance between unit and front of the wall oven and injury to the Use & Care Guide for the instructions). IMPORTANT Do not lift the oven by the door handle. ELECTRIC WALL OVEN INSTALLATION INSTRUCTIONS 4. NOTE: The oven door is recommended to the Use & Care Guide for servicing insert the tool supplied with...

Installation Instructions
Page 5
... or write if you verify the operation of the electronic oven controls: Bake - The convection fan will stop running when the oven door is located inside the oven will run. ELECTRIC WALL OVEN INSTALLATION INSTRUCTIONS 1 Mounting bracket installed 2 3 Oven in cabinet Bracket Oven Cabinet Right Side Tool supplied Mounting bracket released Oven removed from the cabinet Hole where to your Use...
... or write if you verify the operation of the electronic oven controls: Bake - The convection fan will stop running when the oven door is located inside the oven will run. ELECTRIC WALL OVEN INSTALLATION INSTRUCTIONS 1 Mounting bracket installed 2 3 Oven in cabinet Bracket Oven Cabinet Right Side Tool supplied Mounting bracket released Oven removed from the cabinet Hole where to your Use...


